第一步:
npm init -y 【初始文件】
npm info webpack / bower info webpack【查看版本,用bower的时候要先 npm install bower】
npm install webpack –save-dev 【下载webpack】
第二步:
mkdir src 【创建源文件】
mkdir dist 【创建打包后的文件】
第三步:
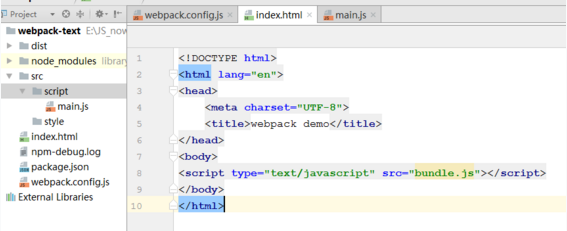
手动创建index.html文件
在index.html中引入打包后的json文件 我们设置为 bundle.js文件
mkdir script
mkdir style
在根目录中手动创建webpack.config.js文件
第四步:
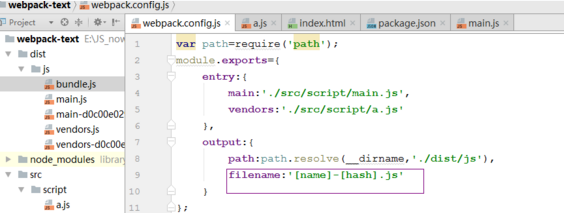
配置webpack.config.js文件
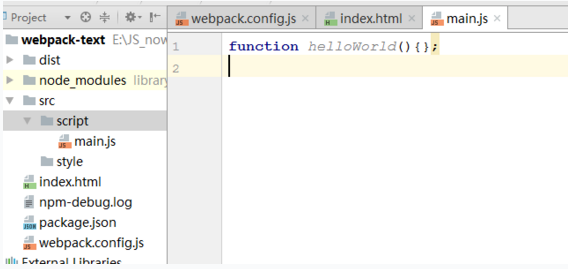
手动在src/script中新建main.js文件,【随便写个函数】
entry 入口,引入main.js配置文件
outer出口,打包后的文件位置,path打包后的路径,filename打包后的文件
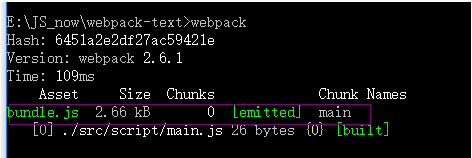
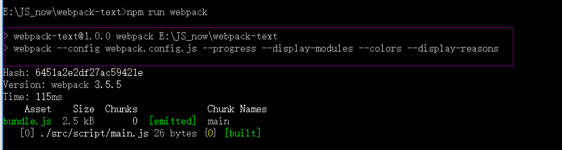
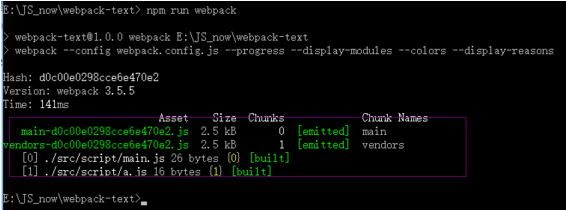
在命令行运行:npm run webpack
webpack.config.js的配置:
main.js 文件 里面写入你的JS:
index.html文件中的内容
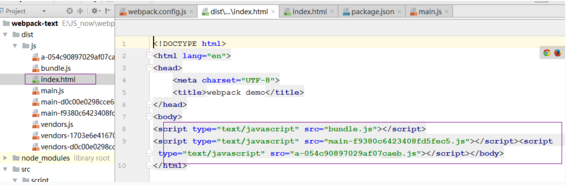
执行npm run webpack后成功打包完后在dist/js下会自动生成bundle.js文件
如果webpack.config.js 的名字改变如改为:webpack.dev.config.js,执行的时候要用 webpack –config webpack.dev.config.js执行。一般情况用webpack.config.js
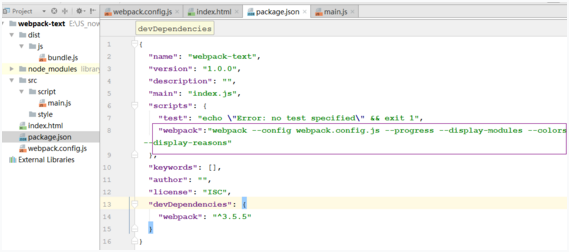
如果在webpack中加参数,我们在package.json中配置:
|
1
2
3
4
5
6
|
webpack --config webpack.config.js:webpack命令
--progress打包的过程
--display-modules打包的模块
--colors:希望打包的字是彩色,
--display-reasons:打包的原因
"webpack"
:
"webpack --config webpack.config.js --progress --display-modules --colors --display-reasons"
|
打包成功后运行npm run webpack 成功后的,注意运行webpack是运行的node_modules中的webpack而npm run webpack是运行的package.json的与npm相关,所有要运行npm run webpack
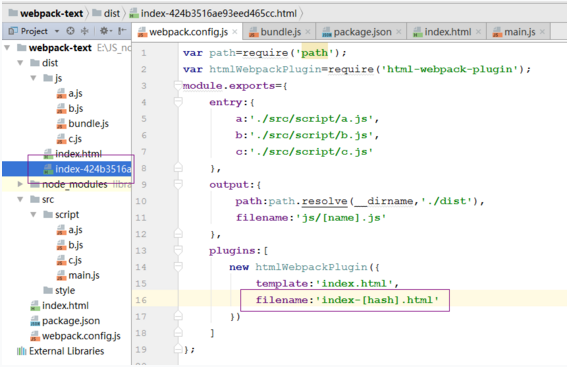
webpack配置的entry和output
entry设置:
第一种情况:一个文件的情况:entry:’./src/script/main.js’,
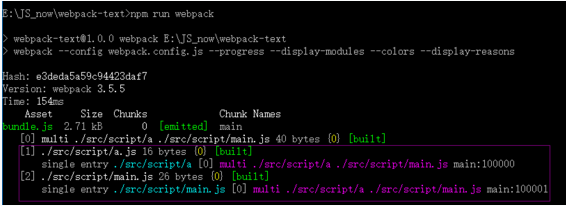
第二种情况:多个文件:entry:[‘./src/script/a’,’./src/script/main.js’],
第二种情况下,我们手动在src/script下新建了a.js文件[写点东西],执行npm run webpack后就会将a与main打包到bundle.js中
第三种以对象形式传入,在多页面中使用

onst config = {
  entry: {
  pageOne: './src/pageOne/index.js',
  pageTwo: './src/pageTwo/index.js',
  pageThree: './src/pageThree/index.js'
  },
  output:{
        path:path.resolve(__dirname,'./dist/js'),
        filename:'[name].js'
    }
};
注意output中filename中改为:filename:'[name].js'
output设置
output中有很多属性,我们常用的有filename、paht,
filename:当entry中有多个属性的时候 filename:’[name].js’,如果是单独的一个则直接打包到filename:’bundle.js’中
filename中的三个属性:
[name] : 表示entry作为对象时的key值
[hash]: 是打包的hash值
[chunkhash]: 每一个chunk的hash值
打包后可以看到两个文件的名字变为hash值
使用[chunkhash]后可以看到两个文件的名字与上面的Hash不一样了,我们可以认为是文件的版本号或者MD5值(保证每个文件的唯一值)
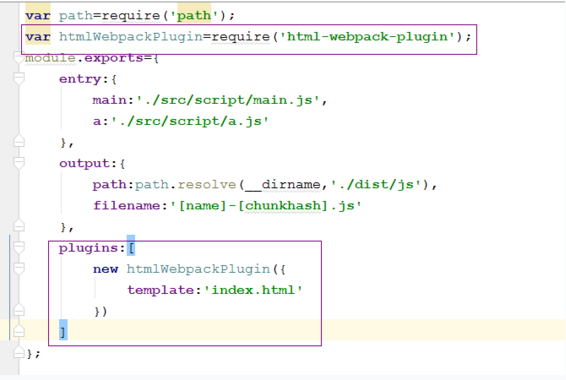
var path=require('path');
module.exports={
   entry:{
        main:'./src/script/main.js',
       a:'./src/script/a.js'
    },
    output:{
        path:path.resolve(__dirname,'./dist/js'),
        filename:'[name]-[chunkhash].js'
    }
};
如果文件改后会发现版本的值与上次不一样了,所以利用这种方式可以在项目上线的时候使用或者文件更改的时候查看
运行npm run webpack后,会发现命令行中多了一个index.html文件,而在 dist中会生成打包后的index.html里面会自动生成三个script
例如:在模板的title中改变名字后,运行后在dist中的index.html下自动改变了,所以以后我们就不用在根目录的index.html下手动增加文件了。直接执行html-webpack-plugin就可以了
更改路径:
如果我们想如src一样把index.html放在dist文件的根目录下把其余JS文件放到JS文件夹中则output的配置如:当然在有html-webpack-plugin运行的时候
output:{
        path:path.resolve(__dirname,'./dist'),
        filename:'js/[name]-[chunkhash].js'
    },
名字更改
如果我们想把指定的文件的名字打包成hash的名字如index-[hash].html

如果想把文件放到指定的位置如:head/body
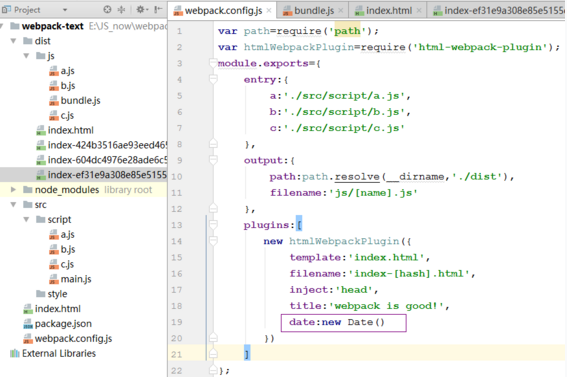
则直接在plugins中加入inject:’head’
plugins:[
        new htmlWebpackPlugin({
            template:'index.html',
            filename:'index-[hash].html',
            inject:'head'
        })
    ]
自动化生成项目中的html页面(下)
如果想在配置中指定title则要在htmlWebpackPulgins中写入title如内容,在src的根index.html中的title中用ejs模板<%= htmlWebpackPlugin.options.title %>,之后则可以在dist文件中看到新生成的index.html文件title改变了
webpack.config.js配置:
plugins:[
       new htmlWebpackPlugin({
           template:'index.html',
           filename:'index-[hash].html',
           inject:'head',
           title:'webpack is good!'
       })
    ]
src中根index.html中 ejs模板方式:
<!DOCTYPE html>
<html lang="en">
<head>
    <meta charset="UTF-8">
    <title><%=htmlWebpackPlugin.options.title%></title>
</head>
<body>
<script type="text/javascript" src="bundle.js"></script>
</body>
</html>
运行后则可以在dist中看到新生成的index.html文件的title改变为我们设置的
设置时间同上:
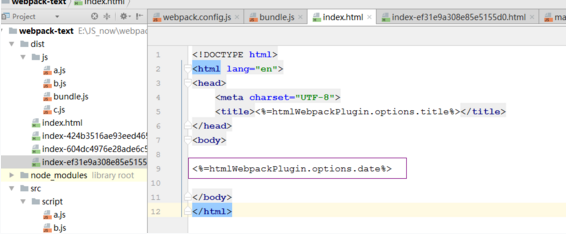
在src中的根目录的index.html中设置:
<%= htmlWebpackPlugin.options.date%>
运行后,可以在dist中新生成index.html中看到时间
我们在模板中也可以循环遍历htmlWebpackPlugin的属性与值
直接在src根目录下的index.html中写模板即可
<% for(var key in htmlWebpackPlugin.files){%>
 <%= key %> : <%= JSON.stringify(htmlWebpackPlugin.files[key])%>
<%}%>

<% for(var key in htmlWebpackPlugin.options){%>
<%= key %> : <%= JSON.stringify(htmlWebpackPlugin.options[key])%>
<%}%>
运行后,可以在dist的index.html中看到生成的属性与值
可以在插件的官网查看 https://www.npmjs.com/package/html-webpack-plugin中Configuration对照每个插件的值与属性
ejs模板引入文件:
在src根文件里用EJS模板引入
npm run webpack
在dist文件里查看 index.html可以看到引入的文件打包后的结果
<!DOCTYPE html>
<html lang="en">
<head>
    <meta charset="UTF-8">
    <title><%= htmlWebpackPlugin.options.title %></title>
    <script type="text/javascript" src="<%=htmlWebpackPlugin.files.chunks.main.entry %>"></script>
</head>
<body>
<%= htmlWebpackPlugin.options.date%>

<script type="text/javascript" src="<%=htmlWebpackPlugin.files.chunks.a.entry%>"></script>

</body>
</html>
publicPath:占位符,也就是上线的时候的域名地址
|
1
|
publicPath:’https:
//cdn.com/’
|
output:{
       path:path.resolve(__dirname,'./dist'),
       filename:'js/[name]-[hash].js',
       publicPath:'https://cdn.com/'
    },
上线压缩文件
压缩上线minify属性:值有很多可以查看:https://github.com/kangax/html-minifier#options-quick-reference
removeComments:删除空格
collapseWhitespace:删除注释
plugins:[
        new htmlWebpackPlugin({
            template:'index.html',
            filename:'index.html',
            inject:false,
            title:'webpack is good',
            date:new Date(),
            minify:{
                removeComments:true,
                collapseWhitespace:true
            }
        })
    ]
npm run webpack
dist根文件中查看index.html中压缩的index.htm
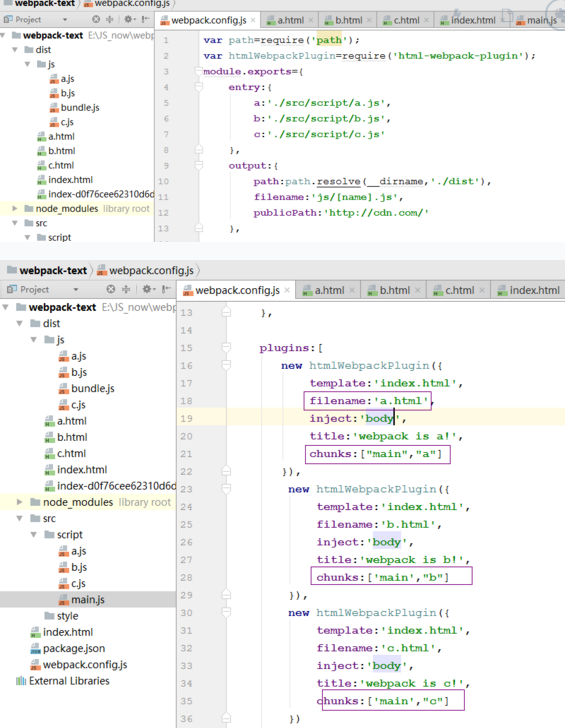
多页面应用:
如果根据一个根目录下index.html模板在生成a.html/b.html/c.html三个页面
我们可以在webpack.config.js中配置三个htmlWebpackPlugin
在src/script中手动新建a.js/b.js/c.js三个js
在entry中引入
在htmlWebpackPlugin中的filename改成a.html/b.html/c.html
title可以改成不同的名字
如果指定引入不同的文件则用chunks 参考https://www.npmjs.com/package/html-webpack-plugin
注意 在dist/js中必须存在要引入的文件,我的里面没有main.js,但是图片上有写
npm run webpack
可以看到dist里生成了a.html/b.html/c.html三个文件
打开后可以看到里面的title和引入的文件的不同
excludeChunks:除了哪些文件不引入:
new htmlWebpackPlugin({
           template:'index.html',
           filename:'a.html',
           inject:'body',
           title:'webpack is a!',
           excludeChunks:['b','c']
       }),
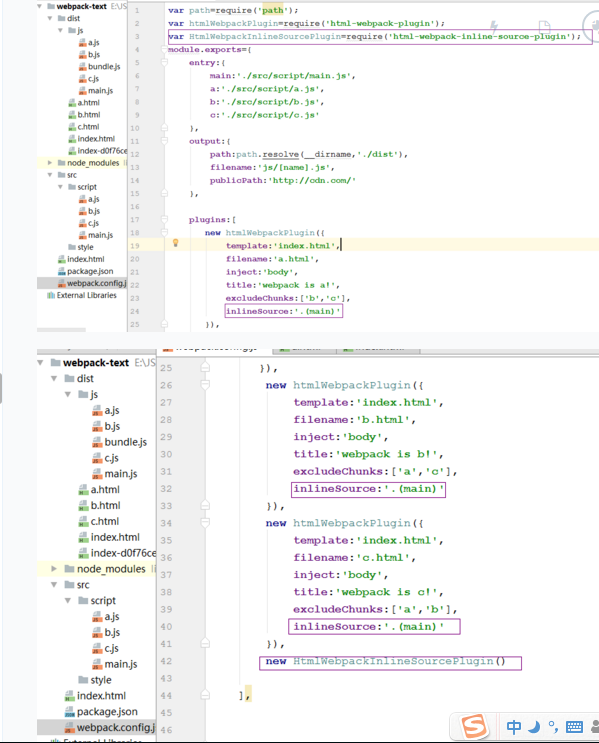
如果我们为了达到极致,减少http请求,使用 html-webpack-inline-source-plugin
npm run webpack
则可以看到每个新生成的页面中都插入了相应的js代码(a.html/b.html/c.html)
html-webpack-inline-source-plugin:插入代码使用方法:
npm install –save-dev html-webpack-inline-source-plugin
webpack.config.js配置命令:
1、引入插件:var HtmlWebpackInlineSourcePlugin = require(‘html-webpack-inline-source-plugin’);
2、在plugins中加入htmlWebpackInlineSourcePlugin()
new HtmlWebpackInlineSourcePlugin()
3、在htmlWebpackPlugin中加入要插入的格式
inlineSource: ‘.(js|css)$’ : 添加js 与 css格式的
或者inlineSource中添加要插入的文件名如:inlineSource:’.(main)’
npm run webpack
查看a.html/b.html/c.html中可以看到插入了main.js源码,通过excludeChunks可以插入src的js
参考资料:https://github.com/DustinJackson/html-webpack-inline-source-plugin
什么是loader以及loader的特性:
loader是用来处理资源文件,接受资源文件为一个参数,处理完后返回一个新的资源文件。
也就是利用loader告诉webpack处理的是coffeeScript,还是JSX.
loader特性:
1、可以被串联的
2、可以是同步或异步
3、可以接受参数
4、可以直接通过正则指定后缀名
5、可以用npm安装
6、可以获取webpack配置
7、可以生成额外的文件
loader的三种方式:
require("./loader!./dir/file.txt");
第二种:
配置文件
第三种:
webpack --module-bind jade --module-bind "css=style!css"
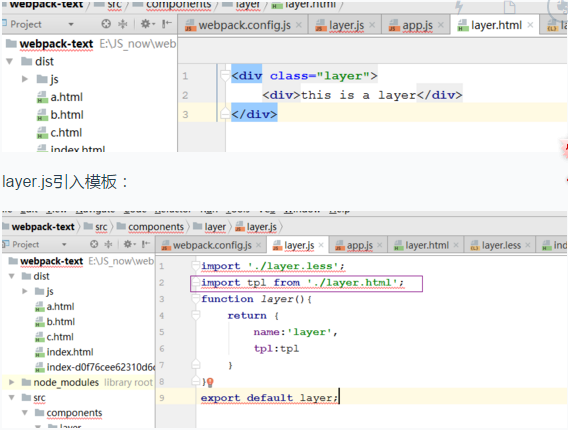
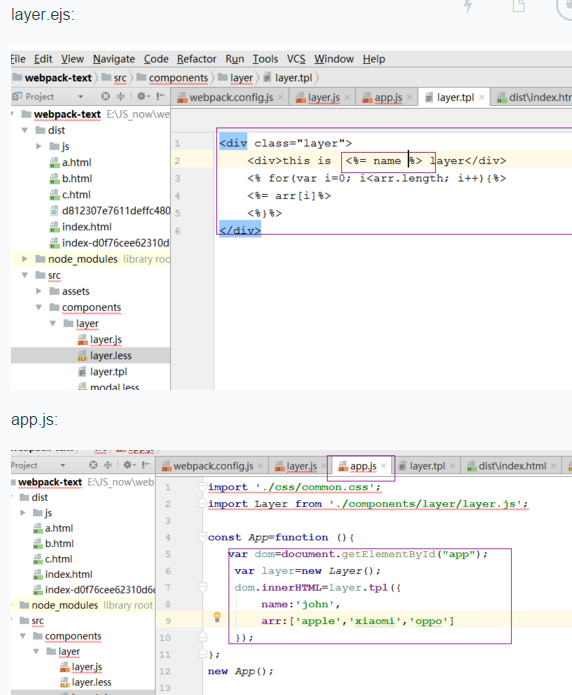
之前是多页面应用,现在新建单页面less应用如下图:
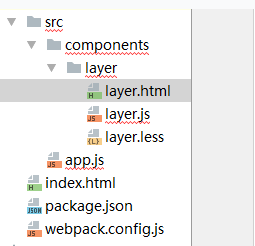
layer.html代码
<div class="layer">
   <div>this is layer</div>
</div>
layer.less代码
.layer{
  width:600px;
  height:200px;
  background:green;

·> div{
width:400px;
height:100px;
background:red;
}
}
layer.js代码
import tpl from './layer.html'; //ES6写法
function layer(){
    return {
        name:'layer',
        tpl:tpl
    }
}
export default layer;
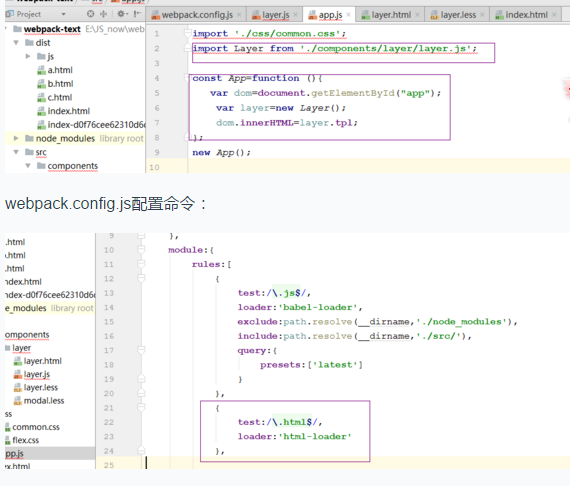
app.js代码
import layer from './components/layer/layer.js';
const App=function (){
    const NUM=1;
    alert(NUM);
    console.log(layer);
};
new App();
loader 配置:
https://babeljs.io/docs/setup/#installation babel官网
npm install –save-dev babel-loader babel-core
loader中babel文件:如何处理JS文件:
安装:npm install --save-dev babel-preset-latest
第一种:
module:{
loaders:[
{
 test:/\.js$/,
 loader:'babel-loader',
 query:{ //参数
        presets:['latest']
      }
}
]
}

第二种:在根目录中创建一个.babelrc配置文件
代码:
{
"presets":["es2015"]
}

第三种:直接在package.json中
{
  "name": "webpack-text",
  "version": "1.0.0",
  "description": "",
  "main": "webpack.config.js",
  "babel":{
    "presets":["latest"]
  },
  "scripts": {
    "test": "echo \"Error: no test specified\" && exit 1",
    "webpack": "webpack --config webpack.config.js --progress --display-modules --colors  --display-reasons"
 },
npm run webpack
出现错误:Unexpected token….这种情况在layer.js中 先把 上面import tpl from’./layer.html’ 去掉
查看dist中main.bundle.js可以查看生成的文件
查看dist中index.html中也引入了main.bundle.js文件
exclude:loader的排查范围,include:loader的包含范围:

可以优化文件,时间减少
处理项目中的css
npm install style-loader css-loader –save-dev
手动创建common.css文件
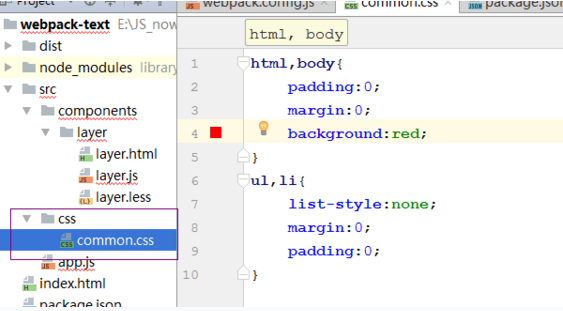
在app.js中引入css模块
import ‘./css/common.css’;
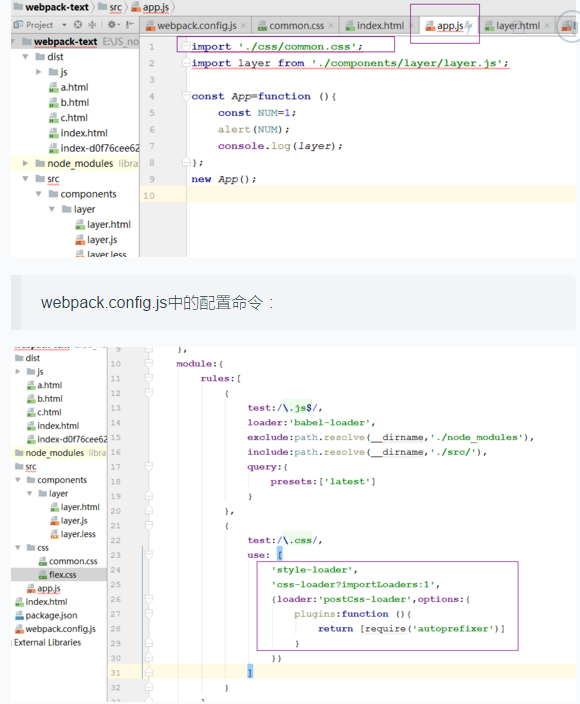
postcss-loader:
npm i -D postcss-loader :样式处理器
npm install autoprefixer –save-dev :是 postcss的插件,自动加载样式前缀
css-loader?importLoaders:1 :是flex样式文件利用@import引入到另一个样式表中
效果:但是在3.5版的webpack中,autoprefixer却不能用了,如果有更好的方法,请大家分享
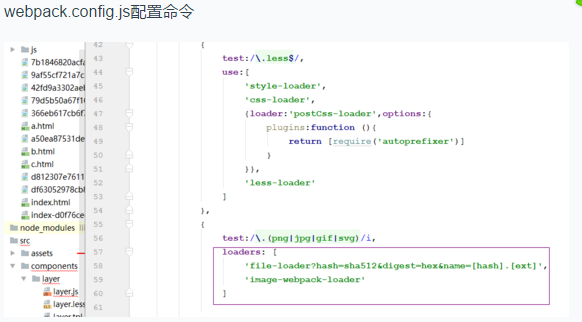
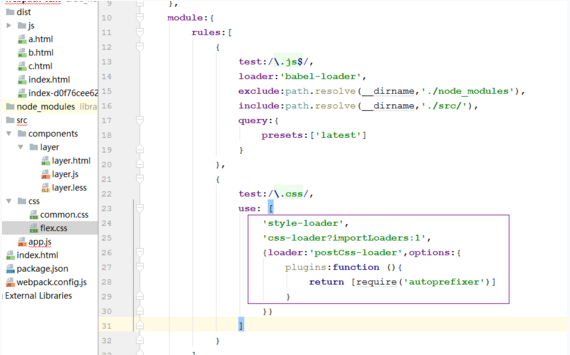
使用less和sass:
使用less需要安装:npm i less-loader –save-dev
如果电脑上没有less还需要安装:
npm install less –save-dev
webpack.config.js命令配置
{
              test:/\.less$/,
               use:[
                   'style-loader',
                   'css-loader',
                   'postcss-loader',
                   'less-loader'
               ]
            }
处理模板文件
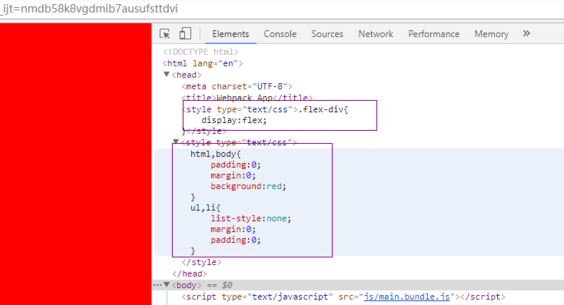
npm i -D html-loader [安装html模板,3.5版本安装方式]
layer.html模板,作为一个字符串进行处理
layer.js中引入layer.html模板
在app.js中引入layer.js;首先获取app节点,然后dom.innerhtml=layer.tpl;
layer.html的模板:
app.js:
注意:import Layer 与App中new Layer一致
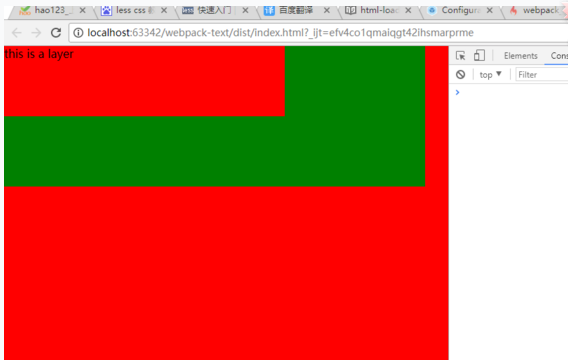
webpack运行
查看dist中index.html 可以看到效果
ejs模板方法:
将layer.html改为layer.ejs或者直接改为layer.tpl,以及更改模板内容
npm install ejs-loader –save-dev
注意layer.js中引入的是layer.tpl
此时app.js中的tpl就是一个函数
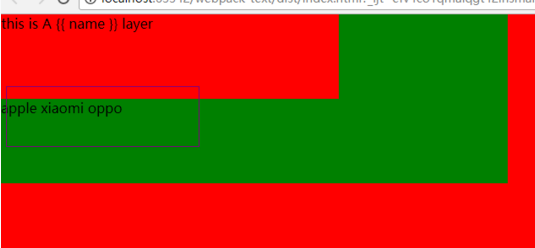
webpack 运行
查看index.html效果:会看到已经将数组插入了
处理图片及其他文件
处理图片文件的几种情况:
1、css文件里有很多背景文件
2、模板结构里会直接引用某一个标签
3、根部html里的图片文件
1、css里的背景图片
npm install file-loader –save-dev :使用的loader加载器
layer.less文件里添加background背景图片
 div{
width:400px;
height:100px;
background:url('../../assets/1.png');
}

2、根index.html中的图片处理
上面已经加载了file-loader,所以我们在html中直接写图片运行即可
3、模板文件中的图片处理
在layer.tpl模板中,如果要用相对路径需要这样写:${require()} 否则会报错
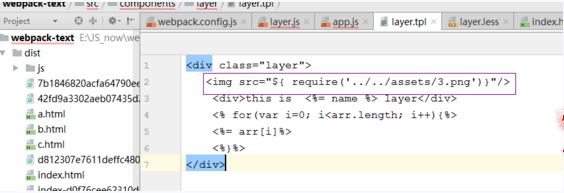
如果要改变图片的输出地址
加入query 输出地址是在assets文件内的5位的hash值,
参考资料:https://github.com/webpack/file-loader
|
1
2
3
4
5
6
7
|
{
test:/\.(png|jpg|gif|svg)/,
loader:
'file-loader'
,
query:{
name:
'assets/[name]-[hash:5].[ext]'
}
}
|

npm install –save-dev url-loader
url-loader类似file-loader,但是它可以指定一个参数(limit)意思是:如果这个图片或者文件大于设定的limit的大小的时候就会丢给file-loader处理,如果小于就会设定一个编码
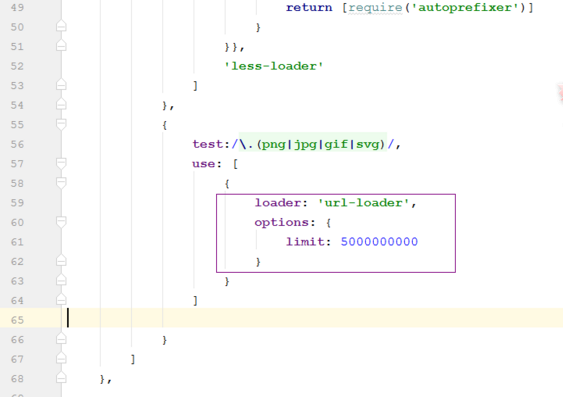
webpack 运行后,在dist/index.html中可以看到

这种情况说明文件已经被打包到main.bundle.js和index.html中了
通过这种方式,我们可以对图片进行分类,通过大小的设定看打包到哪里
bace64与htpp请求的优势略势:
通过http请求载入过来的图片,可以使浏览器享受到缓存,图片重复性很高的时候用http请求会利用缓存请求
如果是通过bace64载入的图片,相当于只要在任何地方应用这个图片的时候,都会引用一个同样大小的bace64编码存在这个地方,从某种程度上来说,会导致代码的冗余与体积,
image-webpack-loader:图片压缩:
npm install image-webpack-loader –save-dev