需要更换证件照的背景,大多软件App直接收费或者需要支付后才可去水除印,本文公开不收费,欢迎使用,代码可在IDE如PyCharm或者Linux上直接运行,程序会自动安装依赖库OpenCV,如果觉得不错随手点个赞哦 :)
1.常用的图像分割算法
下面提供两种常用的图像分割算法,精确的图像分割之后可用于证件照替换背景。
1.1. GrabCut算法:
GrabCut是一种基于迭代优化的分割算法,它可以根据用户提供的矩形区域自动分割前景和背景。这个算法在前面的示例代码中已经提到过,它可以更精确地分割出前景对象,并进行背景替换。
1.2. 神经网络图像分割:
近年来,深度学习技术的发展使得神经网络图像分割算法变得流行。例如,U-Net、Mask R-CNN和DeepLab等神经网络模型可以用于图像分割任务。这些模型在训练阶段使用大量标注的图像数据,可以更准确地分割出前景对象。你可以通过使用已经训练好的模型或自行训练一个模型来进行图像分割和背景替换。
2.图像分割证件照快速抠图更换背景
2.1. 证件照背景色颜色定义RGB
尝试使用OpenCV库中的GrabCut算法进行图像分割证件照快速抠图更换背景。
常见证件照的背景颜色 RGB 值,注意OpenCV 颜色通道顺序为 B G R:
# 定义常用背景颜色,注意OpenCV 颜色通道顺序为 B G R
blue_BGR = (240, 167, 2) # 蓝色
white_BGR = (255, 255, 255) # 白色
red_BGR = (27, 0, 217) # 红色
blue_white_BGR = (196, 146, 52) # 蓝白渐变色
light_gray_BGR = (210, 210, 210) # 浅灰色
2.2. 完整Python源码
图像分割证件照快速抠图更换背景
完整Python源码:
import cv2
import numpy as np
import concurrent.futures


def process_image(image, new_background_color):
    # 如果原图尺寸太大,可以进行图像压缩
    scale_percent = 50  # 压缩比例(50%)

    # 计算压缩后的图像尺寸
    width = int(image.shape[1] * scale_percent / 100)
    height = int(image.shape[0] * scale_percent / 100)
    dim = (width, height)

    # 调整图像尺寸
    resized_image = cv2.resize(image, dim, interpolation=cv2.INTER_AREA)

    # 进行图像处理
    result = grabcut_segmentation(resized_image, new_background_color)

    # 返回处理结果
    return result


def grabcut_segmentation(image, new_background_color):
    # 创建掩膜
    mask = np.zeros(image.shape[:2], np.uint8)

    # 定义GrabCut算法所需的前景和背景模型
    bgd_model = np.zeros((1, 65), np.float64)
    fgd_model = np.zeros((1, 65), np.float64)

    # 定义矩形区域,包含前景对象(根据实际需要调整矩形位置和大小)
    height, width = image.shape[:2]
    rect = (10, 10, width - 10, height - 10)

    # 执行GrabCut算法, 通过调整num_iterations参数来控制迭代次数,以平衡速度和准确性
    num_iterations = 5
    cv2.grabCut(image, mask, rect, bgd_model, fgd_model, num_iterations, cv2.GC_INIT_WITH_RECT)

    # 创建前景和背景掩膜
    mask_foreground = np.where((mask == 2) | (mask == 0), 0, 1).astype('uint8')
    mask_background = 1 - mask_foreground

    # 创建纯色背景图像
    background = np.zeros_like(image, np.uint8)
    background[:] = new_background_color

    # 将前景放在白色背景上
    foreground = cv2.bitwise_and(image, image, mask=mask_foreground)
    result = cv2.add(foreground, cv2.bitwise_and(background, background, mask=mask_background))

    return result


# 安装所需的依赖库
# 使用pip安装OpenCV
try:
    import cv2
except ImportError:
    import os
    import sys
    import subprocess

    def install(package):
        subprocess.check_call([sys.executable, "-m", "pip", "install", package])

    install("opencv-python")

# 定义常用背景颜色,注意OpenCV 颜色通道顺序为 B G R
blue_BGR = (240, 167, 2) # 蓝色
white_BGR = (255, 255, 255) # 白色
red_BGR = (27, 0, 217) # 红色
blue_white_BGR = (196, 146, 52) # 蓝白渐变色
light_gray_BGR = (210, 210, 210) # 浅灰色

new_background_color = blue_BGR  # 新的背景色

# 原图像和输出图像
image_path = 'input.jpg'
output_path = 'output.jpg'

# 读取原图像
image = cv2.imread(image_path)

# 使用多线程处理单张照片
with concurrent.futures.ThreadPoolExecutor() as executor:
    result = executor.submit(process_image, image, new_background_color)

# 获取处理结果
result = result.result()

# 显示和保存处理结果
cv2.imshow('Result', result)
cv2.waitKey(0)
cv2.destroyAllWindows()

# 保存结果图像
cv2.imwrite(output_path, result)
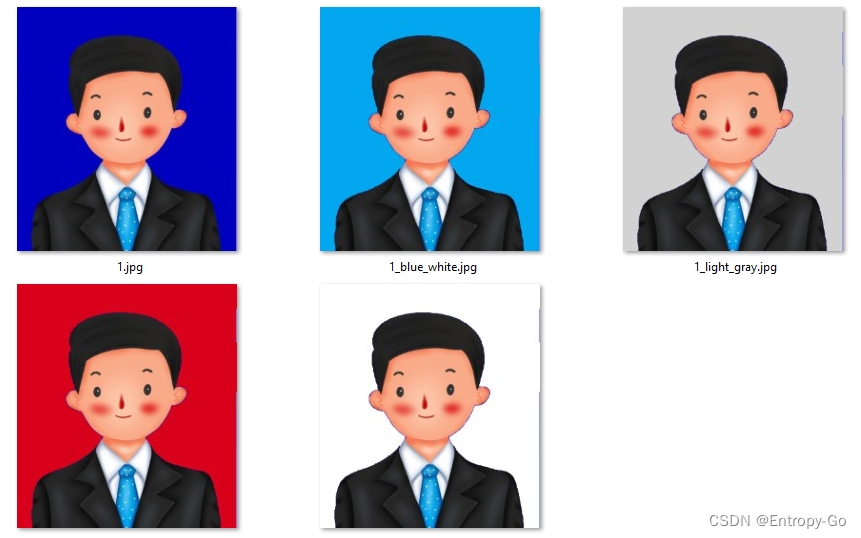
2.3. 代码运行,结果展示
3. 简单粗暴快速更换证件照背景颜色
最简单的办法是,圈出需要替换的颜色的范围,然后直接替换成期望的颜色即可。适用于主题前景包括人脸发色服装颜色跟背景颜色明显反差,比如红色和蓝色背景效果都不错。
3.1. 获取背景颜色RGB范围
使用画图/Paint工具打开需要处理的图片,使用颜色提取工具获得具体的颜色RGB值,随机取样几个点,如背景中心,头发和背景颜色边缘处,人脸和背景颜色边缘处,服装和背景颜色边缘处,获取背景色RGB的取值范围。

3.2. 替换背景颜色RGB取值范围
根据上述样本点的背景颜色RGB值,调整下面的背景颜色RGB取值范围,注意OpenCV 颜色通道顺序为 B G R
# 定义颜色范围 注意OpenCV 颜色通道顺序为 B G R
# 蓝色
lower_blue = np.array([100, 0, 0])  # 蓝色的下限(BGR格式)
upper_blue = np.array([255, 100, 100])  # 蓝色的上限(BGR格式)
3.3. 更换背景颜色完整Python源码
不需要压缩原图,不需要并行加速处理,因为处理方法简单,速度飞快。有时,最简单的办法就可以解决最初的需求。
import cv2
import numpy as np

# 用法
input_image_path = 'input_original.jpg'  # 输入图像路径
output_image_path = 'output_original.jpg'  # 输出图像路径

# 定义颜色范围 注意OpenCV 颜色通道顺序为 B G R
# 蓝色
lower_blue = np.array([100, 0, 0])  # 蓝色的下限(BGR格式)
upper_blue = np.array([255, 100, 100])  # 蓝色的上限(BGR格式)

# 红色
lower_red = np.array([0, 0, 100])  # 红色的下限(BGR格式)
upper_red = np.array([100, 100, 255])  # 红色的上限(BGR格式)

# 定义常用背景颜色,注意OpenCV 颜色通道顺序为 B G R
blue_BGR = [240, 167, 2] # 蓝色
white_BGR = [255, 255, 255] # 白色
red_BGR = [27, 0, 217] # 红色
blue_white_BGR = [196, 146, 52] # 蓝白渐变色
light_gray_BGR = [210, 210, 210] # 浅灰色

replacement_color = light_gray_BGR  # 替换的颜色(白色)

# 读取原始图像
image = cv2.imread(input_image_path)

# 创建蓝色的掩膜
blue_mask = cv2.inRange(image, lower_blue, upper_blue)

# 将蓝色区域替换为指定新的背景颜色
image[np.where(blue_mask)] = replacement_color

# 保存替换后的图像
cv2.imwrite(output_image_path, image)