最简单的方法进行图片中的人像检测
使用python-opencv配合yolov3模型进行图片中的人像检测
1、安装python-opencv、numpy
pip install opencv-python
pip install numpy
2、下载yolo模型文件和配置文件:
下载地址:
https://download.csdn.net/download/mldxs/88396654y![]() https://download.csdn.net/download/mldxs/88396654
https://download.csdn.net/download/mldxs/88396654
yolo官网:
YOLO: Real-Time Object DetectionYou only look once (YOLO) is a state-of-the-art, real-time object detection system.![]() https://pjreddie.com/darknet/yolo/3、搬砖:代码比较简单并且带注释,不过多介绍
https://pjreddie.com/darknet/yolo/3、搬砖:代码比较简单并且带注释,不过多介绍
import cv2
import numpy as np
# 读取输入图像
image = cv2.imread('input.jpeg')
# 加载YOLOv3模型和类别标签
net = cv2.dnn.readNet('yolov3.weights', 'yolov3.cfg')
classes = []
with open('coco.data', 'r') as f:
classes = f.read().strip().split('\n')
# 获取YOLO模型的输出层名称
layer_names = net.getLayerNames()
output_layers = []
unconnected_layers = net.getUnconnectedOutLayers()
# 根据输出层索引获取输出层名称
for i in unconnected_layers:
output_layers.append(layer_names[i - 1])
# 为每个类别生成随机颜色
colors = np.random.uniform(0, 255, size=(len(classes), 3))
# 获取图像的尺寸
height, width, channels = image.shape
# 创建YOLO模型的输入blob
blob = cv2.dnn.blobFromImage(image, 0.00392, (416, 416), (0, 0, 0), True, crop=False)
# 将blob设置为模型的输入
net.setInput(blob)
outs = net.forward(output_layers)
class_ids = []
confidences = []
boxes = []
# 处理YOLO模型的输出
for out in outs:
for detection in out:
scores = detection[5:]
class_id = np.argmax(scores)
confidence = scores[class_id]
# 如果置信度大于0.5并且类别是"person"(0对应COCO数据集中的"person"类)
if confidence > 0.5 and class_id == 0:
center_x = int(detection[0] * width)
center_y = int(detection[1] * height)
w = int(detection[2] * width)
h = int(detection[3] * height)
x = int(center_x - w / 2)
y = int(center_y - h / 2)
boxes.append([x, y, w, h])
confidences.append(float(confidence))
class_ids.append(class_id)
# 使用非极大值抑制获取最终的检测结果
indexes = cv2.dnn.NMSBoxes(boxes, confidences, 0.5, 0.4)
margin = 30 # 定义边框扩展的边距大小
# 绘制边框和类别标签
for i in range(len(boxes)):
if i in indexes:
x, y, w, h = boxes[i]
label = str(classes[class_ids[i]])
color = colors[i]
# 扩展边框的坐标
x_new = max(0, x - margin)
y_new = max(0, y - margin)
w_new = min(image.shape[1], w + 2 * margin)
h_new = min(image.shape[0], h + 2 * margin)
# 绘制扩展后的边框
cv2.rectangle(image, (x_new, y_new), (x_new + w_new, y_new + h_new), color, 2)
cv2.putText(image, label, (x_new, y_new - 10), cv2.FONT_HERSHEY_SIMPLEX, 0.5, color, 2)
# 显示带有边框的图像
cv2.imshow('Detected Bodies', image)
cv2.waitKey(0)
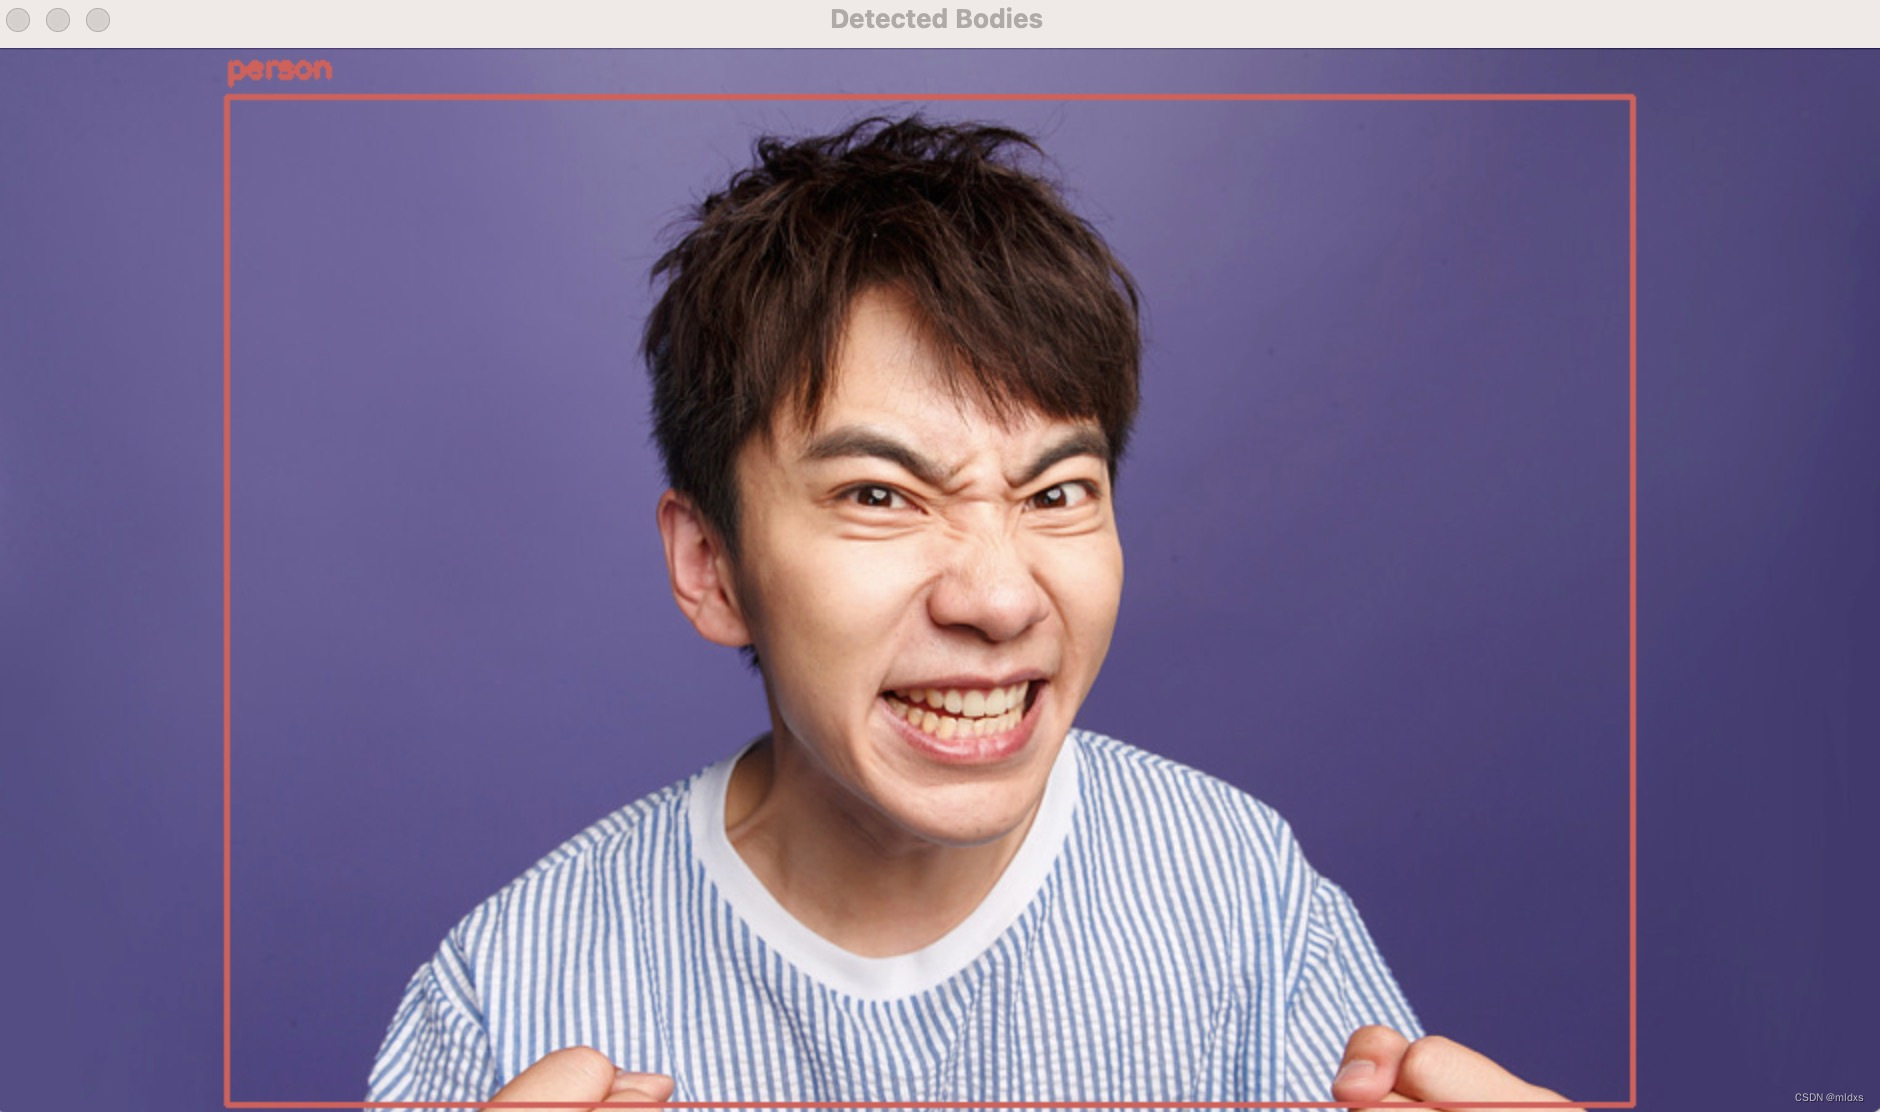
cv2.destroyAllWindows()最终效果:
扫描二维码关注公众号,回复:
17270367 查看本文章

yolo有很多检测类别,上述代码只对人像进行检测,就是检测类别里的第一项(person)