1. 基本说明
-
只有看过Netty源码,才能说是真的掌握了Netty框架。
-
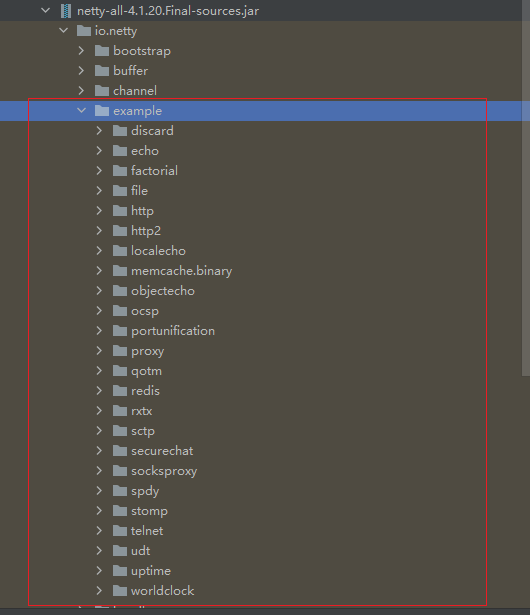
在 io.netty.example 包下,有很多Netty源码案例,可以用来分析
2. netty 启动过程源码分析
本次分析使用的是example包下的echo
2.1 源码剖析的目的
用源码分析的方式走一下 Netty(服务器〉的启动过程,更好的理解Netty的整体设计和运行机制。
2.2 源码剖析
- 源码需要剖析到Netty调用doBind方法,追踪到NioServerSocketChannel的doBind
- 并且要Debug程序到NioEventLoop类的run代码,无限循环,在服务器端运行。
2.2.1 EchoServer
/*
 * Copyright 2012 The Netty Project
 *
 * The Netty Project licenses this file to you under the Apache License,
 * version 2.0 (the "License"); you may not use this file except in compliance
 * with the License. You may obtain a copy of the License at:
 *
 *   http://www.apache.org/licenses/LICENSE-2.0
 *
 * Unless required by applicable law or agreed to in writing, software
 * distributed under the License is distributed on an "AS IS" BASIS, WITHOUT
 * WARRANTIES OR CONDITIONS OF ANY KIND, either express or implied. See the
 * License for the specific language governing permissions and limitations
 * under the License.
 */
package site.zhourui.nioAndNetty.netty.source.echo;

import io.netty.bootstrap.ServerBootstrap;
import io.netty.channel.*;
import io.netty.channel.nio.NioEventLoopGroup;
import io.netty.channel.socket.SocketChannel;
import io.netty.channel.socket.nio.NioServerSocketChannel;
import io.netty.handler.logging.LogLevel;
import io.netty.handler.logging.LoggingHandler;
import io.netty.handler.ssl.SslContext;
import io.netty.handler.ssl.SslContextBuilder;
import io.netty.handler.ssl.util.SelfSignedCertificate;

/**
 * Echoes back any received data from a client.
 */
public final class EchoServer {


    static final boolean SSL = System.getProperty("ssl") != null;
    static final int PORT = Integer.parseInt(System.getProperty("port", "8888"));

    public static void main(String[] args) throws Exception {


        // Configure SSL.
        final SslContext sslCtx;
        if (SSL) {


            SelfSignedCertificate ssc = new SelfSignedCertificate();
            sslCtx = SslContextBuilder.forServer(ssc.certificate(), ssc.privateKey()).build();
        } else {


            sslCtx = null;
        }

        // Configure the server.
        EventLoopGroup bossGroup = new NioEventLoopGroup(1);
        EventLoopGroup workerGroup = new NioEventLoopGroup();
        try {


            ServerBootstrap b = new ServerBootstrap();
            b.group(bossGroup, workerGroup)
             .channel(NioServerSocketChannel.class)
             .option(ChannelOption.SO_BACKLOG, 100)
             .handler(new LoggingHandler(LogLevel.INFO))
             .childHandler(new ChannelInitializer<SocketChannel>() {


                 @Override
                 public void initChannel(SocketChannel ch) throws Exception {


                     ChannelPipeline p = ch.pipeline();
                     if (sslCtx != null) {


                         p.addLast(sslCtx.newHandler(ch.alloc()));
                     }
                     p.addLast(new LoggingHandler(LogLevel.INFO));
                     //p.addLast(new EchoServerHandler());
                 }
             });

            // Start the server.
            ChannelFuture f = b.bind(PORT).sync();

            // Wait until the server socket is closed.
            f.channel().closeFuture().sync();
        } finally {


            // Shut down all event loops to terminate all threads.
            bossGroup.shutdownGracefully();
            workerGroup.shutdownGracefully();
        }
    }
}
2.2.1.1 先看启动类: main方法中,首先创建了关于SSL的配置类
2.2.1.2 重点分析下创建了两个EventLoopGroup对象
-
这两个对象是整个Netty的核心对象,可以说,整个Netty的运作都依赖于他们。bossGroup用于接受Tep 请求,他会将请求交给 workerGiroup , workerGroup 会获取到真正的连接,然后和连接进行通信,比如读写解码编码等操作。
-
new NioEventLoopGiroup(1);这个1表示bossGroup事件组有1个线程你可以指定,如果 newNioEventLoopGroup()会含有默认个线程cpu核数*2,即可以充分的利用多核的优势
debug分析在5.4.2章节
-
EventLoopGroup是事件循环组(线程组)含有多个EventLoop,可以注册 channel ,用于在事件循环中去进行选择(和选择器相关) .。[debug看]
-
沿着**new NioEventLoopGroup()**一直下一步找到最终实现方法为
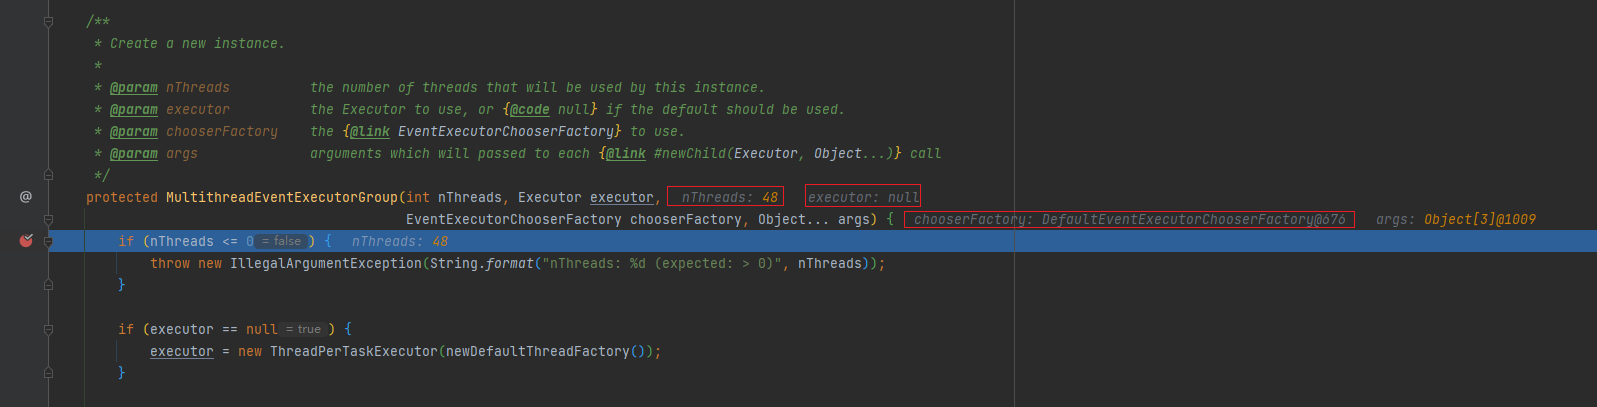
MultithreadEventExecutorGroup -
创建workerGroup时传入MultithreadEventExecutorGroup的参数
- nThreads:使用的线程数,默认为core *2 [可以追踪源码]
- executor执行器:如果传入null,则采用Netty默认的线程工厂和默认的执行器ThreadPerTaskExecutor
- chooserFactory:单例new DefaultEventExecutorChooserFactory()
- args在创建执行器的时候传入固定参数
-
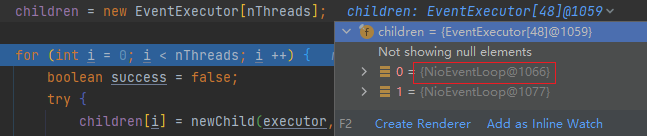
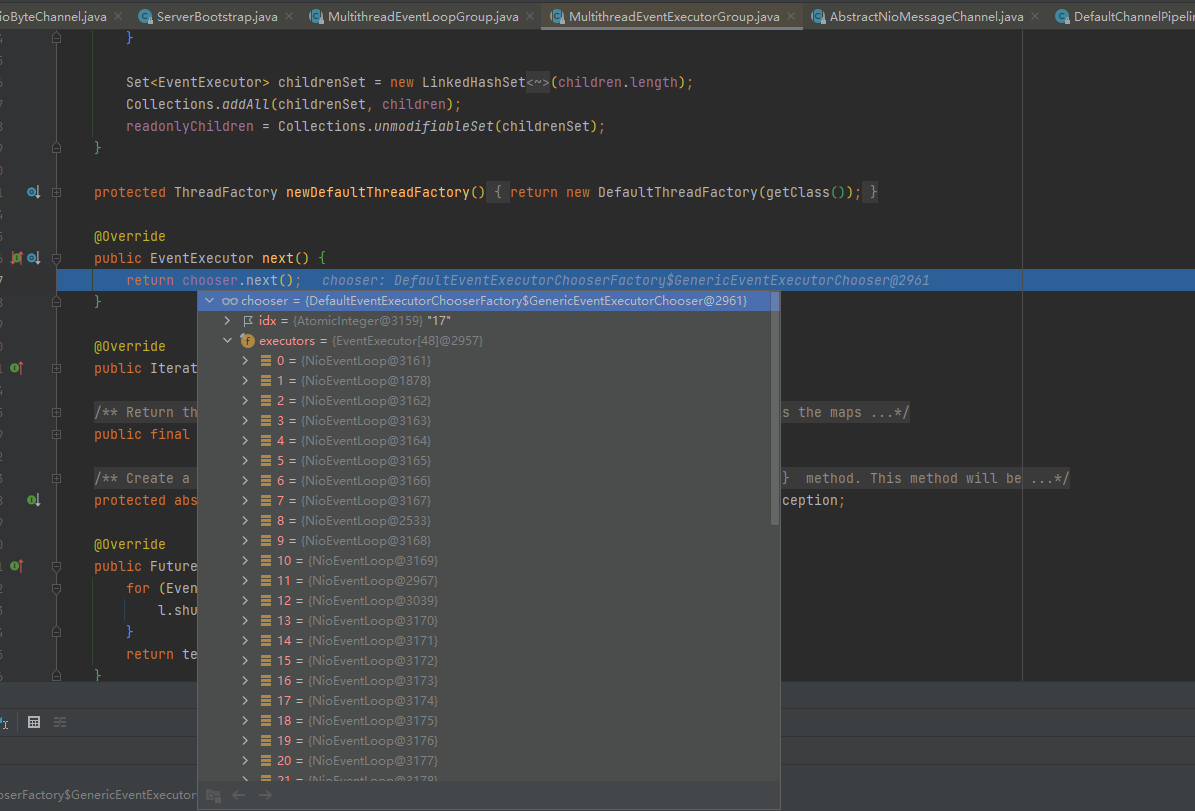
创建并初始化NIOEventLoop
NIOEventLoop实现了EventLoop接口和Executor接口
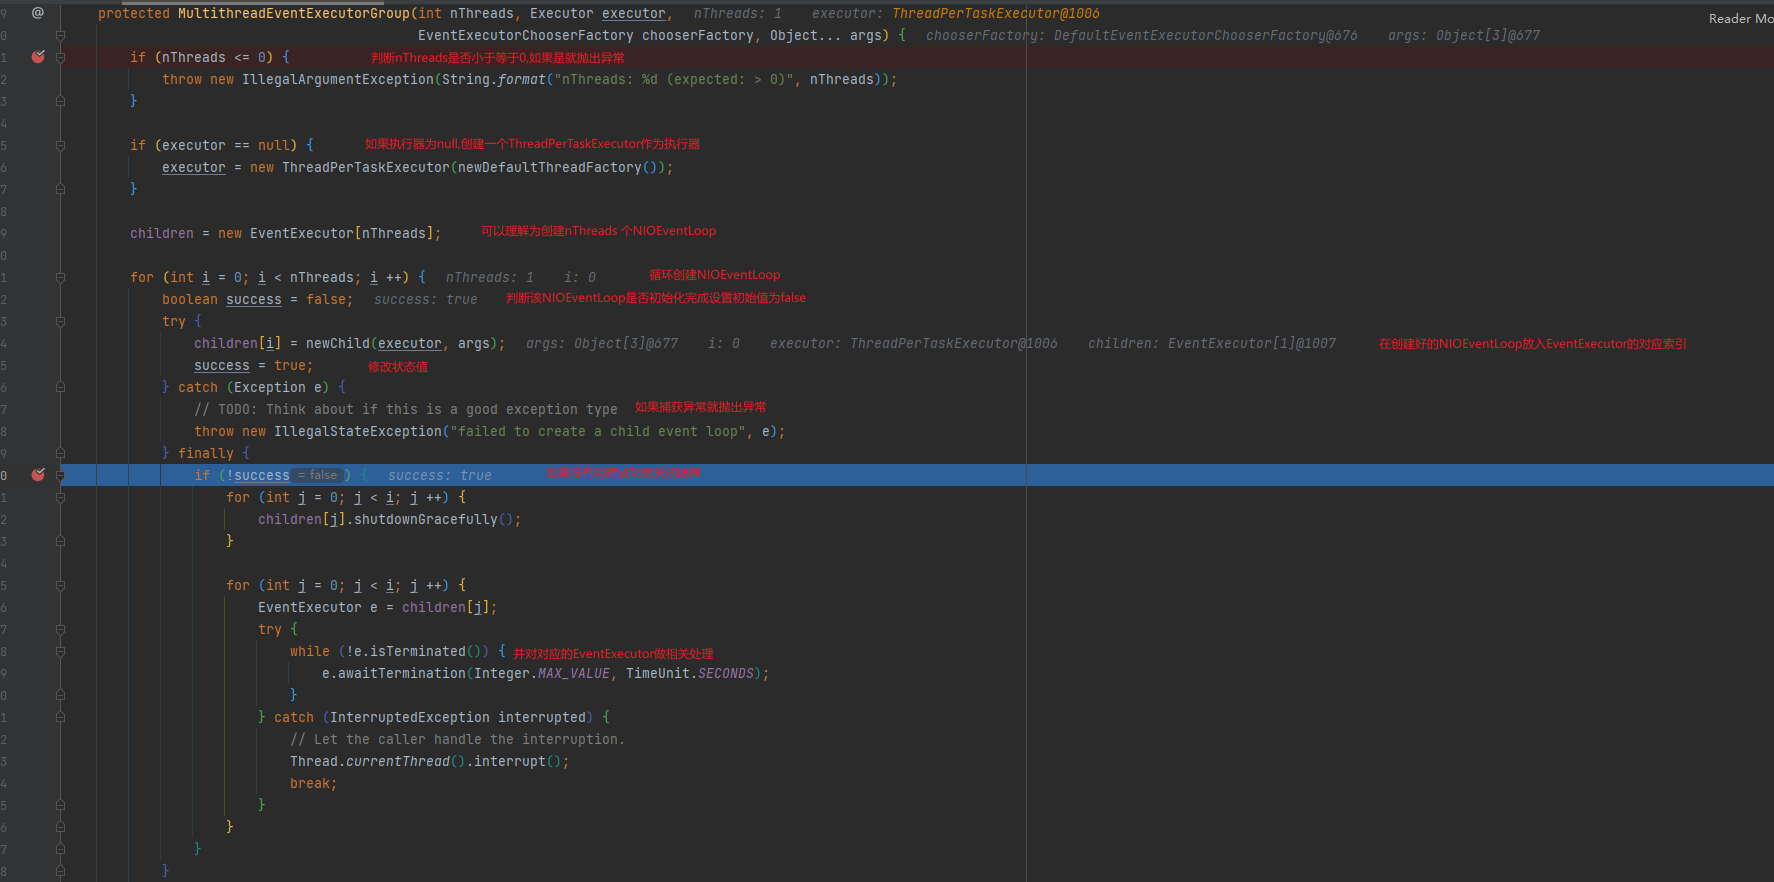
children装的数据就是NIOEventLoop
-
为每一个NIOEventLoop添加一个监听器,并放入一个LinkedHashSet
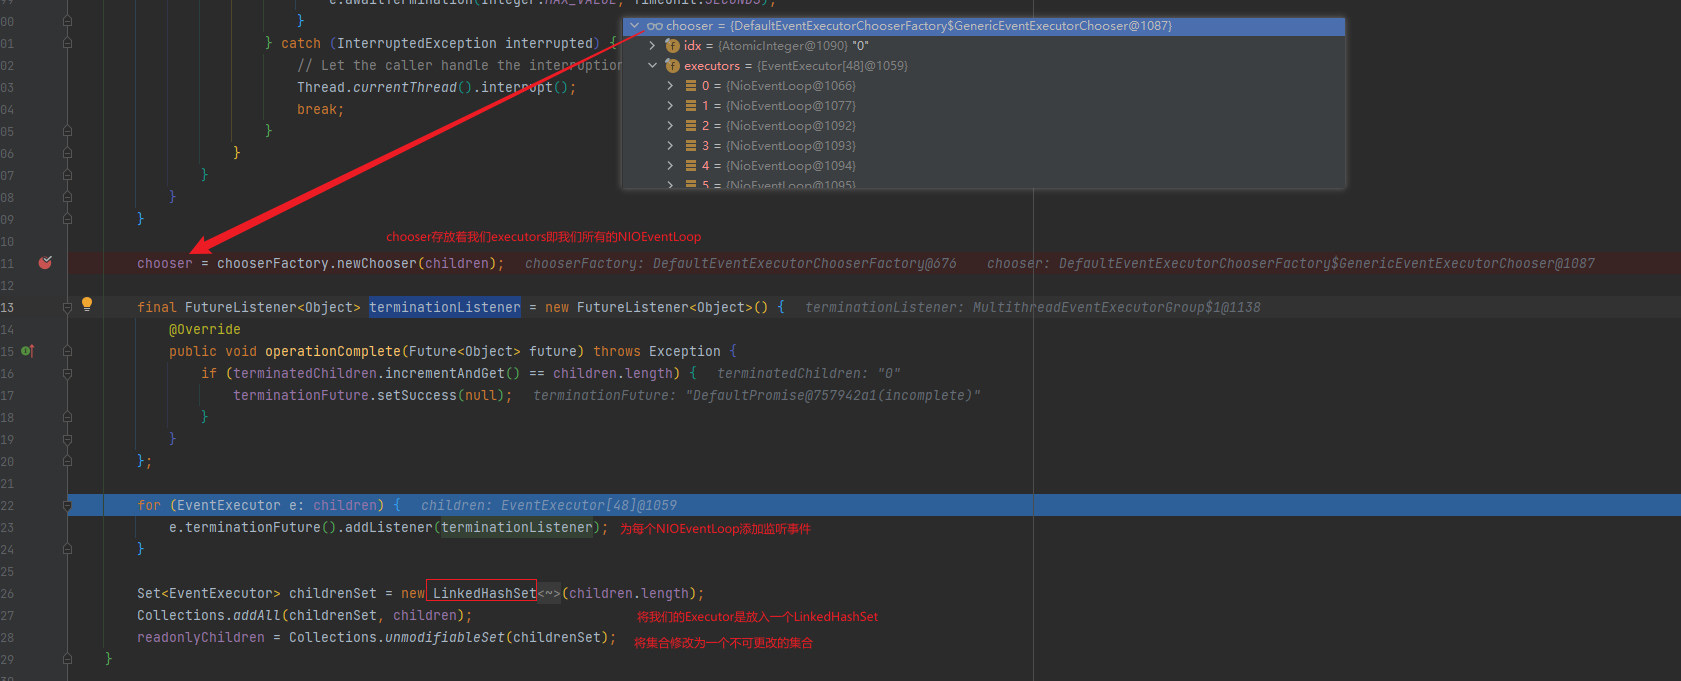
-
服务器启动类源码总结
- 如果executor是 null,创建一个默认的ThreadPerTaskExecutor,使用Netty默认的线程工厂
- 根据传入的线程数(CPU*2)创建一个线程池〔单例线程池)数组。
- 循环填充数组中的元素。如果异常,则关闭所有的单例线程池
- 根据线程选择工厂创建一个线程选择器
- 为每一个单例线程池添加一个关闭监听器
- 将所有的单例线程池添加到一个HashSet中。
-
2.2.1.3 ServerBootstrap
- 他是一个引导类,用于启动服务器和引导整个程序的初始化
- 它和 ServerChannel 关联,而ServerChannel继承了Channel,有一些方法remotcAddress 等
-
我们进入空构造方法发现什么也没做
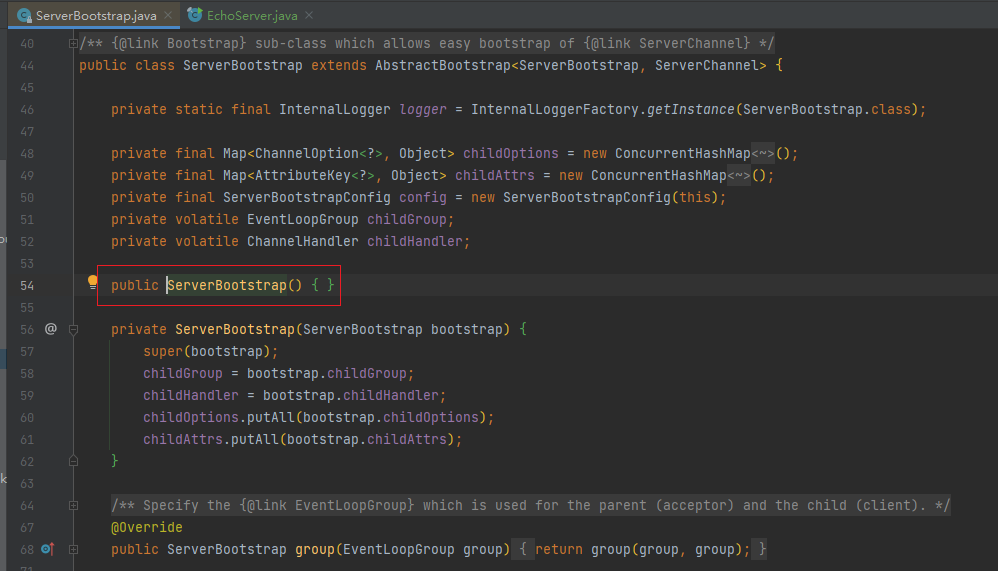
-
group(EventLoopGroup parentGroup, EventLoopGroup childGroup)

-
channel(NioServerSocketChannel.class)
- 这里会对象反射创建一个
ReflectiveChannelFactory(NioServerSocketChannel.class) - 注意这里并不会创建channel,只是创建了工厂
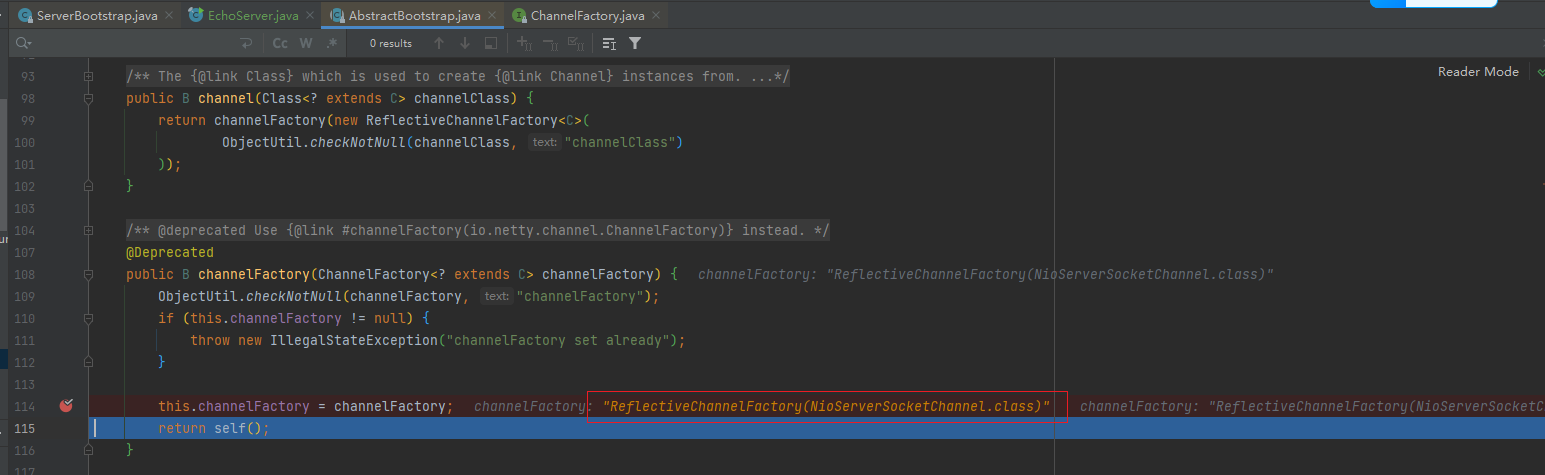
- 这里会对象反射创建一个
-
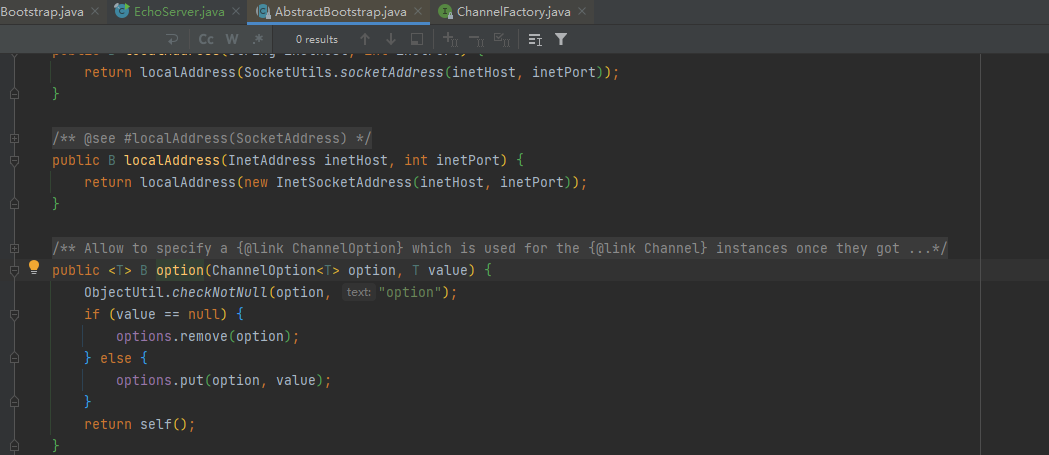
option(ChannelOption.SO_BACKLOG, 100)
放了一些参数
-
handler(new LoggingHandler(LogLevel.INFO))
添加了一个日志相关handler
-
childHandler(ChannelInitializer)
再添加一个SocketChannel(不是ServerSocketChannel)的handler。
-
引导类总结
- 链式调用: group方法,将 boss和 worker传入,boss 赋值给parentGroup 属性,worker 赋值给childGroup属性
- channel方法传入NioServerSocketChannel class 对象。会根据这个class创建channel对象。
- option方法传入TCP参数,放在一个LinkedHashMap中
- handler方法传入一个 handler中,这个hanlder 只专属于ServerSocketChannel而不是SocketChannel
- childHandler传入一个hanlder ,这个 handler将会在每个客户端连接的时候调用。供SocketChannel使用
2.2.1.4 端口绑定分析
-
bind(PORT)
-
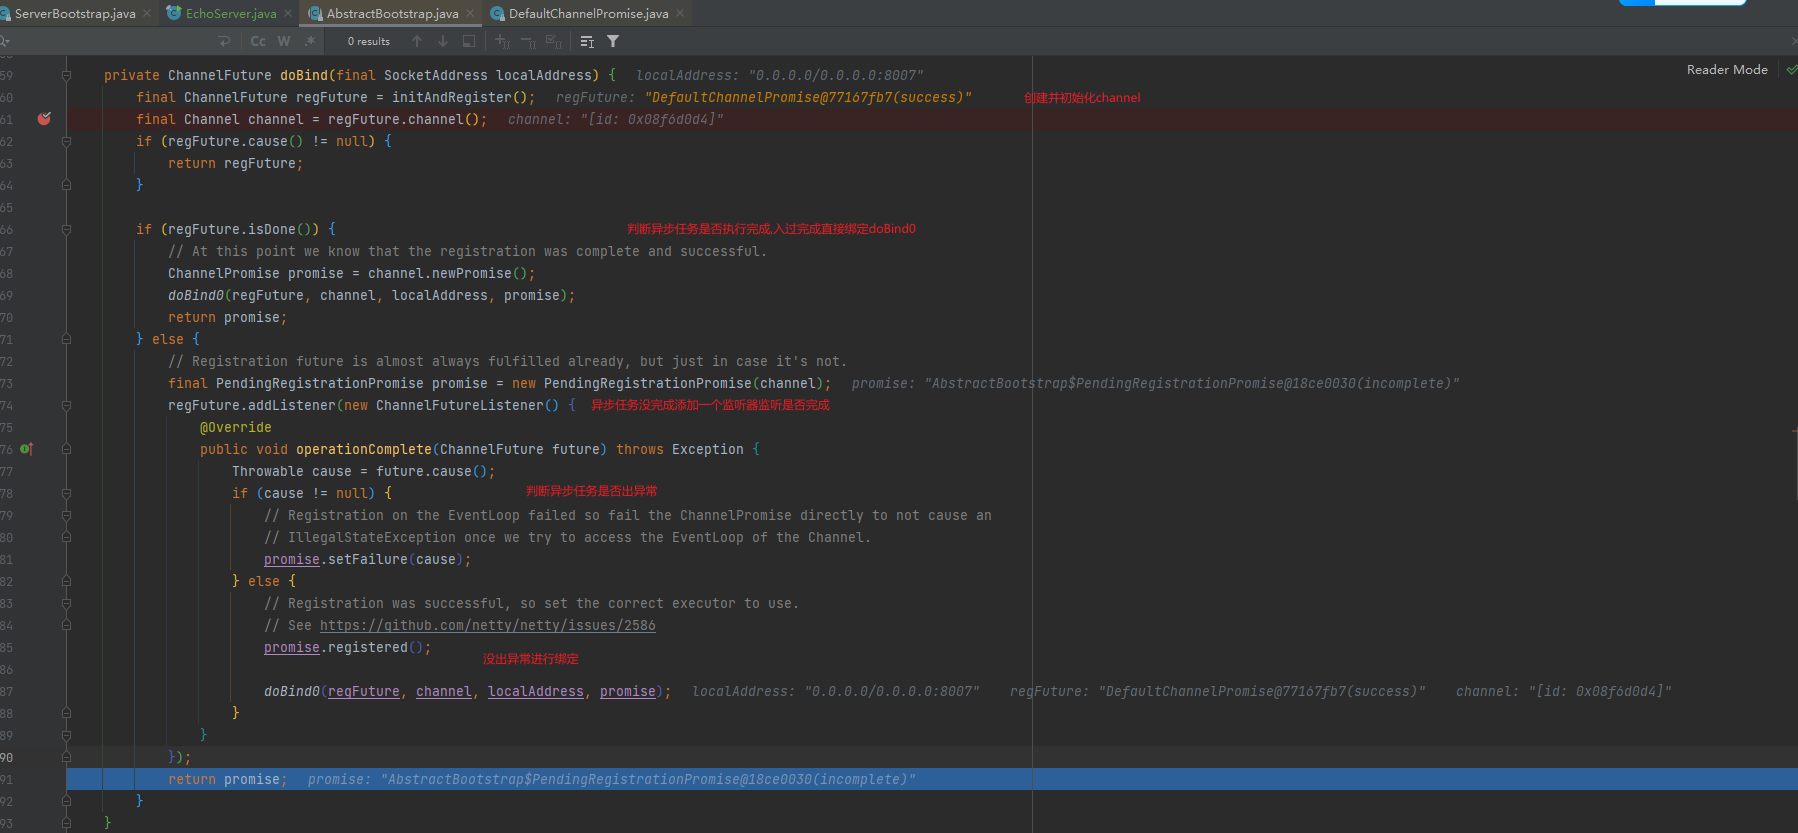
最终追到AbstractBootstrap的doBind方法
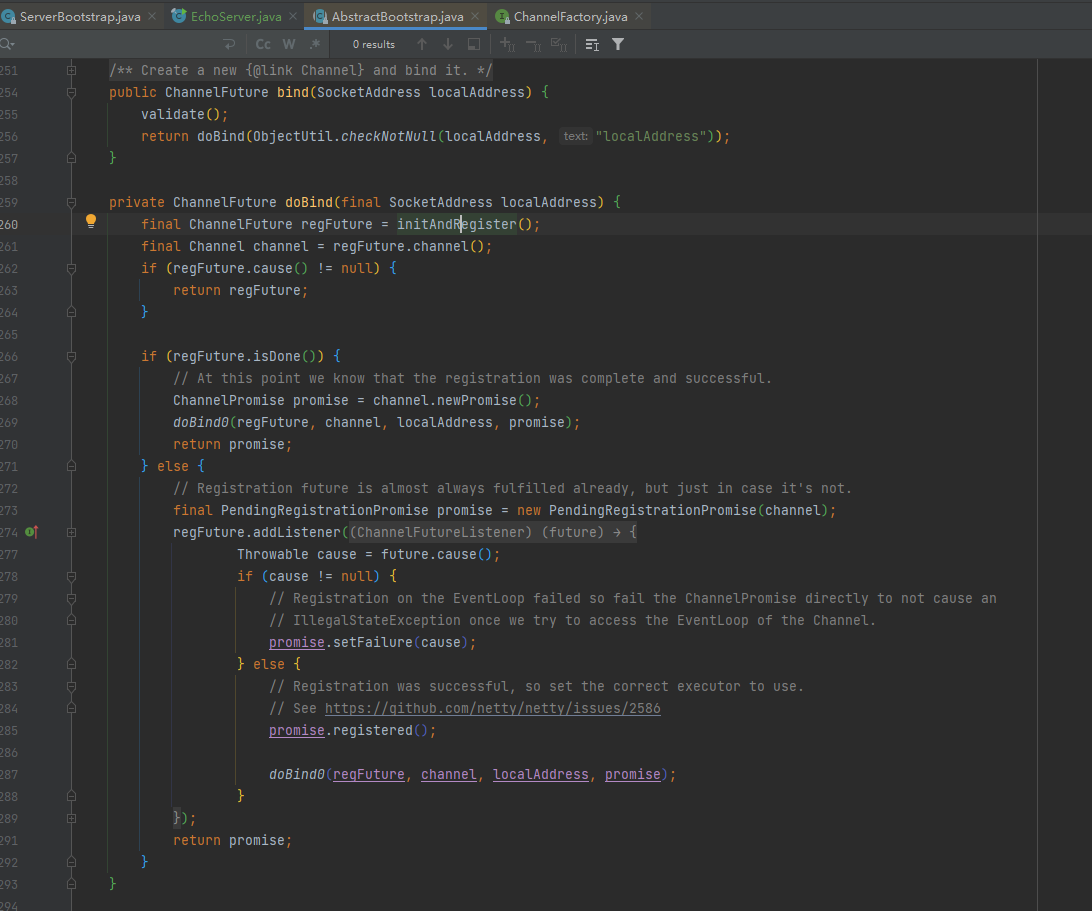
-
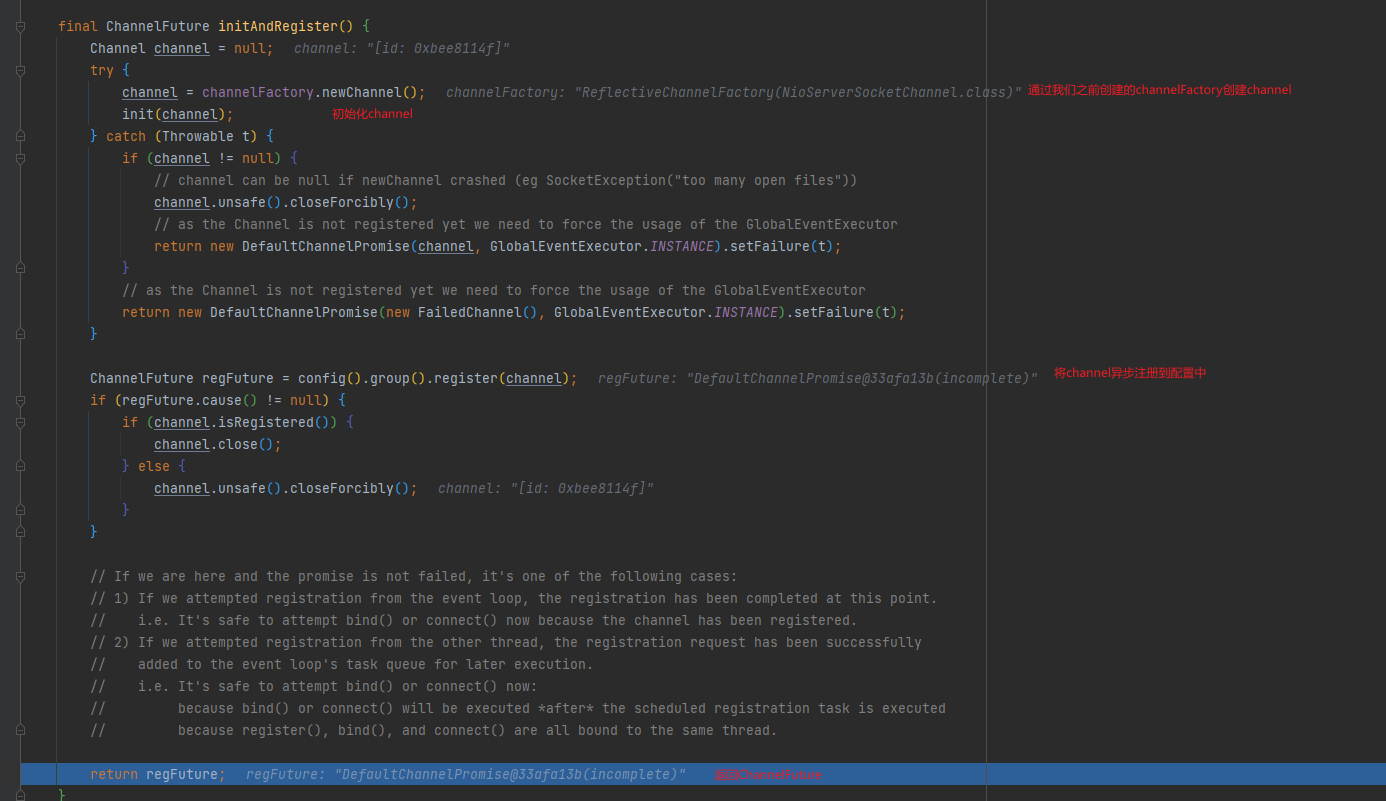
initAndRegister()此处才创建channel
- 说明channelFactory.newChannel()方法的作用通过ServerBootstrap 的通道工厂反射创建一个NioServerSocketChannel
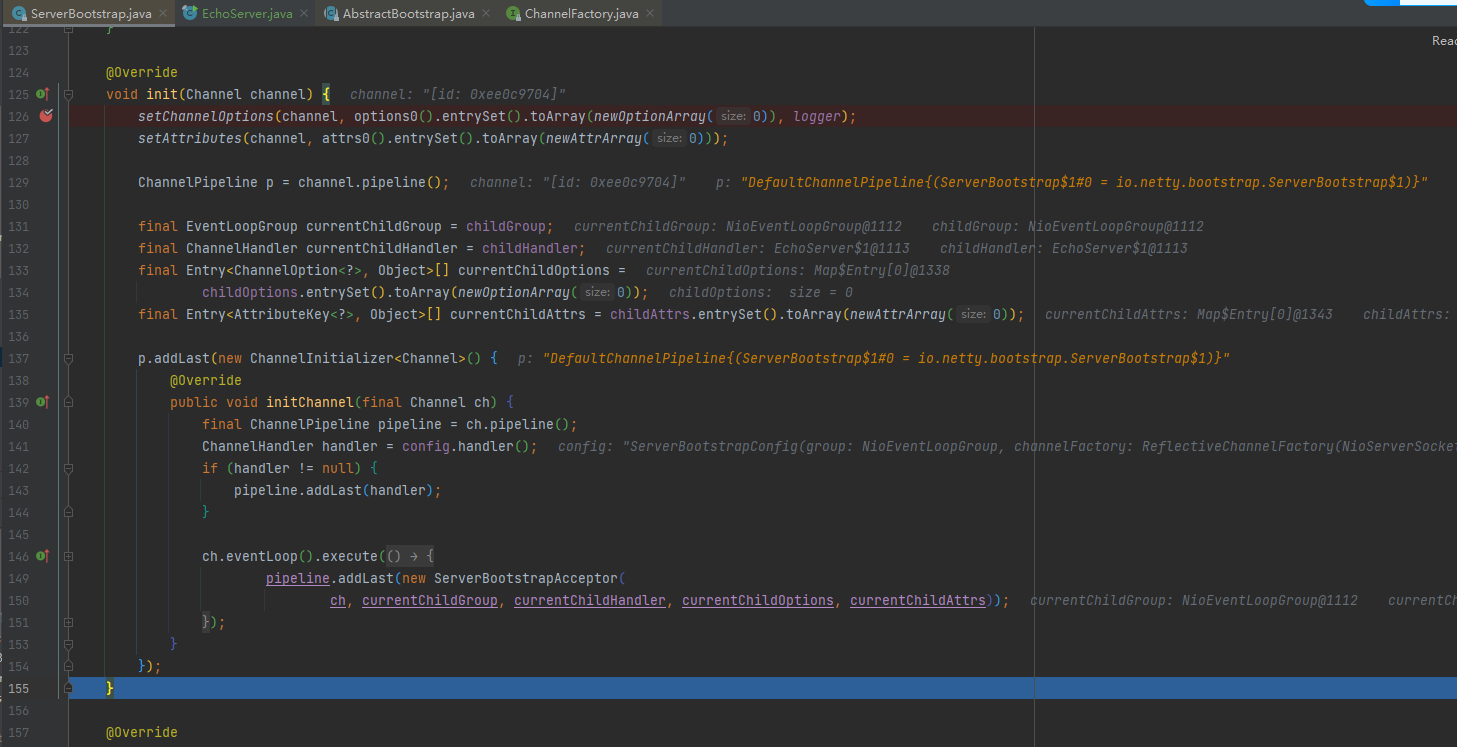
init的方法的核心作用在和ChannelPipeline相关。
- init方法。这是个抽象方法(.AbstractBootstrap类的)。由ServerBootstrap实现
- 设NioServerSocketChannel 的TCP属性.
- 由于LinkedHashMap是非线程安全的。使用同步进行处理.
- 对NioServerSocketChannel的ChanneIPipeline添加ChannelInitializer处理器.
- 可以看出,init的方法的桢心作用在和ChannelPipeline相关.
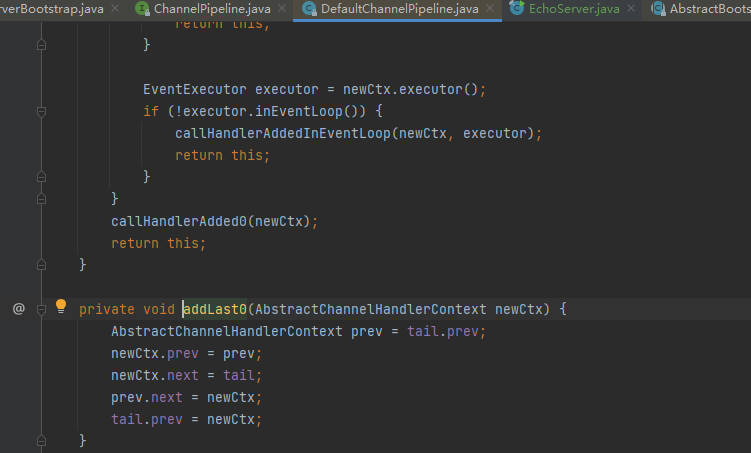
- 从NioServerSocketChannel的初始化过程中,我们知道,pipeline是一个双向链表,并且,他本身就初始化了head和 tail,这里调用了他的 addLast方法,也就是将整个handler插入到tail 的前面,因为tail永远会在后面,需要做一些系统的固定工作。
init中的addLast方法通过debug最终会找到这里,然后最后调用addLast0
- addLast方法,在 DefaultChannelPipeline类中
- addLast方法这就是pipeline 方法的核心
- 检查该handler是否符合标准。
- 创建一个AbstractChannelHandlerContext对象,这里说一下,ChannelHandlerContext对象是ChannelHandler和ChannelPipeline 之间的关联,每当有ChannelHandler添加到 Pipeline 中时,都会创建Context。Context 的主要功能是管理他所关联的 Handler 和同一个Pipeline 中的其他Handler 之间的交互。
- 将Context添加到链表中。也就是追加到tail节点的前面。
- 最后,同步或者异步或者晚点异步的调用callHandlerAdded0方法
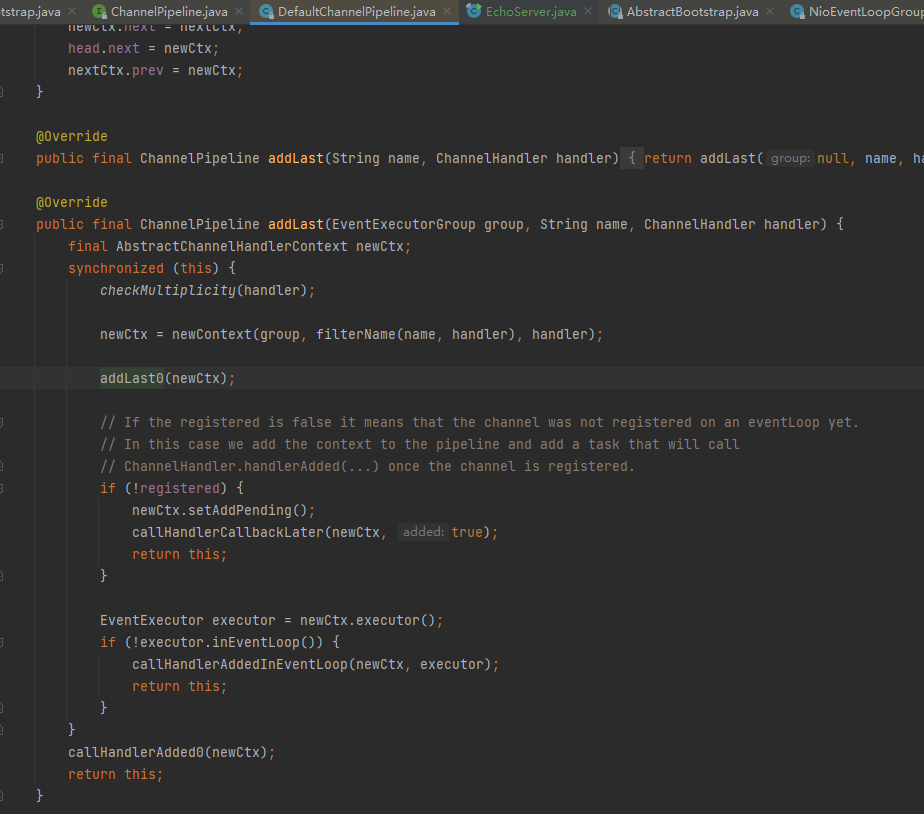
addLast0本质上就是对双向链表的尾节点之前进行插入节点的操作
-
绑定regFuture, channel, localAddress, promise,(然后绑定端口并阻塞至连接成功。)
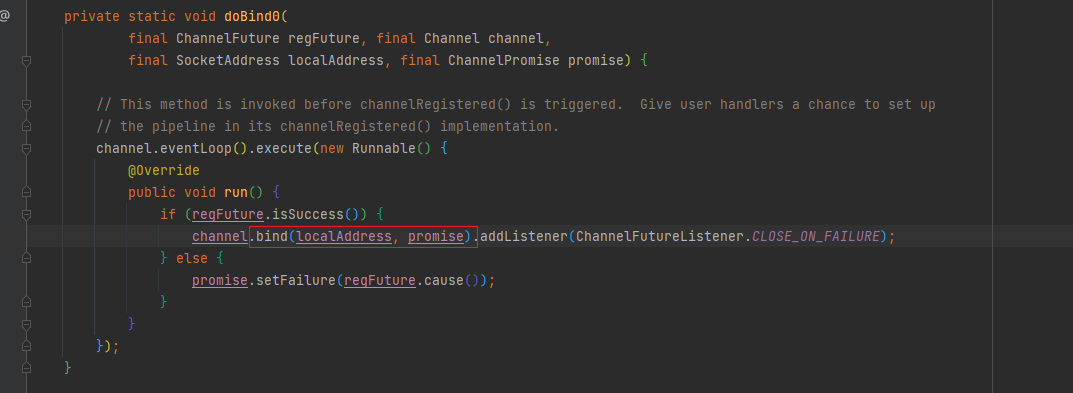
找到doBind0方法了
doBind0核心就是bind方法,这里就可以根据前面下的断点
一直debug,将调用LoggingHandler(next)的invokeBind方法
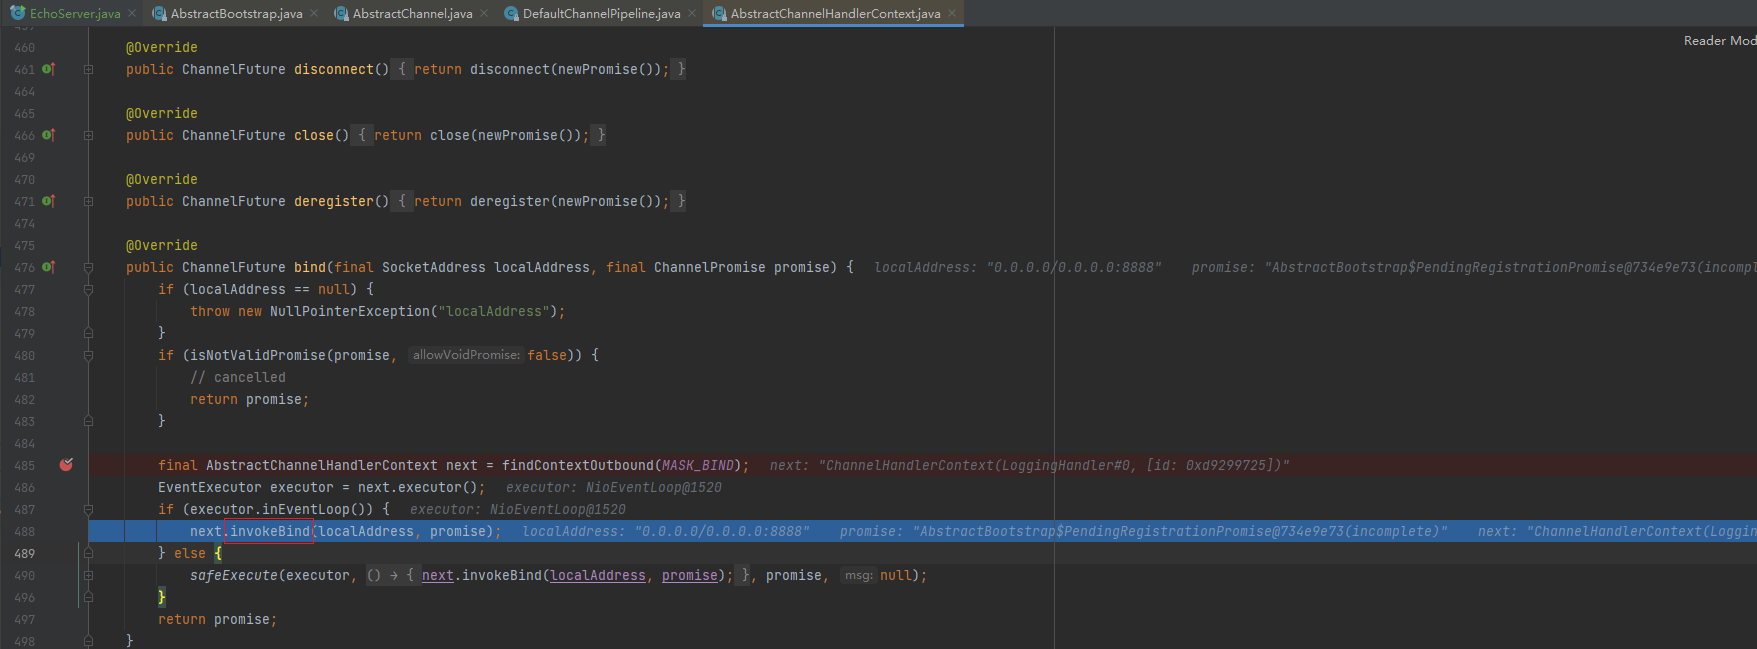
invokeBind方法
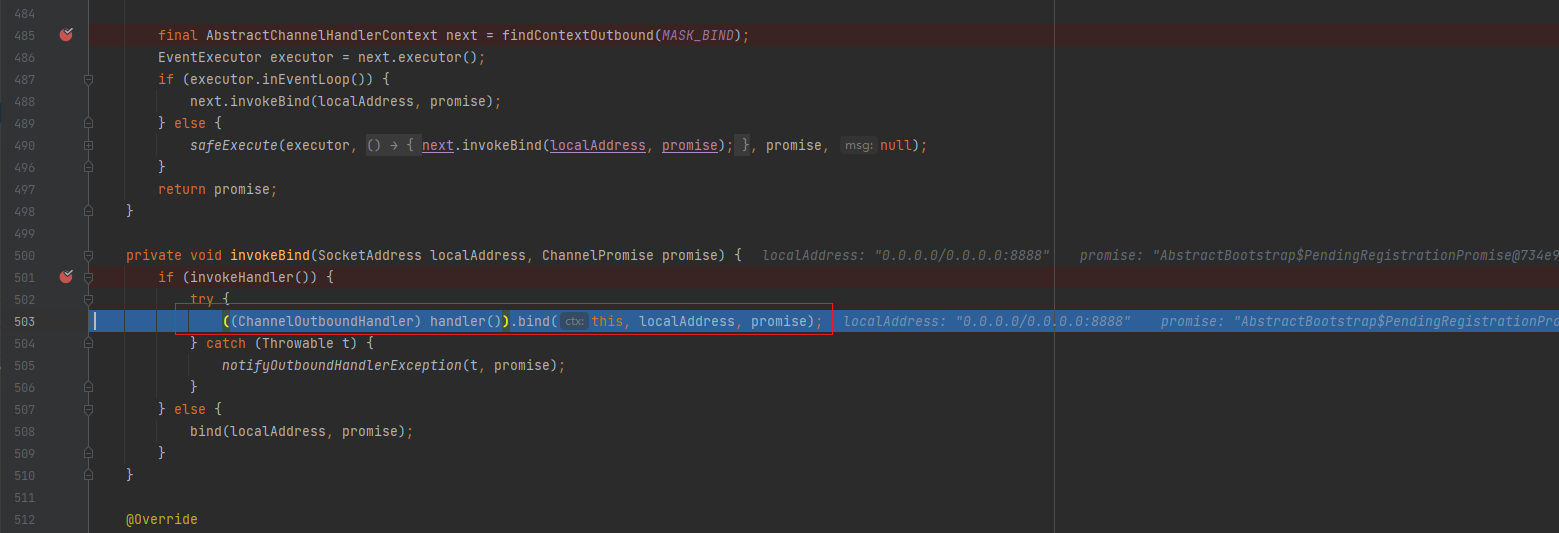
反射调用LoggingHandler(next)的bind方法

继续debug 第二圈再到这里这里的bind方法就会跳转到
注意:unsafe.bind,要debug第二圈的时候,才能看到.

这里的bind方法就会跳转到unsafe的bind方法

unsafe的bind方法会调用dobind 方法,其实这个dobind0就是NioServerSocketChannel的doBind方法了
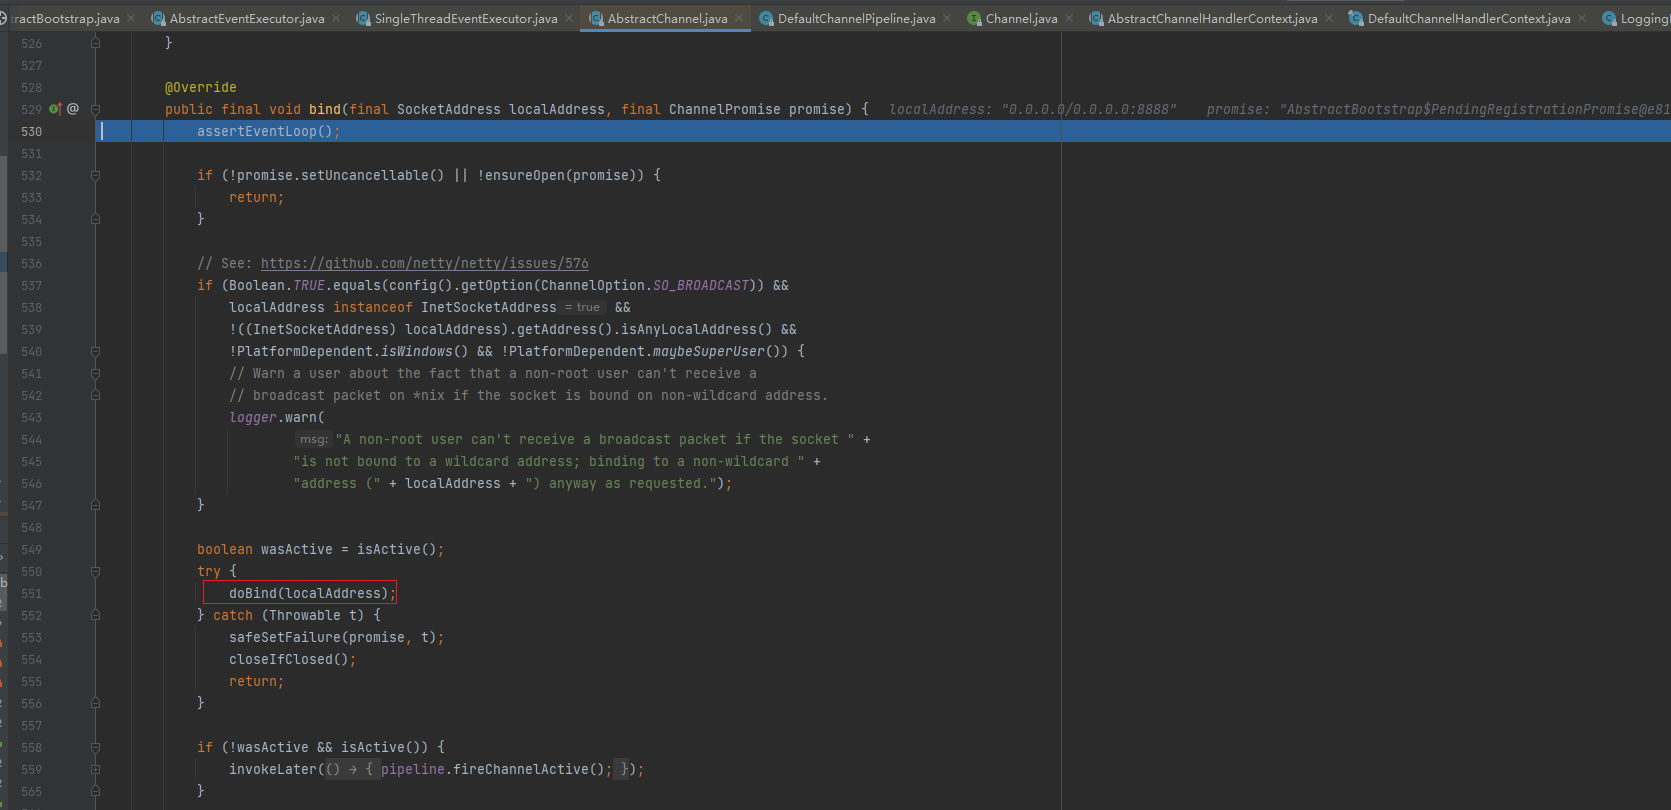
最后找进来就是NioServerSocketChannel

-
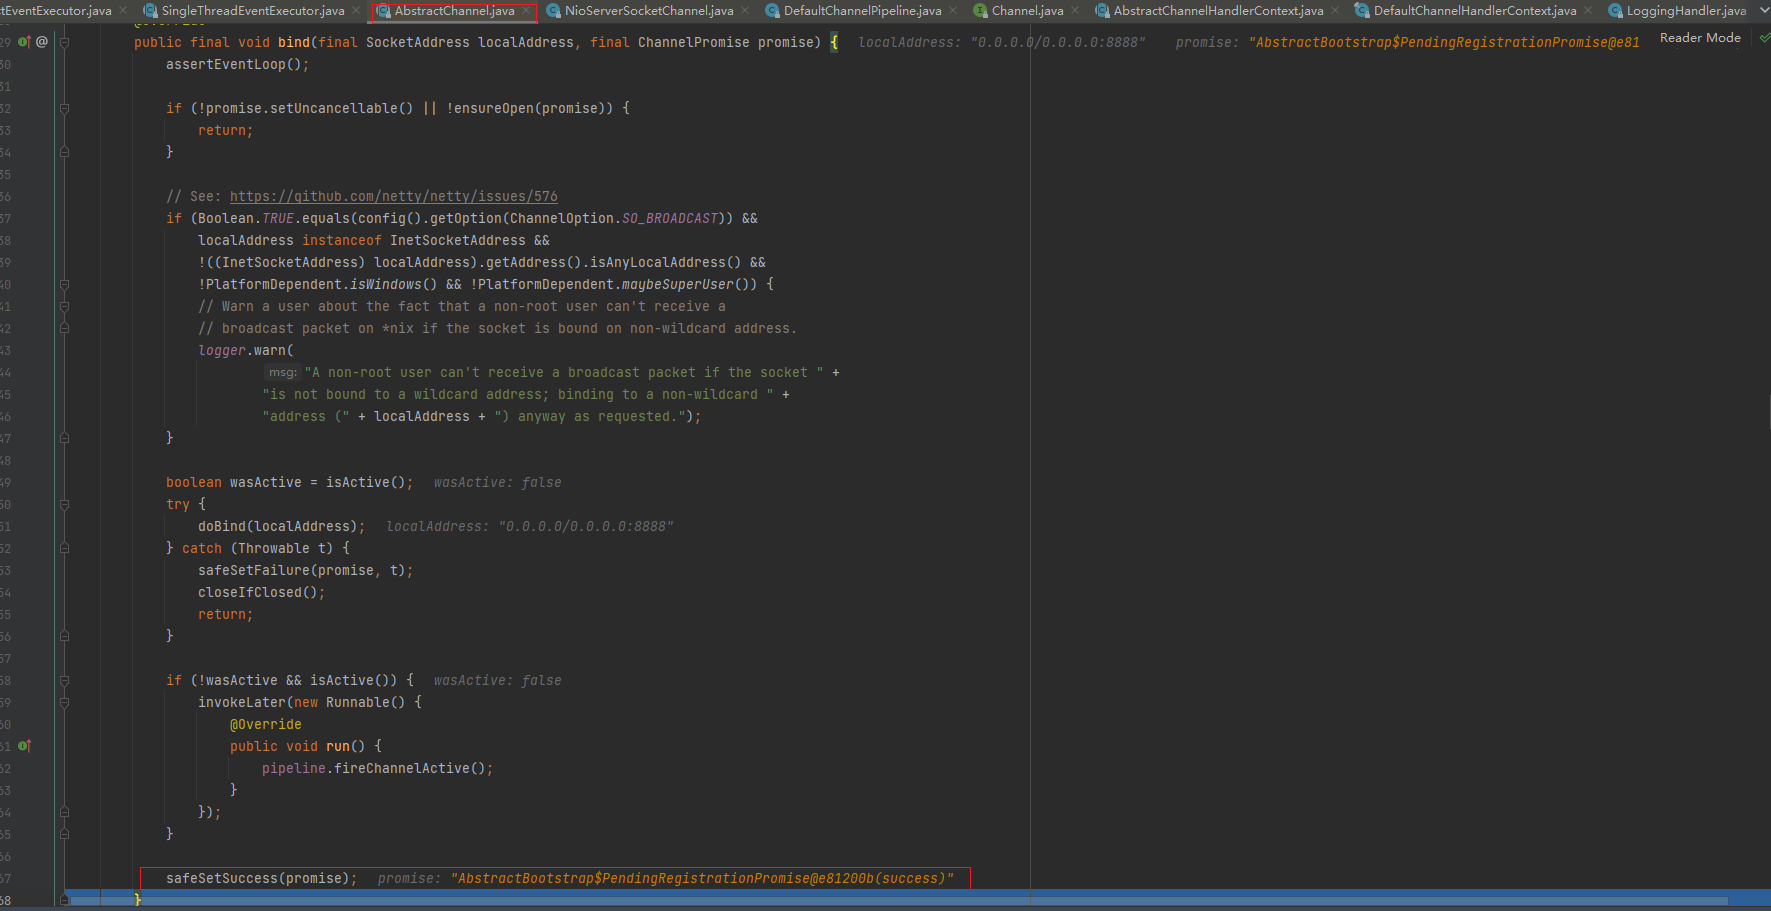
绑定完成后
最后一步: safeSetSuccess(promise),告诉 promise 任务成功了。其可以执行监听器的方法了。到此整个启动过程已经结束了,ok 了
-
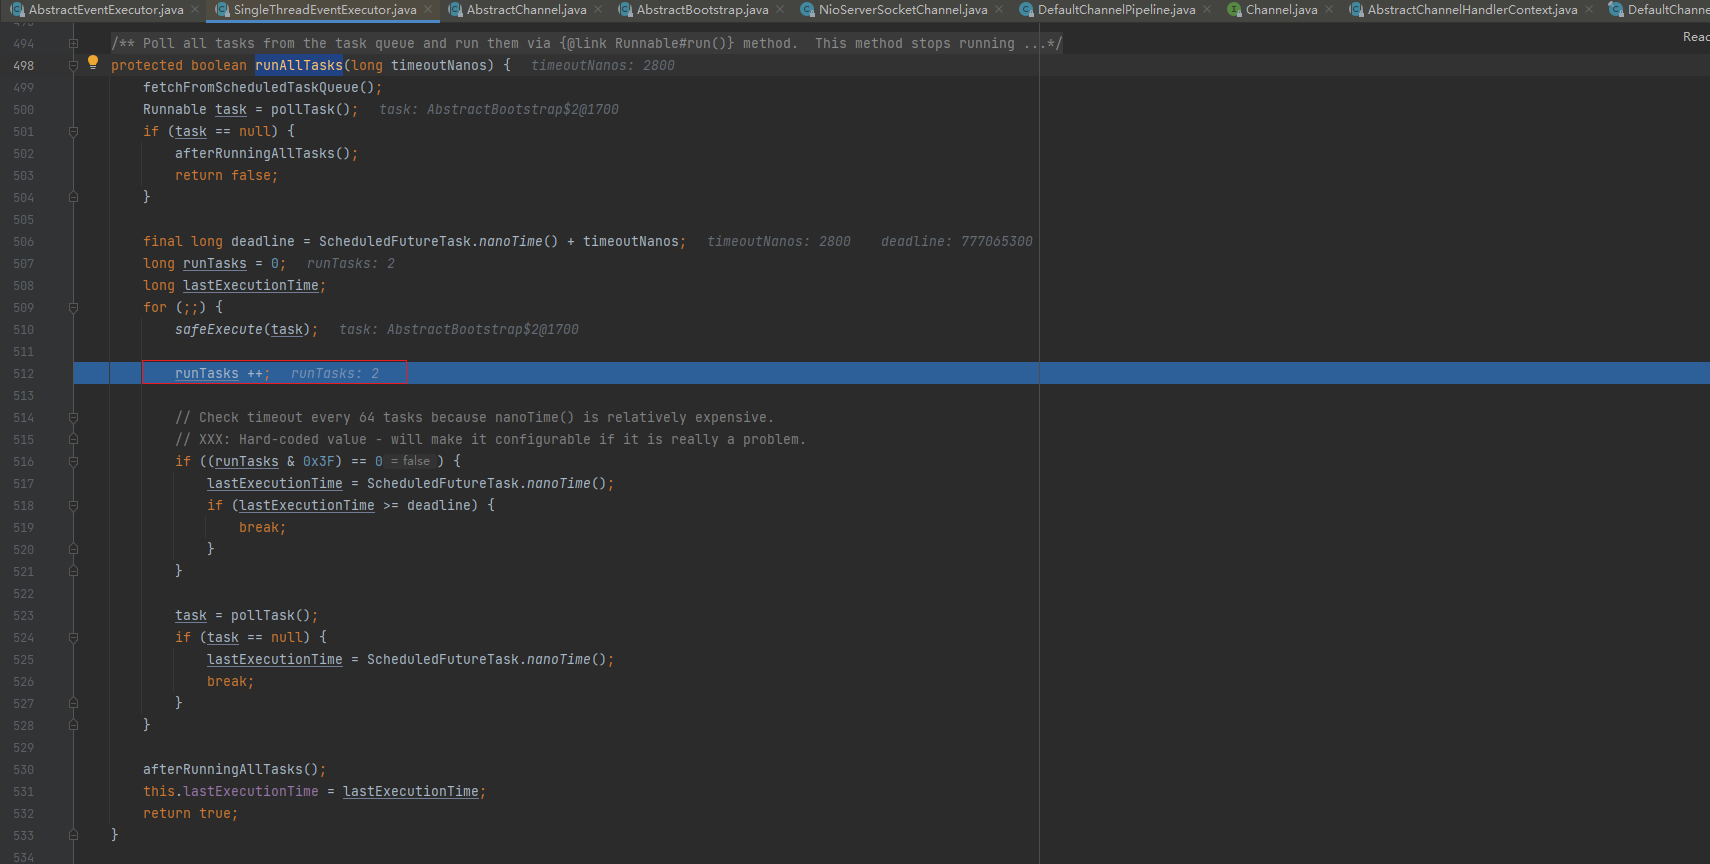
runAllTasks
最后一直debug,会找到runAllTasks方法,这里就一直自旋直到所有异步任务执行完成
-
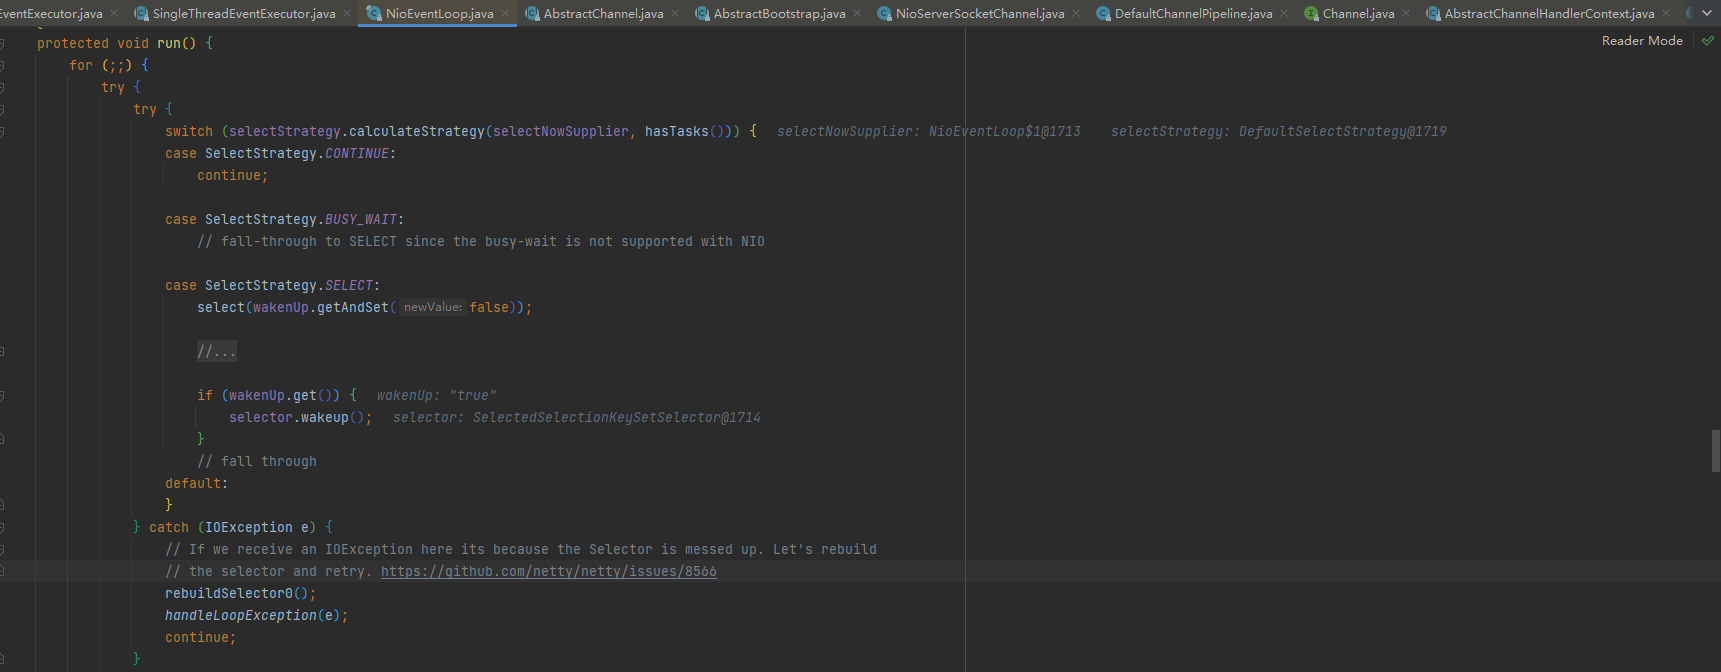
NIOEventLoop的run方法
最后终于执行到NIOEventLoop的run方法,
然后一直自旋,processSelectedKeys然后runAllTasks
-
-
closeFuture()
最后main线程阻塞等待关闭。
-
finally块中的代码将在服务器关闭时优雅关闭所有资源
-
端口绑定总结
- 基本说明:initAndRegister()初始化NioServerSocketChannel通道并注册各个 handler,返回一个future
- 通过ServerBootstrap的通道工厂反射创建一个NioServerSocketChannel.
- init初始化这个NioServerSocketChannel.
- config().group().register(channel)通过ServerBootstrap 的 bossGroup 注册NioServerSocketChannel.
- 最后,返回这个异步执行的占位符即 regFuture.
2.3 Netty启动过程梳理
- 创建2个 EventLoopGroup 线程池数组。数组默认大小CPU*2,方便chooser选择线程池时提高性能
- BootStrap 将 boss 设置为 group属性,将 worker 设置为childer 属性
- 通过 bind 方法启动,内部重要方法为 initAndRegister 和dobind 方法
- initAndRegister 方法会反射创建 NioServerSocketChannel 及其相关的NIO的对象,pipeline , unsafe,同时也为 pipeline 初始了 head 节点和tail 节点。
- 在register0 方法成功以后调用在 dobind 方法中调用doBind0 方法,该方法会调用 NioServerSocketChannel 的 doBind 方法对JDK 的channel 和端口进行绑定,完成 Netty 服务器的所有启动,并开始监听连接事件
3. Netty接受请求过程源码剖析
3.1 目的
服务器启动后肯定是要接受客户端请求并返回客户端想要的信息的,下面源码分析Netty 在启动之后是如何接受客户端请求的
3.2 源码剖析
3.2.1 说明
-
从之前服务器启动的源码中,我们得知,服务器最终注册了一个Accept事件等待客户端的连接。我们也知道,NioServerSocketChannel 将自己注册到了boss单例线程池(reactor 线程)上,也就是 EventLoop .
-
先简单说下EventLoop的逻辑(后面我们详细讲解 EventLoop)
EventLoop的作用是一个死循环,而这个循环中做3件事情:
- 有条件的等待Nio事件。
- 处理Nio事件。
- 处理消息队列中的任务。
-
仍用前面的项目来分析:进入到NioEventLoop 源码中后,在private void processSelectedKey(SelectionKey key)
-
AbstractNioChannel ch)方法开始调试最终我们要分析到AbstractNioChannel 的 doBeginRead 方法,当到这个方法时,针对于这个客户端的连接就完成了,接下来就可以监听读事件了
3.2.2 源码剖析
接着启动过程源码分析的最后的位置即run方法,这次我们要分析的是processSelectedKeys
-
断点打在processSelectedKeys处,然后启动服务端,然后通过浏览器或者客户端访问服务端

-
当客户端启动成功后processSelectedKeys的size大于0就代表监听到事件了,监听到事件就执行processSelectedKeysOptimized方法
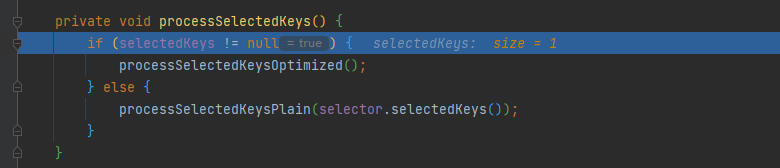
-
processSelectedKeysOptimized方法判断如果是NioChannel就执行processSelectedKey方法
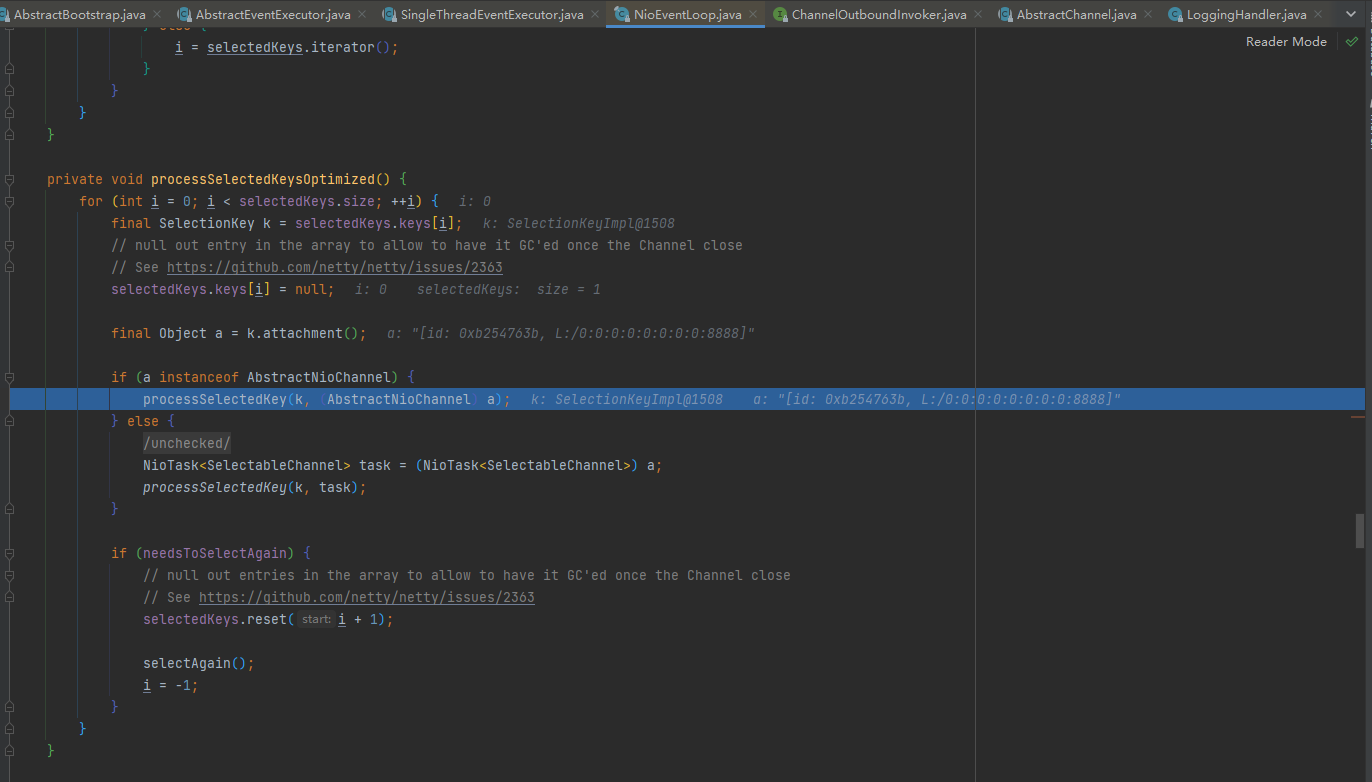
-
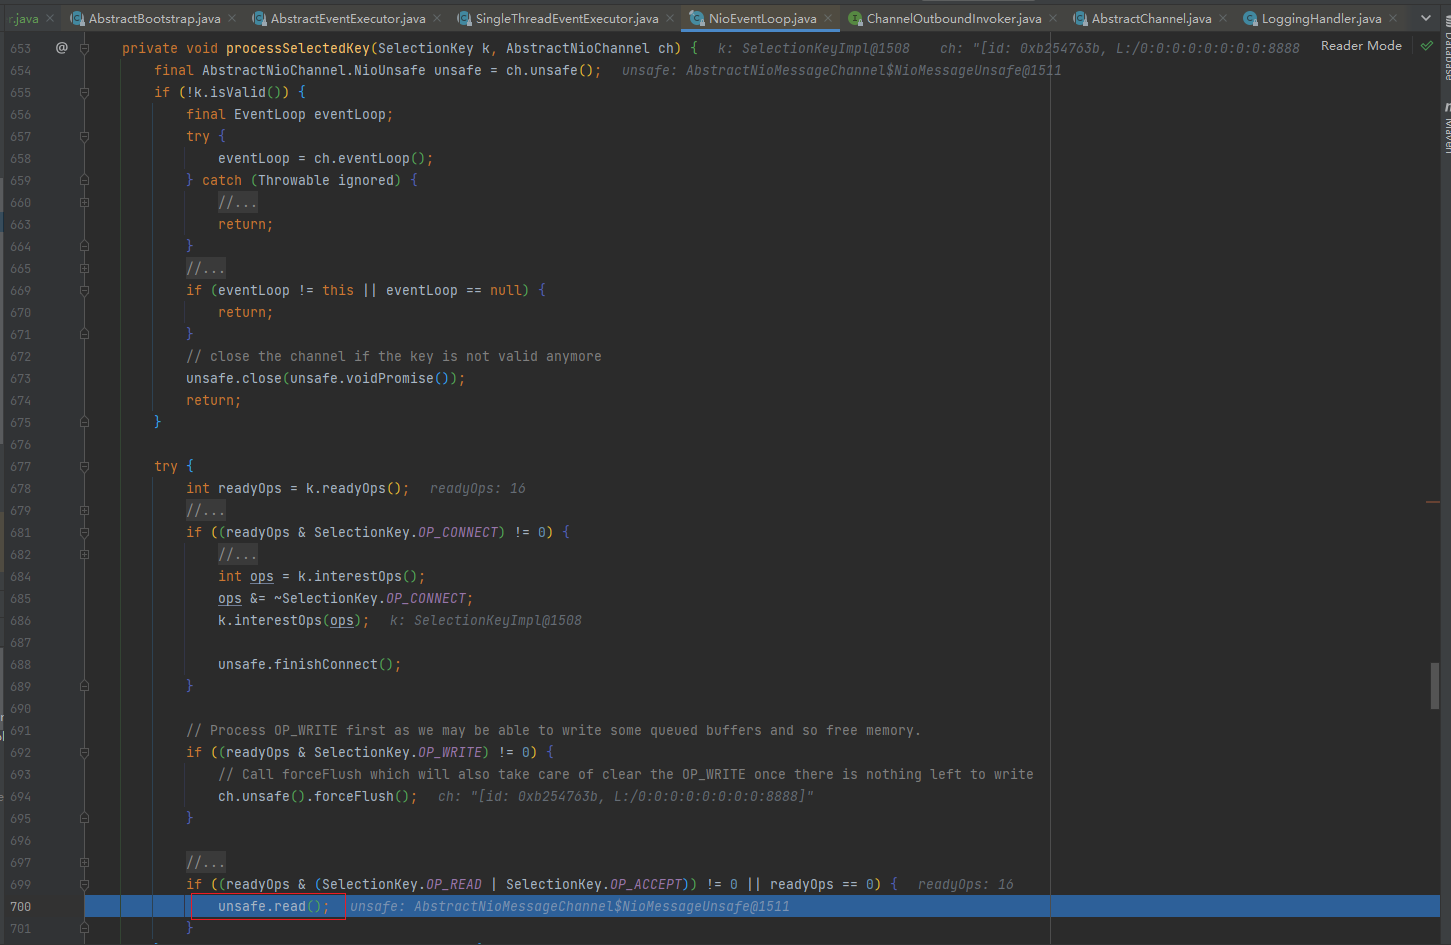
processSelectedKey
- isValid:判断selectedKey是否合法
- 如果合法就判断类型,我这里是启动客户端发送了数据,那么服务端接收到的readyOps是16 ,也就是Accept事件。
- 那么就执行unsafe.read();
-
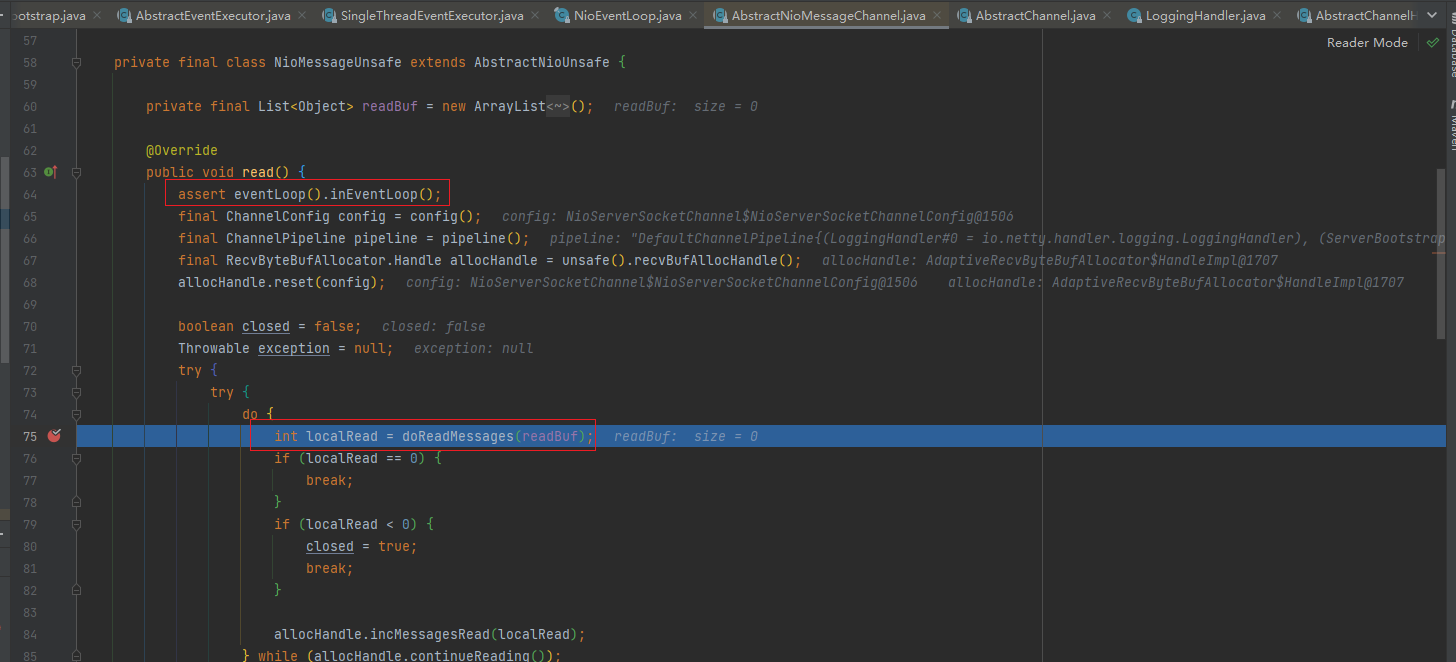
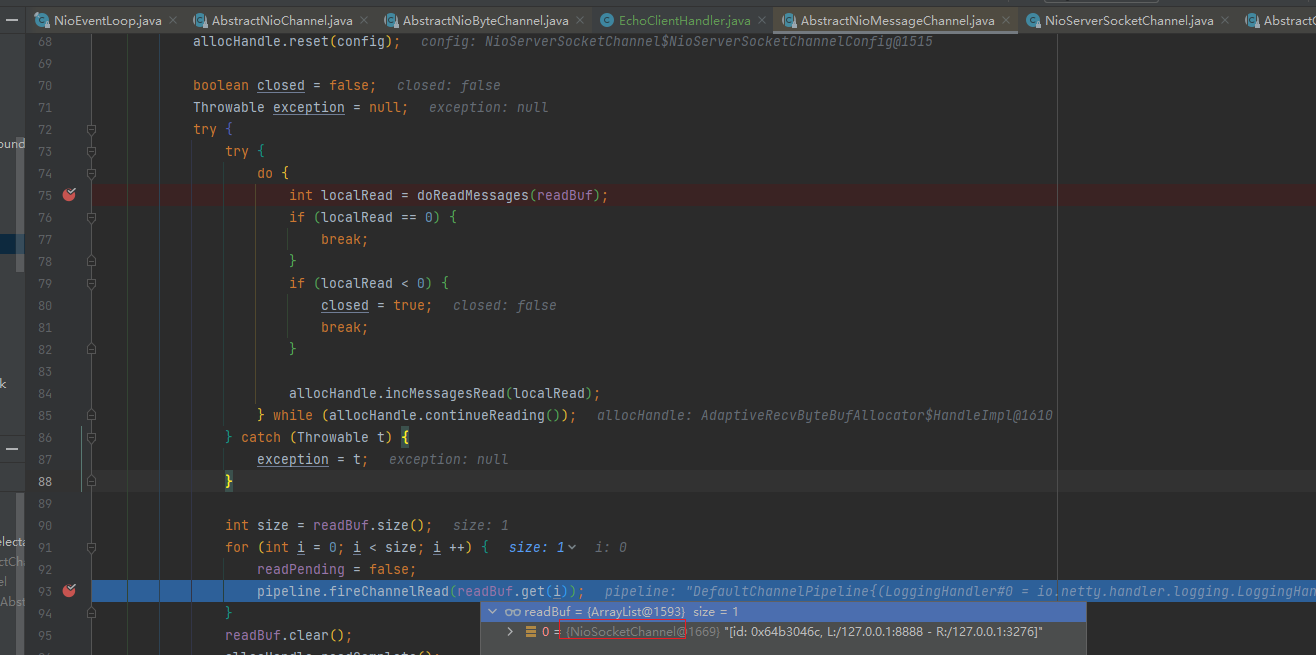
unsafe.read()
- 断言检查该eventloop线程是否是当前线程。assert eventLoop().inEventLoop()
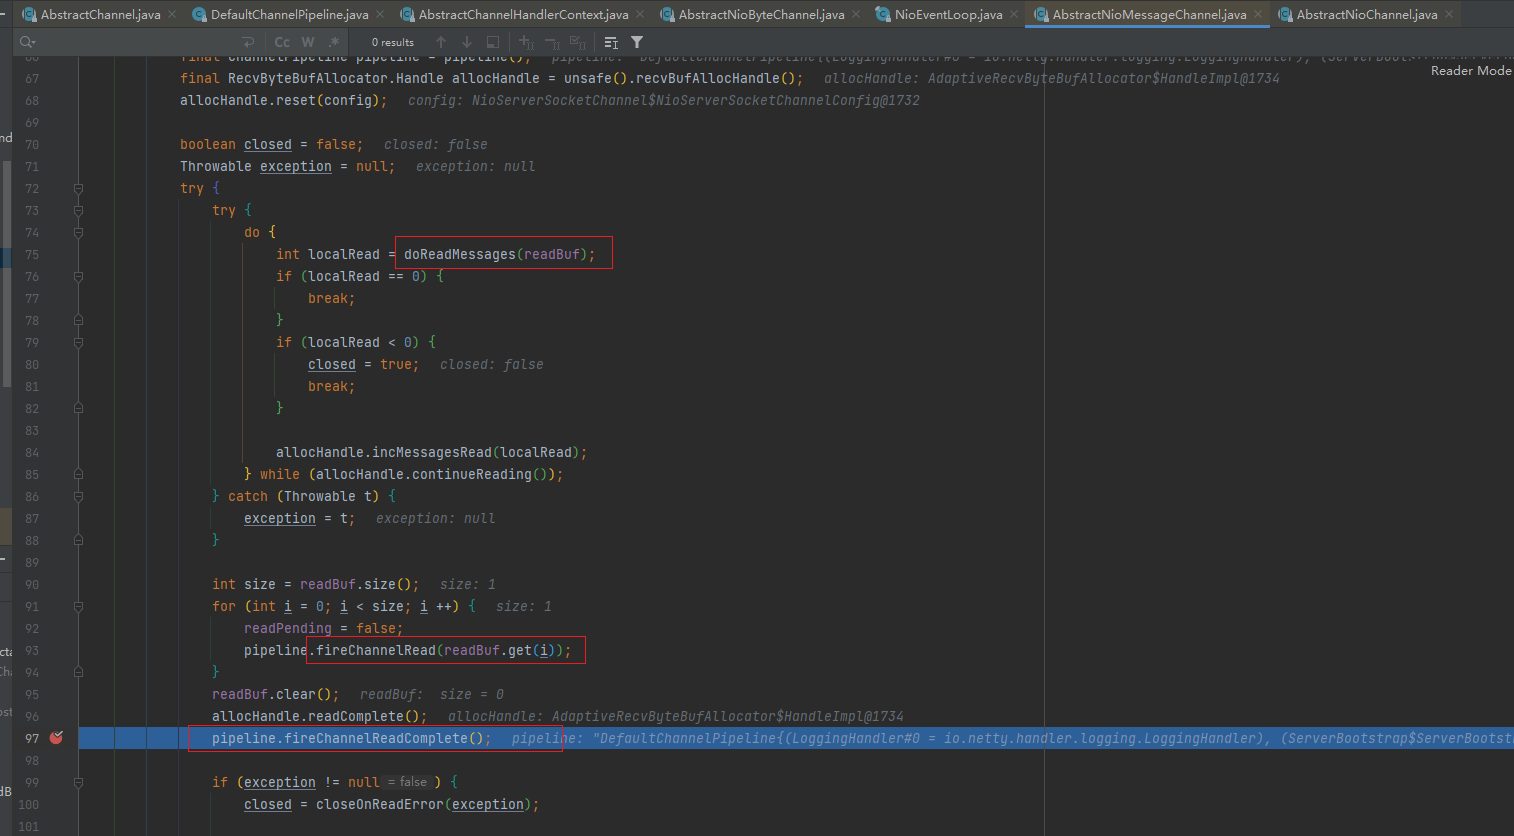
- 执行doReadMessages方法,并传入一个readBuf变量,这个变量是一个List,也就是容器。
- 循环容器,执行pipeline.fireChannelRead(readBuf.get(i));
- doReadMessages是读取 boss 线程中的NioServerSocketChannel接受到的请求。并把这些请求放进容器,
- 循环遍历容器中的所有请求,调用 pipeline 的 fireChannelRead方法,用于处理这些接受的请求或者其他事件,在read 方法中,循环调用ServerSocket 的 pipeline 的 fireChannelRead 方法,开始执行管道中的handler 的ChannelRead方法(debug进入)
-
debug到doReadMessages时size为0
-
doReadMessages方法
获取到一个JDK 的SocketChannel,然后,使用NioSocketChannel进行封装。最后添加到容器中并返回
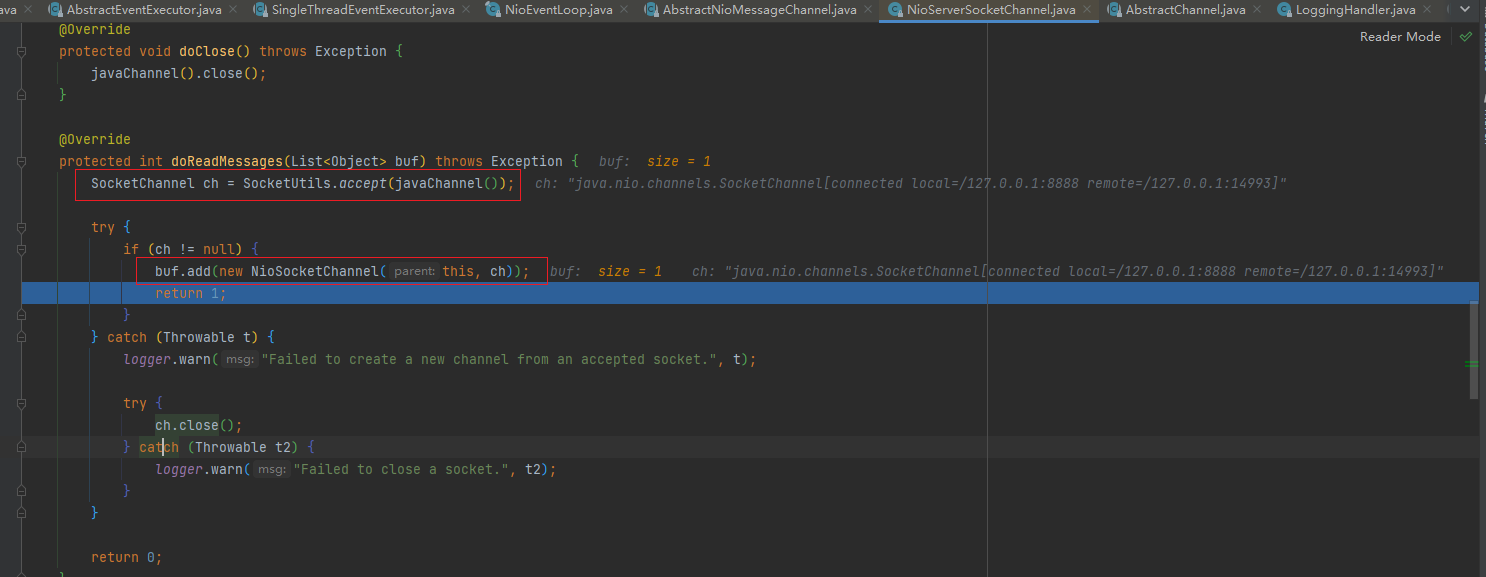
doReadMessages执行完成后
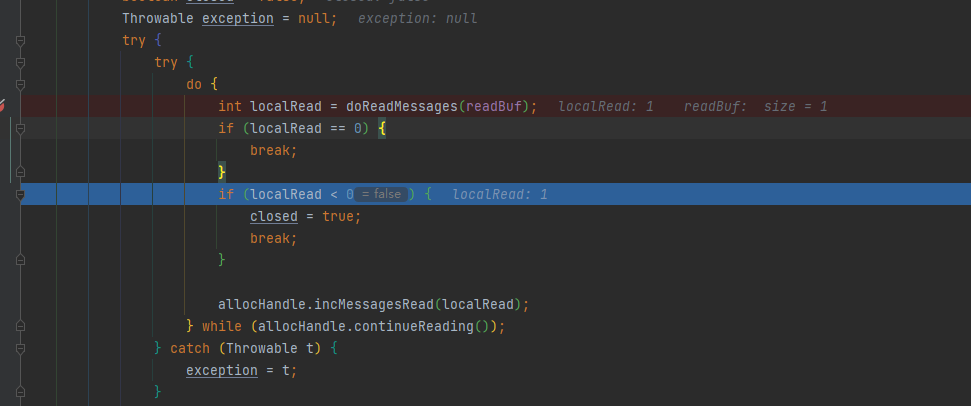
-
循环容器,执行pipeline.fireChannelRead(readBuf.get(i));
我们传入其实就是服务端与客户的连接的channel
-
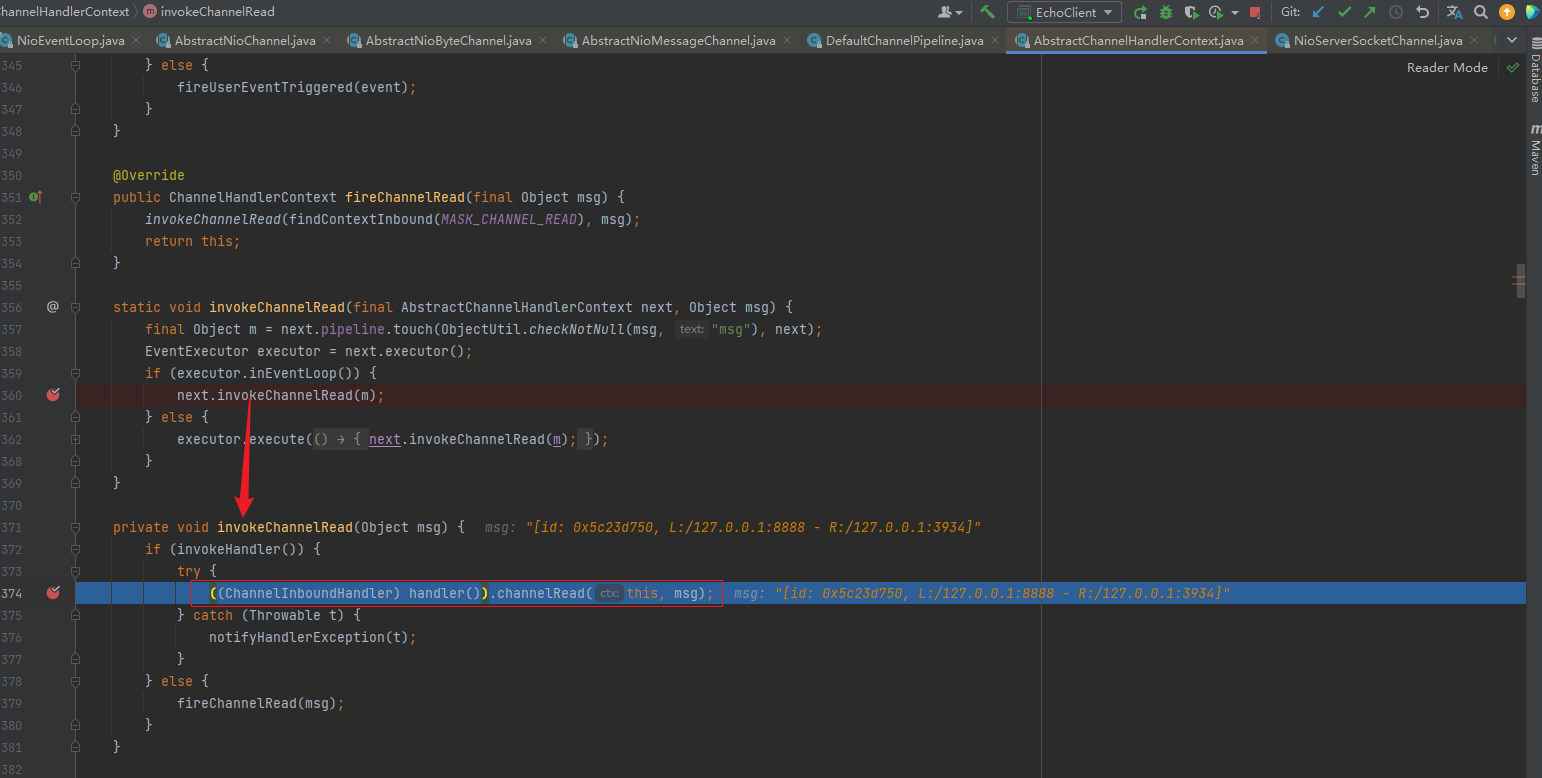
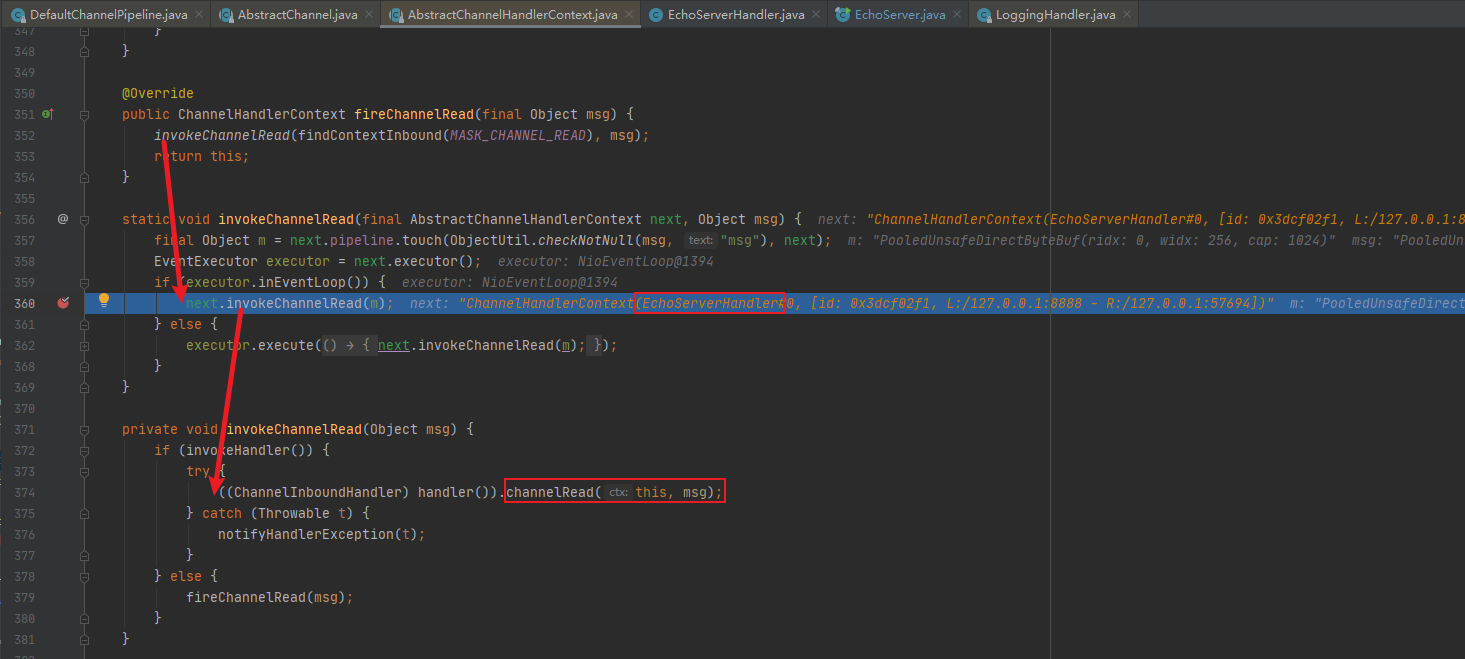
fireChannelRead 方法
在read方法中,循环调用 ServerSocket 的 pipeline的fireChannelRead 方法,开始执行管道中的 handler的ChannelRead方法

这里就开始执行handler调用链了
经过dubug(多次),可以看到会反复执行多个handler 的ChannelRead ,我们知道,pipeline 里面有4个handler ,分别是 Head,LoggingHandler,ServerBootstrapAcceptor,Tail。
-
我们需要在next是ServerBootstrapAcceptor的时候进入((ChannelInboundHandler) handler()).channelRead(this, msg);才会进入客户端连接注册到worker线程池的源码

-
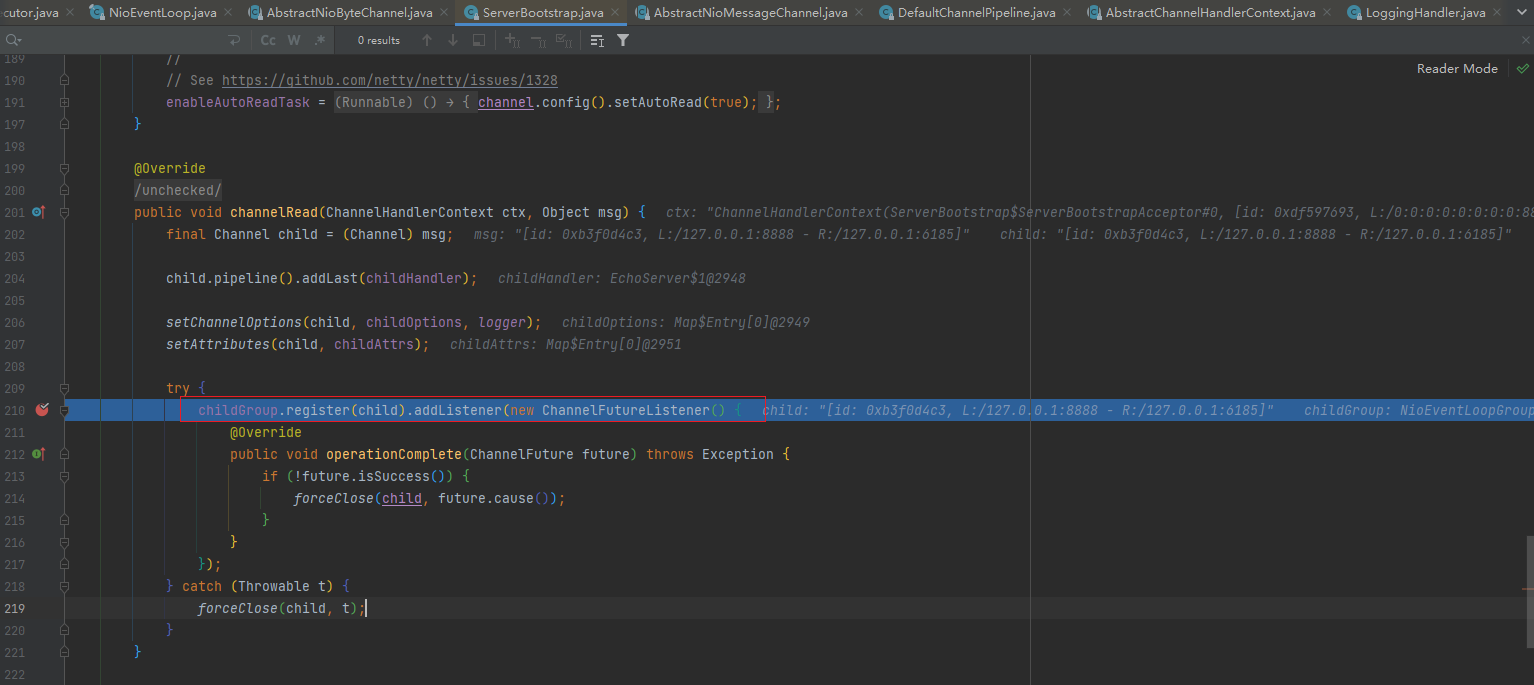
将客户端连接注册到worker 线程池 childGroup就是我们workerGroup
注册规则默认从第一个顺序注册,之前讲过
-
以上总结
- msg强转成Channel ,实际上就是NioSocketChannel .
- 添加NioSocketChannel 的 pipeline的 handler ,就是我们 main方法里面设置的childHandler 方法里的。
- 设置 NioSocketChannel的各种属性。
- 将该 NioSocketChannel注册到 childGroup 中的一个EventLoop 上,并添加一个监听器。
- 这个childGroup就是我们main方法创建的数组workerGroup。
-
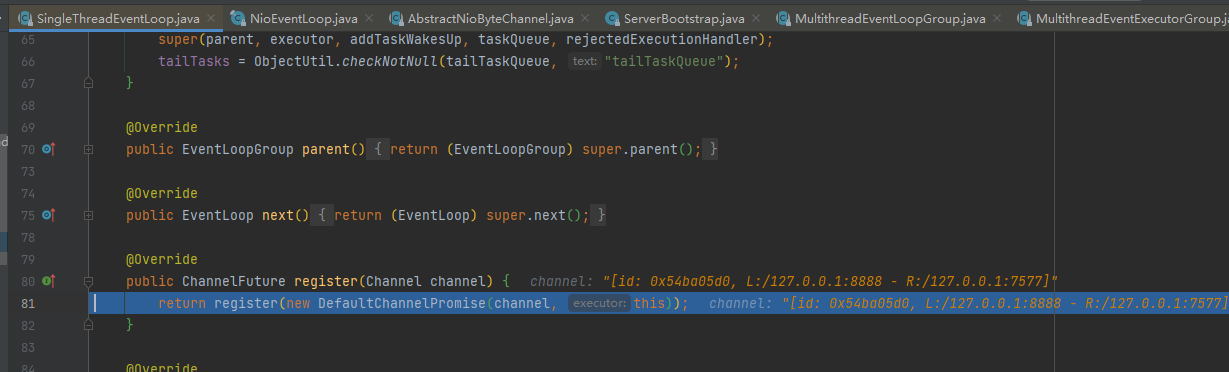
register方法

-
next()方法
会调用super的next方法
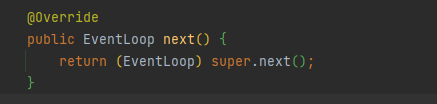
super的next方法
-
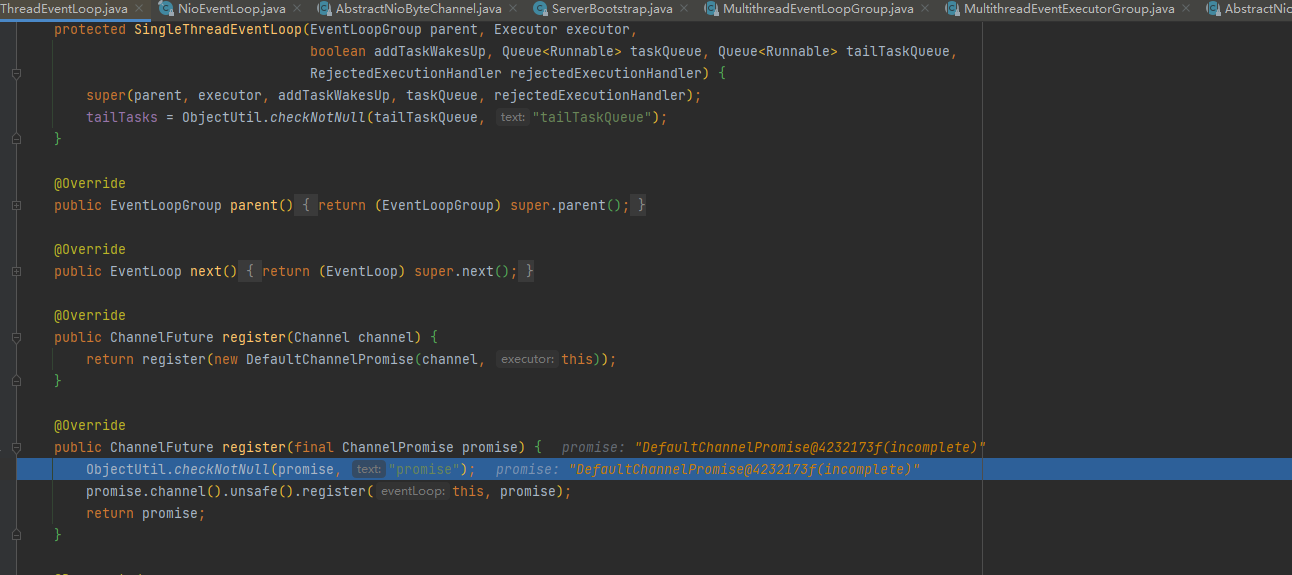
register方法
-
进入register方法又是一个register,继续进入
-
找到unsafe().register
-
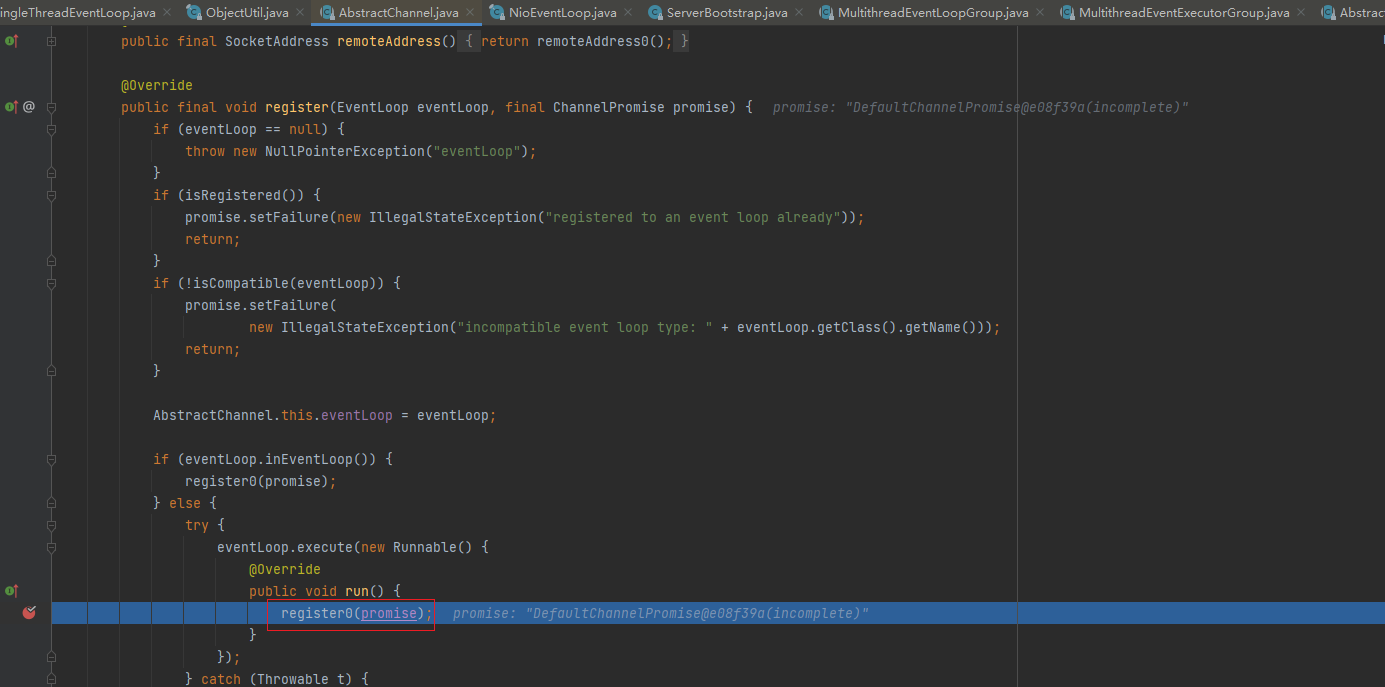
unsafe().register才是我们最终处理注册的方法,然后进入register0(promise)
-
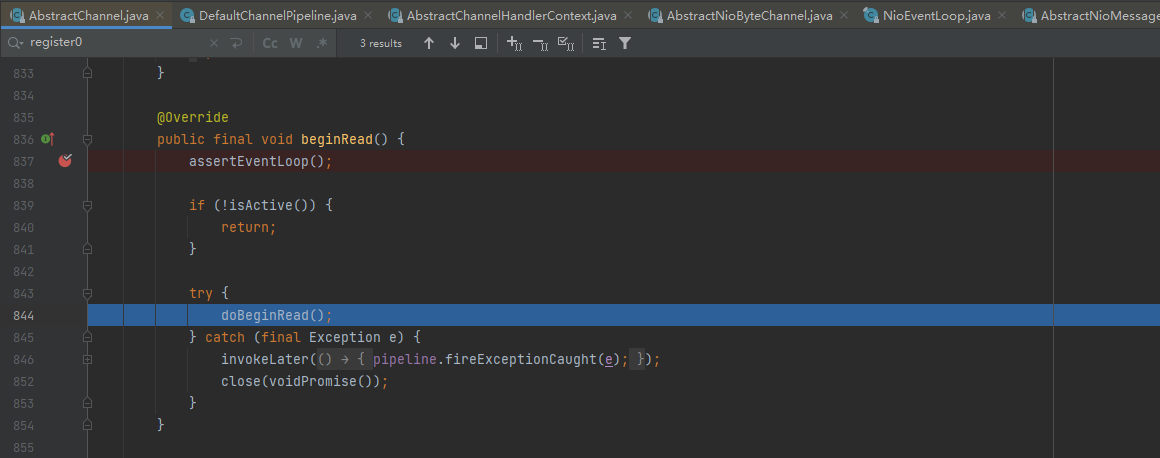
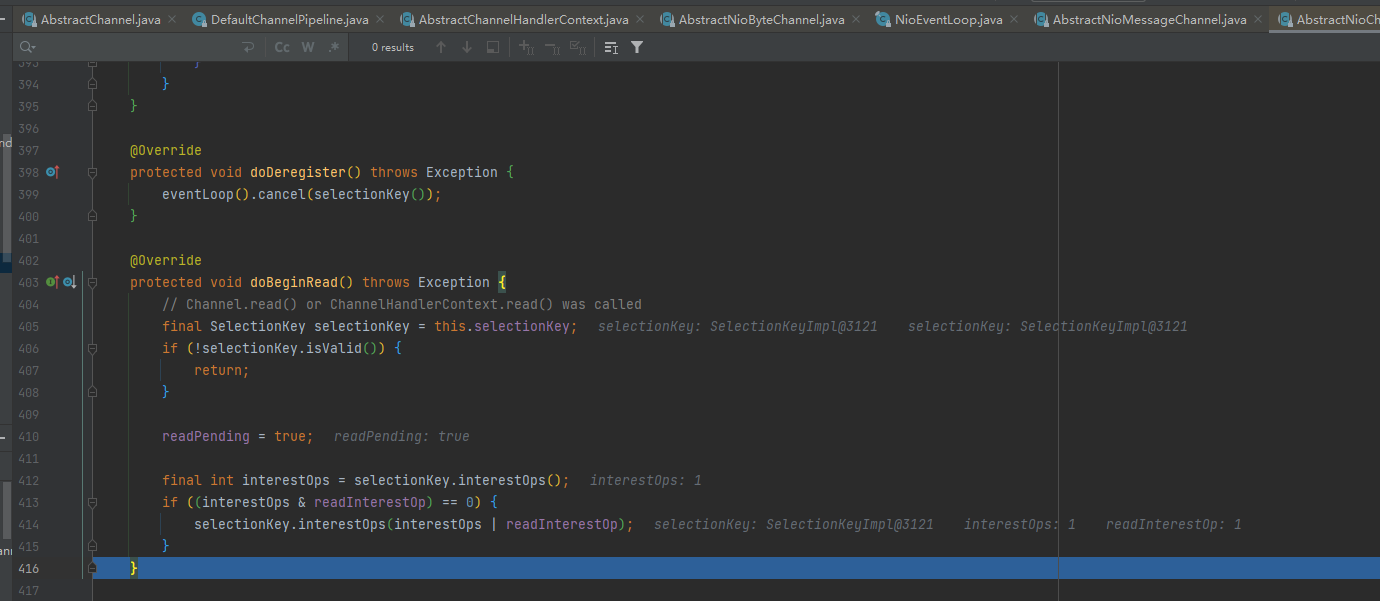
最终会调用doBeginRead方法,也就是 AbstractNioChannel类的方法
什么时候调用?
在执行doReadMessages及fireChannelRead时执行fireChannelReadComplete时调用
这个地方调试时,请把前面的断点都去掉,然后启动服务器就会停止在 doBeginRead(需要先放过该断点,然后浏览器请求,才能看到效果)
执行到这里时,针对于这个客户端的连接就完成了,接下来就可以监听读事件了,即workerGroup的NioEventLoop 可以执行processSelectedKeys然后runAllTasks
-
doBeginRead()
监听workerGroup的事件了
-
-
-
Netty 接受请求过程梳理
总体流程:接受连接……>创建一个新的NioSocketChanne–…>注册到一个 worker EventLoop 上.-…>注册selecot Read 事件。
- 服务器轮询Accept事件,获取事件后调用unsafe的 read 方法,这个unsafe是ServerSocket 的内部类,该方法内部由2部分组成
-
doReadMessages用于创建NioSocketChannel对象,该对象包装JDK的 Nio Channel 客户端。该方法会像创建ServerSocketChanel 类似创建相关的 pipeline , unsafe,config
- 随后执行执行 pipeline.fireChannelRead 方法,并将自己绑定到一个chooser选择器选择的 workerGroup 中的一个 EventLoop。并且注册一个0,表示注册成功,但并没有注册读(1)事件
4. Pipeline Handler HandlerContext创建源码剖析
4.1 源码剖析目的
Netty 中的 ChannelPipeline 、 ChannelHandler 和ChannelHandlerContext是非常核心的组件, 我们从源码来分析Netty 是如何设计这三个核心组件的,并分析是如何创建和协调工作的.
4.2 源码剖析
4.2.1 ChannelPipeline | ChannelHandler | ChannelHandlerContext介绍
4.2.1.1 三者关系
-
每当ServerSocket创建一个新的连接,就会创建一个Socket,对应的就是目标客户端。
-
每一个新创建的Socket 都将会分配一个全新的 ChanneIPipeline(以下简称 pipeline)
-
每一个ChannelPipeline内部都含有多个ChannelHandlerContext(以下简称 Context)
-
他们一起组成了双向链表,这些Context 用于包装我们调用addLast 方法时添加的ChannelHandler (以下简称handler)
-
关系图
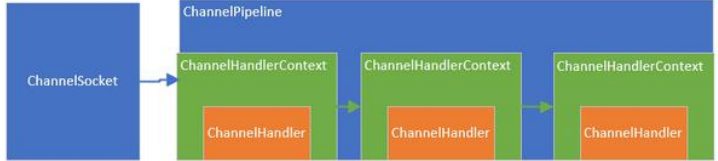
- 上图中:ChannelSocket 和 ChannelPipeline是一对一的关联关系,而 pipeline 内部的多个Context 形成了链表,Context只是对Handler 的封装。
- 当一个请求进来的时候,会进入Socket对应的 pipeline,并经过 pipeline 所有的 handler,对,就是设计模式中的
过滤器模式。
4.1.2.2 ChannelPipeline作用及设计
-
pipeline 的接口设计
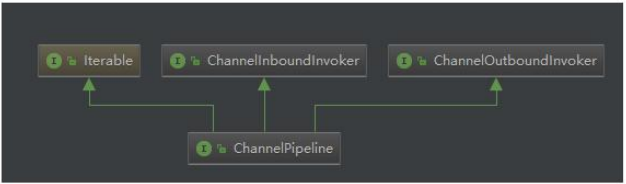
可以看到该接口继承了inBound,outBound,lterable接口,表示他可以调用敷据出站的方法和入站的方法,同时也能遍历内部的链表
-
部分方法
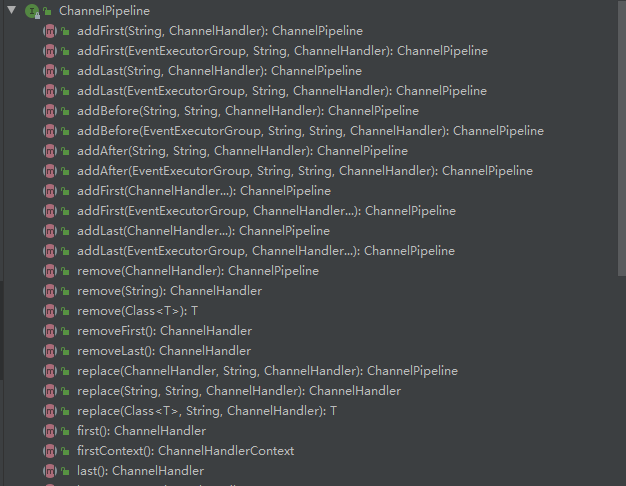
看看他的几个代表性的方法,基本上都是针对handler链表的插入,追加,删除,替换操作,类似是一个LinkedList。同时,也能返回channel(也就是 socket)
-
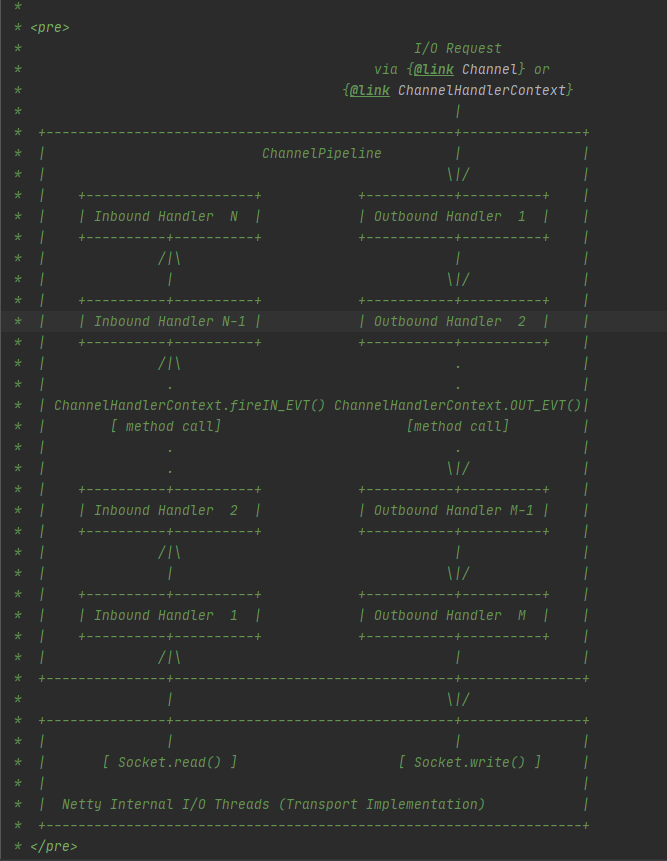
在pipeline的接口文档上,提供了一幅图
出站和入站的理解:
- 入站:数据进入Pipeline
- 出站:数据出Pipeline
-
这是一个handler 的 list,handler 用于处理或拦截入站事件和出站事件,pipeline 实现了过滤器的高级形式,以便用户控制事件如何处理以及handler在 pipeline中如何交互。
-
上图描述了一个典型的 handler 在 pipeline 中处理I/О事件的方式,IO事件由inboundHandler或者outBounidHlandler 处理,并通过调用ChannelHandlerContext.fireChannelRead方法转发给其最近的处理程序。

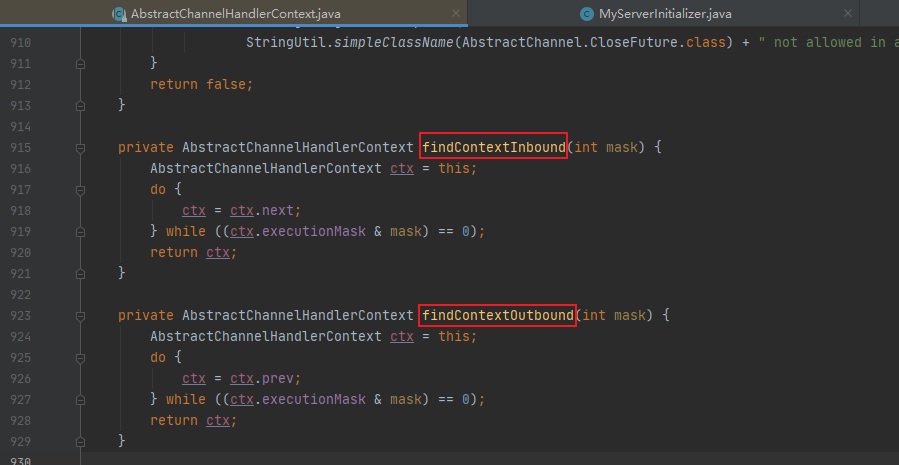
- 入站调用findContextInbound–入站从头节点往尾节点执行
- 会调用findContextInbound(int mask)方法,从头至尾遍历InboundHandler,注意,只遍历Inbound操作;
- 出站调用findContextOutbound–出站从尾节点往头节点执行
- 会调用findContextOutbound(int mask),从尾到头遍历OutboundHandler,这时只有OutBound操作被执行
- 入站调用findContextInbound–入站从头节点往尾节点执行
-
入站事件由入站处理程序以自下而上的方向处理,如图所示。入站处理程序通常处理由图底部的Ⅰ/ O线程生成入站数据。入站数据通常从如SocketChannel.read(ByteBuffer)获取。
-
通常一个pipeline 有多个handler,例如,一个典型的服务器在每个通道的管道中都会有以下处理程序
- 协议解码器–将二进制数据转换为.Java对象。
- 协议编码器–将.Java.对象转换为二进制数据。
- 业务逻辑处理程序–执行实际业务逻辑〔例如数据库访问)
-
你的业务程序不能将线程阻塞,会影响IO 的速度,进而影响整个Netty程序的性能。如果你的业务程序很快,就可以放在IO线程中,反之,你需要异步执行(使用taskQueen或者scheduleTaskQueen执行)。或者在添加 handler的时候添加一个线程池,例如:
//下面这个任务执行的时候,将不会阻塞IO线程,执行的线程来自group 线程池
pipeline.addLast(group,“handler”, new MyBusinessLogicHandler());
4.1.2.3 ChannelHandler作用及设计
-
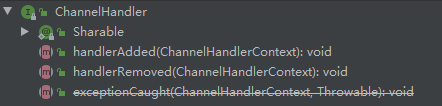
ChannelHandler的两个重要方法:
handlerAdded: 当把 ChannelHandler添加到pipeline时被调用handlerRemoved:当从pipeline中移除时调用exceptionCaught(已过时):当处理过程中在 pipeline发生异常时调用
-
ChannelHandler 的作用就是处理IO事件或拦截IO 事件,并将其转发给下一个处理程序ChannelHandler。Handler 处理事件时分入站和出站的,两个方向的操作都是不同的,因此,Netty定义了两个子接口继承ChannelHandler
-
ChannelInboundHandler:处理入站的Handler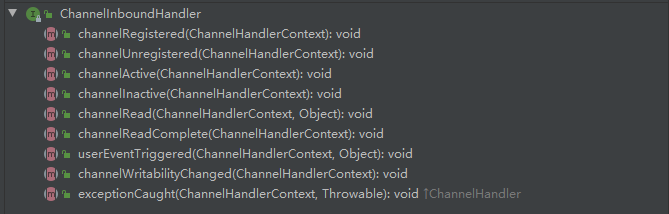
channelActive用于当Channel处于活动状态时被调用:channelRead当从Channel读取数据时被调用等等方法。- 程序员需要重写一些方法,当发生关注的事件,需要在方法中实现我们的业务逻辑,因为当事件发生时,Netty 会回调对应的方法。
-
ChannelOutboundHandler:处理出站的Handler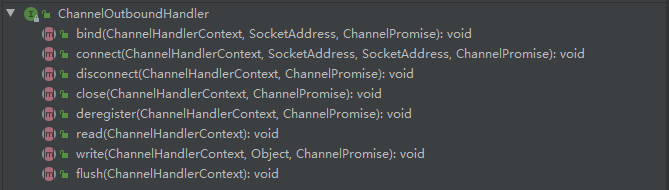
bind方法,当请求将Channel绑定到本地地址时调用- close方法,当请求关闭Channel时调用等等
- 出站操作都是一些连接和写出数据类似的方法。
-
ChannelDuplexHandler:既能处理出站又能处理入站事件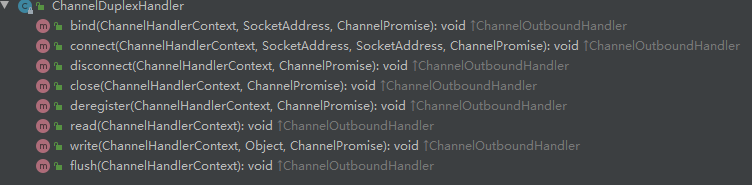
- 间接实现了入站接口并直接实现了出站接口。
- 是一个通用的能够同时处理入站事件和出站事件的类。
- 尽量不要使用:容易出现出站和入站调度的混淆
-
4.1.2.4 ChannelHandlerContext作用及设计
-
ChannelHandlerContext UML图
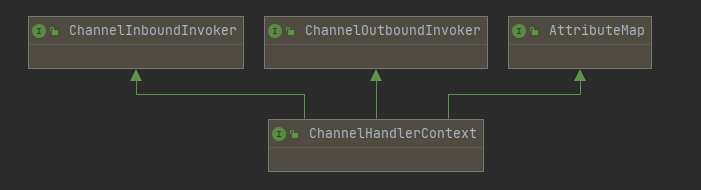
ChannelHandlerContext继承了出站方法调用接口和入站方法调用接口
- 这两个invoker就是针对入站或出站方法来的,就是在入站或出站 handler 的外层再包装一层,达到在方法前后拦戴并做一些特定操作的目的
-
ChannelInboundInvoker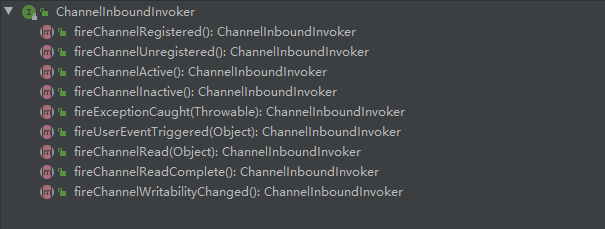
-
ChannelOutboundInvoker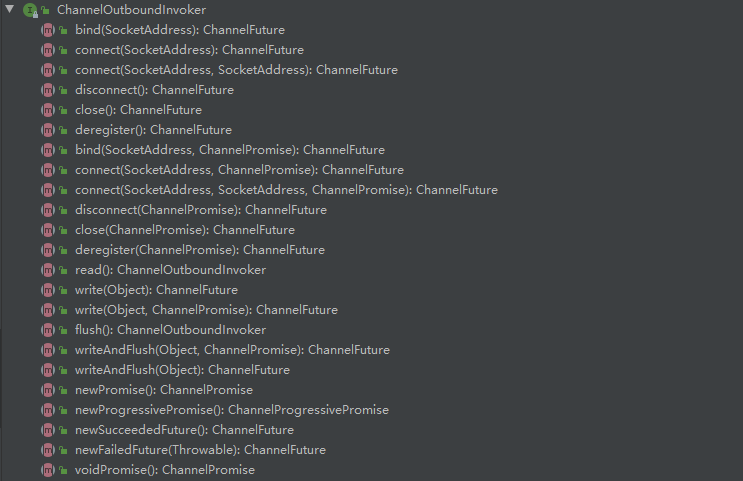
-
ChannelHandlerContext 方法
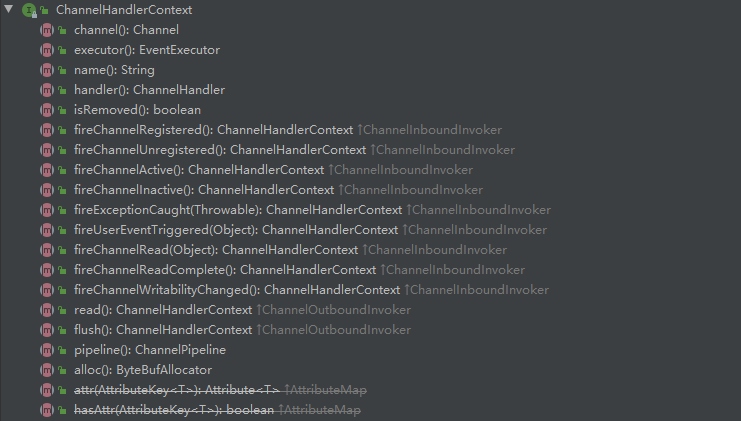
- ChannelHIandlerContext不仅仅时继承了他们两个的方法,同时也定义了一些自己的方法
- 这些方法能够获取Context 上下文环境中对应的比如 channel,executor,handler , pipeline,内存分配器,关联的handler是否被删除。
- Context就是包装了handler 相关的一切,以方便Context可以在 pipeline方便的操作 handler
4.2.2 ChannclPipeline | ChannelHandler | ChannelHandlerContext创建过程
分为3个步骤来看创建的过程:
- 任何一个ChannelSocket创建的同时都会创建一个pipeline.
- 当用户或系统内部调用pipeline的 ad***方法添加 handler 时,都会创建一个包装这handler 的 Context.
- 这些Context在pipeline中组成了双向链表。
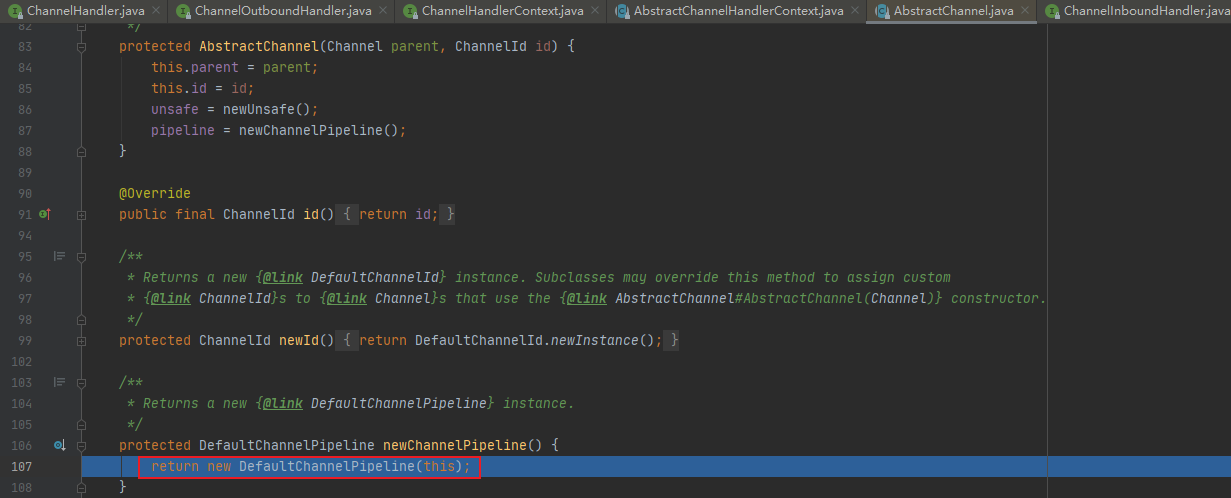
4.2.2.1 Socket创建的时候创建pipeline
在SocketChannel 的抽象父类AbstractChannel 的构造方法中被创建
    /**
     * Creates a new instance.
     *
     * @param parent
     *        the parent of this channel. {@code null} if there's no parent.
     */
    protected AbstractChannel(Channel parent) {


        this.parent = parent;
        id = newId();
        unsafe = newUnsafe();
        pipeline = newChannelPipeline();
    }
-
打上断点开始debug

-
newChannelPipeline()
创建了一个DefaultChannelPipeline
-
DefaultChannelPipeline

- 将channel赋值给channel字段,用于pipeline操作channel。
- 创建一个future和 promise,用于异步回调使用。
- 创建一个inbound 的 tailContext,创建一个既是 inbound类型又是 outbound类型的 headContext.
- 最后,将两个Context互相连接。形成双向链表。
- tailContext和HeadContext非常的重要,所有 pipeline中的事件都会流经他们,
- 这里构建了只有头尾两个节点的双向链表
4.2.2.2 在add**添加处理器的时候创建Context**
看下DefaultChannelPipeline 的 addLast方法如何创建的Context,代码如下
-
打上断点开始debug

-
addLast(executor, null, h)
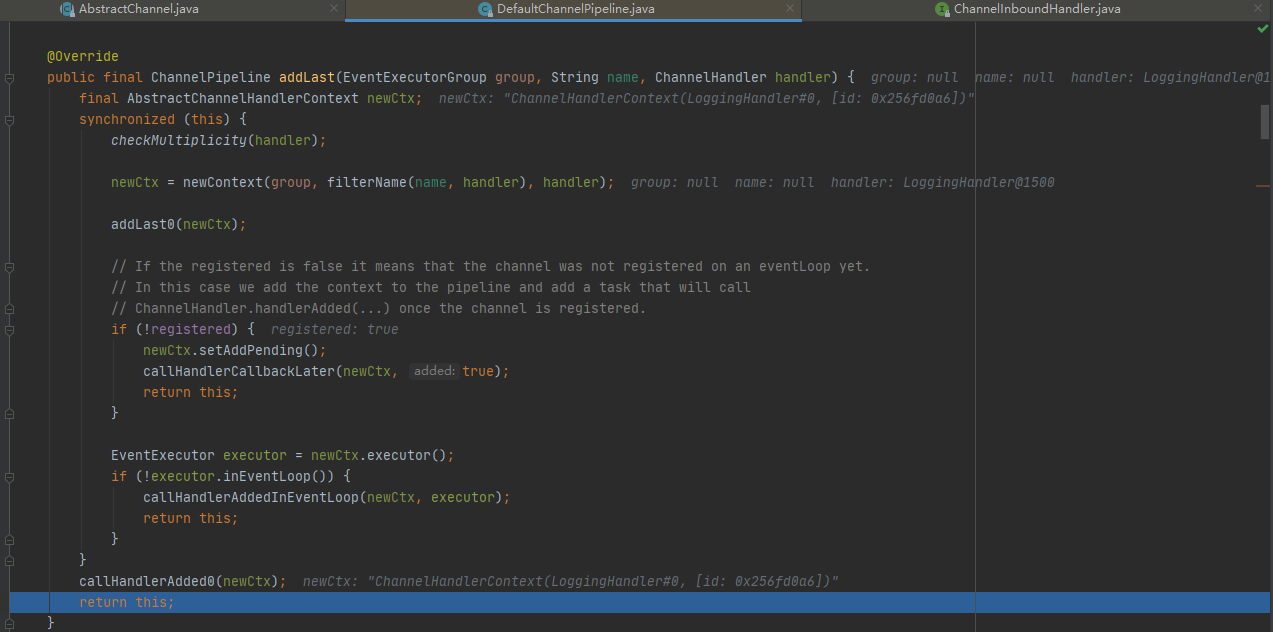
- pipeline添加 handler,参数是线程池,name是null,handler 是我们或者系统传入的 handler。Netty为了防止多个线程导致安全问题,同步了这段代码,步骤如下:
- 检查这个 handler实例是否是共享的,如果不是,并且已经被别的 pipeline使用了,则抛出异常。
- 调用newContext(group, filterName(name, handler), handler)方法,创建一个Context。从这里可以看出来了,每次添加一个handler都会创建一个关联Context.
- 调用addLast方法,将Context追加到链表中。
- 如果这个通道还没有注册到 selecor 上,就将这个Context添加到这个pipeline 的待办任务中。当注册好了以后,就会调用callHandlerAdded0方法(默认是什么都不做,用户可以实现这个方法)。
- 到这里,针对三对象创建过程,了解的差不多了,和最初说的一样,每当创建ChannelSocket 的时候都会创建一个绑定的 pipeline,一对一的关系,创建 pipeline 的时候也会创建tail节点和 head 节点,形成最初的链表。 tail是入站inbound 类型的 handler,head 既是 inbound 也是 outbound 类型的 handler。在调用 pipeline的 addLast方法的时候,会根据给定的 handler创建一个Context,然后,将这个Context 插入到链表的尾端(tail前面)。到此就OK 了
5. ChannelPipeline 调度 handler 的源码剖析
    @Override
    public final ChannelPipeline fireChannelActive() {


        AbstractChannelHandlerContext.invokeChannelActive(head);
        return this;
    }
5.1 分析目的
- 当一个请求进来的时候,ChannelPipeline是如何调用内部的这些handler的呢?我们一起来分析下。
- 首先,当一个请求进来的时候,会第一个调用pipeline 的相关方法,如果是入站事件,这些方法由fire 开头,表示开始管道的流动。让后面的handler继续处理
5.2 源码剖析
说明:
当浏览器输入 http://localhost:8888。可以看到会执行handler
在Debug时,可以将断点下在 DefaultChannelPipeline 类的fireChannelRead方法为例
同理其他fireChannelxxx方法也是这个原理
    @Override
    public final ChannelPipeline fireChannelRead(Object msg) {


        AbstractChannelHandlerContext.invokeChannelRead(head, msg);
        return this;
    }
-
先启动服务端,再启动一个客户端,执行invokeChannelActive(head)
注意:这里就是传入的头结点,因为是入站

-
invokeChannelActive(head)
- 因为有4个handler ,分别是 Head,LoggingHandler,EchoServerHandler,Tail。
- 我们自定义的在第三个,所以我们放行之前的handler,直到next为我们想要的为止,这里就是EchoServerHandler
-
channelActive(this)
我们进入channelActive()方法,就直接到我们自定义handler的channelRead方法了
-
说明
-
可以看出来,这些方法都是inbound 的方法(因为我们示例的是fireChannelRead所以是入站,出站可以调用其他方法),也就是入站事件,调用静态方法传入的也是inbound 的类型headhandler。这些静态方法则会调用head 的ChannelInboundInvoker接口的方法fireChannelxxx方法,再然后调用handler的真正方法
-
如果这些都是出站的实现,但是调用的是 outbound类型的 tail handler来进行处理,因为这些都是outbound事件。
如果自定义Handler继承了ChannelOutboundHandlerAdapter并重写了以下方法
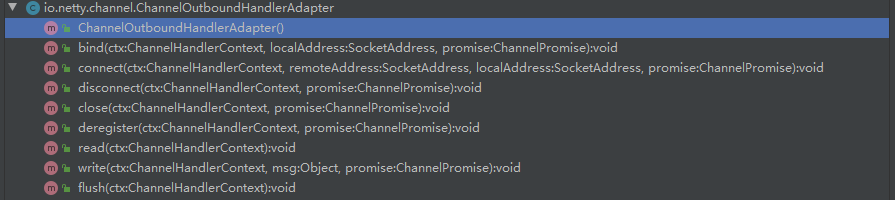
-
出站是 tail开始,入站从 head 开始。
- 因为出站是从内部向外面写,从tail 开始,能够让前面的 handler进行处理,防止 handler被遗漏,比如编码。
-
反之,入站当然是从head 往内部输入,让后面的 handler 能够处理这些输入的数据。
- 比如解码。因此虽然head 也实现了outbound 接口,但不是从head 开始执行出站任务
-
5.3 图解如何调度
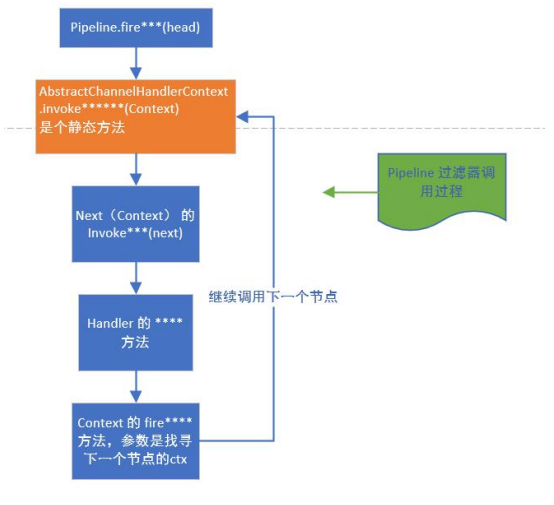
- pipeline 首先会调用Context 的静态方法 fireXXx,并传入Context
- 然后,静态方法调用Context 的 invoker方法,而 invoker方法内部会调用该Context所包含的Handler的真正的XXX方法,调用结束后,如果还需要继续向后传递,就调用Context的 fireXXX2方法,循环往复。
5.4 ChannelPipeline 调度 handler 梳理
- Context 包装 handler,多个 Context 在 pipeline 中形成了双向链表,入站方向叫inbound,由 head 节点开始,出站方法叫 outbound ,由tail 节点开始。
- 而节点中间的传递通过 AbstractChannelHandlerContext 类内部的fire系列方法,找到当前节点的下一个节点不断的循环传播。是一个过滤器形式完成对handler的调度
6. Netty 心跳(heartbeat)服务源码剖析
6.1 源码剖析目的
Netty 作为一个网络框架,提供了诸多功能,比如编码解码等,Netty 还提供了非常重要的一个服务-----心跳机制heartbeat。通过心跳检查对方是否有效,这是RPC框架中是必不可少的功能。下面我们分析一下Netty内部心跳服务源码实现。
6.2 源码剖析
本次剖析的源码是之前写的
Netty核心技术六–Netty核心模块组件的第12章节
Netty心跳检测机制及实现
6.2.1 说明
Netty 提供了 IdleStateHandler ,ReadTimeoutHandler,WriteTimeoutHandler三个Handler 检测连接的有效性,重点分析 IdleStateHandler .
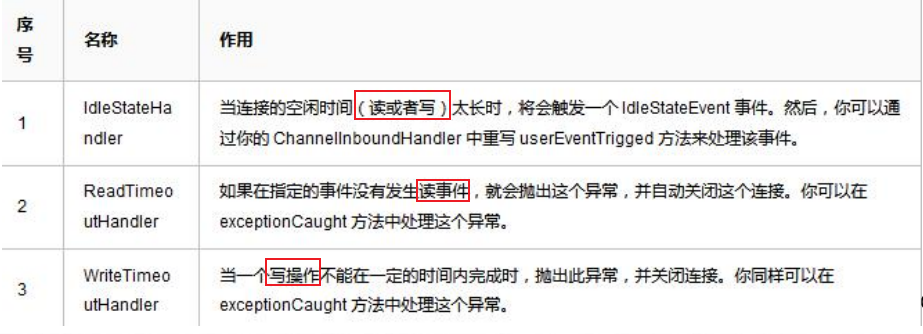
ReadTimeout事件和WriteTimeout事件都会白动关闭连接,而且,属于异常处理,所以,这里只是介绍一下,我们重点看IdleStateHandler。
6.2.2 IdleStateHandler源码剖析
6.2.2.1 四个重要属性
解释observeOutput:
假设:当你的客户端应用每次接收数据是10秒,而你的写空闲时间是 5 秒,那么,当你数据还没有写出的时候,写空闲时间触发了。实际上是不合乎逻辑的。因为你的应用根本不空闲。
    private final boolean observeOutput;//是否考虑出站时较慢的情况。默认值是false
    private final long readerIdleTimeNanos;//读事件空闲时间,0则禁用事件(纳秒)

    private final long writerIdleTimeNanos;//写事件空闲时间,0则禁用事件(纳秒)

    private final long allIdleTimeNanos;//读或写空闲时间,0则禁用事件(纳秒)
6.2.2.2 handlerAdded方法
当该handler被添加到pipeline中时,则调用initialize方法
6.2.2.2.1 前置知识-System.nanoTime()
发现是调用的本地方法
public static native long nanoTime();
6.2.2.2.2 System.nanoTime()使用
package site.zhourui.nioAndNetty.netty.source.echo;
public class Test {


    public static void main(String[] args) throws Exception {


        System.out.println(System.nanoTime());
        Thread.sleep(1000);
        System.out.println(System.nanoTime());
    }
}
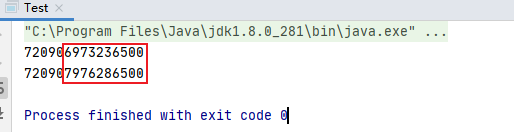
执行结果
结论1000毫秒=1秒=10亿纳秒
6.2.2.2.3 initialize方法
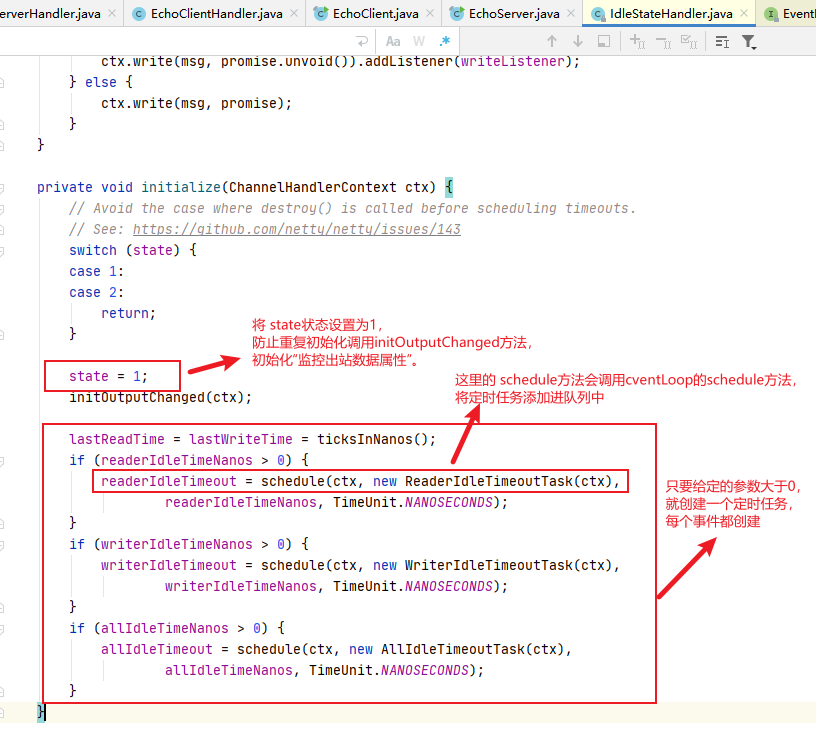
6.2.2.3 该类内部的3个定时任务类
ReaderIdleTimeoutTask:读超时任务WriterIdleTimeoutTask:写超时任务AllIdleTimeoutTask:读或写超时任务
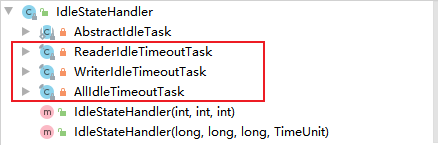
这3个定时任务分别对应读,写,读或者写事件。共有一个父类(
AbstractldleTask)。这个父类提供了一个模板方法
6.2.2.3.1 共有父类AbstractldleTask
- 实现了Runnable接口
- 在执行run方法时首先判断ctx.channel().isOpen(),
- 当通道关闭了,就不执行任务了。
- 反之,执行子类的run方法
    private abstract static class AbstractIdleTask implements Runnable {


        private final ChannelHandlerContext ctx;

        AbstractIdleTask(ChannelHandlerContext ctx) {


            this.ctx = ctx;
        }

        @Override
        public void run() {


            if (!ctx.channel().isOpen()) {


                return;
            }

            run(ctx);
        }

        protected abstract void run(ChannelHandlerContext ctx);
    }
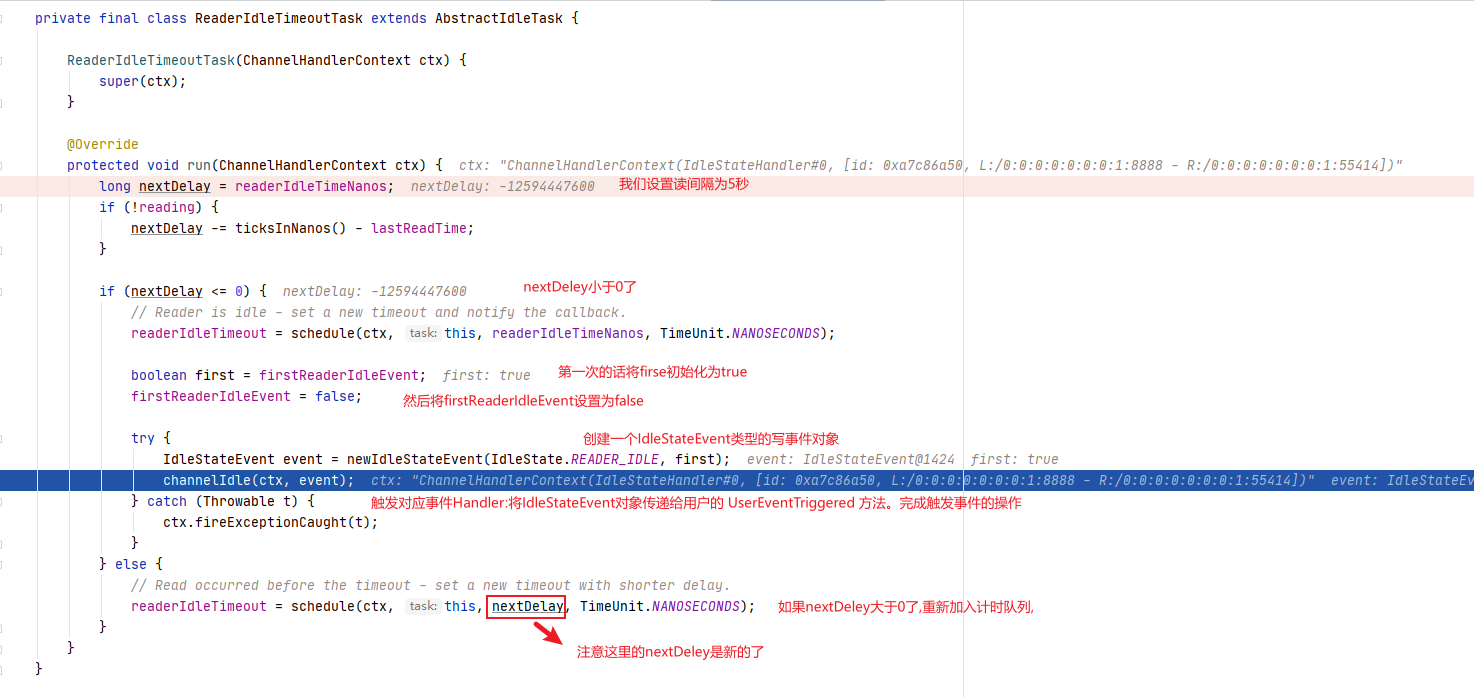
6.2.2.3.2 读事件的run方法(即ReaderldleTimeoutTask 的run方法)分析
- 得到用户设置的超时时间。
- 如果读取操作结束了(执行了channelReadComplete方法设置)就用当前时间(ticksInNanos())减去给定时间(readerIdleTimeNanos)和最后一次读时间(lastReadTime)(执操作的时间行了 channelReadComplete方法设置)
- 如果小于0,就触发事件。
- 反之,继续放入队列。间隔时间是新的计算时间。
- 触发的逻辑是:首先将任务再次放到队列,时间是刚开始设置的时间,返回一个 promise对象,用于做取消操作。然后,设置 first 属性为 false ,表示,下一次读取不再是第一次了,这个属性在channelRead 方法会被改成true.
- 创建一个IdleStateEvent类型的写事件对象,将此对象传递给用户的 UserEventTriggered 方法。完成触发事件的操作。
- 总的来说,每次读取操作都会记录一个时间,定时任务时间到了,会计算当前时间和最后一次读的时间的间隔,如果间隔超过了设置的时间,就触发UserEventTriggered 方法。//前面介绍ldleStateHandler说过,可以看一下
    private final class ReaderIdleTimeoutTask extends AbstractIdleTask {


        ReaderIdleTimeoutTask(ChannelHandlerContext ctx) {


            super(ctx);
        }

        @Override
        protected void run(ChannelHandlerContext ctx) {


            long nextDelay = readerIdleTimeNanos;
            if (!reading) {


                nextDelay -= ticksInNanos() - lastReadTime;
            }

            if (nextDelay <= 0) {


                // Reader is idle - set a new timeout and notify the callback.
                //用于取消任务promise
                readerIdleTimeout = schedule(ctx, this, readerIdleTimeNanos, TimeUnit.NANOSECONDS);

                boolean first = firstReaderIdleEvent;
                firstReaderIdleEvent = false;

                try {


                    //再次提交任务
                    IdleStateEvent event = newIdleStateEvent(IdleState.READER_IDLE, first);
                    //触发用户Handler
                    channelIdle(ctx, event);
                } catch (Throwable t) {


                    ctx.fireExceptionCaught(t);
                }
            } else {


                // Read occurred before the timeout - set a new timeout with shorter delay.
                readerIdleTimeout = schedule(ctx, this, nextDelay, TimeUnit.NANOSECONDS);
            }
        }
    }
6.2.2.3.2.1 debug分析
-
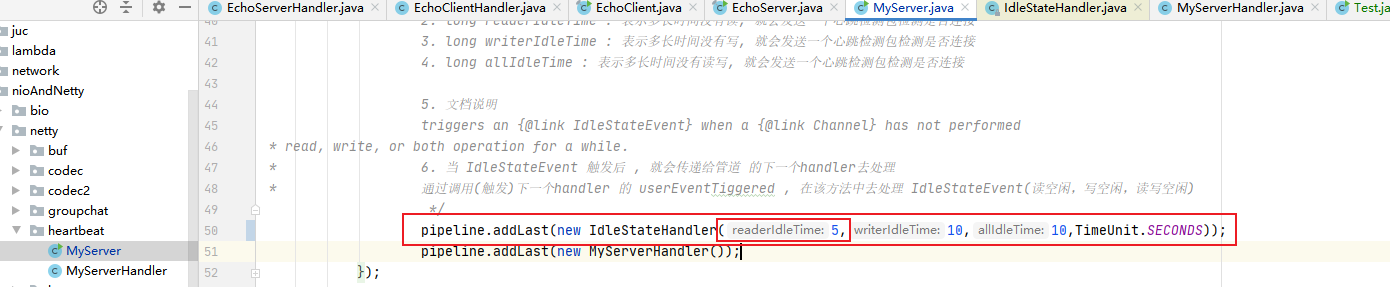
将心跳服务端的读间隔时间设置得小一点,方便观察读事件
-
服务端启动后使用浏览器连接服务端,打上断点
-
一直debug进入方法来到我们自定义Handler的userEventTriggered方法,IdleStateEvent拿到为
READER_IDLE读事件,然后做我们自定义的处理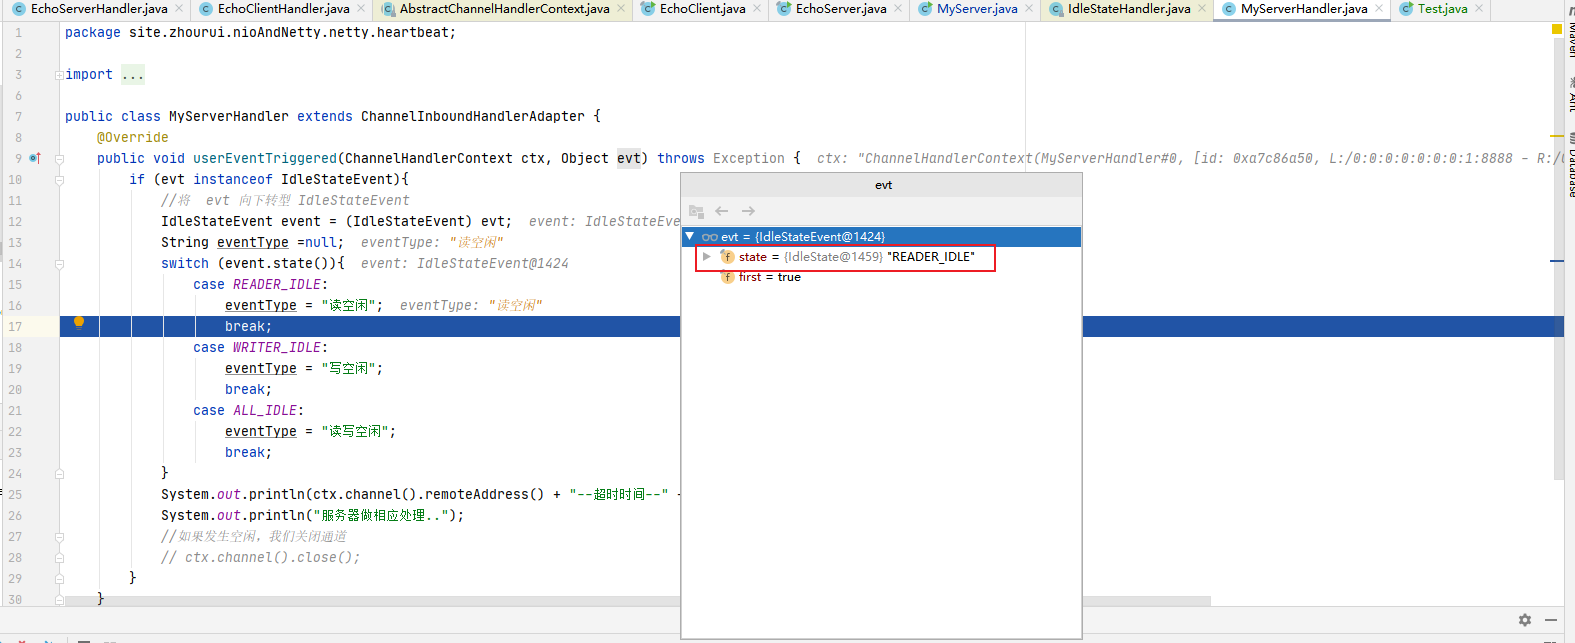
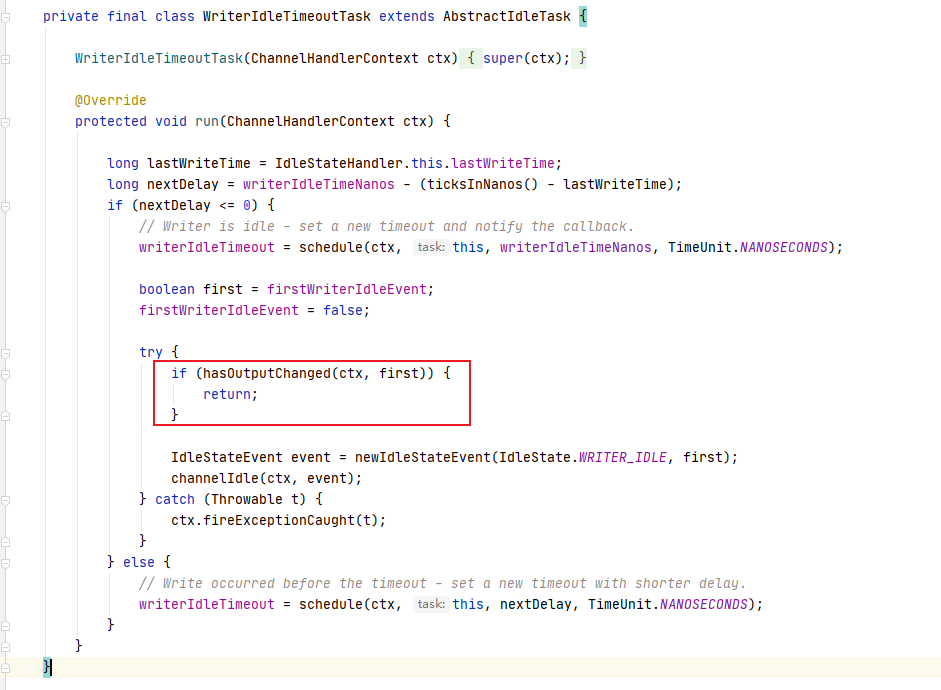
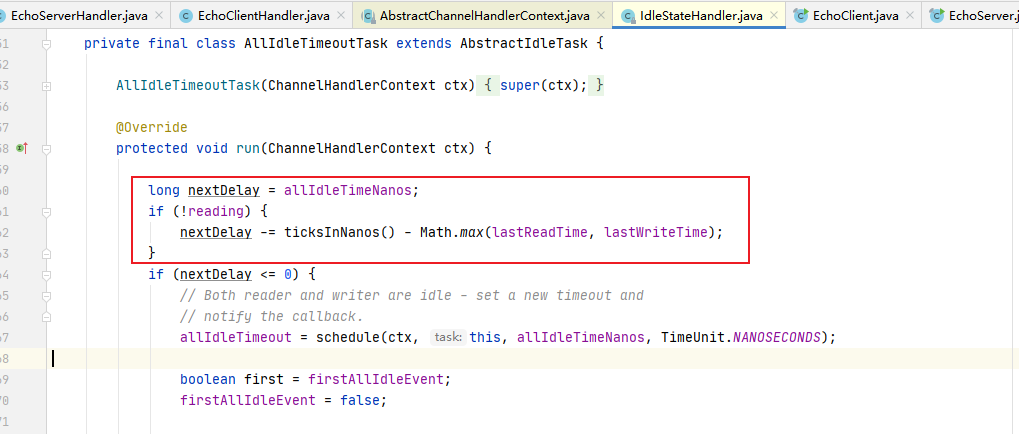
6.2.2.3.3 写事件的run方法(即WriterldleTimeoutTask 的run方法)分析
写任务的run 代码逻辑基本和读任务的逻辑一样,唯一不同的就是有一个针对出站较慢数据的判断
hasOutputChanged
6.2.2.3.3.1 debug分析
-
将心跳服务端的写间隔时间设置得小一点,方便观察写事件
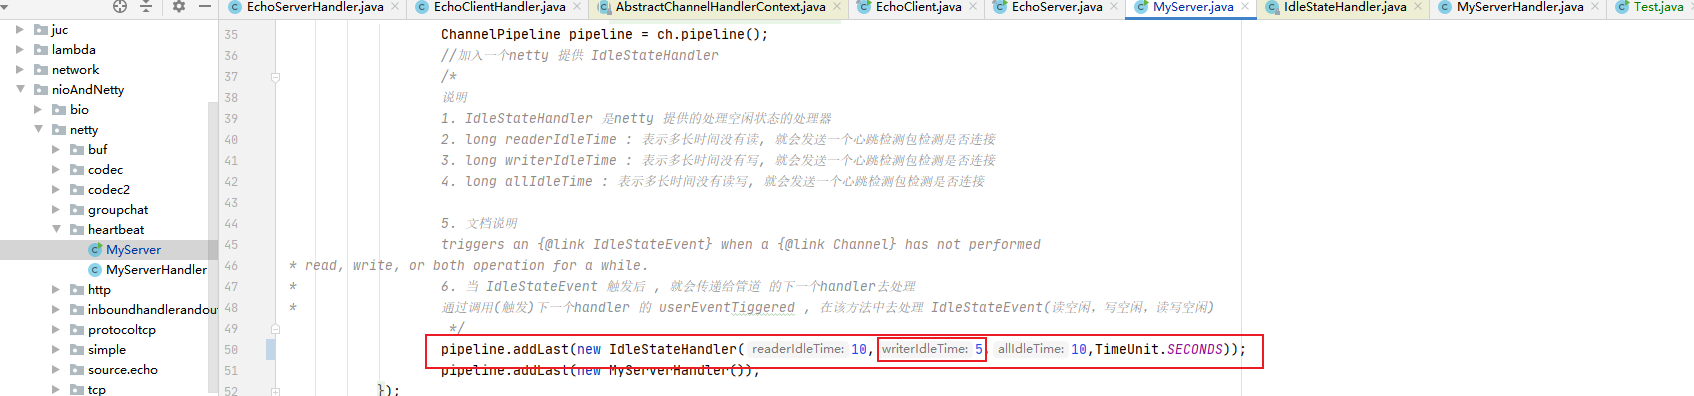
-
服务端启动后使用浏览器连接服务端,打上断点
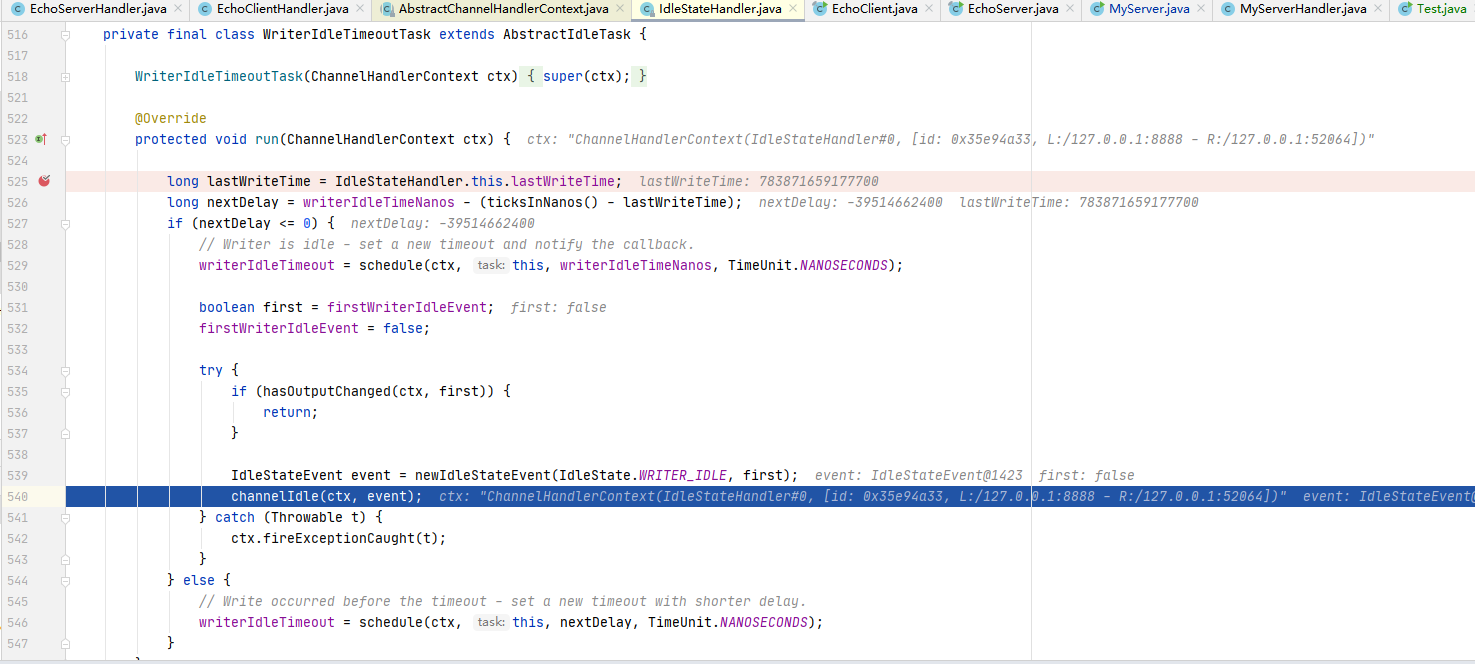
-
一直debug进入方法来到我们自定义Handler的userEventTriggered方法,IdleStateEvent拿到为
WRITER_IDLE写事件,然后做我们自定义的处理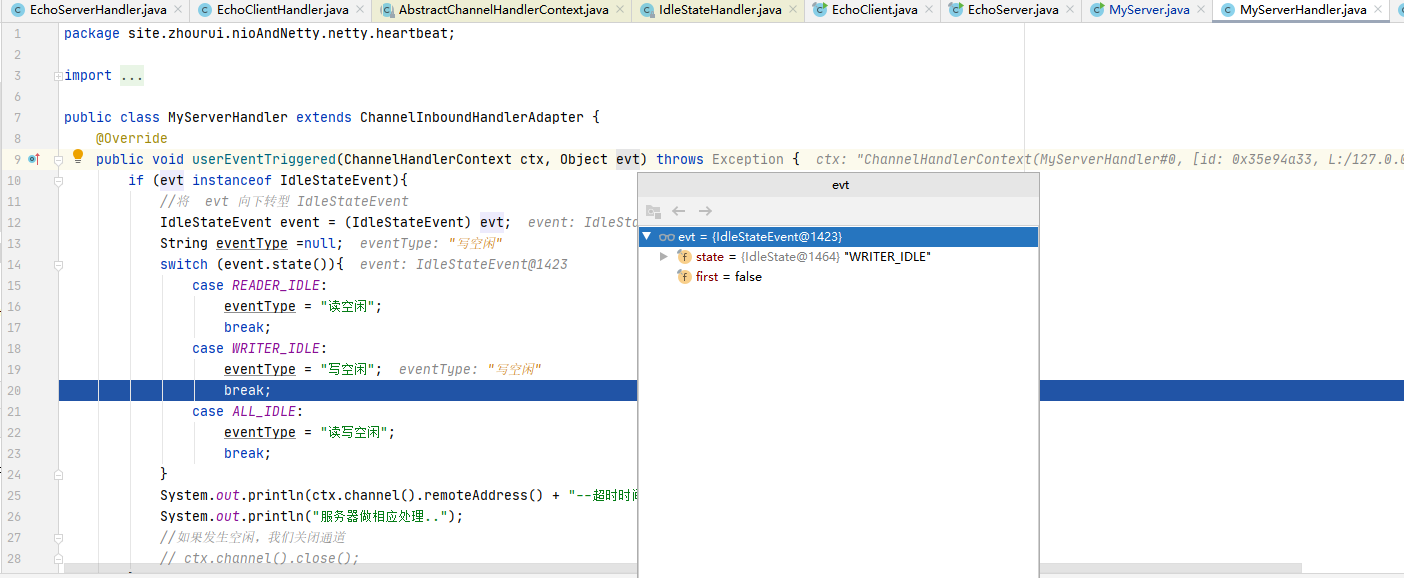
6.2.2.3.4 读写事件的run方法(即AllldleTimeoutTask 的run方法分析
表示这个监控着所有的事件。当读写事件发生时,都会记录。代码逻辑和写事件的的基本一致
需要大家注意的地方是 :
当前时间(ticksInNanos())减去最后一次写或读的时间(谁最大的时间)、若大于0,说明超时了
**这里的时间计算是取读写事件中的最大值来的。**然后像写事件一样,判断是否发生了写的慢的情况。
6.2.2.3.5.1 debug分析
-
将心跳服务端的所有间隔时间设置得小一点,方便观察所以事件

-
服务端启动后使用浏览器连接服务端,打上断点
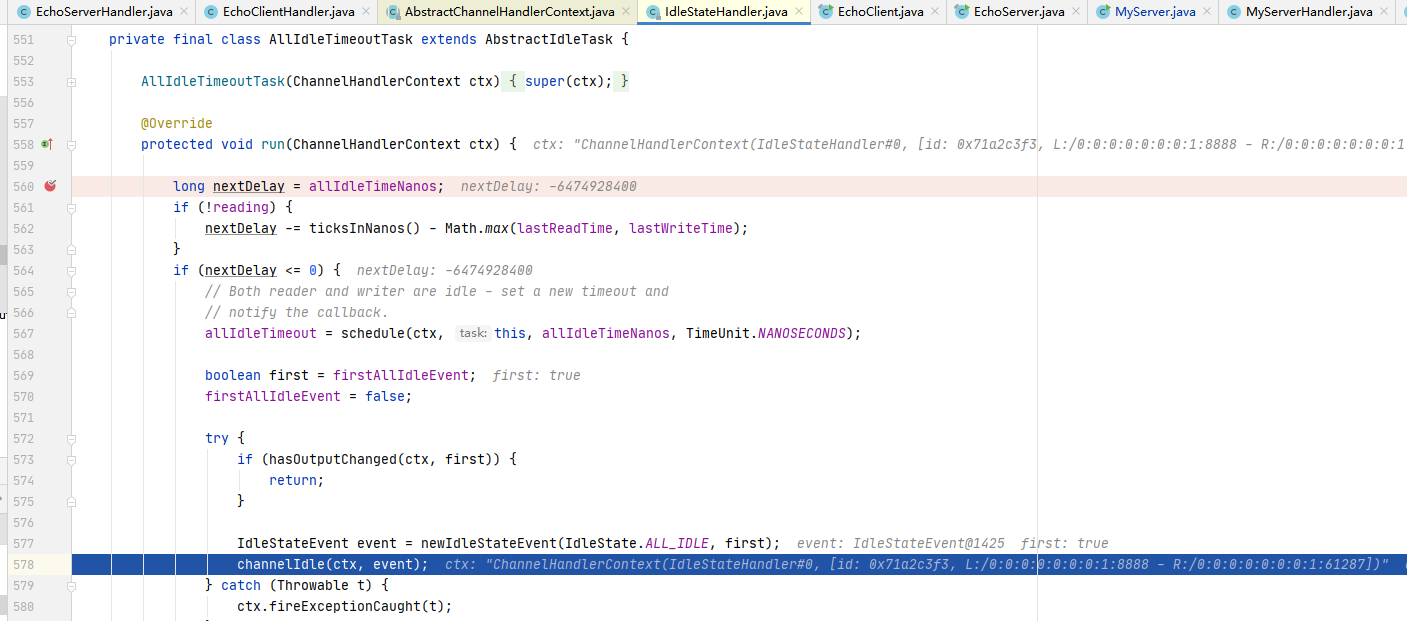
-
一直debug进入方法来到我们自定义Handler的userEventTriggered方法,IdleStateEvent拿到为
ALL_IDLE读写事件,然后做我们自定义的处理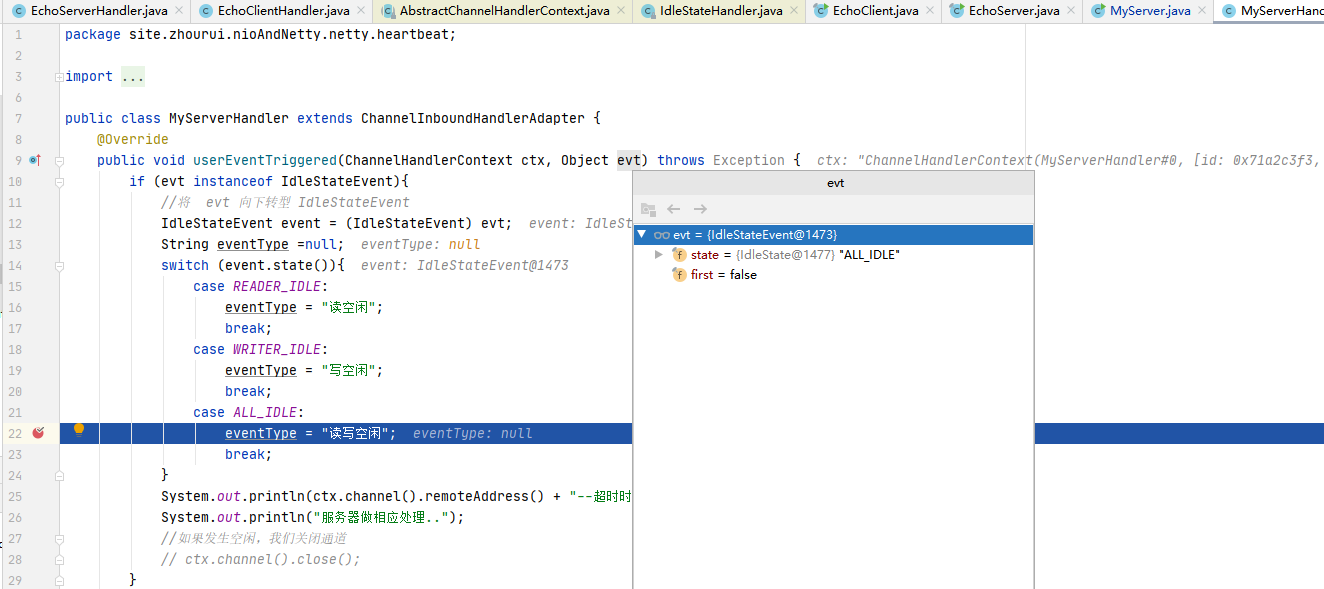
6.2.3 小结Netty的心跳机制
- ldleStatcHandler可以实现心跳功能,当服务器和客户端没有任何读写交互时,并超过了给定的时间,则会触发用户 handler的uscrEventTriggered方法。用户可以在这个方法中尝试向对方发送信息,如果发送失败,则关闭连接。
- ldleStatcHandler的实现基于EventLoop 的定时任务,每次读写都会记录一个值,在定时任务运行的时候,通过计算当前时间和设置时间和上次事件发生时间的结果,来判断是香空闲。
- 内部有3个定时任务,分别对应读事件,写事件,读写事件。通常用户监听读写事件就足够了。
- 同时,IdleStatcHandler内部也考虑了一些极端情况:客户端接收缓慢,一次接收数据的速度超过了设置的空闲时间。Netty通过构造方法中的
observeOutput属性来决定是否对出站缓冲区的情况进行判断。 - 如果出站缓慢,Netty不认为这是空闲,也就不触发空闲事件。==但第一次无论如何也是要触发的。因为第一次无法判断是出站缓慢还是空闲。==当然,出站缓慢的话,可能造成OOM , OOM比空闲的问题更大。
- 所以,当你的应用出现了内存溢出,OOM之类,并且写空闲极少发生(使用了observeOutput为 true) ,那么就需要注意是不是致据出站速度过慢。
- 还有一个注意的地方:就是ReadTimeoutHandler,它继承自IdleStateHandler,当触发读空闲事件的时候,就触发ctx.fireExceptionCaught 方法,并传入一个 ReadTimeoutException。然后关闭Socket。
- 而 **WriteTimeoutHandler 的实现不是基于IdleStateHandler的,他的原理是,当调用 write方法的时候,会创建一个定时任务,任务内容是根据传入的promise的完成情况来判断是否超出了写的时间。**当定时任务根据指定时间开始运行,发现 promise的 isDone方法返回false,表明还没有写完,说明超时了,则抛出异常。当write方法完成后,会打断定时任务。
7. Netty 核心组件 EventLoop 源码剖析
7.1 源码剖析目的
Echo第一行代码就是 :EventLoopGroup bossGroup = new NioEventLoopGroup(1);下面分析其最核心的组件 EventLoop。
7.2 源码剖析
7.2.1 EventLoop 介绍
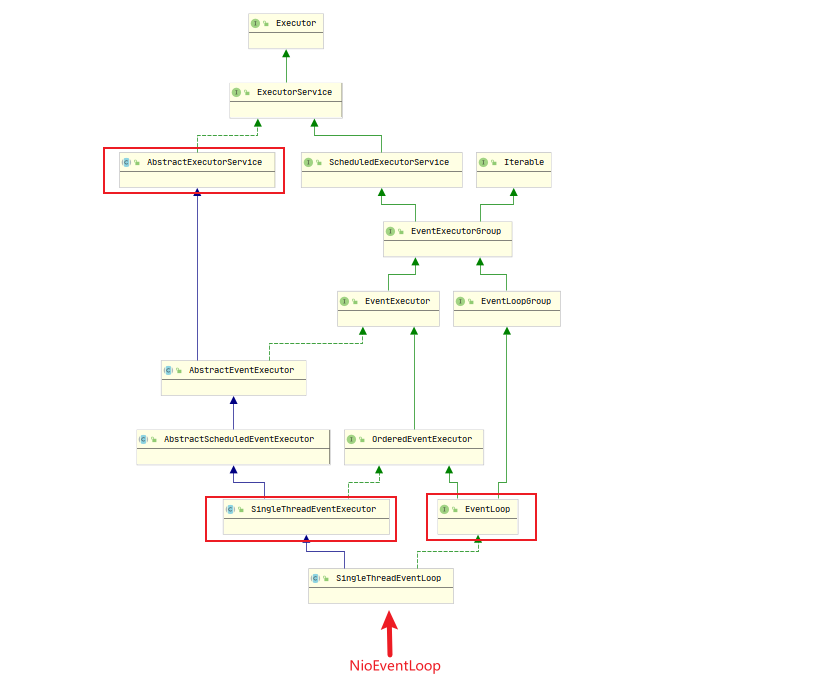
说明重点:
-
ScheduledExecutorService接口表示是一个定时任务接口,EventLoop可以接受定时任务。
-
EventLoop接口:Netty接口文档说明该接口作用:一旦Channel 注册了,就处理该Channel对应的所有I/O操作。 -
SingleThreadEventExecutor:表示这是一个单个线程的线程池 -
EventLoop是一个单例的线程池,里面含有一个死循环的线程不断的做着3件事情:每个EventLoop都可以绑定多个Channel,而每个Channel 始终只能由一个 EventLoop来处理
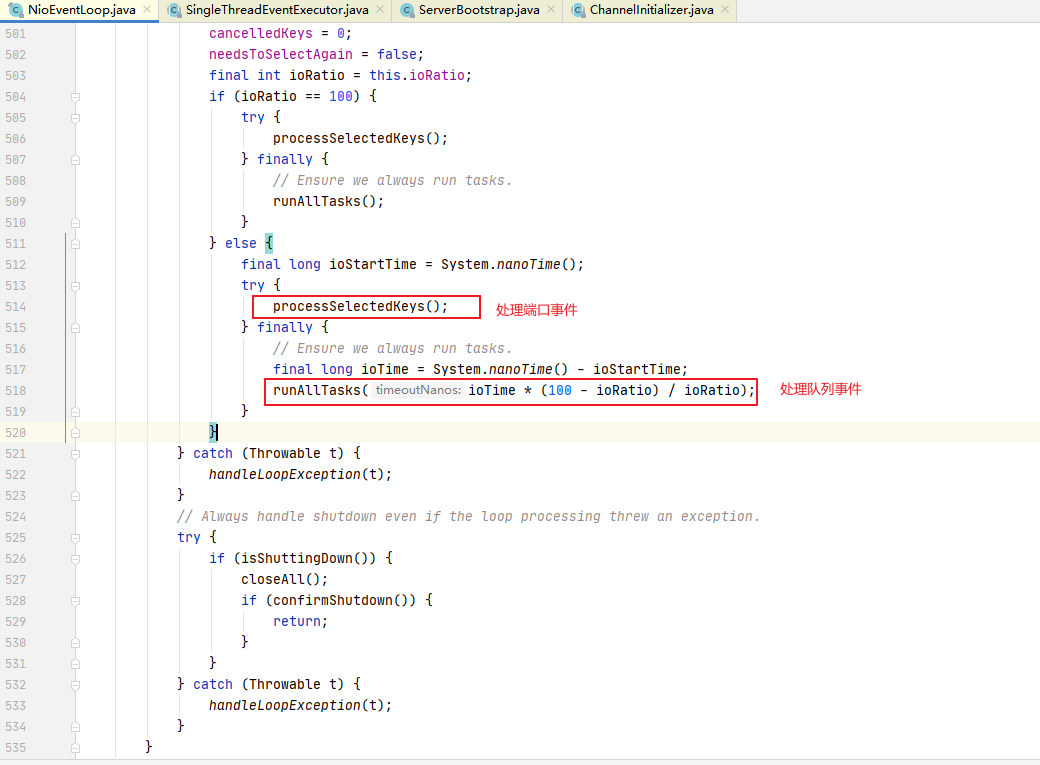
- 监听端口。
- 处理端口事件。
- 处理队列事件。
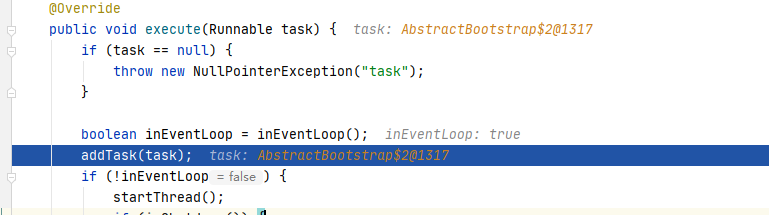
7.2.2 NioEventLoop的使用- execute方法源码剖析
在EventLoop的使用一般就是eventloop.execute(task);
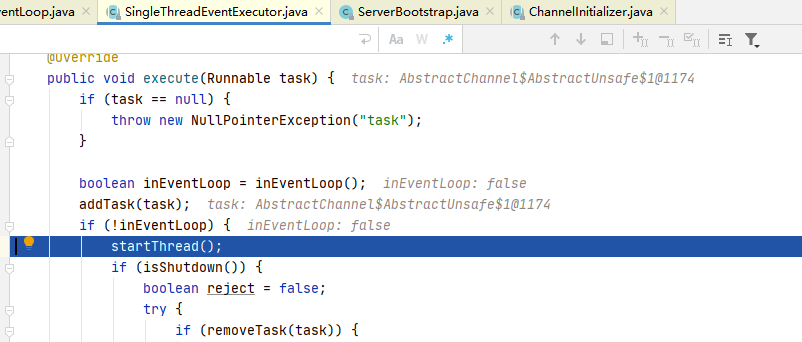
execute方法的实现(在SingleThreadEventExecutor类中)
在下图位置打上断点,启动一个服务端
说明:
首先判断该EventLoop的线程是否是当前线程,
if (!inEventLoop)
- 如果是,直接添加到任务队列中去
- 如果不是,则尝试启动线程(但由于线程是单个的,因此只能启动一次),随后再将任务添加到队列中去。
如果线程已经停止,并且删除任务失败,则执行拒绝策略,默认是抛出异常
UnsupportedOperationException。if (isShutdown())如果addTaskWakesUp是false,并且任务不是 NonWakeupRunnable类型的,就尝试唤醒 selector。这个时候,阻塞在selecor 的线程就会立即返回
if (!addTaskWakesUp && wakesUpForTask(task))可以下断点来追踪

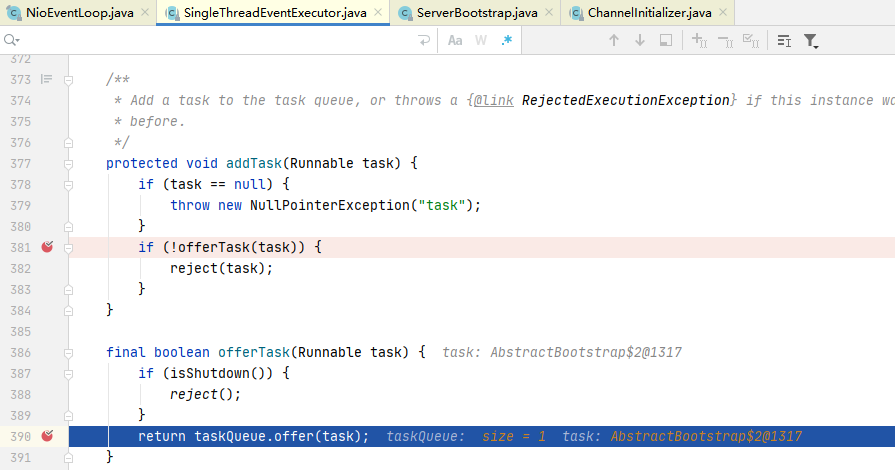
7.2.2.1 debug addTask和offerTask方法源码
-
execute执行到addTask(task)
-
addTask方法
准备将task向taskQueue中添加,添加不成功就采用拒接策略
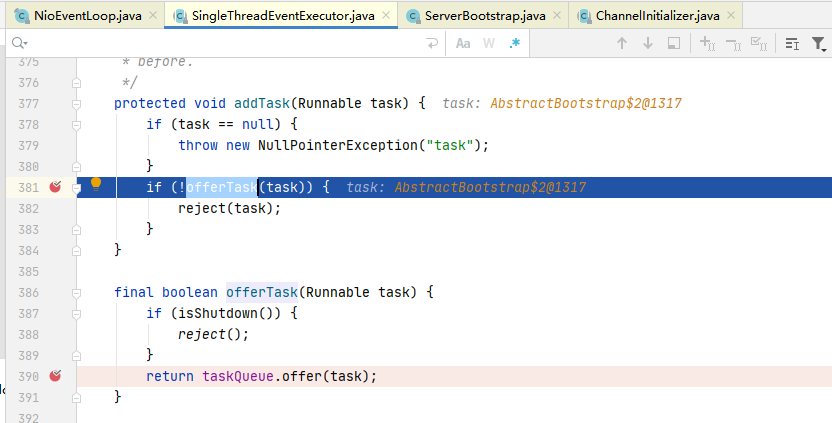
-
offerTask方法
如果isShutdown是false就添加到taskQueue中,为true就采用拒接策略
7.2.2.2 NioEventLoop的父类SingleThreadEventExecutor 的startThread方法
-
执行到startThread()
-
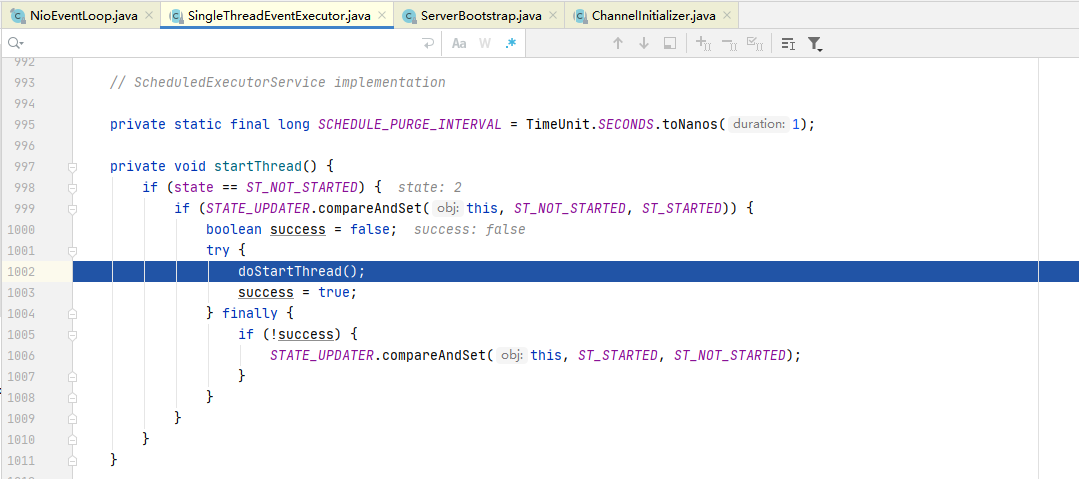
startThread()方法
说明:
- 该方法首先判断是否启动过了,保证 EventLoop只有一个线程
- 如果没有启动过,则尝试使用Cas 将 state状态改为
ST_STARTED,也就是已启动。 - 然后调用doStartThread 方法。如果失败,则进行回滚
-
doStartThread方法会调用run()方法
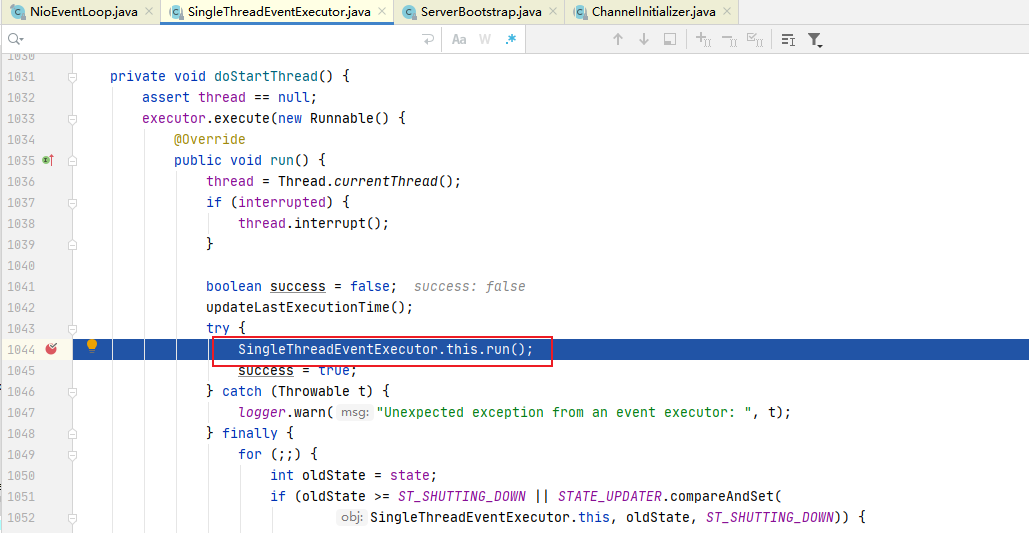
-
来到我们熟悉的自旋run方法了
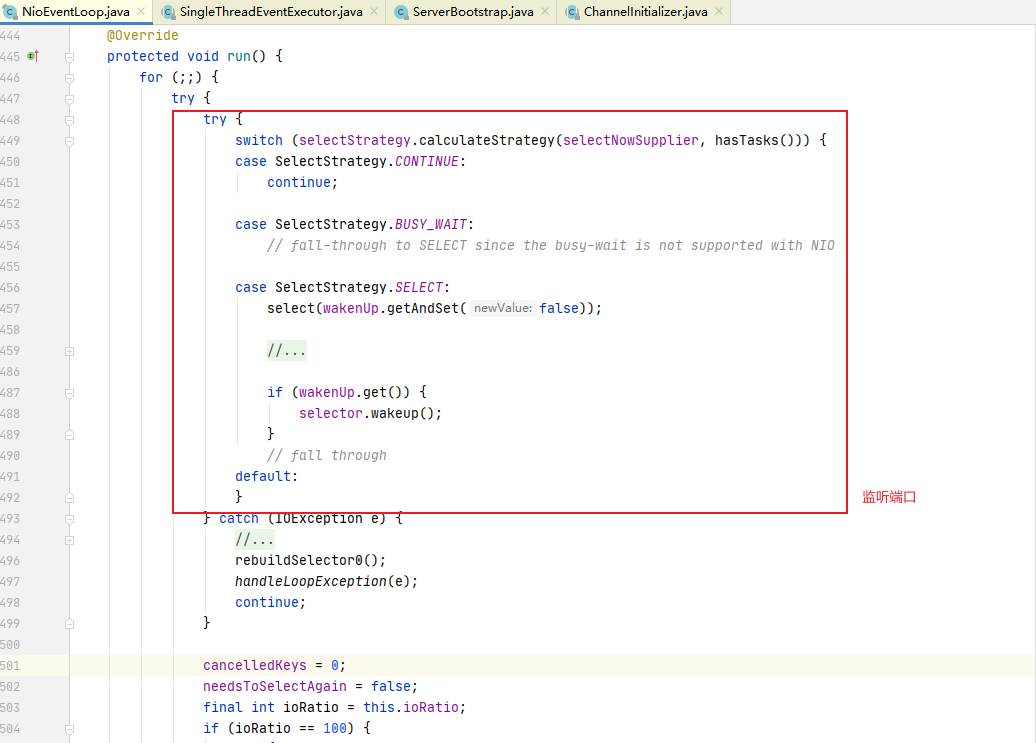
-
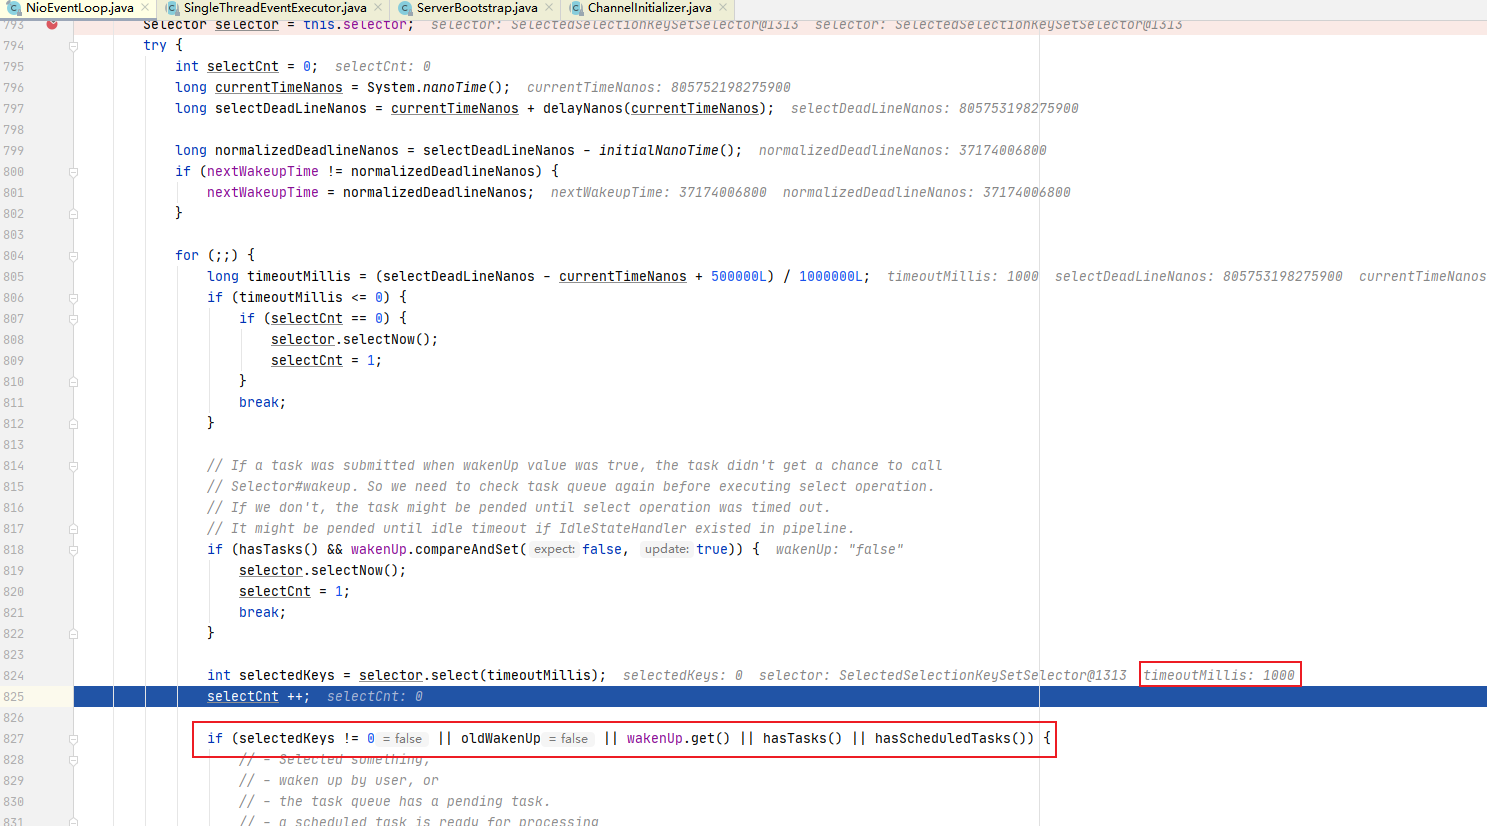
上面的三个方法我们就追一下select 方法(体现非阻塞)核心select 方法解析(其他两个方法都追过了,看前面)
说明:
- 调用selector 的 select方法,默认阻塞一秒钟
- 如果有定时任务,则在定时任务剩余时间的基础上在加上0.5秒进行阻塞。
- 当执行execute方法的时候,也就是添加任务的时候,唤醒 selector
- 防止: selector阻塞时间过长
7.3 EventLoop作为Netty的核心的运行机制小结
- 每次执行 execute方法都是向队列中添加任务。当第一次添加时就启动线程,执行 run方法,而 run方法是整个 EventLoop 的核心,就像EventLoop的名字一样,Loop Loop ,不停的 Loop , Loop做什么呢?做3件事情。
- 调用selector的 select 方法,默认阻塞一秒钟,如果有定时任务,则在定时任务剩余时间的基础上再加上0.5秒进行阻塞。当执行 execute方法的时候,也就是添加任务的时候,唤醒 selector,防止 selector阻塞时间过长。
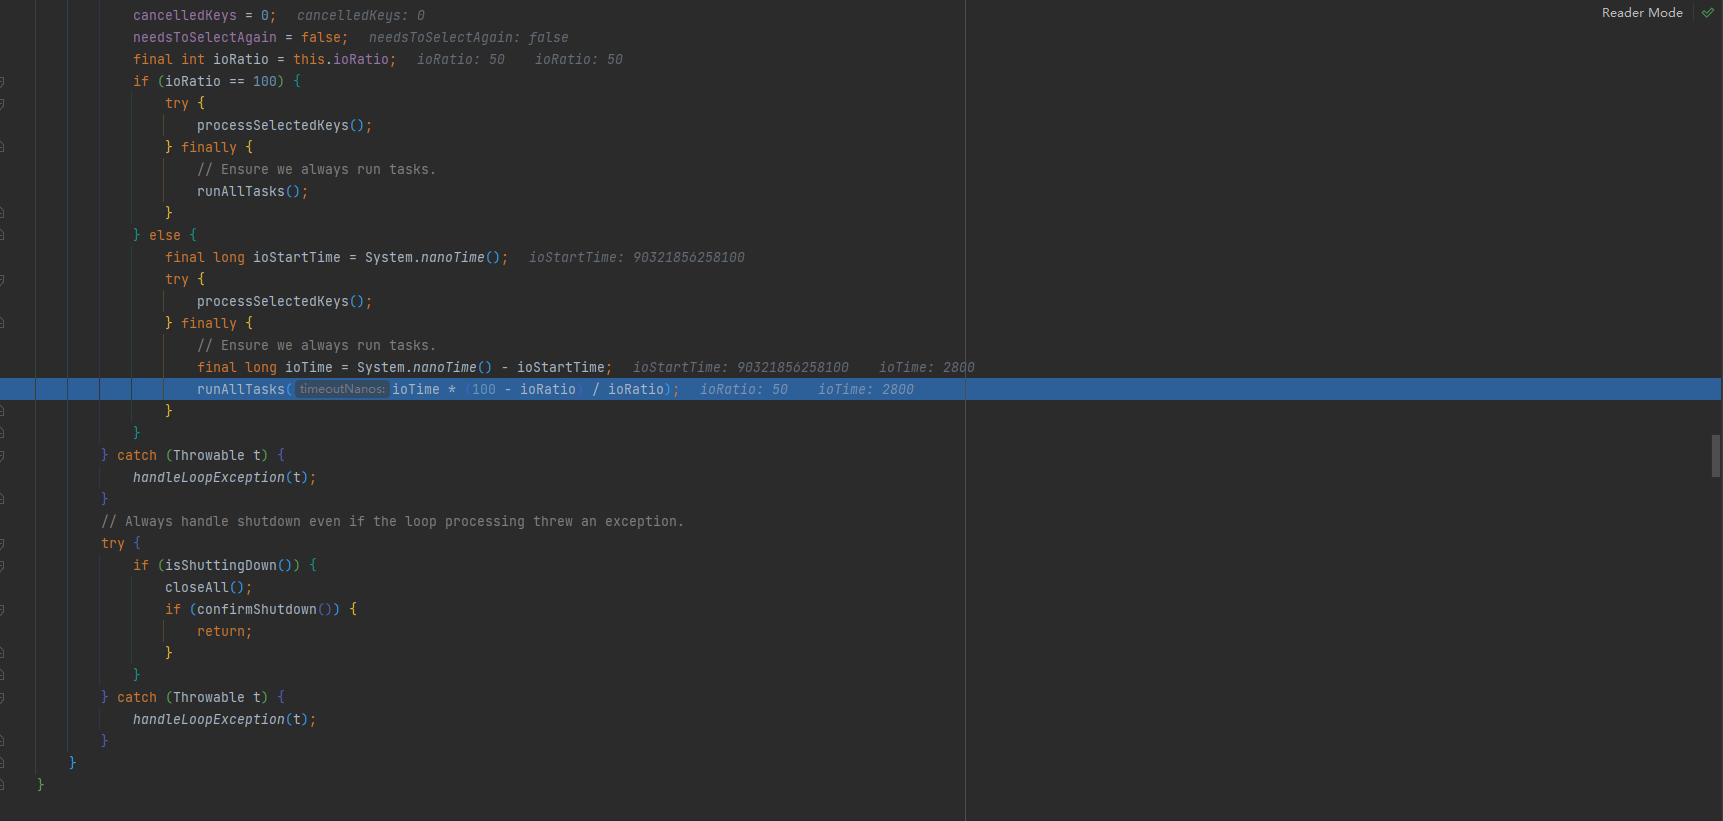
- 当selector返回的时候,回调用processSelectedKeys方法对selectKey进行处理。
- 当processSclectedKeys方法执行结束后,则按照 ioRatio的比例执行runAllTasks方法,默认是IO任务时间和非IO任务时间是相同的,你也可以根据你的应用特点进行调优。
- 比如非IO 任务比较多,那么你就将ioRatio调小一点,这样非IO任务就能执行的长一点。防止队列积攒过多的任务。
8. handler中加入线程池和Context中添加线程池的源码剖析
8.1 源码剖析目的
- 在Netty中做耗时的,不可预料的操作,比如数据库,网络请求,会严重影响Netty 对Socket 的处理速度。
- 而解决方法就是将耗时任务添加到异步线程池中。但就添加线程池这步操作来讲,可以有2种方式,而且这2种方式实现的区别也蛮大的。
- 处理耗时业务的第一种方式—handler中加入线程池
- 处理耗时业务的第二种方式—Contcxt中添加线程池
- 我们就来分析下两种方式
8.2 源码剖析
8.2.1 解决方案1 用户程序自定义的普通任务
8.2.1.1 EchoClient
说明:
- 一个简单的客户端,加入了我们自定义的EchoClientHandler
/*
 * Copyright 2012 The Netty Project
 *
 * The Netty Project licenses this file to you under the Apache License,
 * version 2.0 (the "License"); you may not use this file except in compliance
 * with the License. You may obtain a copy of the License at:
 *
 *   http://www.apache.org/licenses/LICENSE-2.0
 *
 * Unless required by applicable law or agreed to in writing, software
 * distributed under the License is distributed on an "AS IS" BASIS, WITHOUT
 * WARRANTIES OR CONDITIONS OF ANY KIND, either express or implied. See the
 * License for the specific language governing permissions and limitations
 * under the License.
 */
package site.zhourui.nioAndNetty.netty.source.echo2;

import io.netty.bootstrap.Bootstrap;
import io.netty.channel.*;
import io.netty.channel.nio.NioEventLoopGroup;
import io.netty.channel.socket.SocketChannel;
import io.netty.channel.socket.nio.NioSocketChannel;
import io.netty.handler.ssl.SslContext;
import io.netty.handler.ssl.SslContextBuilder;
import io.netty.handler.ssl.util.InsecureTrustManagerFactory;

/**
 * Sends one message when a connection is open and echoes back any received
 * data to the server.  Simply put, the echo client initiates the ping-pong
 * traffic between the echo client and server by sending the first message to
 * the server.
 */
public final class EchoClient {


    static final boolean SSL = System.getProperty("ssl") != null;
    static final String HOST = System.getProperty("host", "127.0.0.1");
    static final int PORT = Integer.parseInt(System.getProperty("port", "8007"));
    static final int SIZE = Integer.parseInt(System.getProperty("size", "256"));

    public static void main(String[] args) throws Exception {


        // Configure SSL.git
        final SslContext sslCtx;
        if (SSL) {


            sslCtx = SslContextBuilder.forClient()
                .trustManager(InsecureTrustManagerFactory.INSTANCE).build();
        } else {


            sslCtx = null;
        }

        // Configure the client.
        EventLoopGroup group = new NioEventLoopGroup();
        try {


            Bootstrap b = new Bootstrap();
            b.group(group)
             .channel(NioSocketChannel.class)
             .option(ChannelOption.TCP_NODELAY, true)
             .handler(new ChannelInitializer<SocketChannel>() {


                 @Override
                 public void initChannel(SocketChannel ch) throws Exception {


                     ChannelPipeline p = ch.pipeline();
                     if (sslCtx != null) {


                         p.addLast(sslCtx.newHandler(ch.alloc(), HOST, PORT));
                     }
                     //p.addLast(new LoggingHandler(LogLevel.INFO));
                     p.addLast(new EchoClientHandler());
                 }
             });

            // Start the client.
            ChannelFuture f = b.connect(HOST, PORT).sync();

            // Wait until the connection is closed.
            f.channel().closeFuture().sync();
        } finally {


            // Shut down the event loop to terminate all threads.
            group.shutdownGracefully();
        }
    }
}
8.2.1.2 EchoClientHandler
- 通道连接时给服务器发消息
- 接收服务器消息时打印消息
/*
* Copyright 2012 The Netty Project
*
* The Netty Project licenses this file to you under the Apache License,
* version 2.0 (the "License"); you may not use this file except in compliance
* with the License. You may obtain a copy of the License at:
*
* http://www.apache.org/licenses/LICENSE-2.0
*
* Unless required by applicable law or agreed to in writing, software
* distributed under the License is distributed on an "AS IS" BASIS, WITHOUT
* WARRANTIES OR CONDITIONS OF ANY KIND, either express or implied. See the
* License for the specific language governing permissions and limitations
* under the License.
*/
package site.zhourui.nioAndNetty.netty.source.echo2;
import io.netty.buffer.ByteBuf;
import io.netty.buffer.Unpooled;
import io.netty.channel.ChannelHandlerContext;
import io.netty.channel.ChannelInboundHandlerAdapter;
import java.nio.charset.Charset;
/**
* Handler implementation for the echo client. It initiates the ping-pong
* traffic between the echo client and server by sending the first message to
* the server.
*/
public class EchoClientHandler extends ChannelInboundHandlerAdapter {
private final ByteBuf firstMessage;
/**
* Creates a client-side handler.
*/
public EchoClientHandler() {
firstMessage = Unpooled.buffer(EchoClient.SIZE);
for (int i = 0; i < firstMessage.capacity(); i ++) {
firstMessage.writeByte((byte) i);
}
}
@Override
public void channelActive(ChannelHandlerContext ctx) {
//给服务器发消息
ctx.writeAndFlush(Unpooled.copiedBuffer(("hello i am client").getBytes()));
}
@Override
public void channelRead(ChannelHandlerContext ctx, Object msg) {
//接收服务器消息
ByteBuf buf = (ByteBuf) msg;
byte[] bytes = new byte[buf.readableBytes()];
buf.readBytes(bytes);
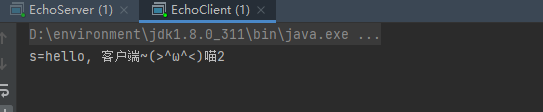
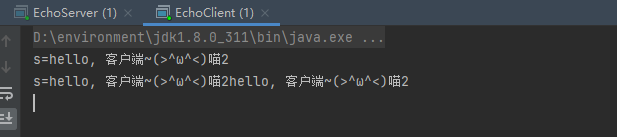
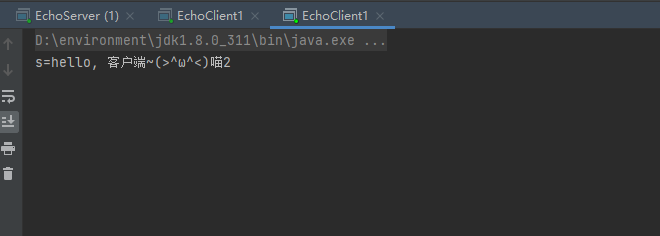
String s = new String(bytes, Charset.forName("UTF-8"));
System.out.println("s=" + s);
}
@Override
public void channelReadComplete(ChannelHandlerContext ctx) {
ctx.flush();
}
@Override
public void exceptionCaught(ChannelHandlerContext ctx, Throwable cause) {
// Close the connection when an exception is raised.
//cause.printStackTrace();
ctx.close();
}
}
8.2.1.3 EchoServer
一个简单的服务端,加入我们自定义的EchoServerHandler
/*
 * Copyright 2012 The Netty Project
 *
 * The Netty Project licenses this file to you under the Apache License,
 * version 2.0 (the "License"); you may not use this file except in compliance
 * with the License. You may obtain a copy of the License at:
 *
 *   http://www.apache.org/licenses/LICENSE-2.0
 *
 * Unless required by applicable law or agreed to in writing, software
 * distributed under the License is distributed on an "AS IS" BASIS, WITHOUT
 * WARRANTIES OR CONDITIONS OF ANY KIND, either express or implied. See the
 * License for the specific language governing permissions and limitations
 * under the License.
 */
package site.zhourui.nioAndNetty.netty.source.echo2;

import io.netty.bootstrap.ServerBootstrap;
import io.netty.channel.*;
import io.netty.channel.nio.NioEventLoopGroup;
import io.netty.channel.socket.SocketChannel;
import io.netty.channel.socket.nio.NioServerSocketChannel;
import io.netty.handler.logging.LogLevel;
import io.netty.handler.logging.LoggingHandler;
import io.netty.handler.ssl.SslContext;
import io.netty.handler.ssl.SslContextBuilder;
import io.netty.handler.ssl.util.SelfSignedCertificate;
import io.netty.util.concurrent.DefaultEventExecutorGroup;
import io.netty.util.concurrent.EventExecutorGroup;

/**
 * Echoes back any received data from a client.
 */
public final class EchoServer {


    static final boolean SSL = System.getProperty("ssl") != null;
    static final int PORT = Integer.parseInt(System.getProperty("port", "8007"));

    //创建业务线程池
    //这里我们就创建2个子线程
    static final EventExecutorGroup group = new DefaultEventExecutorGroup(2);

    public static void main(String[] args) throws Exception {


        // Configure SSL.
        final SslContext sslCtx;
        if (SSL) {


            SelfSignedCertificate ssc = new SelfSignedCertificate();
            sslCtx = SslContextBuilder.forServer(ssc.certificate(), ssc.privateKey()).build();
        } else {


            sslCtx = null;
        }

        // Configure the server.
        EventLoopGroup bossGroup = new NioEventLoopGroup(1);
        EventLoopGroup workerGroup = new NioEventLoopGroup();
        try {


            ServerBootstrap b = new ServerBootstrap();
            b.group(bossGroup, workerGroup)
             .channel(NioServerSocketChannel.class)
             .option(ChannelOption.SO_BACKLOG, 100)
             .handler(new LoggingHandler(LogLevel.INFO))
             .childHandler(new ChannelInitializer<SocketChannel>() {


                 @Override
                 public void initChannel(SocketChannel ch) throws Exception {


                     ChannelPipeline p = ch.pipeline();
                     if (sslCtx != null) {


                         p.addLast(sslCtx.newHandler(ch.alloc()));
                     }
                     //p.addLast(new LoggingHandler(LogLevel.INFO));
                     p.addLast(new EchoServerHandler());
                 }
             });

            // Start the server.
            ChannelFuture f = b.bind(PORT).sync();

            // Wait until the server socket is closed.
            f.channel().closeFuture().sync();
        } finally {


            // Shut down all event loops to terminate all threads.
            bossGroup.shutdownGracefully();
            workerGroup.shutdownGracefully();
        }
    }
}
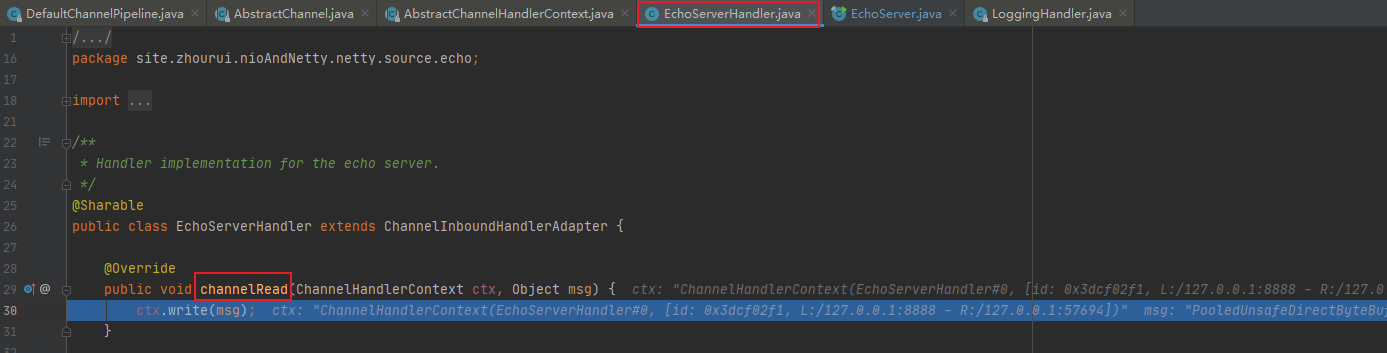
8.2.1.4 EchoServerHandler
- 读取客户发送的消息时模拟耗时任务-用户程序自定义的普通任务来处理
- 打印出Handler的线程和普通任务中的线程
/*
* Copyright 2012 The Netty Project
*
* The Netty Project licenses this file to you under the Apache License,
* version 2.0 (the "License"); you may not use this file except in compliance
* with the License. You may obtain a copy of the License at:
*
* http://www.apache.org/licenses/LICENSE-2.0
*
* Unless required by applicable law or agreed to in writing, software
* distributed under the License is distributed on an "AS IS" BASIS, WITHOUT
* WARRANTIES OR CONDITIONS OF ANY KIND, either express or implied. See the
* License for the specific language governing permissions and limitations
* under the License.
*/
package site.zhourui.nioAndNetty.netty.source.echo2;
import io.netty.buffer.ByteBuf;
import io.netty.buffer.Unpooled;
import io.netty.channel.ChannelHandler.Sharable;
import io.netty.channel.ChannelHandlerContext;
import io.netty.channel.ChannelInboundHandlerAdapter;
import io.netty.util.CharsetUtil;
import io.netty.util.concurrent.DefaultEventExecutorGroup;
import io.netty.util.concurrent.EventExecutorGroup;
/**
* Handler implementation for the echo server.
*/
@Sharable
public class EchoServerHandler extends ChannelInboundHandlerAdapter {
@Override
public void channelRead(ChannelHandlerContext ctx, Object msg) throws Exception {
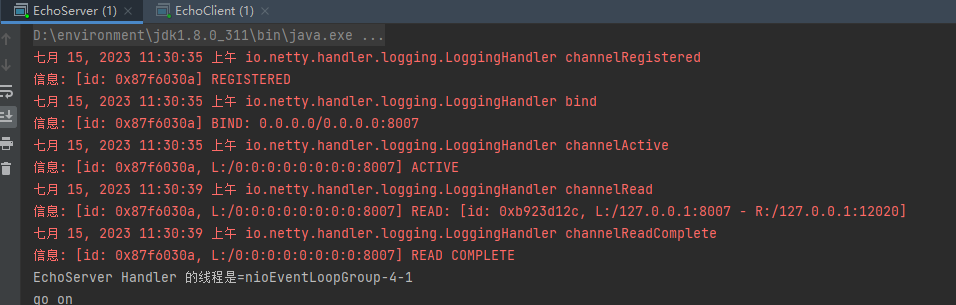
System.out.println("EchoServer Handler 的线程是=" + Thread.currentThread().getName());
//按照原来的方法处理耗时任务
//解决方案1 用户程序自定义的普通任务
ctx.channel().eventLoop().execute(new Runnable() {
@Override
public void run() {
try {
Thread.sleep(5 * 1000);
//输出线程名
System.out.println("EchoServerHandler execute 线程是=" + Thread.currentThread().getName());
ctx.writeAndFlush(Unpooled.copiedBuffer("hello, 客户端~(>^ω^<)喵2", CharsetUtil.UTF_8));
} catch (Exception ex) {
System.out.println("发生异常" + ex.getMessage());
}
}
});
ctx.channel().eventLoop().execute(new Runnable() {
@Override
public void run() {
try {
Thread.sleep(5 * 1000);
//输出线程名
System.out.println("EchoServerHandler execute 线程2是=" + Thread.currentThread().getName());
ctx.writeAndFlush(Unpooled.copiedBuffer("hello, 客户端~(>^ω^<)喵2", CharsetUtil.UTF_8));
} catch (Exception ex) {
System.out.println("发生异常" + ex.getMessage());
}
}
});
System.out.println("go on ");
}
@Override
public void channelReadComplete(ChannelHandlerContext ctx) {
ctx.flush();
}
@Override
public void exceptionCaught(ChannelHandlerContext ctx, Throwable cause) {
// Close the connection when an exception is raised.
//cause.printStackTrace();
ctx.close();
}
}
8.2.1.5 测试
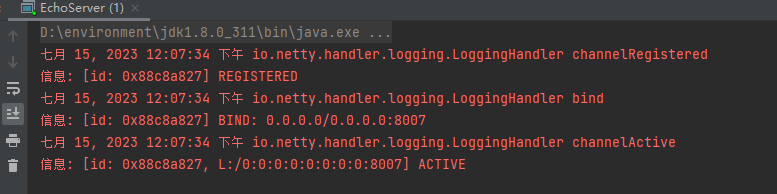
-
启动服务端
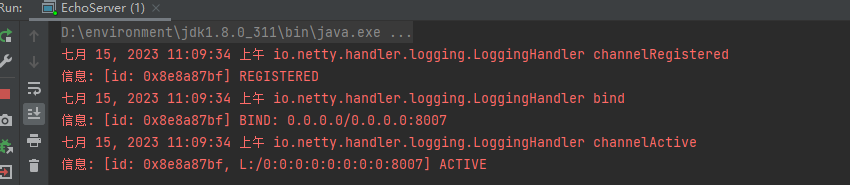
-
启动客户端
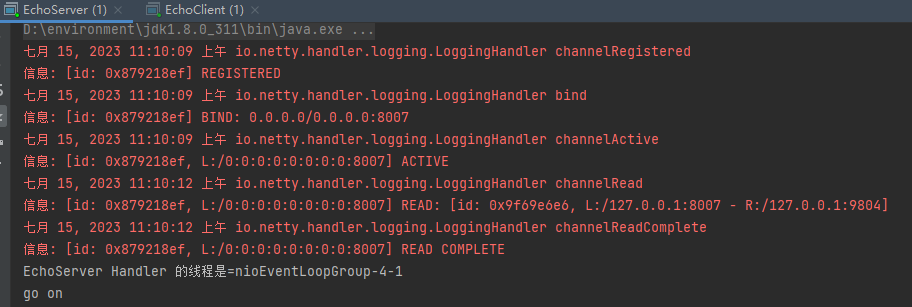
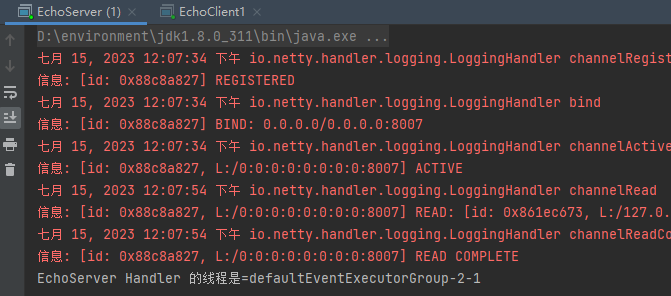
-
启动5秒后
我们发现EchoServerHandler execute使用的线程和EchoServerHandler一样
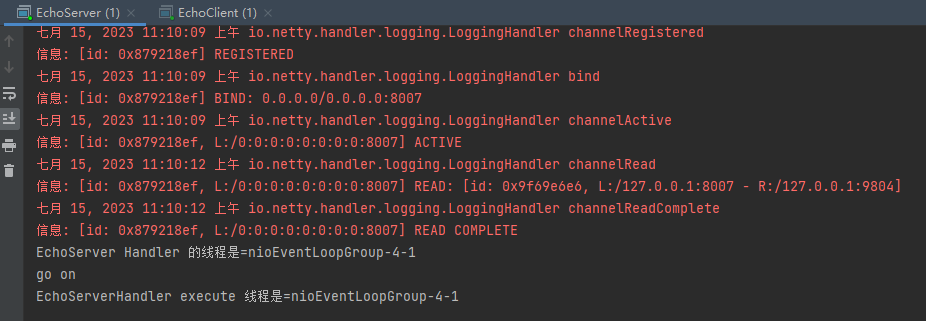
-
再过5秒后
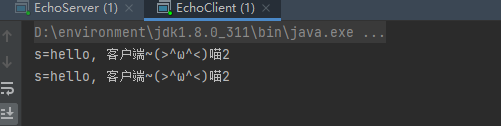
我们发现第二个EchoServerHandler execute使用的线程和EchoServerHandler也是一样
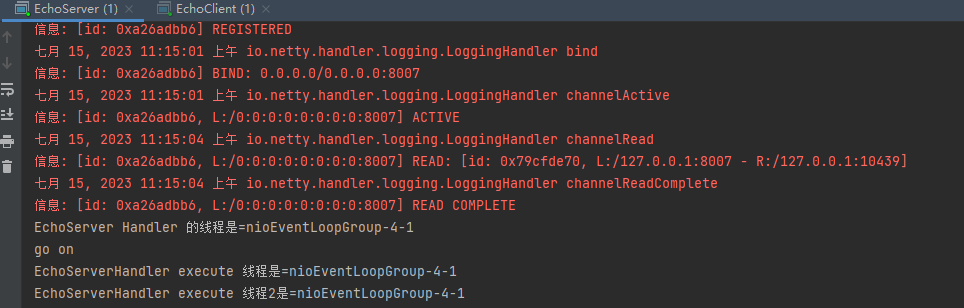
小结: 用户程序自定义的普通任务来执行任务只有一个线程执行,还是会阻塞队列,生产时不会使用
8.2.2 处理耗时业务的第一种方式—handler中加入线程池
8.2.2.1 EchoServerHandler源码修改
-
将8.2.1.4中channelRead方法中使用ctx.channel().eventLoop().execute()的方式注释起来
-
新建一个自定义线程池
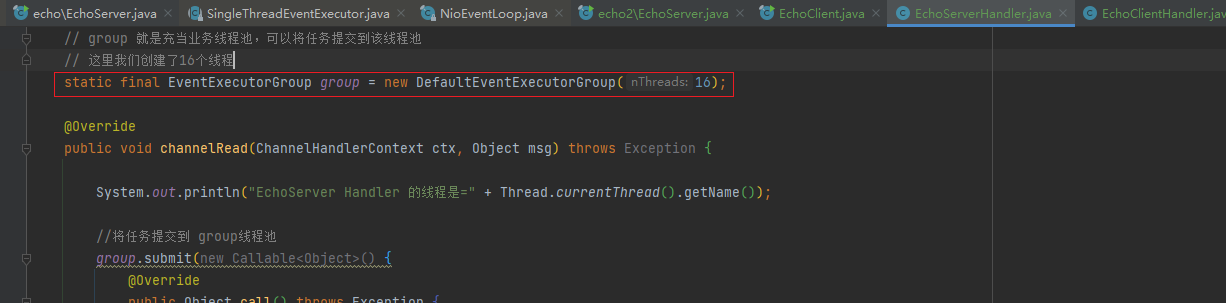
-
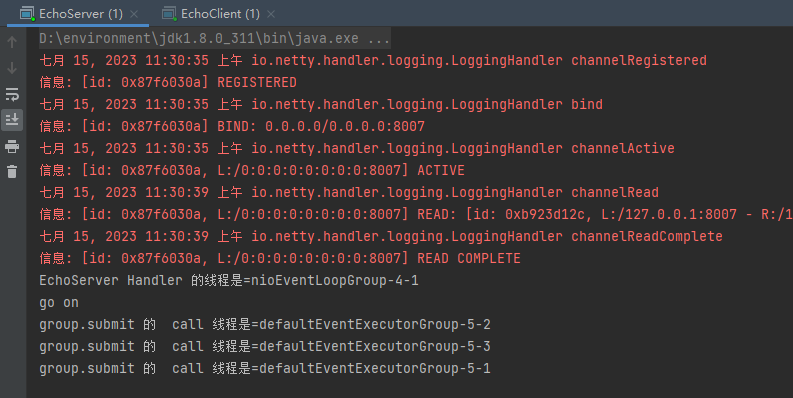
想业务线程池group中提交三次任务,三次都等待10秒,模拟业业务处理10秒
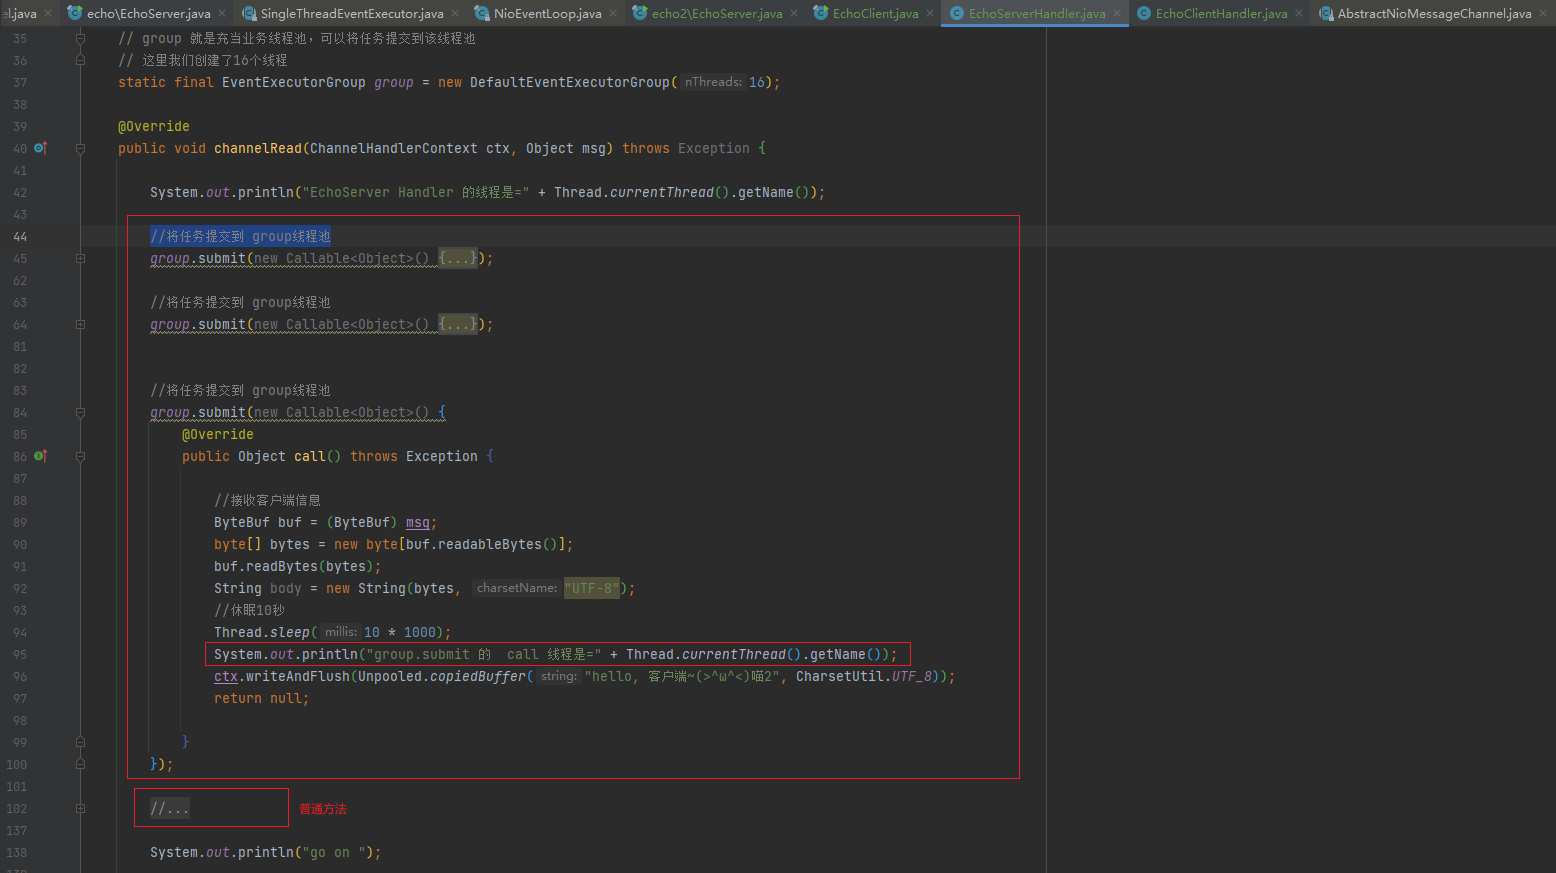
8.2.2.2 测试
-
启动服务端
-
启动客户端

-
启动10秒后
- 发现10秒后三个提交的异步任务都返回了,并没有阻塞
- 每个异步任务使用的都是业务线程池group中的线程,而不是EchoServerHandler中的线程
- 并且每个任务使用group线程池中的线程都不一样
8.2.2.3 使用这种方式后的逻辑
-
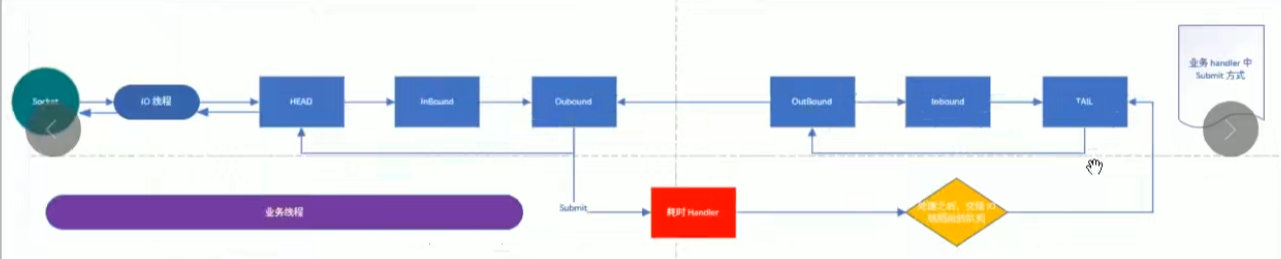
解释一下上图,当IO 线程轮询到一个 socket 事件,然后,IO 线程开始处理,当走到耗时 handler 的时候,将耗时任务交给业务线程池。
-
当耗时任务执行完毕再执行 pipeline write方法的时候(代码中使用的是 context的 write方法,上图画的是执行pipeline方法,是一个意思)会将任务这个任务交给IO线程
-
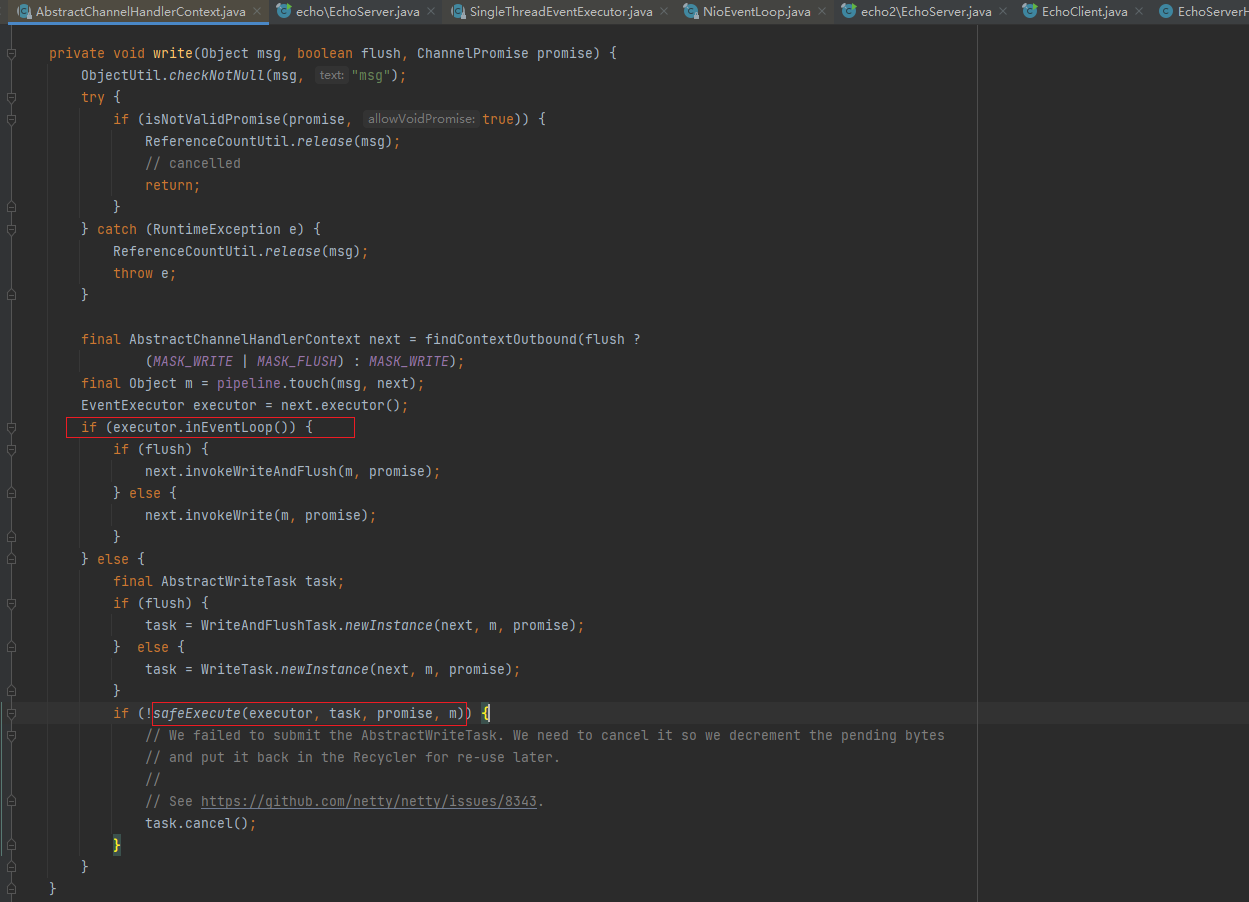
write方法的源码(在AbstractChannelHandlerContext类)
说明:
- 当判定下个outbound 的 executor线程不是当前线程的时候,会将当前的工作封装成task ,然后放入mpsc队列中,等待IO任务执行完毕后执行队列中的任务。
- 这里可以Debug 来验证(提醒:Debug时,服务器端Debug ,客户端Run的方式),
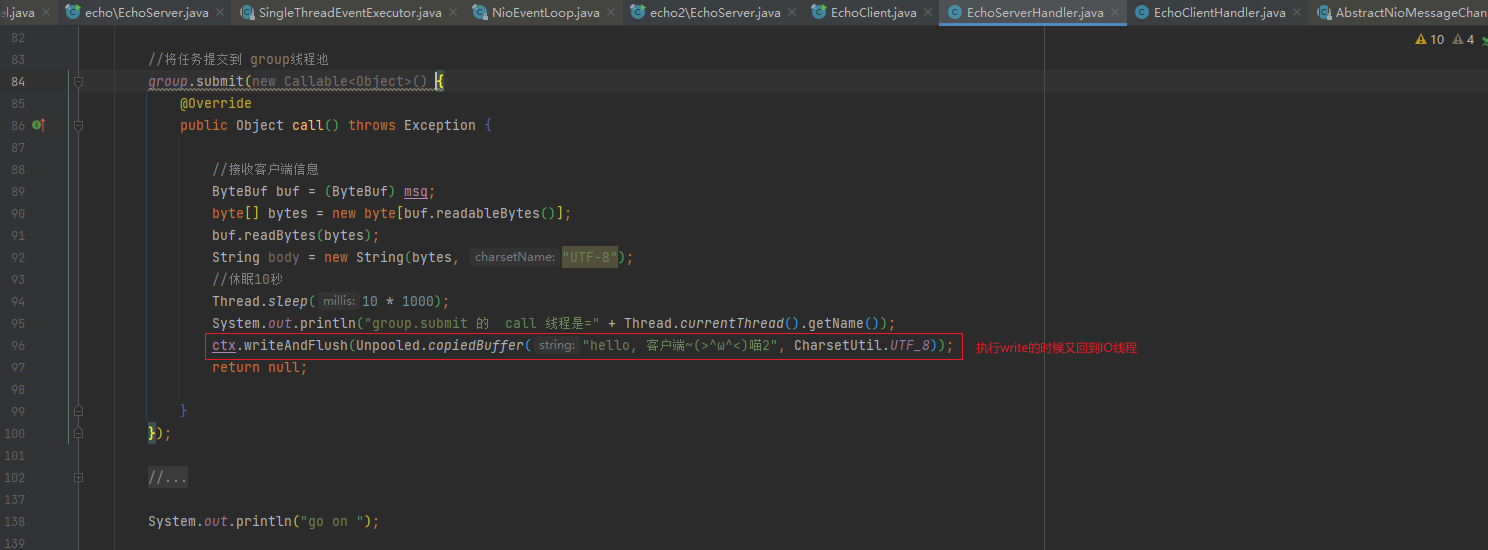
- 当我们使用了group.submit(new Callable<Object>()在 handler 中加入线程池,就会进入到safeExecute(executor,task,promise,m);
- 如果使用普通方式来执行耗时的业务,那么就不会进入到 safeExecute(executor,task, promise, m); 而是进入next.invokeWriteAndFlush(m, promise);就不会使用业务线程池中的线程
8.2.3 处理耗时业务的第二种方式-Context中添加线程池
8.2.3.1 EchoServerHandler源码修改
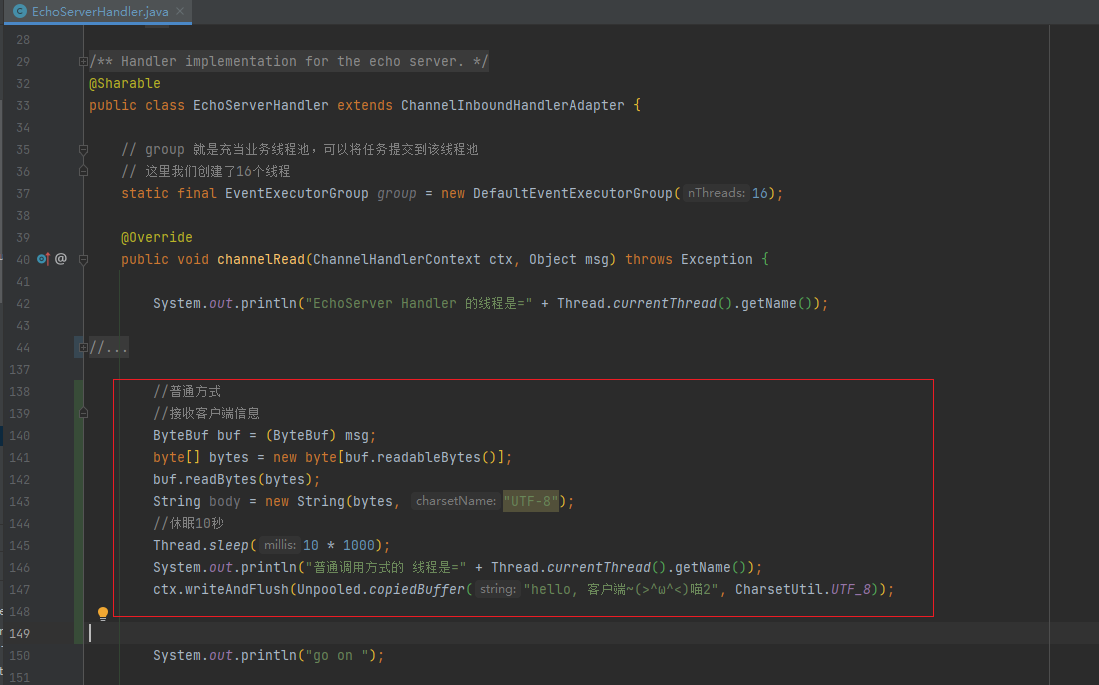
将8.2.2.1中使用group提交任务的代码也注释掉
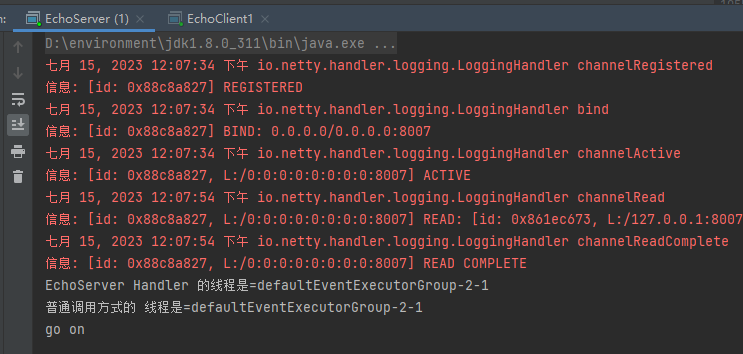
使用普通方式
        //普通方式
        //接收客户端信息
        ByteBuf buf = (ByteBuf) msg;
        byte[] bytes = new byte[buf.readableBytes()];
        buf.readBytes(bytes);
        String body = new String(bytes, "UTF-8");
        //休眠10秒
        Thread.sleep(10 * 1000);
        System.out.println("普通调用方式的 线程是=" + Thread.currentThread().getName());
        ctx.writeAndFlush(Unpooled.copiedBuffer("hello, 客户端~(>^ω^<)喵2", CharsetUtil.UTF_8));
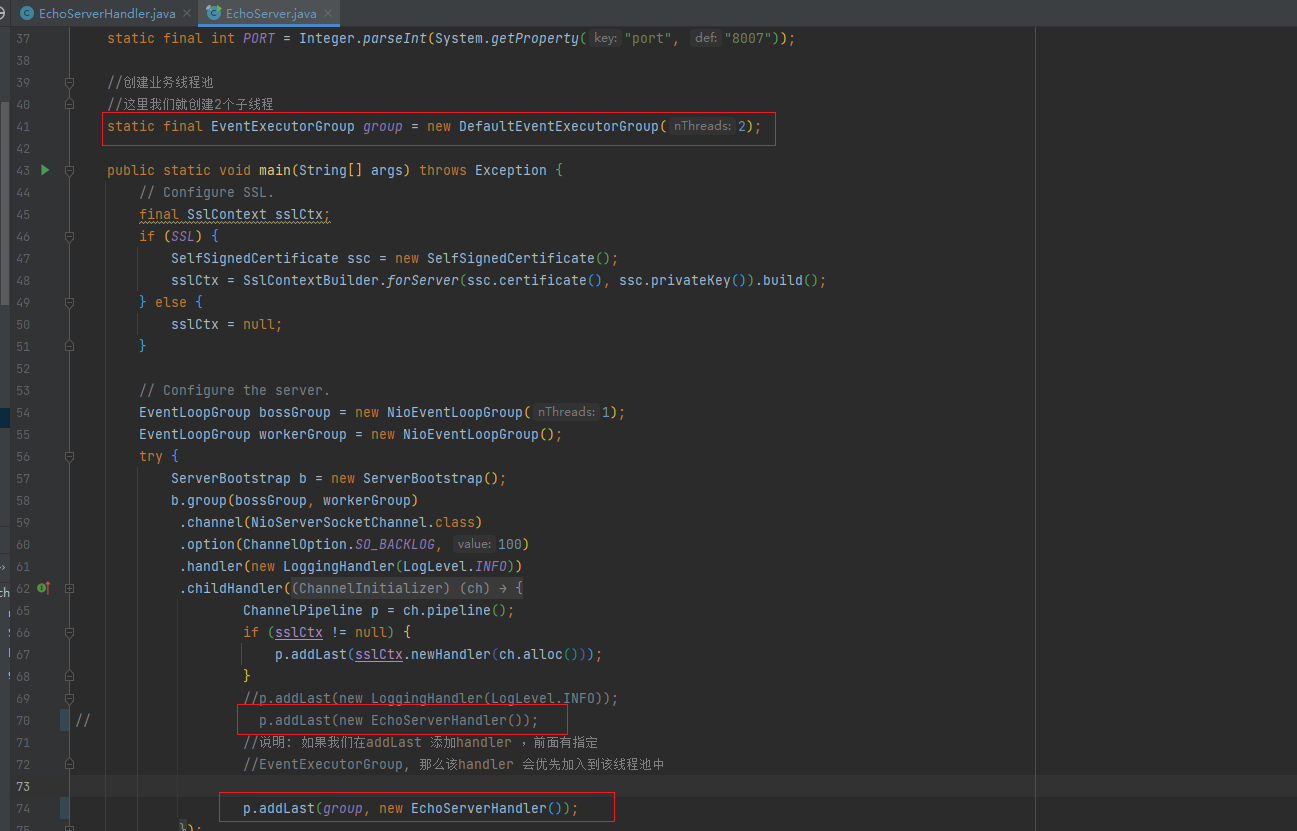
8.2.3.2 EchoServer源码修改
- 这次我们在EchoServer创建自定义线程池group
- 然后在addLast的时候就加入线程池
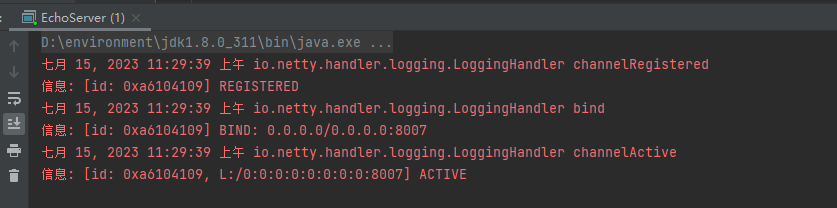
8.2.3.3 测试
-
启动服务端
-
启动一个客户端
-
10秒后

-
再启动一个客户端
-
10秒后
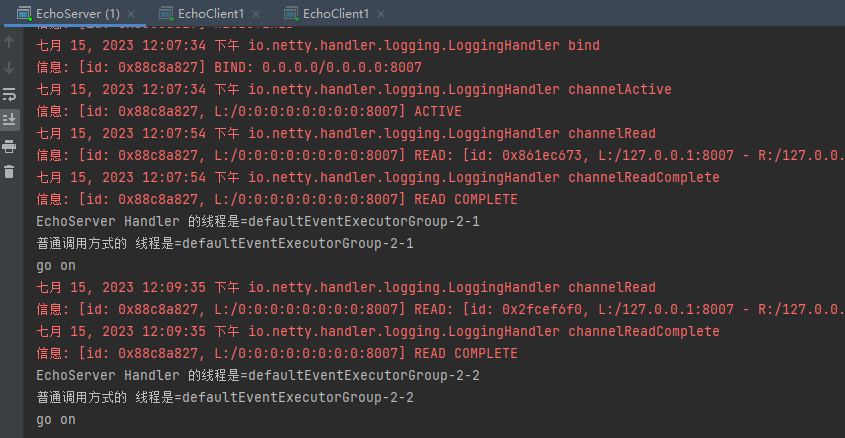
小结:虽然IO和业务使用的同一个线程,但是不同的客户端连接的时候也会使用不同的线程,所以还是异步的
8.2.3.4 源码剖析
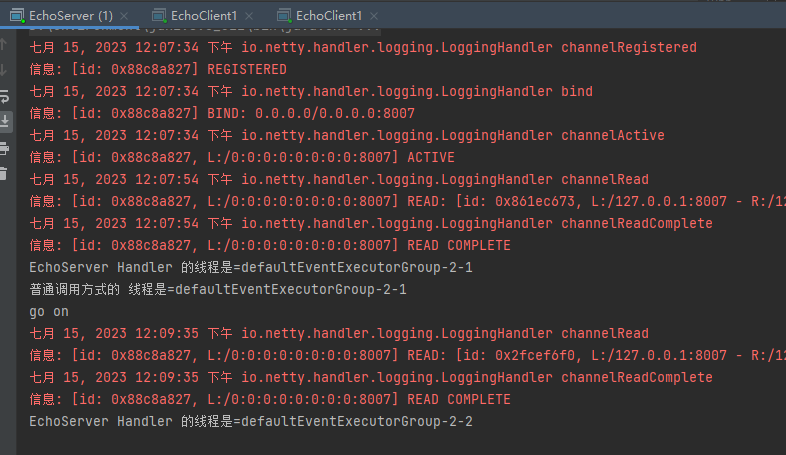
说明:
handler中的代码就使用普通的方式来处理耗时业务。
当我们在调用addLast 方法添加线程池后,handler 将优先使用这个线程池,如果不添加,将使用IO 线程
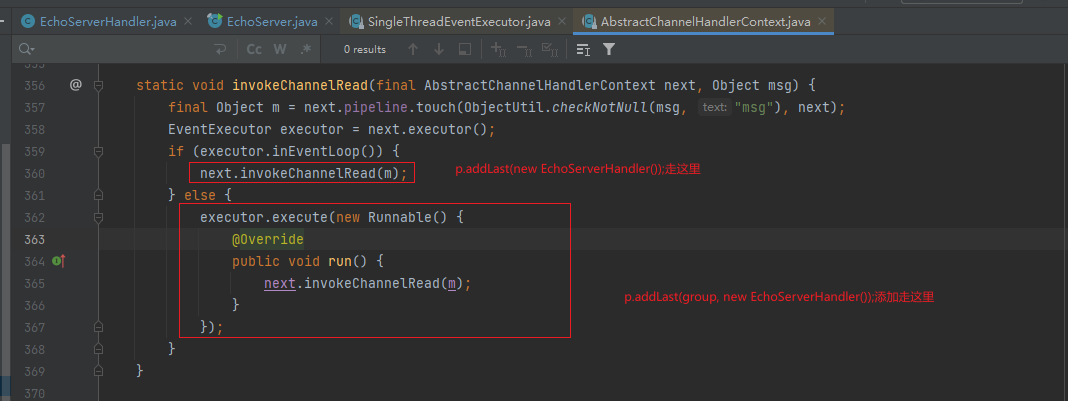
当走到AbstractChannelHandlerContext 的
invokeChannelRead方法的时候,executor.inEventLoop()是不会通过的,因为当前线程是IO线程Context(也就是Handler)的 executor 是业务线程,所以会异步执行验证时,我们如果去掉 p.addLast(group,new EchoServerHandler() );改成p.addL.astnewEchoServerHandler() );你会发现代码不会进行异步执行
后面的整个流程就变成和第一个方式一样了
8.2.4 两种方式的比较
- 第一种方式在 handler 中添加异步,可能更加的自由
- 优点:比如如果需要访问数据库,那我就异步,如果不需要,就不异步,异步会拖长接口响应时间。因为需要将任务放进
mpscTask中。 - 缺点:如果IO 时间很短,task 很多,可能一个循环下来,都没时间执行整个task,导致响应时间达不到指标。
- 优点:比如如果需要访问数据库,那我就异步,如果不需要,就不异步,异步会拖长接口响应时间。因为需要将任务放进
- 第二种方式是 Netty标准方式(即加入到队列),但是,这么做会将整个 handler 都交给业务线程池。不论耗时不耗时,都加入到队列里,不够灵活。
- 各有优劣,从灵活性考虑,第一种较好