先上图
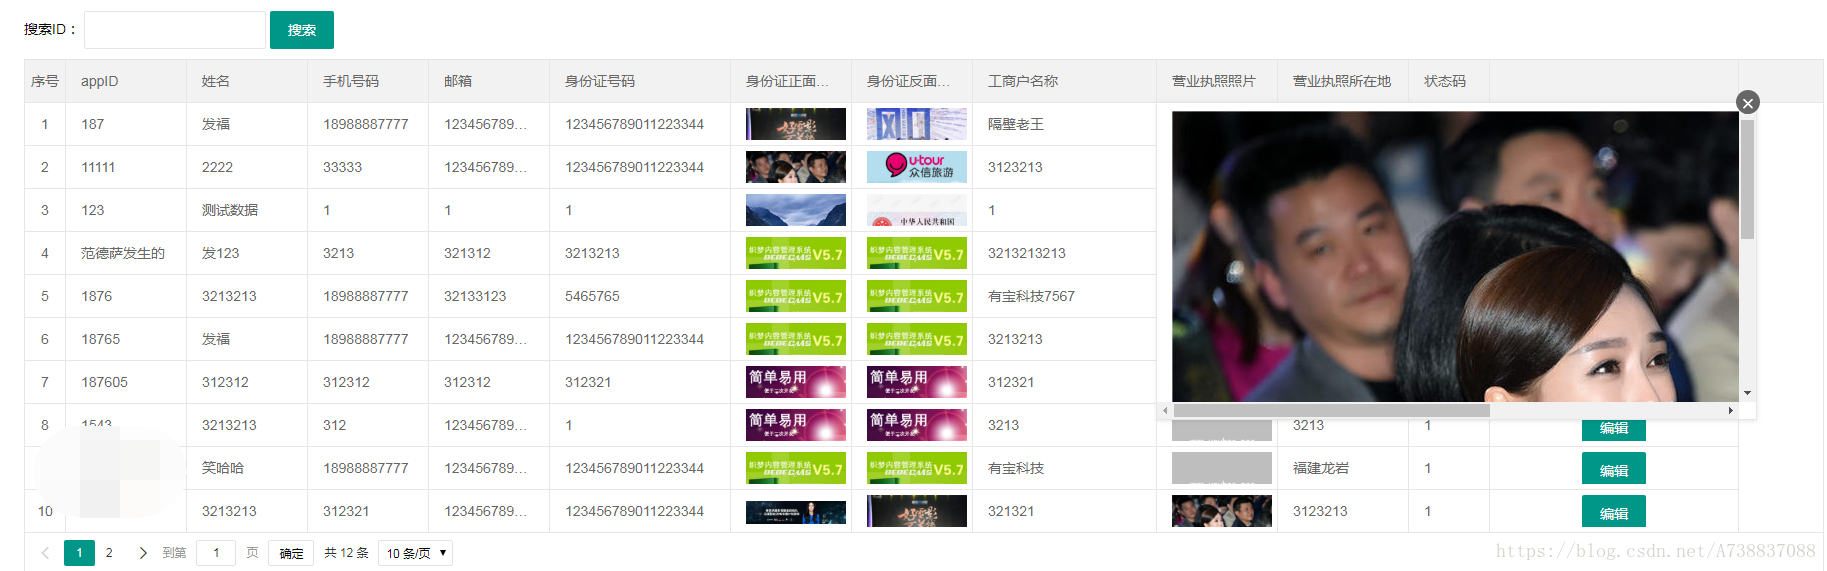
整个页面用的都是layui插件。
页面有数据展示(带分页),显示图片,查看图片大图,编辑数据实时更新。搜索功能带分页。
引入layui.css,layui.js 2个文件,文件自行到官网下载。
前端代码,整个页面的前端代码就这么点,很舒服有没有。
要注意的是数据页面和搜索功能用的是同一个请求,搜索的多带一个keyword参数到后端进行判断。
<!DOCTYPE html>
<html>
<head>
    <meta charset="utf-8">
    <title>layui</title>
    <meta name="renderer" content="webkit">
    <meta http-equiv="X-UA-Compatible" content="IE=edge,chrome=1">
    <meta name="viewport" content="width=device-width, initial-scale=1, maximum-scale=1">
    <link rel="stylesheet" href="layui/css/layui.css" media="all">

</head>
<style>
    #tb {
        float: left;
        margin-left: 50px;
        margin-top: 50px;
    }

    .layui-table-cell {
        height: 32px;
        line-height: 32px;
    }

    .layui-table-tips-main {
        max-height: 300px;
    }
</style>

<body>
<!--layui数据表格-->
<div id="tb">
    <div class="demoTable">
        搜索ID:
        <div class="layui-inline">
            <input class="layui-input" name="id" id="demoReload" autocomplete="off">
        </div>
        <button class="layui-btn" data-type="reload">搜索</button>
    </div>
    <table class="layui-hide" id="LAY_table_user" lay-filter="useruv"></table>
    <script type="text/html" id="barDemo">
        <a class="layui-btn layui-btn-mini" lay-event="edit">编辑</a>
    </script>
</div>

<script src="layui/layui.js" charset="utf-8"></script>

<script type="text/javascript">
    layui.use('table', function () {
        var table = layui.table;
        table.render({
            elem: '#LAY_table_user'
            , url: '/getAllStore'
            , width: 1800
            , cols: [[
                {type: 'numbers', title: "序号"}
                , {field: 'appId', width: 120, title: 'appID'}
                , {field: 'name', width: 120, title: '姓名'}
                , {field: 'phone', width: 120, title: '手机号码'}
                , {field: 'email', width: 120, title: '邮箱'}
                , {field: 'idNumber', width: 180, title: '身份证号码'}
                , {
                    field: 'storeImage',
                    width: 130,
                    title: '身份证正面照片',
                    templet: '<div><img src="{{d.idImgFront}}"></div>'
                }
                , {
                    field: 'storeImage',
                    width: 130,
                    title: '身份证反面照片',
                    templet: '<div><img src="{{d.idImgRever}}"></div>'
                }
                , {field: 'storeName', width: 183, title: '工商户名称'}
                , {field: 'storeImage', width: 120, title: '营业执照照片', templet: '<div><img src="{{d.storeImage}}"></div>'}
                , {field: 'storeAdd', width: 130, title: '营业执照所在地'}
                , {field: 'status', width: 80, title: '状态码'}
                , {fixed: 'right', width: 248, align: 'center', toolbar: '#barDemo'}
            ]]
            , id: 'testReload'
            , page: true
        });


        var $ = layui.$, active = {
            reload: function () {
                var demoReload = $('#demoReload');

                table.reload('testReload', {
                    where: {
                        keyword: demoReload.val()
                    }
                });
            }
        };


        //搜索框 绑定click点击事件
        $('.demoTable .layui-btn').on('click', function () {
            var type = $(this).data('type');
            active[type] ? active[type].call(this) : '';
        });


        //监听工具条
        table.on('tool(useruv)', function (obj) {
            var data = obj.data;
            if (obj.event === 'edit') {
                layer.prompt({
                    formType: 2
                    , title: '修改状态码[0:等待审核],[1:审核成功],[2:审核失败]'
                    , value: data.status
                }, function (value, index) {
                    EidtUv(data, value, index, obj);
                });
            }
        });

        //编辑方法
        function EidtUv(data, value, index, obj) {
            $.ajax({
                url: "/updateStatus",
                type: "post",
                data: {"appId": data.appId, "status": value},
                dataType: "json",
                success: function (data) {
                    if (status == 0) {
                        layer.close(index);
                        //同步更新表格和缓存对应的值
                        obj.update({
                            status: value
                        });
                        layer.msg("修改成功", {icon: 6});
                    } else {
                        layer.msg("修改失败", {icon: 5});
                    }
                }
            });
        }
    });

</script>
</body>
</html>
前端代码多看看就懂了。把请求的url和字段换成自己的就行了,编辑方法绑定一个事件发送ajax请求就ok啦。
要开启分页只需要page:true就行,默认1limit10 ,field对应数据库字段,title对应表头,也可以在里面设置样式
这里有一个bug ,field 参数3个都是storeImage,我这边必须是storeImage才能点击查看大图,你们搞的时候要注意看看。
               ,}field: 'storeImage',
                    width: 130,
                    title: '身份证正面照片',
                    templet: '<div><img src="{{d.idImgFront}}"></div>'
                }
                , {
                    field: 'storeImage',
                    width: 130,
                    title: '身份证反面照片',
                    templet: '<div><img src="{{d.idImgRever}}"></div>'
                }
主要看后端,controller层 获得所有数据 ,编辑方法就不发了,
//后台查询所有商铺数据
@RequestMapping("/getAllStore")
@ResponseBody
public Map<String, Object> getAllStore(int page, @RequestParam(value = "limit") int pageSize, @RequestParam(value = "keyword", required = false) String appId, HttpSession session) {
    User user = (User) session.getAttribute("CURRENT_USER");
    //判断用户是否登录
    if (user == null) {
        HashMap<String, Object> resultMap = new HashMap<>();
        resultMap.put("msg", "用户未登录,请先登录");
        return resultMap;
    }
    //如果前端没给appID就执行搜索所有(分页)
    if (appId == null) {
        HashMap<String, Object> resultMap = new HashMap<>();
        //放入分页参数进行查询
        PageInfo<Store> store = storeService.getStore(page, pageSize);
        resultMap.put("code", 0);
        resultMap.put("msg", "");
        resultMap.put("count", store.getTotal());
        resultMap.put("data", store.getList());
        return resultMap;
        //由于layui接口返回值有固定格式,所以用map返回固定格式参数
    }
    //如果前端给了appID就执行模糊搜索(分页)
    HashMap<String, Object> searchMap = new HashMap<>();
    //将3个参数传入dao进行查询
    PageInfo<Store> phoneByLike = storeService.getPhoneByLike(page, pageSize, appId);
    searchMap.put("code", 0);
    searchMap.put("msg", "");
    searchMap.put("count", phoneByLike.getTotal());
    searchMap.put("data", phoneByLike.getList());
    return searchMap;
}
先来看看getAllStore的参数和返回值,返回值有固定要求,详细看官方API
public Map<String, Object> getAllStore(int page, @RequestParam(value = "limit") int pageSize, @RequestParam(value = "keyword", required = false) String appId, HttpSession session) {
先说参数,pageSize,因为前端传来的叫limit我这边用@requestParam注解指定了以下。page和pageSize用来分页的详细看service层,
@requestParam(value="keword",required=false)String appId 这个参数是给搜索框用的,之前说了搜索和数据用的是同一个controller方法,keword对应前端 table.reload方法里面的参数,required=false 为是否必填 否,有了这个注解就省事了,判断一下keword也就是appId是否为空就好了。有传appId和没传appId走的是不同的service。详细看service。
我返回的json数据格式
    "msg": "",
    "code": 0,
    "data": [
        {
            "id": 49,
            "appId": "187",
            "name": "发福",
            "phone": "18988887777",
            "email": "[email protected]",
            "idNumber": "123456789011223344",
            "idImgFront": "http://localhost:8080/upload/d0e7f1e5713b4ceca1b497c6484eee63.jpg",
            "idImgRever": "http://localhost:8080/upload/43d04e126a824a439c06a8846c5888c8.jpg",
            "storeName": "隔壁老王",
            "storeImage": "http://localhost:8080/upload/2360fd571d094742a0ee7161d7655f4a.jpg",
            "storeAdd": "深圳",
            "status": 0,
            "createTime": 1529381280000
        },
        {
            "id": 50,
            "appId": "11111",
            "name": "2222",
            "phone": "33333",
            "email": "[email protected]",
            "idNumber": "123456789011223344",
            "idImgFront": "http://localhost:8080/upload/765e25c53ef14639bb75cbca64f2bb47.jpg",
            "idImgRever": "http://localhost:8080/upload/f932c4e251f042dcb725b2d7bc090bb7.jpg",
            "storeName": "3123213",
            "storeImage": "http://localhost:8080/upload/495ff6862ec24f23a5668b1301b9b312.jpg",
            "storeAdd": "布吉",
            "status": 0,
            "createTime": 1529375272000
        },    ...省略
service层的getStore方法,也就是没有appId走的这个 pageInfo,没用过的自行百度。
@Override
    public PageInfo<Store> getStore(int page, int pageSize) {
        PageHelper.startPage(page, pageSize);
        List<Store> store = storeMapper.getStore();
        PageInfo<Store> storePageInfo = new PageInfo<>(store);
        return storePageInfo;
    }
service层的 getPhoneByLike方法 有appId走的这个方法。多了个appId参数。
 @Override
    public PageInfo<Store> getPhoneByLike(int page, int pageSize,String appId) {
        PageHelper.startPage(page,pageSize);
        List<Store> likeStore = storeMapper.getLikeStore(appId);
        PageInfo<Store> storePageInfo = new PageInfo<>(likeStore);
        return storePageInfo;


    }
dao层 getstore方法 我加了个状态码排序,根据自行需要,layui也有这个功能但是只能在当前页排序,下一页的数据不变。所以还是自行排序吧
List<Store> getStore();
 <select id="getStore" resultMap="BaseResultMap">
        SELECT *
        FROM store
        ORDER BY status ASC
    </select>
dao层的 getLikeStore方法 ,模糊查询,select * ,呵呵 又偷懒了
List<Store> getLikeStore(String appId);
 <select id="getLikeStore" resultMap="BaseResultMap" parameterType="string">
    SELECT *
    from store
    WHERE app_id LIKE CONCAT('%',#{appId},'%')
    ORDER BY status ASC
    </select>
就这么简单方便。