目录
父子组件之间通信
父组件向子组件传递数据和方法
父组件可以向子组件传递数据和方法,子组件通过props来获取。
父组件:
import React from "react";
import Child from "./Child";
export default class Demo extends React.Component {

    constructor(props) {
        super(props)
        this.state = {
            value: 0
        }
        this.changeValue = this.changeValue.bind(this)
    }

    changeValue() {
        this.setState({
            value: this.state.value + 1
        }, () => {
            console.log('changeValue 方法执行了 value: ', this.state.value)
        })
    }

    render() {
        const value = this.state.value
        return (
            <div>
                <h1>父组件</h1>
                <p>value: {value}</p>
                <Child
                    // 向子组件传递数据
                    value={value}
                    // 向子组件传递方法
                    changeValue={this.changeValue}
                ></Child>
            </div>
        )
    }
}
子组件:
import React from "react";
export default class Child extends React.Component {

    constructor(props) {
        super(props)
    }
    dealClidk() {
        // 子组件触发父组件的方法执行
        this.props.changeValue()
    }
    render() {
        return (
            <div>
                <h1>子组件</h1>
                {/* 子组件通过props获取父组件传递的数据 */}
                <p>value:{this.props.value}</p>
                <button onClick={this.dealClidk.bind(this)}>点击</button>
            </div>
        )
    }
} 
当点击子组件中的按钮时,就可以通过触发父组件的方法而改变父组件中的属性值。
父组件获取子组件数据和方法
父组件可以通过ref获取子组件的数据和方法。
父组件:
import React from "react";
import Child from "./Child";
export default class Demo extends React.Component {

    constructor(props) {
        super(props)
        this.ChildRef = React.createRef()
    }

    dealClidk() {
        if (this.ChildRef && this.ChildRef.current) {
            // 父组件触发子组件方法的执行
            this.ChildRef.current.changeValue()
        }
    }
    getData() {
        if (this.ChildRef && this.ChildRef.current) {
            // 父组件获取子组件中state的值
            const childData = this.ChildRef.current.state.data
            console.log('获取子组件的数据 childData: ', childData)
        }
    }

    render() {
        return (
            <div>
                <h1>父组件</h1>
                <button onClick={this.dealClidk.bind(this)}>点击</button>
                <button onClick={this.getData.bind(this)}>获取</button>
                <Child ref={this.ChildRef}></Child>
            </div>
        )
    }
}
子组件:
import React from "react";
export default class Child extends React.Component {

    constructor(props) {
        super(props)
        this.state = {
            data: 0
        }
        this.changeValue = this.changeValue.bind(this)
    }

    changeValue() {
        this.setState({
            data: this.state.data + 1
        }, () => {
            console.log('changeValue 方法执行了 data: ', this.state.data)
        })
    }

    render() {
        const data = this.state.data
        return (
            <div>
                <h1>子组件</h1>
                <p>value:{data}</p>
            </div>
        )
    }
}
跨级组件之间通信
使用props实现跨级组件通信
使用props实现跨级组件通信也有两种方法。
直接一级一级的传递
父组件:
import React from "react";
import Child from "./Child";
export default class Demo extends React.Component {
constructor(props) {
super(props)
this.state = {
value: 0,
value2: '张三'
}
this.changeValue = this.changeValue.bind(this)
}
changeValue() {
this.setState({
value: this.state.value + 1
}, () => {
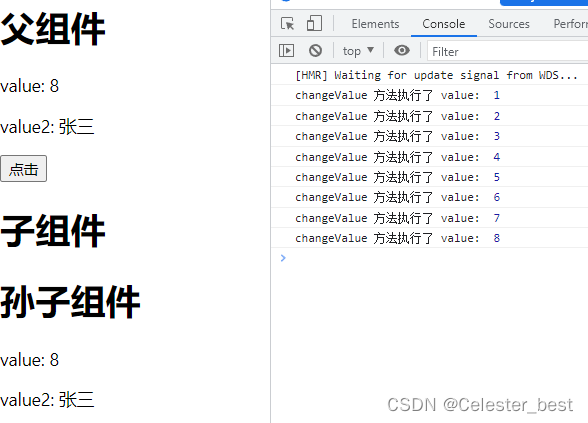
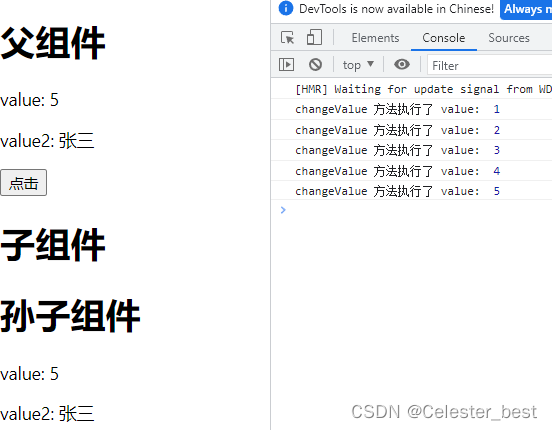
console.log('changeValue 方法执行了 value: ', this.state.value)
})
}
render() {
const { value, value2 } = this.state
return (
<div>
<h1>父组件</h1>
<p>value: {value}</p>
<p>value2: {value2}</p>
<button onClick={this.changeValue}>点击</button>
<Child
value={value}
value2={value2}
></Child>
</div>
)
}
}子组件:
import React from "react";
import GrandSon from "./GrandSon";
export default class Child extends React.Component {

    render() {
        const { value, value2 } = this.props
        return (
            <div>
                <h1>子组件</h1>
                <GrandSon
                    // 子组件将数据继续向下传递
                    value={value}
                    value2={value2}
                ></GrandSon>
            </div>
        )
    }
}
孙子组件
import React from "react";
export default class GrandSon extends React.Component {

    constructor(props) {
        super(props)
    }
    render() {
        const { value, value2 } = this.props
        return (
            <div>
                <h1>孙子组件</h1>
                <p>value: {value}</p>
                <p>value2: {value2}</p>
            </div>
        )
    }
}
这种方式适合传递的数据比较少的情况,可以一个一个传递,如果传递的数据比较多的话使用这种方式传递就容易造成代码重复。我们可以使用{...this.props}的方式打包传递。不管父组件传递了多少数据,子组件都打包将所有数据传递给孙子组件,孙子组件依然使用this.props获取即可。
我们修改下子组件的传递方式;
import React from "react";
import GrandSon from "./GrandSon";
export default class Child extends React.Component {

    render() {
        return (
            <div>
                <h1>子组件</h1>
                <GrandSon
                    // 子组件将数据继续向下传递
                    {...this.props}
                ></GrandSon>
            </div>
        )
    }
} 
可以看到实现了相同的效果。
使用context实现跨级组件通信
使用context实现跨级传递数据,需要以下几步:
1、通过React.createContext()创建一个context实例
import React from "react";
const DemoContext = React.createContext()

export default DemoContext;
2、通过provider创建一个生产者,provider有一个value属性可以用来包装所需要传递的数据
import React from "react";
import Child from "./Child";
import DemoContext from './DemoContext'
export default class Demo extends React.Component {

    constructor(props) {
        super(props)
        this.state = {
            value: 0,
            value2: '张三'
        }
        this.changeValue = this.changeValue.bind(this)
    }

    changeValue() {
        this.setState({
            value: this.state.value + 1
        }, () => {
            console.log('changeValue 方法执行了 value: ', this.state.value)
        })
    }

    render() {
        const { value, value2 } = this.state
        return (
            <div>
                <h1>父组件</h1>
                <p>value: {value}</p>
                <p>value2: {value2}</p>
                <button onClick={this.changeValue}>点击</button>
                <DemoContext.Provider value={

   {
                    value: value,
                    value2: value2
                }}>
                    <Child></Child>
                </DemoContext.Provider>
            </div>
        )
    }
}
3、通过Consumer创建一个消费者,用来接收传递的数据
import React from "react";
import DemoContext from "./DemoContext";
export default class GrandSon extends React.Component {

    constructor(props) {
        super(props)
    }
    render() {
        return (
            <div>
                <h1>孙子组件</h1>
                <DemoContext.Consumer>
                    {/* Consumer中需要使用函数 */}
                    {
                        (value) => {
                            return (
                                <div>
                                    <p>value: {value.value}</p>
                                    <p>value2: {value.value2}</p>
                                </div>
                            )
                        }
                    }
                </DemoContext.Consumer>
            </div>
        )
    }
}
中间组件:
import React from "react";
import GrandSon from "./GrandSon";
export default class Child extends React.Component {

    render() {
        return (
            <div>
                <h1>子组件</h1>
                <GrandSon></GrandSon>
            </div>
        )
    }
}
使用状态管理实现跨级组件通信
可以参考之前的博客:React-redux全局状态管理
无关组件之间通信
使用EventEmitter实现无关组件之间通信
使用EventEmitter的步骤;
1、安装events库
npm install events2、创建 EventEmitter的实例
import React from "react";
import { EventEmitter } from "events";
// 创建EventEmitter实例
const DemoEvent = new EventEmitter()
export default DemoEvent;
3、发布事件
使用emit("事件名",参数)发布事件
import React from "react";
import DemoEvent from './DemoEvent'
export default class GrandSon extends React.Component {
    constructor(props) {
        super(props)
        this.state = {
            value: 0
        }
        this.changeValue = this.changeValue.bind(this)
    }

    changeValue() {
        this.setState({
            value: this.state.value + 1
        }, () => {
            console.log('changeValue 方法执行了 value: ', this.state.value)
            // 发送一个事件
            DemoEvent.emit('sendData', this.state.value)
        })
    }

    render() {
        return (
            <div>
                <h1>孙子组件 GrandSon</h1>
                <p>{this.state.value}</p>
                <button onClick={this.changeValue}>点击</button>
            </div>
        )
    }
}
4、订阅事件
订阅事件可以使用addListener("事件名",回调函数),也可以使用on("事件名",回调函数)
5、取消订阅
取消订阅可以使用removeListener("事件名",回调函数),也可以使用off("事件名",回调函数)
import React from "react";
import DemoEvent from './DemoEvent'
export default class GrandSon2 extends React.Component {
    constructor(props) {
        super(props)
        this.state = {
            value: 0
        }
        this.receiveData = this.receiveData.bind(this)
    }

    componentDidMount() {
        // 订阅事件
        DemoEvent.addListener('sendData', this.receiveData)
    }

    receiveData(data) {
        console.log('接收的数据 data: ', data)
        this.setState({
            value: data
        })
    }

    componentWillUnmount() {
        // 取消订阅
        DemoEvent.removeListener(this.receiveData)
    }

    render() {
        return (
            <div>
                <h1>孙子组件 GrandSon2</h1>
                <p>{this.state.value}</p>
            </div>
        )
    }
} 
使用状态管理实现无关组件通信
可以参考之前的博客:React-redux全局状态管理
补充:自己实现一个EventEmitter
待续