Opencv 中 watershed函数原型:
void watershed( InputArray image, InputOutputArray markers );第一个参数 image,必须是一个8bit 3通道彩色图像矩阵序列,第一个参数没什么要说的。关键是第二个参数 markers,Opencv官方文档的说明如下:
Before passing the image to the function, you have to roughly outline the desired regions in the image markers with positive (>0) indices. So, every region is represented as one or more connected components with the pixel values 1, 2, 3, and so on. Such markers can be retrieved from a binary mask using findContours() and drawContours(). The markers are “seeds” of the future image regions. All the other pixels in markers , whose relation to the outlined regions is not known and should be defined by the algorithm, should be set to 0’s. In the function output, each pixel in markers is set to a value of the “seed” components or to -1 at boundaries between the regions.
就不一句一句翻译了,大意说的是在执行分水岭函数watershed之前,必须对第二个参数markers进行处理,它应该包含不同区域的轮廓,每个轮廓有一个自己唯一的编号,轮廓的定位可以通过Opencv中findContours方法实现,这个是执行分水岭之前的要求。
接下来执行分水岭会发生什么呢?算法会根据markers传入的轮廓作为种子(也就是所谓的注水点),对图像上其他的像素点根据分水岭算法规则进行判断,并对每个像素点的区域归属进行划定,直到处理完图像上所有像素点。而区域与区域之间的分界处的值被置为“-1”,以做区分。
简单概括一下就是说第二个入参markers必须包含了种子点信息。Opencv官方例程中使用鼠标划线标记,其实就是在定义种子,只不过需要手动操作,而使用findContours可以自动标记种子点。而分水岭方法完成之后并不会直接生成分割后的图像,还需要进一步的显示处理,如此看来,只有两个参数的watershed其实并不简单。
下边通过图示来看一下watershed函数的第二个参数markers在算法执行前后发生了什么变化。对于一个原图:

经过灰度化、滤波、Canny边缘检测、findContours轮廓查找、轮廓绘制等步骤后终于得到了符合Opencv要求的merkers,我们把merkers转换成8bit单通道灰度图看看它里边到底是什么内容:
这个是分水岭运算前的merkers:
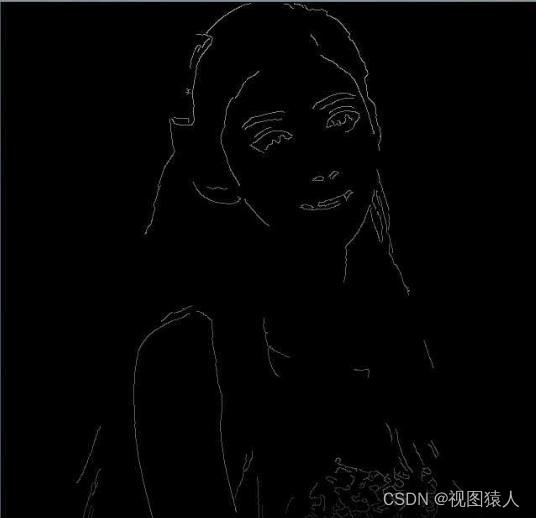
这个是findContours检测到的轮廓:

看效果,基本上跟图像的轮廓是一样的,也是简单的勾勒出了物体的外形。但如果仔细观察就能发现,图像上不同线条的灰度值是不同的,底部略暗,越往上灰度越高。由于这幅图像边缘比较少,对比不是很明显.
从图像底部往上,线条的灰度值是越来越高的,并且merkers图像底部部分线条的灰度值由于太低,已经观察不到了。相互连接在一起的线条灰度值是一样的,这些线条和不同的灰度值又能说明什么呢?
答案是:每一个线条代表了一个种子,线条的不同灰度值其实代表了对不同注水种子的编号,有多少不同灰度值的线条,就有多少个种子,图像最后分割后就有多少个区域。
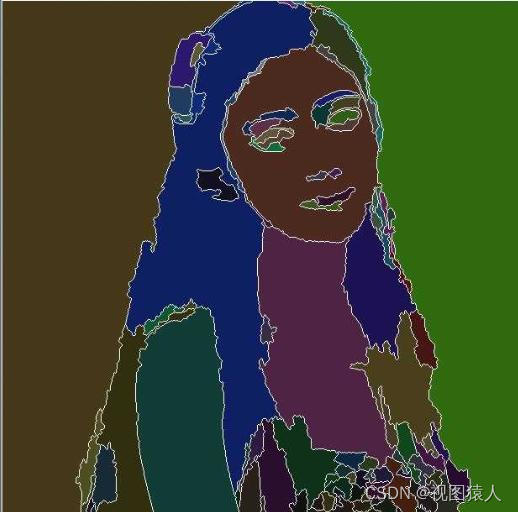
再来看一下执行完分水岭方法之后merkers里边的内容发生了什么变化:

可以看到,执行完watershed之后,merkers里边被分割出来的区域已经非常明显了,空间上临近并且灰度值上相近的区域被划分为一个区域,灰度值是一样,不同区域间被划分开,这其实就是分水岭对图像的分割效果了。
总的概括一下watershed图像自动分割的实现步骤:
1. 图像灰度化、滤波、Canny边缘检测
2. 查找轮廓,并且把轮廓信息按照不同的编号绘制到watershed的第二个入参merkers上,相当于标记注水点。
3. watershed分水岭运算
4. 绘制分割出来的区域,视觉控还可以使用随机颜色填充,或者跟原始图像融合以下,以得到更好的显示效果。
以下是Opencv分水岭算法watershed实现的完整过程:
#include "opencv2/imgproc/imgproc.hpp"
#include "opencv2/highgui/highgui.hpp"

#include <iostream>

using namespace cv;
using namespace std;

Vec3b RandomColor(int value);  //生成随机颜色函数

int main( int argc, char* argv[] )
{
	Mat image=imread(argv[1]);    //载入RGB彩色图像
	imshow("Source Image",image);

	//灰度化,滤波,Canny边缘检测
	Mat imageGray;
	cvtColor(image,imageGray,CV_RGB2GRAY);//灰度转换
	GaussianBlur(imageGray,imageGray,Size(5,5),2);   //高斯滤波
	imshow("Gray Image",imageGray);
	Canny(imageGray,imageGray,80,150);
	imshow("Canny Image",imageGray);

	//查找轮廓
	vector<vector<Point>> contours;
	vector<Vec4i> hierarchy;
	findContours(imageGray,contours,hierarchy,RETR_TREE,CHAIN_APPROX_SIMPLE,Point());
	Mat imageContours=Mat::zeros(image.size(),CV_8UC1);  //轮廓
	Mat marks(image.size(),CV_32S);   //Opencv分水岭第二个矩阵参数
	marks=Scalar::all(0);
	int index = 0;
	int compCount = 0;
	for( ; index >= 0; index = hierarchy[index][0], compCount++ )
	{
		//对marks进行标记,对不同区域的轮廓进行编号,相当于设置注水点,有多少轮廓,就有多少注水点
		drawContours(marks, contours, index, Scalar::all(compCount+1), 1, 8, hierarchy);
		drawContours(imageContours,contours,index,Scalar(255),1,8,hierarchy);
	}

	//我们来看一下传入的矩阵marks里是什么东西
	Mat marksShows;
	convertScaleAbs(marks,marksShows);
	imshow("marksShow",marksShows);
	imshow("轮廓",imageContours);
	watershed(image,marks);

	//我们再来看一下分水岭算法之后的矩阵marks里是什么东西
	Mat afterWatershed;
	convertScaleAbs(marks,afterWatershed);
	imshow("After Watershed",afterWatershed);

	//对每一个区域进行颜色填充
	Mat PerspectiveImage=Mat::zeros(image.size(),CV_8UC3);
	for(int i=0;i<marks.rows;i++)
	{
		for(int j=0;j<marks.cols;j++)
		{
			int index=marks.at<int>(i,j);
			if(marks.at<int>(i,j)==-1)
			{
				PerspectiveImage.at<Vec3b>(i,j)=Vec3b(255,255,255);
			}
			else
			{
				PerspectiveImage.at<Vec3b>(i,j) =RandomColor(index);
			}
		}
	}
	imshow("After ColorFill",PerspectiveImage);

	//分割并填充颜色的结果跟原始图像融合
	Mat wshed;
	addWeighted(image,0.4,PerspectiveImage,0.6,0,wshed);
	imshow("AddWeighted Image",wshed);

	waitKey();
}

Vec3b RandomColor(int value)    <span style="line-height: 20.8px; font-family: sans-serif;">//生成随机颜色函数</span>
{
	value=value%255;  //生成0~255的随机数
	RNG rng;
	int aa=rng.uniform(0,value);
	int bb=rng.uniform(0,value);
	int cc=rng.uniform(0,value);
	return Vec3b(aa,bb,cc);
}
分割效果: