说明
由于响应式相关内容太多,决定先接着上文组件挂载后,继续分析组件后续更新流程,先不分析组件是如何分析的。
例子
将这个 用例 使用 vitest 插件 debug 运行起来 慢慢配合下面 核心代码 来理解
 it('should support runtime template compilation', async () => {


    const container = document.createElement('div')
    container.classList.add('app')
    const foo = {

    name:'kd'}
    let temp ;
    // 子组件
    const child = defineComponent({


      template: `
         <div><p>{

     {age}}</p></div>
      `,
      props:{


        age:{


          type: Number,
          default:20
        }
      }
  })
   let num = 1000
    const App = {


      components:{

    child},
      beforeMount() {


        console.log('beforeMount');

      },
      data() {


        return {


        }
      },
      setup() {


        const count = ref(1)

        const age = ref('20')


        onMounted(()=>{


          count.value = 5
          age.value = '2'
        })

        onUpdated(()=>{


          num++
        })
        // const obj = reactive({name:'kd'})
        // return {obj,time}
        return ()=>{


          return  h('div',[count.value,h(child,{

    age:age.value})])
        }
      }
    }
    createApp(App).mount(container)
    await nextTick()
    // time.value = 2000
    // await nextTick()
    expect(foo).equals(temp)
     expect(container.innerHTML).toBe(`0`)
  })
processComponent
还记得 patch 中 processComponent 初始化副作用函数中 的 updateComponentFn 吗?
当 onMounted 中 count age 响应式数据改变时 就会触发 App 组件 instance 中的 effect (也就是 app 组件在初始化挂载时候创建的)
// packages/runtime-core/src/renderer.ts
const setupRenderEffect: SetupRenderEffectFn = (
    instance,
    initialVNode,
    container,
    anchor,
    parentSuspense,
    isSVG,
    optimized
  ) => {


 const componentUpdateFn = ()=>{

    ...}
const effect = (instance.effect = new ReactiveEffect({

    componentUpdateFn,
      () => queueJob(update),
      instance.scope}))
  const update: SchedulerJob = (instance.update = () => effect.run())
    update.id = instance.uid
    //... 省略部分逻辑
    update()
}
其中 effect 就是 响应式数据更新 会触发调用的 就会走到 componentUpdateFn 中的组件更新部分
componentUpdateFn
 const componentUpdateFn = ()=>{


    if (!instance.isMounted) {

    ...}
    else {


       // 组件更新
        // updateComponent
        // This is triggered by mutation of component's own state (next: null) 由组件自身状态的突变触发时(next: null)
        // OR parent calling processComponent (next: VNode) 父组件 调用一般就是 有新的属性 props slots 改变 有新的vnode
        let {

     next, bu, u, parent, vnode } = instance
        // 如果有 next 的话说明需要更新组件的数组(props, slot 等)
        let originNext = next
        // ... 省略
       if (next) {


          next.el = vnode.el
          // 更新组件vnode实例信息 props slots 等
          updateComponentPreRender(instance, next, optimized)
        } else {


          //没有代表 不需要更新 自身
          next = vnode
        }
   }
// render
        if (__DEV__) {


          startMeasure(instance, `render`)
        }
        // 新的vnode
        const nextTree = renderComponentRoot(instance)
        if (__DEV__) {


          endMeasure(instance, `render`)
        }
        // 旧的vnode
        const prevTree = instance.subTree
        // 新的vnode 给下次渲染更新使用
        instance.subTree = nextTree

        if (__DEV__) {


          startMeasure(instance, `patch`)
        }
        // diff更新
        patch(
          prevTree,
          nextTree,
          // parent may have changed if it's in a teleport
          hostParentNode(prevTree.el!)!,
          // anchor may have changed if it's in a fragment
          getNextHostNode(prevTree),
          instance,
          parentSuspense,
          isSVG
        )
         if (__DEV__) {


          endMeasure(instance, `patch`)
        }
        next.el = nextTree.el

}
这时候 的 instance 是app 由于是内部数据触发的渲染,所以本身的 props slots 并没有发生改变 所以 这时候 next 为null (后面再说明什么时候 执行 updateComponentPreRender)
走到下面 patch 后 会更新 child 组件 这时候 又会进入 processComponent 会走到 updateComponent 方法
updateComponent
const updateComponent = (n1: VNode, n2: VNode, optimized: boolean) => {


    const instance = (n2.component = n1.component)!
    // 先去判断组件自身是否需要被更新
    if (shouldUpdateComponent(n1, n2, optimized)) {


      if (
        __FEATURE_SUSPENSE__ &&
        instance.asyncDep &&
        !instance.asyncResolved
      ) {


        // async & still pending - just update props and slots
        // since the component's reactive effect for render isn't set-up yet
        if (__DEV__) {


          pushWarningContext(n2)
        }
        updateComponentPreRender(instance, n2, optimized)
        if (__DEV__) {


          popWarningContext()
        }
        return
      } else {


        // normal update 将 需要
        instance.next = n2
        // in case the child component is also queued, remove it to avoid
        // double updating the same child component in the same flush.
        // 先执行 invalidataJob 避免子组件(指的是app 的 子组件child)由于自身数据变化导致的重复更新 去除queue 中 子组件的更新 任务(就是子组件child自身的 update)
        invalidateJob(instance.update)
        // instance.update is the reactive effect.
        // 主动触发child组件的更新
        instance.update()
      }
    } else {


      // no update needed. just copy over properties 不需要更新就把之前节点的元素 赋值给 新节点 在赋值到组件的vnode上
      n2.el = n1.el
      instance.vnode = n2
    }
  }
这时候 child 组件实例 instance next 属性 会被复制 成 新的vnode 在手动触发组件更新 又走到 child instance 实例初始化 生成的 componentUpdateFn 中 这时候 就会 走有 next 逻辑 会去更新 child 组件的 props slots 等属性
再来看看 updateComponentPreRender
updateComponentPreRender
const updateComponentPreRender = (
    instance: ComponentInternalInstance,
    nextVNode: VNode,
    optimized: boolean
  ) => {


    // 新组件 vnode 的 component 属性指向组件实例
    nextVNode.component = instance
    // 旧组件vnode 的 props属性
    const prevProps = instance.vnode.props
    //组件实例的vnode属性 也指向新的组件vnode
    instance.vnode = nextVNode
    // 清空next 属性 为下一次重新渲染做准备
    instance.next = null
    // 更新 props
    updateProps(instance, nextVNode.props, prevProps, optimized)
    // 更新 slots
    updateSlots(instance, nextVNode.children, optimized)

    pauseTracking()
    // props update may have triggered pre-flush watchers.
    // flush them before the render update.
    flushPreFlushCbs()
    resetTracking()
  }
child 更新完 自身属性后 执行renderComponentRoot 根据新的组件属性 生成新的 vnode 再会 走 patch = > processElement => 再 diff 更新…
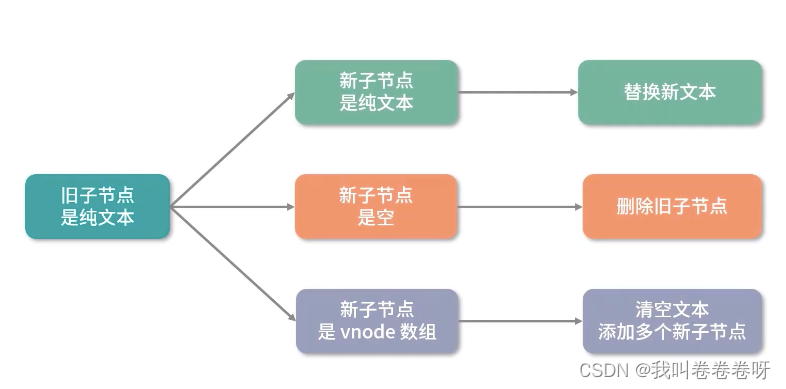
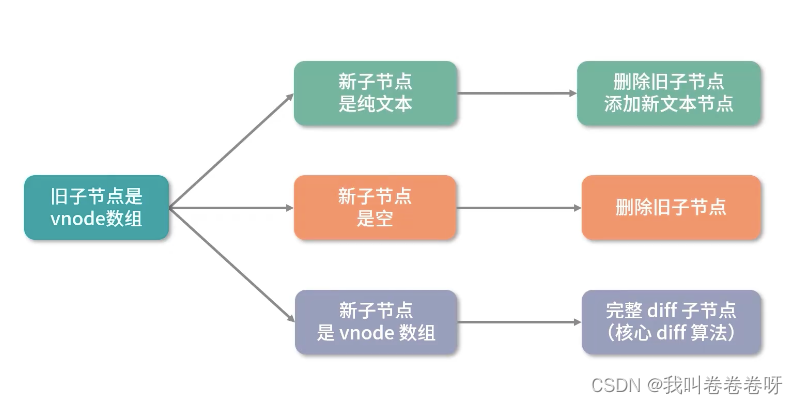
普通元素的比较规则 就不展开说了
总结
processComponent 处理组件 vnode 本质就是先去判断子组件是否需要更新。
如果需要 则 递归子组件的副作用渲染函数来更新,否则仅仅更新一些vnode的属性,并让子组件 实例保留 对组件(自身) vnode 的引用,用于子组件自身数据变化引起组件(自身)重新渲染的时候可以拿到最新的组件(自身)vnode