序言
之前写过一个yolov5的半标注程序,可以大大提高标注工作效率,最近在捣鼓yolov8,索性也写个简单的yolov8半标注实现,以下记录该脚本使用过程。
往期教程:
一、实现一:onnx
因为yolov8的后处理都封装好了,所以使用起来特别容易,但是这里为了摆脱pytorch框架,我决定使用onnx文件进行推理,所以依赖也很简单,只需要依赖如下库:
opencv-python>=4.6.0
PyYAML>=5.3.1
直接pip安装即可:
因为是onnx推理,所以在使用前,需要将pt文件转换为onnx文件:
yolo export model=./weights/yolov8n.pt imgsz=640 format=onnx opset=12
具体实现代码如下:
import os
import cv2.dnn
import numpy as np
from lxml.etree import Element, SubElement, tostring
import re
import yaml

def yaml_load(file='data.yaml'):
    """
    Load YAML data from a file.

    Args:
        file (str, optional): File name. Default is 'data.yaml'.
        append_filename (bool): Add the YAML filename to the YAML dictionary. Default is False.

    Returns:
        dict: YAML data and file name.
    """
    with open(file, errors='ignore', encoding='utf-8') as f:
        # Add YAML filename to dict and return
        s = f.read()  # string
        if not s.isprintable():  # remove special characters
            s = re.sub(r'[^\x09\x0A\x0D\x20-\x7E\x85\xA0-\uD7FF\uE000-\uFFFD\U00010000-\U0010ffff]+', '', s)
    return yaml.safe_load(s)

def draw_bounding_box(img, class_id, confidence, x, y, x_plus_w, y_plus_h,CLASSES,colors):
    label = f'{

      CLASSES[class_id]} ({

      confidence:.2f})'
    color = colors[class_id]
    cv2.rectangle(img, (x, y), (x_plus_w, y_plus_h), color, 2)
    cv2.putText(img, label, (x - 10, y - 10), cv2.FONT_HERSHEY_SIMPLEX, 0.5, color, 2)


def create_xml(boxs,img_shape,xml_path):
    """
    创建xml文件,依次写入xml文件必备关键字
    :param boxs:   txt文件中的box
    :param img_shape:   图片信息,xml中需要写入WHC
    :return:
    """
    node_root = Element('annotation')
    node_folder = SubElement(node_root, 'folder')
    node_folder.text = 'Images'
    node_filename = SubElement(node_root, 'filename')
    node_filename.text = str(img_shape[3])
    node_size = SubElement(node_root, 'size')
    node_width = SubElement(node_size, 'width')
    node_width.text = str(img_shape[1])
    node_height = SubElement(node_size, 'height')
    node_height.text = str(img_shape[0])
    node_depth = SubElement(node_size, 'depth')
    node_depth.text = str(img_shape[2])

    if len(boxs)>=1:        # 循环写入box
        for box in boxs:
            node_object = SubElement(node_root, 'object')
            node_name = SubElement(node_object, 'name')
            # if str(list_[4]) == "person":                # 根据条件筛选需要标注的标签,例如这里只标记person这类,不符合则直接跳过
            #     node_name.text = str(list_[4])
            # else:
            #     continue
            node_name.text = str(box[4])
            node_difficult = SubElement(node_object, 'difficult')
            node_difficult.text = '0'
            node_bndbox = SubElement(node_object, 'bndbox')
            node_xmin = SubElement(node_bndbox, 'xmin')
            node_xmin.text = str(box[0])
            node_ymin = SubElement(node_bndbox, 'ymin')
            node_ymin.text = str(box[1])
            node_xmax = SubElement(node_bndbox, 'xmax')
            node_xmax.text = str(box[2])
            node_ymax = SubElement(node_bndbox, 'ymax')
            node_ymax.text = str(box[3])

    xml = tostring(node_root, pretty_print=True)   # 格式化显示,该换行的换行

    file_name = img_shape[3].split(".")[0]
    filename = xml_path+"/{}.xml".format(file_name)

    f = open(filename, "wb")
    f.write(xml)
    f.close()


def main(onnx_path,imgs_path,xmls_path,output_path,data_yaml):
    model: cv2.dnn.Net = cv2.dnn.readNetFromONNX(onnx_path)         # 初始化模型
    CLASSES = yaml_load(data_yaml)['names']                         # 初始化类别
    colors = np.random.uniform(0, 255, size=(len(CLASSES), 3))               # 初始化画图颜色

    for name in os.listdir(imgs_path):
        original_image: np.ndarray = cv2.imread(os.path.join(imgs_path,name))
        img_shape = (original_image.shape[0], original_image.shape[1], original_image.shape[2], name)             # 记录图片WHC和name,用于写入xmls

        [height, width, _] = original_image.shape
        length = max((height, width))
        image = np.zeros((length, length, 3), np.uint8)
        image[0:height, 0:width] = original_image
        scale = length / 640

        blob = cv2.dnn.blobFromImage(image, scalefactor=1 / 255, size=(640, 640))
        model.setInput(blob)
        outputs = model.forward()

        outputs = np.array([cv2.transpose(outputs[0])])
        rows = outputs.shape[1]

        boxes = []
        scores = []
        class_ids = []

        for i in range(rows):
            classes_scores = outputs[0][i][4:]
            (minScore, maxScore, minClassLoc, (x, maxClassIndex)) = cv2.minMaxLoc(classes_scores)
            if maxScore >= 0.25:
                box = [
                    outputs[0][i][0] - (0.5 * outputs[0][i][2]), outputs[0][i][1] - (0.5 * outputs[0][i][3]),
                    outputs[0][i][2], outputs[0][i][3]]
                boxes.append(box)
                scores.append(maxScore)
                class_ids.append(maxClassIndex)

        result_boxes = cv2.dnn.NMSBoxes(boxes, scores, 0.25, 0.45, 0.5)

        detections = []
        xyxy = []
        for i in range(len(result_boxes)):
            index = result_boxes[i]
            box = boxes[index]                   # xywh
            xyxy.append([round(box[0] * scale), round(box[1] * scale),
                         round((box[0] + box[2]) * scale), round((box[1] + box[3]) * scale),CLASSES[class_ids[index]]])                    #

            detection = {


                'class_id': class_ids[index],
                'class_name': CLASSES[class_ids[index]],
                'confidence': scores[index],
                'box': box,
                'scale': scale}
            detections.append(detection)

            draw_bounding_box(original_image, class_ids[index], scores[index], round(box[0] * scale), round(box[1] * scale),
                              round((box[0] + box[2]) * scale), round((box[1] + box[3]) * scale),CLASSES,colors)

        if len(xyxy)>0:
            create_xml(xyxy,img_shape,xmls_path)                               # 生成xmls文件

        cv2.imwrite(os.path.join(output_path,name),original_image)             # 保留输出结果图

        # cv2.imshow('image', original_image)
        # cv2.waitKey(0)
        # cv2.destroyAllWindows()

if __name__ == '__main__':

    onnx_path = './weights/yolov8n.onnx'                  # onnx路径
    imgs_path = "./ultralytics/assets"                    # 图片路径
    xmls_path = "./xmls"                                            # 生成xmls文件路径
    output_path = "./outputs"                             # 输出推理图片路径
    data_yaml = "./ultralytics/datasets/coco128.yaml"     # 自己的data.yaml 路径

    main(onnx_path,imgs_path,xmls_path,output_path,data_yaml)
二、实现二:pytorch
还是使用torch框架推理,同样很方便,因为推理代码都封装好了,直接调用即可:
import time
import torch
from ultralytics import YOLO
import numpy as np
import cv2
import os
from lxml.etree import Element, SubElement, tostring


def create_xml(boxs,img_shape,xml_path):
    """
    创建xml文件,依次写入xml文件必备关键字
    :param boxs:   txt文件中的box
    :param img_shape:   图片信息,xml中需要写入WHC
    :return:
    """
    node_root = Element('annotation')
    node_folder = SubElement(node_root, 'folder')
    node_folder.text = 'Images'
    node_filename = SubElement(node_root, 'filename')
    node_filename.text = str(img_shape[3])
    node_size = SubElement(node_root, 'size')
    node_width = SubElement(node_size, 'width')
    node_width.text = str(img_shape[1])
    node_height = SubElement(node_size, 'height')
    node_height.text = str(img_shape[0])
    node_depth = SubElement(node_size, 'depth')
    node_depth.text = str(img_shape[2])

    if len(boxs)>=1:        # 循环写入box
        for box in boxs:
            node_object = SubElement(node_root, 'object')
            node_name = SubElement(node_object, 'name')
            # if str(list_[4]) == "person":                # 根据条件筛选需要标注的标签,例如这里只标记person这类,不符合则直接跳过
            #     node_name.text = str(list_[4])
            # else:
            #     continue
            node_name.text = str(box[4])
            node_difficult = SubElement(node_object, 'difficult')
            node_difficult.text = '0'
            node_bndbox = SubElement(node_object, 'bndbox')
            node_xmin = SubElement(node_bndbox, 'xmin')
            node_xmin.text = str(box[0])
            node_ymin = SubElement(node_bndbox, 'ymin')
            node_ymin.text = str(box[1])
            node_xmax = SubElement(node_bndbox, 'xmax')
            node_xmax.text = str(box[2])
            node_ymax = SubElement(node_bndbox, 'ymax')
            node_ymax.text = str(box[3])

    xml = tostring(node_root, pretty_print=True)   # 格式化显示,该换行的换行

    file_name = img_shape[3].split(".")[0]
    filename = xml_path+"/{}.xml".format(file_name)

    f = open(filename, "wb")
    f.write(xml)
    f.close()


def draw_bounding_box(img, class_name, confidence, x, y, x_plus_w, y_plus_h,color):
    label = f'{

      class_name} ({

      confidence:.2f})'
    cv2.rectangle(img, (x, y), (x_plus_w, y_plus_h), color, 2)
    cv2.putText(img, label, (x - 10, y - 10), cv2.FONT_HERSHEY_SIMPLEX, 0.5, color, 2)


def main(weights_path,img_path,xml_path,outputs_path):
    model = YOLO(weights_path)
    arr = torch.ones(1,3,224,224)
    result_init = model(arr)[0]
    colors = np.random.uniform(0, 255, size=(len(result_init.names), 3))       # 初始化画图颜色

    for name in os.listdir(img_path):
        t0 = time.time()
        original_image = cv2.imread(os.path.join(img_path,name))
        img_shape = (original_image.shape[0], original_image.shape[1], original_image.shape[2], name)

        # Use the model
        results = model(original_image)[0]  # predict on an image
        boxes = results.boxes.cpu().numpy()
        CLASSES = results.names
        xyxy_cls = []

        for i in range(len(boxes.xyxy)):
            xyxy_cls.append([int(boxes.xyxy[i][0]),int(boxes.xyxy[i][1]),int(boxes.xyxy[i][2]),int(boxes.xyxy[i][3]),CLASSES[boxes.cls[i]]])
            draw_bounding_box(original_image,CLASSES[boxes.cls[i]],boxes.conf[i],int(boxes.xyxy[i][0]),int(boxes.xyxy[i][1]),int(boxes.xyxy[i][2]),int(boxes.xyxy[i][3]),colors[int(boxes.cls[i])])

        if len(xyxy_cls) >0:
            create_xml(xyxy_cls,img_shape,xml_path)      # 创建xmls
        t1 = time.time()

        print("img name: {}  infer:{:4f} ms".format(name,(t1-t0)*1000))
        cv2.imwrite(os.path.join(outputs_path, name), original_image)          # 保留输出结果图

        # cv2.imshow('image', original_image)
        # cv2.waitKey(0)
        # cv2.destroyAllWindows()


if __name__ =="__main__":

    weights_path = "./weights/yolov8n.pt"
    imgs_path = "./ultralytics/assets"
    xmls_path = "./ultralytics/assets"
    outputs_path = "./"


    main(weights_path,imgs_path,xmls_path,outputs_path)
在两种方式使用过程中只需要修改相关路径即可直接运行。
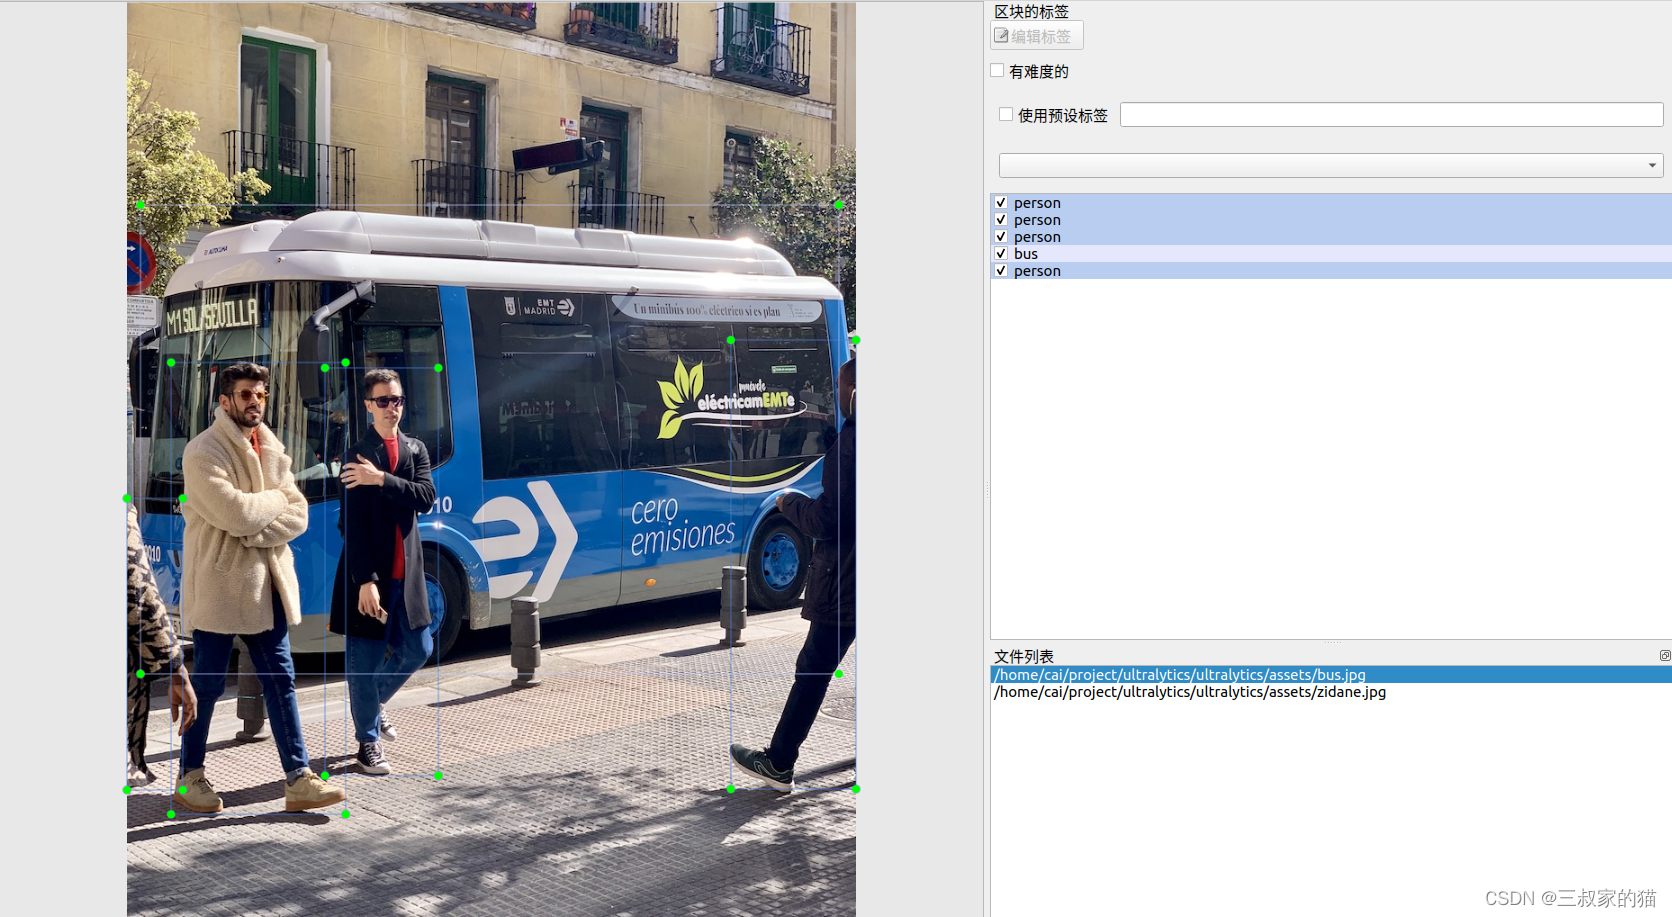
最后打开labelimg标注程序,效果如下: