YOLOv8测试(1)
鉴于网络上的太多教程,都太过繁琐了。其实之前也用过YOLOv2 v3版本,但很久没用,找了一圈教程多少有坑,想想还是自己整理一版吧。花了几天时间仔细看了看,发现还是官网的教程靠谱并且简洁,整理了一个最简快速流程,帮助想要使用目标检测算法的爱好者快速上手项目。
1. 训练最简流程
对于多数用户来说,都是面向边缘端的项目,实际上,日常监测任务也不要求特别高的训练精度,为了能够快速训练,这里选择Github中提到的YOLOv8n模型。
1.1 安装包
- 安装
pip install ultralytics
-检验
Ultralytics YOLOv8.0.51  Python-3.8.13 torch-1.12.0 CUDA:0 (NVIDIA GeForce GTX 1070, 8192MiB)
Setup complete  (20 CPUs, 31.9 GB RAM, 388.2/829.5 GB disk)

1.2 训练demo
官方给的demo似乎对于Pycharm用户会有小报错,使用那个网页版的jupyter notebook似乎不会,应该就是线程的问题
- 官方代码
from ultralytics import YOLO

# Load a model
# model = YOLO("yolov8n.yaml")  # build a new model from scratch
model = YOLO("yolov8n.pt")  # load a pretrained model (recommended for training)
COCO128是一个示例性的小教程数据集,由COCO train2017中的前128幅图像组成。这些相同的128幅图像用于训练和验证,以验证训练管道是否会过拟合。
# Use the model
results = model.train(data="coco128.yaml", epochs=3)  # train the model
- 修改的,增加了main函数就行
from ultralytics import YOLO

# Load a model
def main():
    model = YOLO("yolov8n.yaml")  # build a new model from scratch
    model = YOLO("yolov8n.pt")  # load a pretrained model (recommended for training)
    #
    model.train(data="coco128.yaml", epochs=5)

if __name__ == '__main__':
     main()
1.3 验证
- 完整代码
from ultralytics import YOLO

# Load a model
def main():
    model = YOLO("yolov8n.yaml")  # build a new model from scratch
    model = YOLO("yolov8n.pt")  # load a pretrained model (recommended for training)
    #
    model.train(data="coco128.yaml", epochs=5)
    results = model.val()  # evaluate model performance on the validation set

if __name__ == '__main__':
     main()
- 日志
Image sizes 640 train, 640 val
Using 8 dataloader workers
Logging results to runs\detect\train9
Starting training for 5 epochs...

      Epoch    GPU_mem   box_loss   cls_loss   dfl_loss  Instances       Size
        1/5      5.85G      1.213      1.429      1.258        215        640: 100%|██████████| 8/8 [00:05<00:00,  1.58it/s]
                 Class     Images  Instances      Box(P          R      mAP50  mAP50-95): 100%|██████████| 4/4 [00:36<00:00,  9.12s/it]
                   all        128        929      0.668       0.54      0.624      0.461

      Epoch    GPU_mem   box_loss   cls_loss   dfl_loss  Instances       Size
        2/5      6.87G      1.156      1.327      1.243        163        640: 100%|██████████| 8/8 [00:04<00:00,  1.64it/s]
                 Class     Images  Instances      Box(P          R      mAP50  mAP50-95): 100%|██████████| 4/4 [00:35<00:00,  8.91s/it]
                   all        128        929      0.667      0.589      0.651      0.487

      Epoch    GPU_mem   box_loss   cls_loss   dfl_loss  Instances       Size
      ...
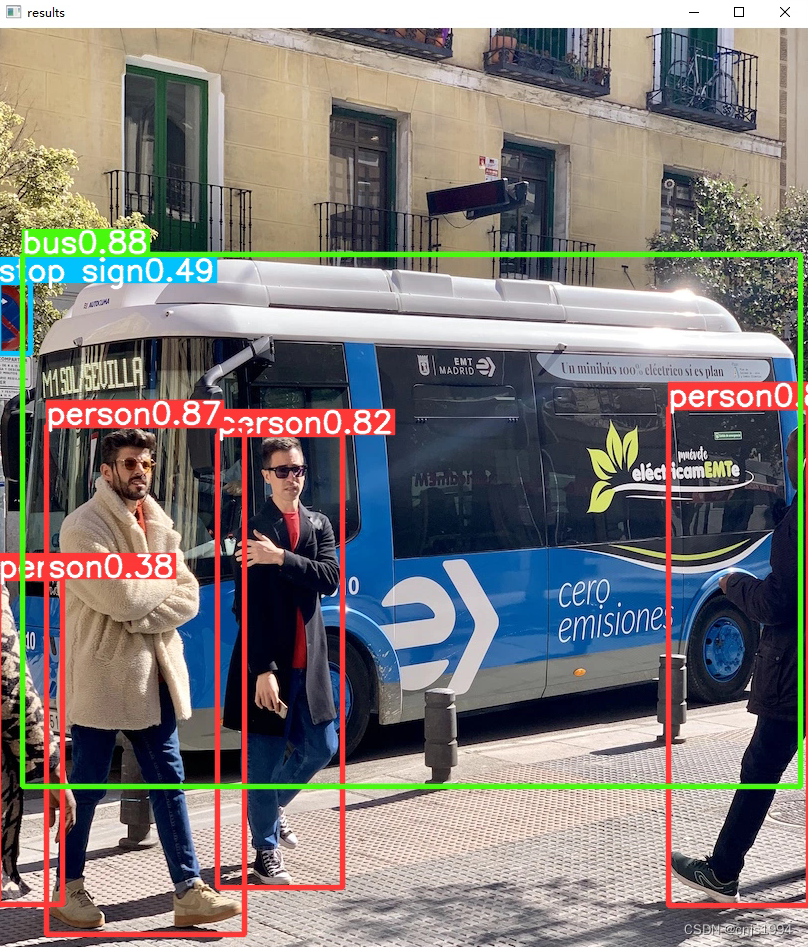
- 预测结果
返回的信息也挺全面的,包括Boxes 原始图像 尺寸之类的
results:[{

     '_keys': <generator object Results.__init__.<locals>.<genexpr> at 0x0000023FA2FC0350>,
  'boxes': ultralytics.yolo.engine.results.Boxes
type:  torch.Tensor
shape: torch.Size([6, 6])
dtype: torch.float32
tensor([[2.40000e+01, 2.26000e+02, 8.02000e+02, 7.58000e+02, 8.75480e-01, 5.00000e+00],
        [4.80000e+01, 3.97000e+02, 2.46000e+02, 9.06000e+02, 8.74487e-01, 0.00000e+00],
        [6.70000e+02, 3.79000e+02, 8.10000e+02, 8.77000e+02, 8.53311e-01, 0.00000e+00],
        [2.19000e+02, 4.06000e+02, 3.44000e+02, 8.59000e+02, 8.16101e-01, 0.00000e+00],
        [0.00000e+00, 2.54000e+02, 3.20000e+01, 3.25000e+02, 4.91605e-01, 1.10000e+01],
        [0.00000e+00, 5.50000e+02, 6.40000e+01, 8.76000e+02, 3.76493e-01, 0.00000e+00]], device='cuda:0'),
  'masks': None,
  'names': {

     0: 'person',
             1: 'bicycle',
             ...
             79: 'toothbrush'},
  'orig_img': array([[[122, 148, 172],
        [120, 146, 170],
        [125, 153, 177],
        ...,

        ...,
        [ 99,  89,  95],
        [ 96,  86,  92],
        [102,  92,  98]]], dtype=uint8),
  'orig_shape': (1080, 810),
  'path': '..\\bus.jpg',
  'probs': None,
  'speed': {

    'inference': 30.916452407836914, 'postprocess': 2.992391586303711, 'preprocess': 3.988981246948242}}]
- 可视化结果
小结:
- 避免多线程导致的程序报错
错误:This probably means that you are not using fork to start your
child processes and you have forgotten to use the proper idiom
in the main module:
        if __name__ == '__main__':
            freeze_support()
            ...

    The "freeze_support()" line can be omitted if the program
    is not going to be frozen to produce an executable.
- 训练注意关闭KX上网工具,否则模型文件可能下载失败
错误:requests.exceptions.ProxyError: HTTPSConnectionPool(host=‘pypi.org’, port=443): Max retries exceeded with url: /pypi/ultralytics/json (Caused by ProxyError(‘Cannot connect to proxy.’, FileNotFoundError(2, ‘No such file or directory’))) - opencv包报错:具体可参考这篇【2】
The function is not implemented. Rebuild the library with Windows, GTK+ 2.x or Cocoa support.
参考文献资料
【1】YOLOv8官方Github
【2】https://stackoverflow.com/questions/74035760/opencv-waitkey-throws-assertion-rebuild-the-library-with-windows-gtk-2-x-or