1. 上传组件
使用KindEditor的上传组件:
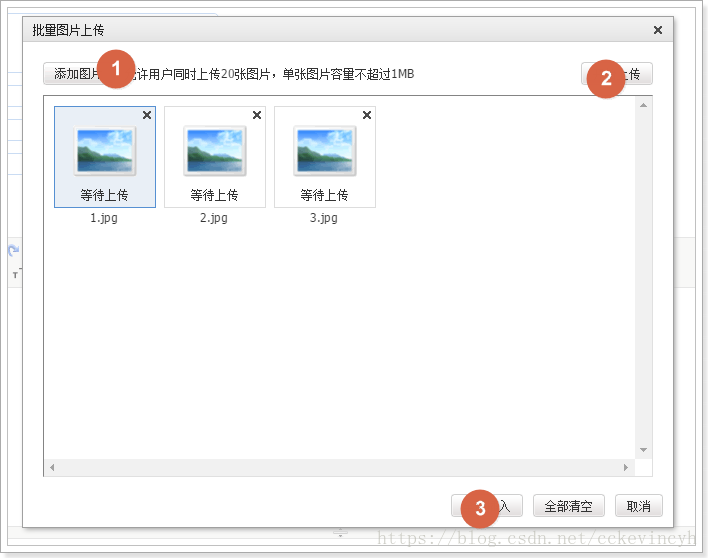
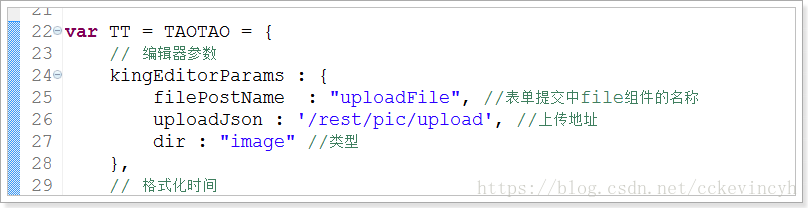
2. 上传组件的JS实现
2.1 上传参数
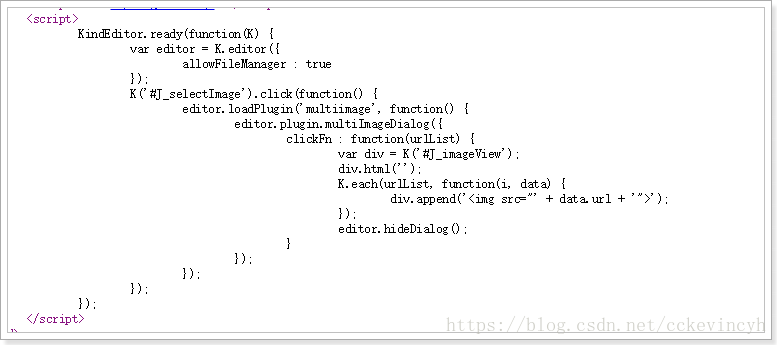
2.2 官方示例代码
workspace/taotao-manage/taotao-manage-web/src/main/webapp/js/kindeditor-4.1.10/examples/multi-image-dialog.html
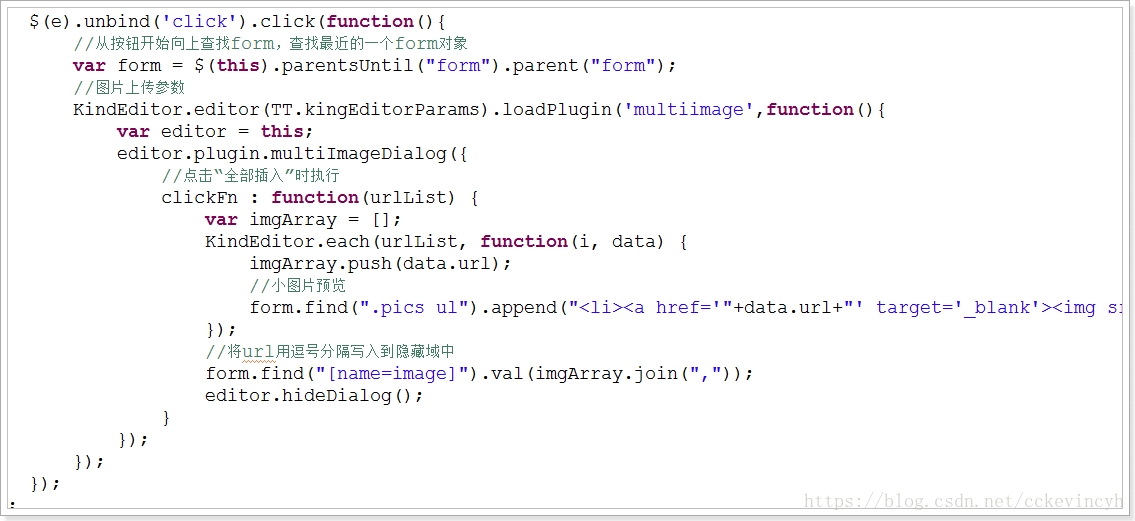
2.3 实现
3. 实现图片上传
在SpringMVC中实现图片上传:
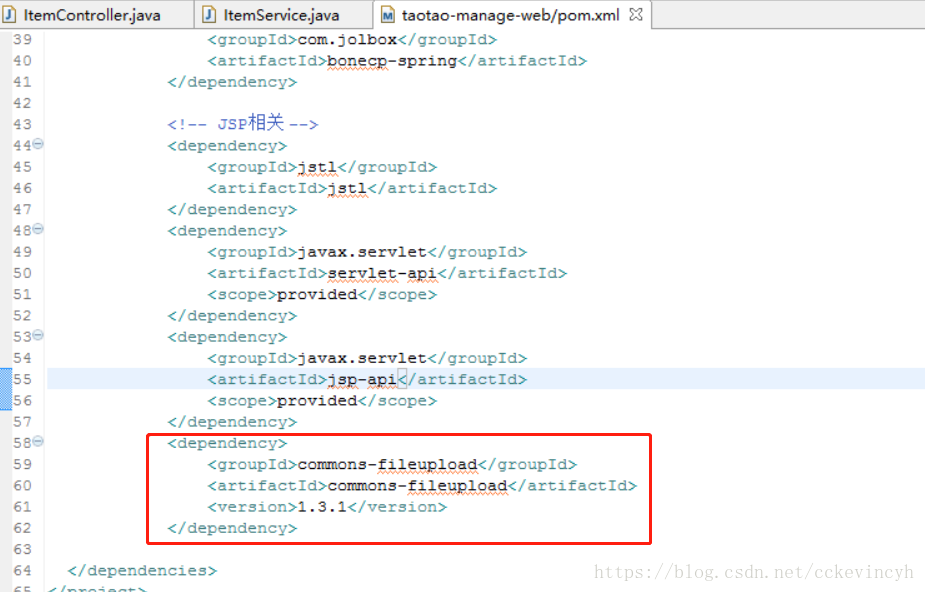
1、 导入依赖 commons-fileupload
2、 配置文件上传解析器

3、 编写具体的上传逻辑(Controller)
对文件做校验:
1、 类型,通过文件的后缀名
2、 大小
3、 上传文件的内容做校验
a) 通过获取文件的宽和高来判断是否是图片
web层pom.xml加入依赖:

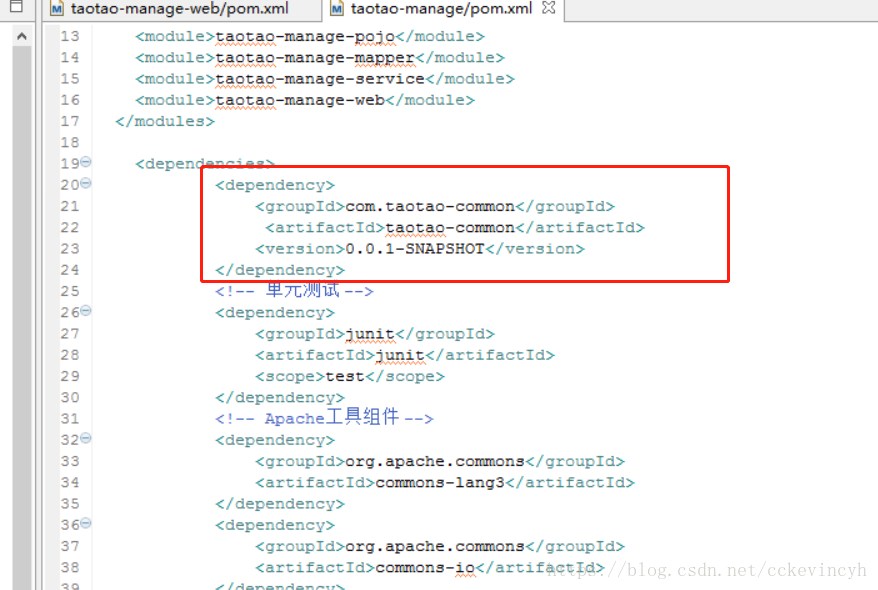
taotao-manage加入common依赖:
common加入上传的bean:
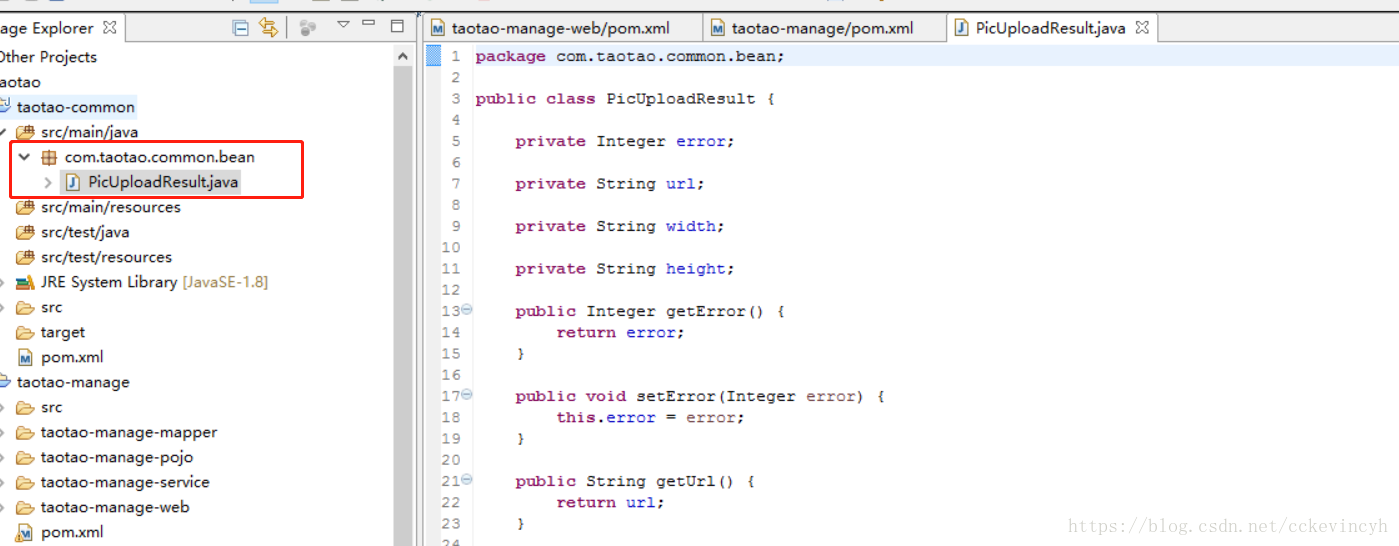
package com.taotao.common.bean;

public class PicUploadResult {

    private Integer error;

    private String url;

    private String width;

    private String height;

    public Integer getError() {
        return error;
    }

    public void setError(Integer error) {
        this.error = error;
    }

    public String getUrl() {
        return url;
    }

    public void setUrl(String url) {
        this.url = url;
    }

    public String getWidth() {
        return width;
    }

    public void setWidth(String width) {
        this.width = width;
    }

    public String getHeight() {
        return height;
    }

    public void setHeight(String height) {
        this.height = height;
    }


}
controller具体上传逻辑:
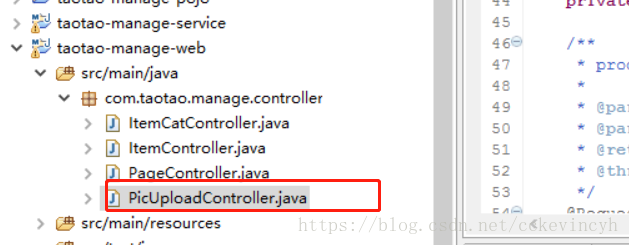
package com.taotao.manage.controller;
import java.awt.image.BufferedImage;
import java.io.File;
import java.io.IOException;
import java.util.Date;
import javax.imageio.ImageIO;
import javax.servlet.http.HttpServletResponse;
import org.apache.commons.lang3.RandomUtils;
import org.apache.commons.lang3.StringUtils;
import org.joda.time.DateTime;
import org.slf4j.Logger;
import org.slf4j.LoggerFactory;
import org.springframework.beans.factory.annotation.Autowired;
import org.springframework.http.MediaType;
import org.springframework.stereotype.Controller;
import org.springframework.web.bind.annotation.RequestMapping;
import org.springframework.web.bind.annotation.RequestMethod;
import org.springframework.web.bind.annotation.RequestParam;
import org.springframework.web.bind.annotation.ResponseBody;
import org.springframework.web.multipart.MultipartFile;
import com.fasterxml.jackson.databind.ObjectMapper;
import com.taotao.common.bean.PicUploadResult;
import com.taotao.manage.service.PropertieService;
/**
* 图片上传
*/
@Controller
@RequestMapping("pic")
public class PicUploadController {
private static final Logger LOGGER = LoggerFactory.getLogger(PicUploadController.class);
private static final ObjectMapper mapper = new ObjectMapper();
// 允许上传的格式
private static final String[] IMAGE_TYPE = new String[] { ".bmp", ".jpg", ".jpeg", ".gif", ".png" };
/**
* produces: 指定响应类型
*
* @param uploadFile
* @param response
* @return
* @throws Exception
*/
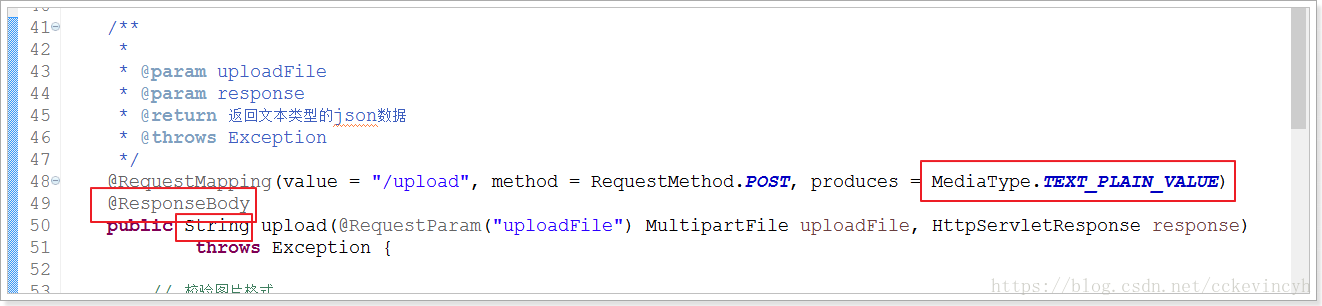
@RequestMapping(value = "/upload", method = RequestMethod.POST, produces = MediaType.TEXT_PLAIN_VALUE)
@ResponseBody
public String upload(@RequestParam("uploadFile") MultipartFile uploadFile, HttpServletResponse response)
throws Exception {
// 校验图片格式
boolean isLegal = false;
for (String type : IMAGE_TYPE) {
if (StringUtils.endsWithIgnoreCase(uploadFile.getOriginalFilename(), type)) {
isLegal = true;
break;
}
}
// 封装Result对象,并且将文件的byte数组放置到result对象中
PicUploadResult fileUploadResult = new PicUploadResult();
// 状态
fileUploadResult.setError(isLegal ? 0 : 1);
// 文件新路径
String filePath = getFilePath(uploadFile.getOriginalFilename());
if (LOGGER.isDebugEnabled()) {
LOGGER.debug("Pic file upload .[{}] to [{}] .", uploadFile.getOriginalFilename(), filePath);
}
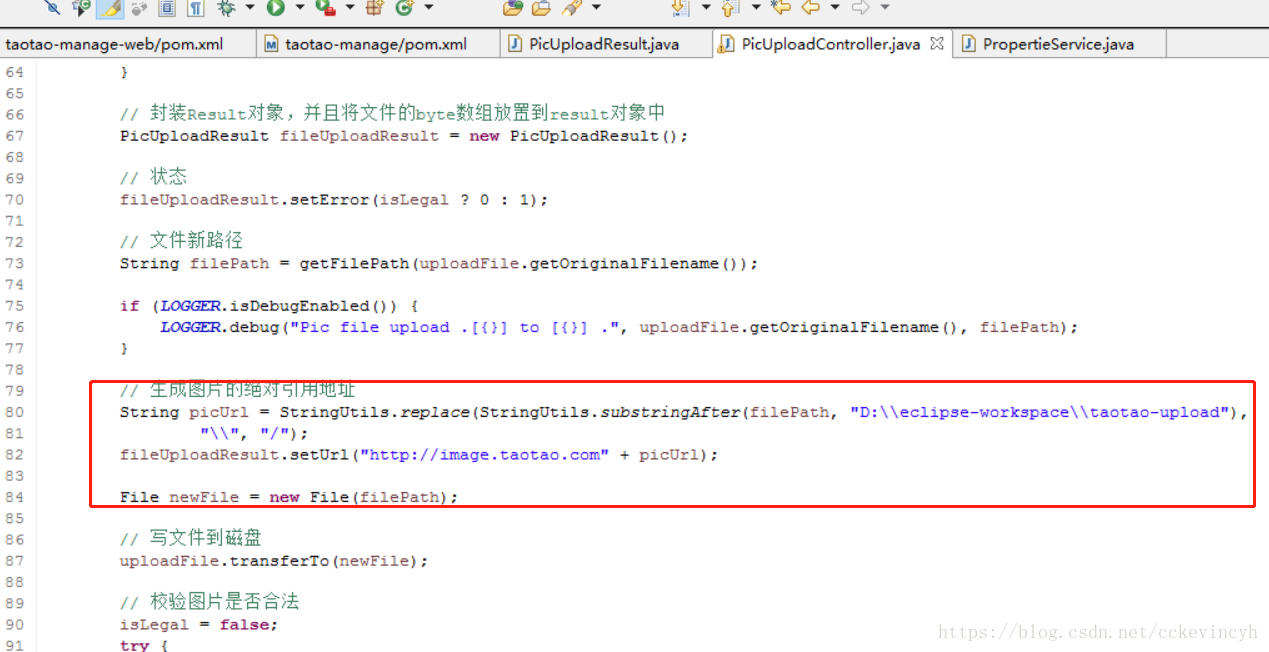
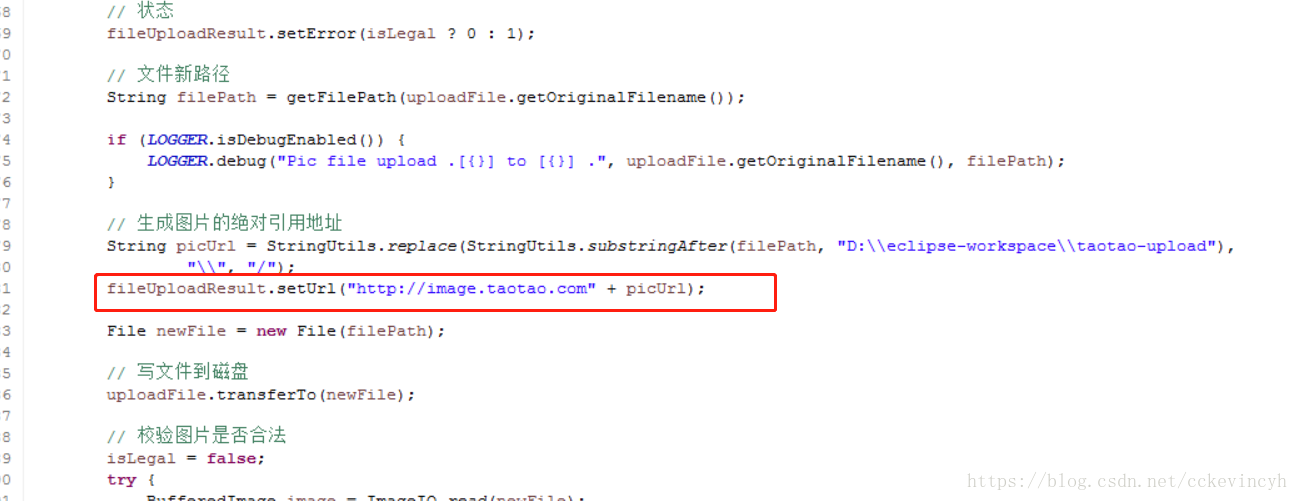
// 生成图片的绝对引用地址
String picUrl = StringUtils.replace(StringUtils.substringAfter(filePath, "D:\\eclipse-workspace\\taotao-upload"),
"\\", "/");
fileUploadResult.setUrl("http://image.taotao.com" + picUrl);
File newFile = new File(filePath);
// 写文件到磁盘
uploadFile.transferTo(newFile);
// 校验图片是否合法
isLegal = false;
try {
BufferedImage image = ImageIO.read(newFile);
if (image != null) {
fileUploadResult.setWidth(image.getWidth() + "");
fileUploadResult.setHeight(image.getHeight() + "");
isLegal = true;
}
} catch (IOException e) {
}
// 状态
fileUploadResult.setError(isLegal ? 0 : 1);
if (!isLegal) {
// 不合法,将磁盘上的文件删除
newFile.delete();
}
//将java对象序列化成json字符串
return mapper.writeValueAsString(fileUploadResult);
}
private String getFilePath(String sourceFileName) {
String baseFolder = "D:\\eclipse-workspace\\taotao-upload" + File.separator + "images";
Date nowDate = new Date();
// yyyy/MM/dd
String fileFolder = baseFolder + File.separator + new DateTime(nowDate).toString("yyyy")
+ File.separator + new DateTime(nowDate).toString("MM") + File.separator
+ new DateTime(nowDate).toString("dd");
File file = new File(fileFolder);
if (!file.isDirectory()) {
// 如果目录不存在,则创建目录
file.mkdirs();
}
// 生成新的文件名
String fileName = new DateTime(nowDate).toString("yyyyMMddhhmmssSSSS")
+ RandomUtils.nextInt(100, 9999) + "." + StringUtils.substringAfterLast(sourceFileName, ".");
return fileFolder + File.separator + fileName;
}
}
这里先把地址写死了:
4. 上传组件
需求:上传文件返回的数据是:文本类型的json数据。
响应类型:
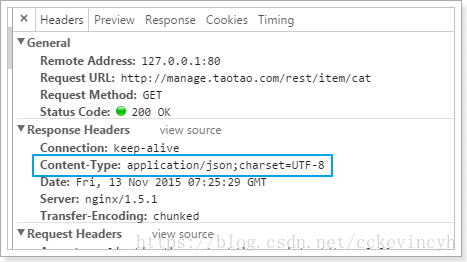
文本类型:
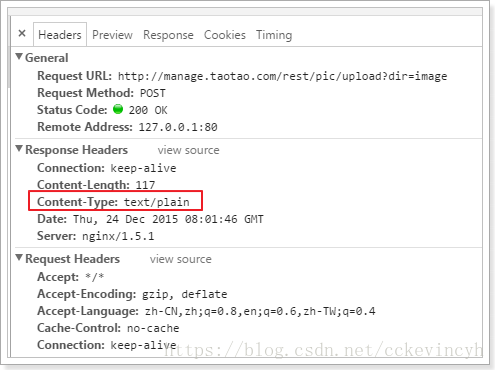
因为历史遗留原因,KindEditor的上传组件要求我们返回的是文本类型的json数据。
所以我们的解决方法是:
5. 测试
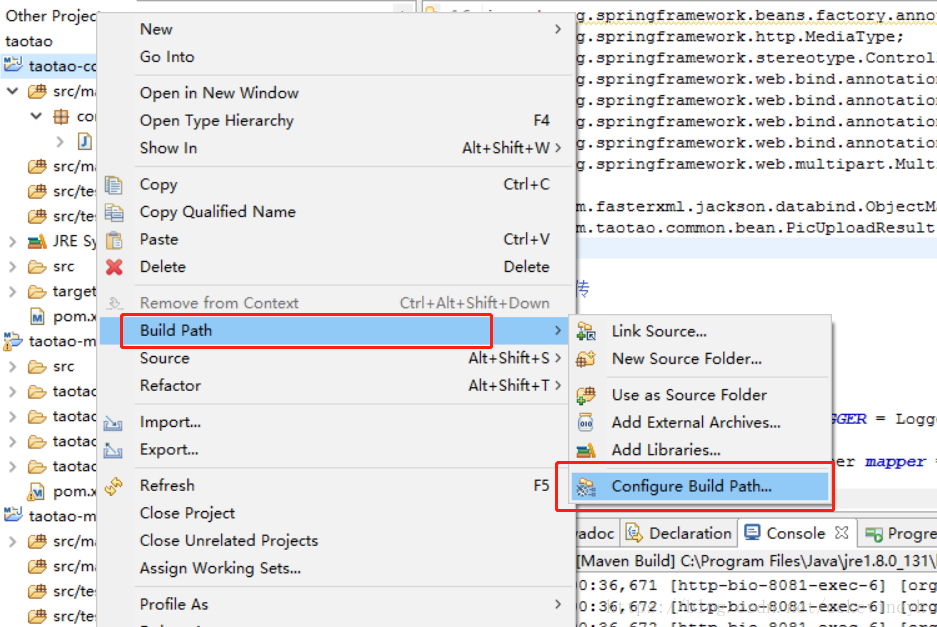
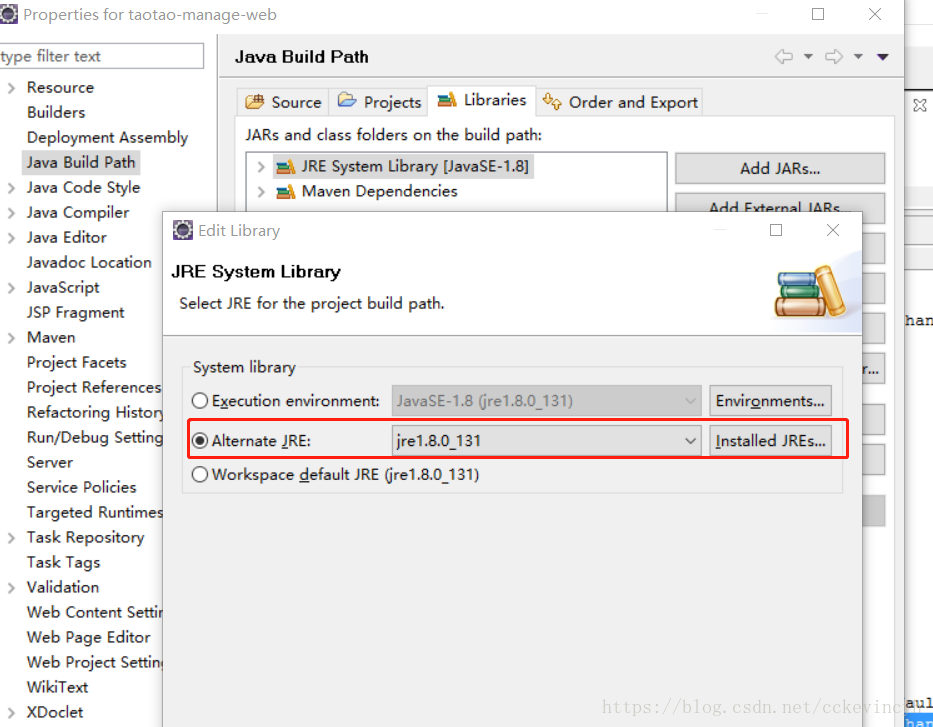
安装taotao-common到本地仓库时出错:

出现问题:No compiler is provided in this environment. Perhaps you are running on a JRE rather than a JDK?
解决方法:
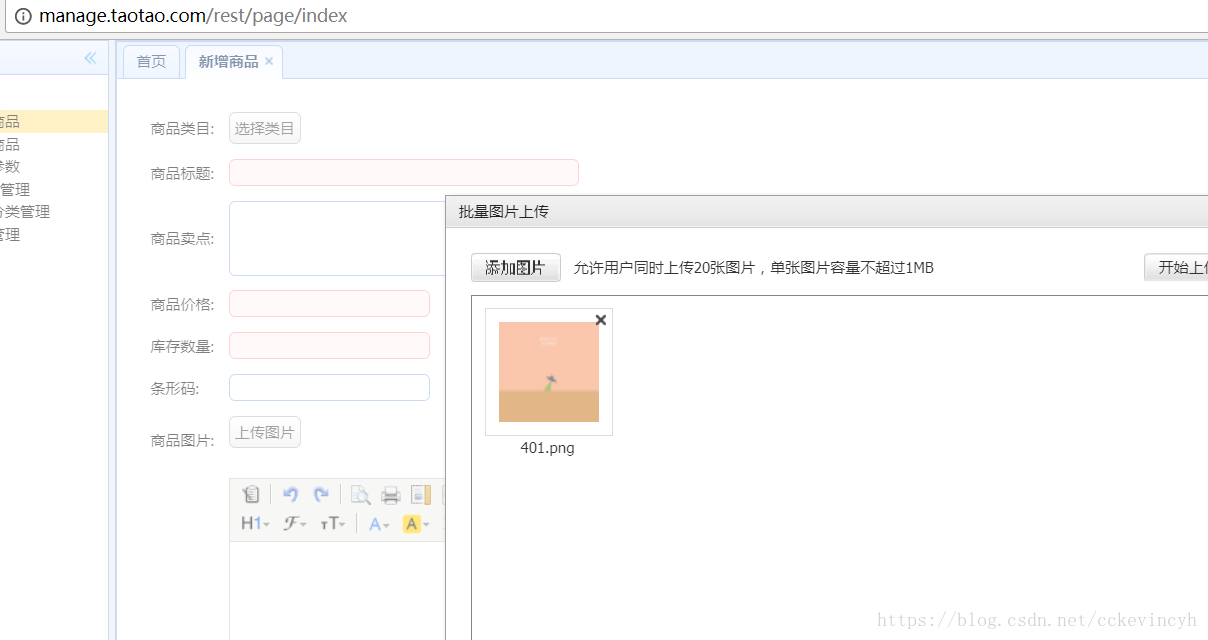
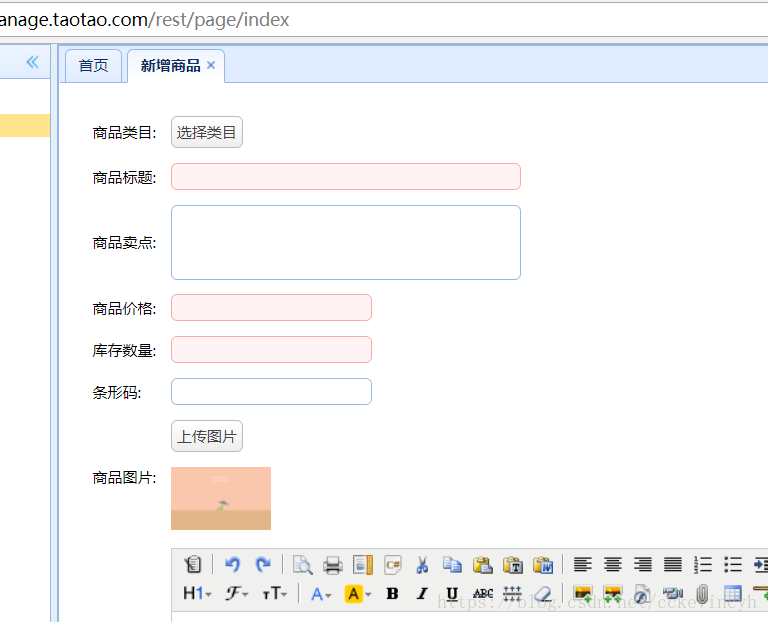
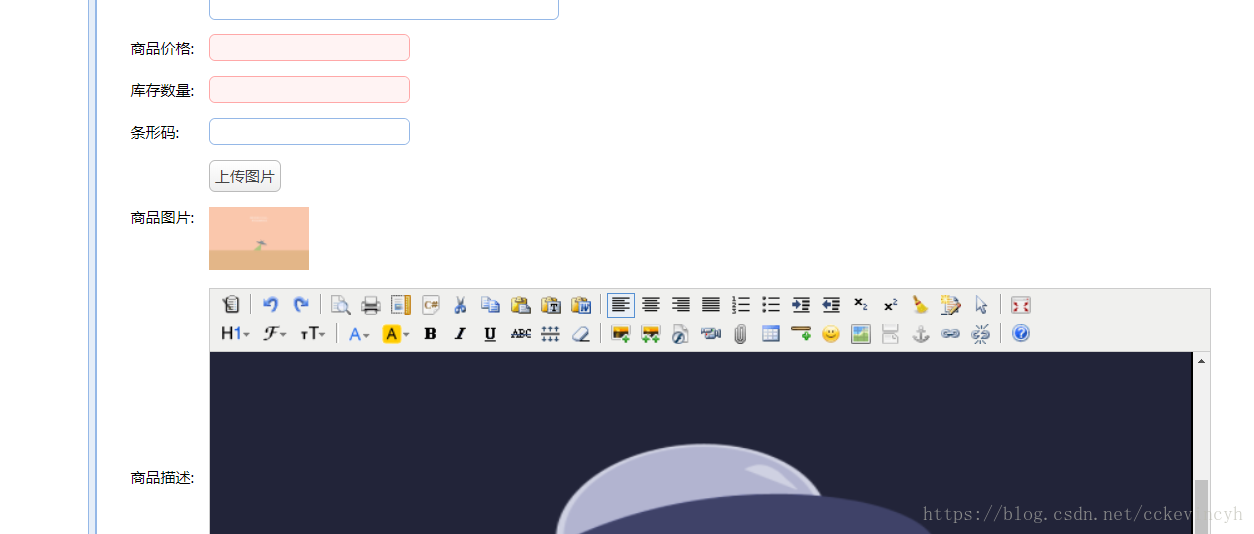
现在我们开始测试上传功能:
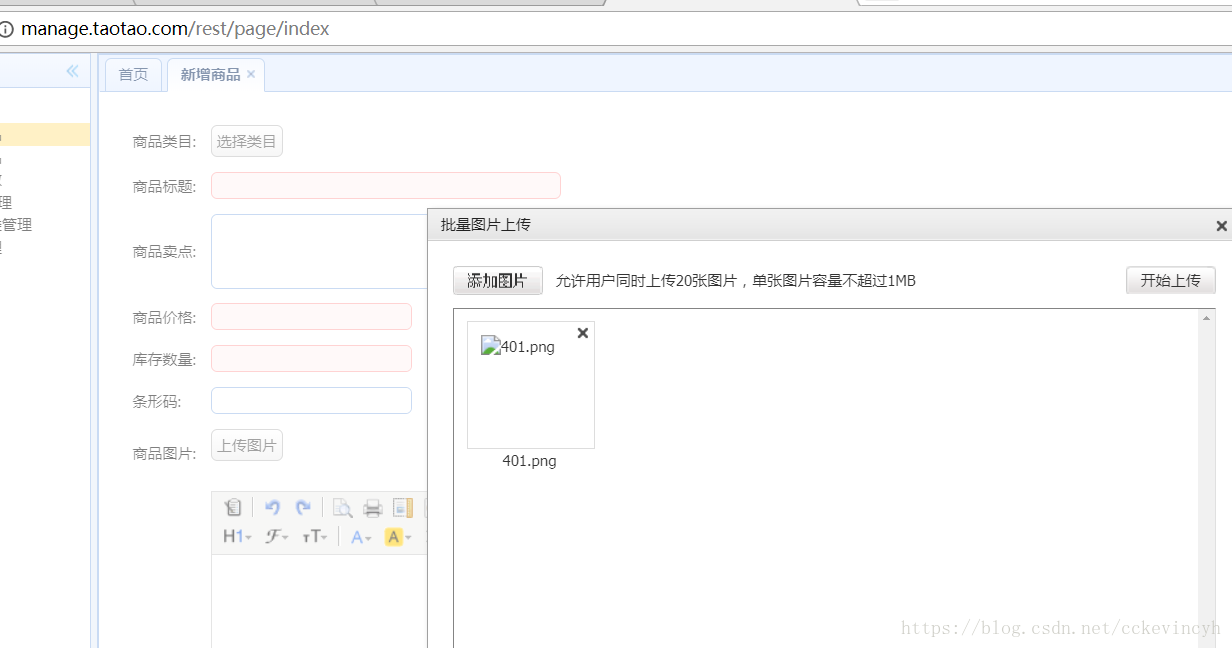
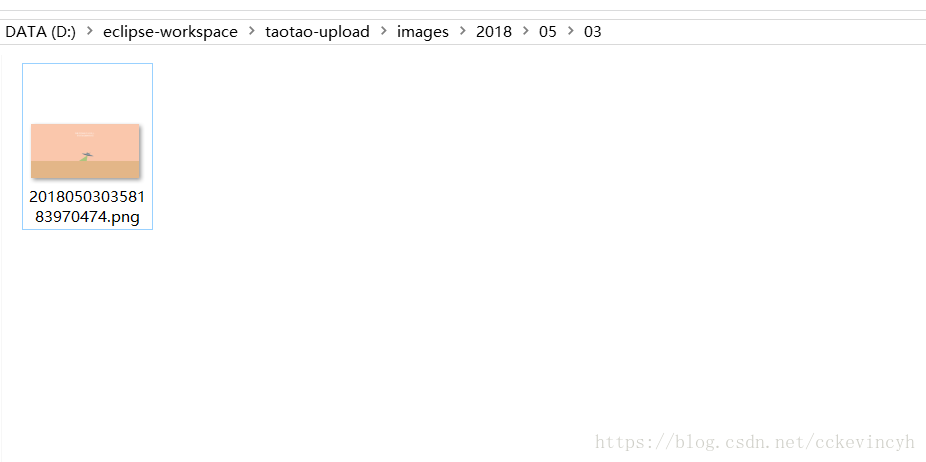
虽然图片没有回显,但是我们可以看到我们的上传路径上已经有图片存在了:
而且我们查看开发者工具,返回的也是文本格式的数据:

6. 解决显示图片的问题
之前的上传后,通过tomcat访问图片。
没有真实的项目是通过tomcat访问静态资源。 为什么?
Tomcat是应用服务器,作用:处理动态请求。
Nginx、Apache是web服务器,作用:处理静态资源、反向代理功能。
Web服务器的并发能力远高于应用服务器。
6.1. 配置nginx访问图片
    server {
        listen       80;
        server_name  image.taotao.com;

        #charset koi8-r;

        #access_log  logs/host.access.log  main;

    proxy_set_header X-Forwarded-Host $host;
        proxy_set_header X-Forwarded-Server $host;
        proxy_set_header X-Forwarded-For $proxy_add_x_forwarded_for;

        location / {
        root  D:\\eclipse-workspace\\taotao-upload;
        }

    }
6.2. 配置hosts

然后我们在重新测试一次:
7. 图片存储路径硬编码到java代码中
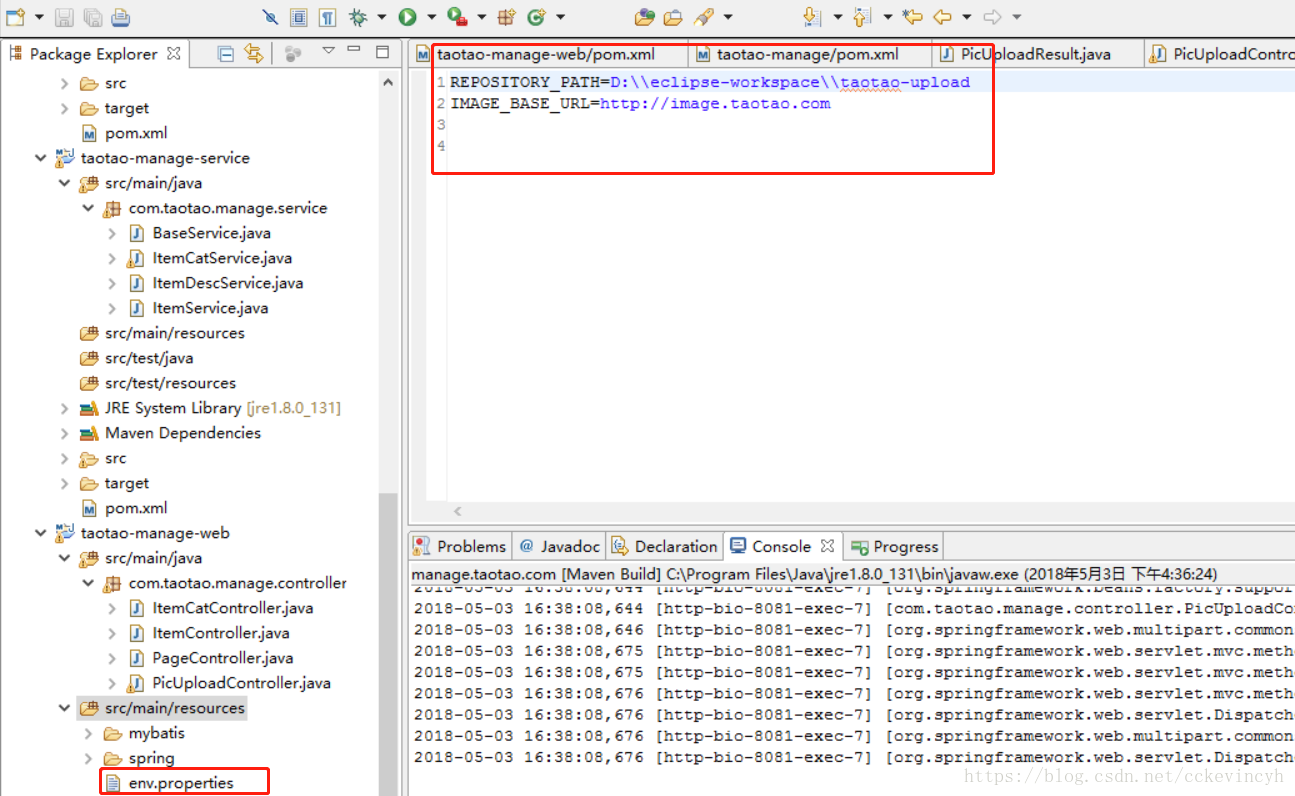
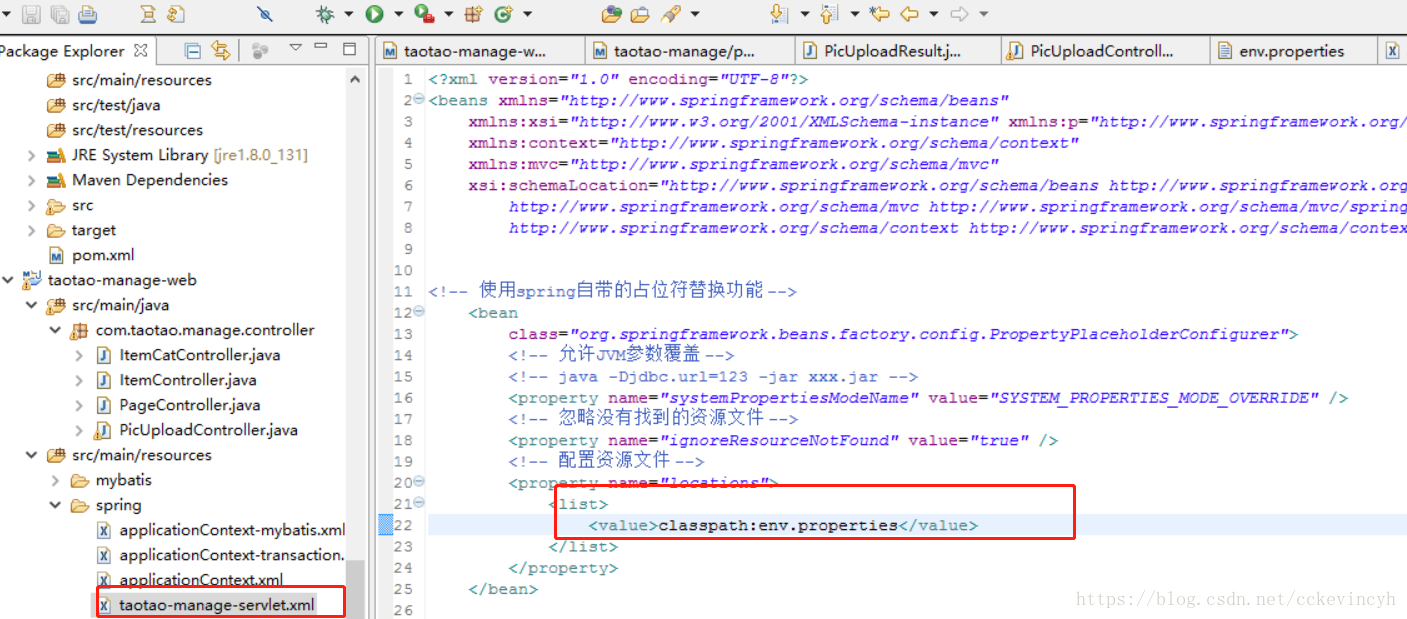
解决方案:需要将路径配置到外部的配置文件中。
我们在外部配置一个文件:
spring配置中加入配置文件的读取:

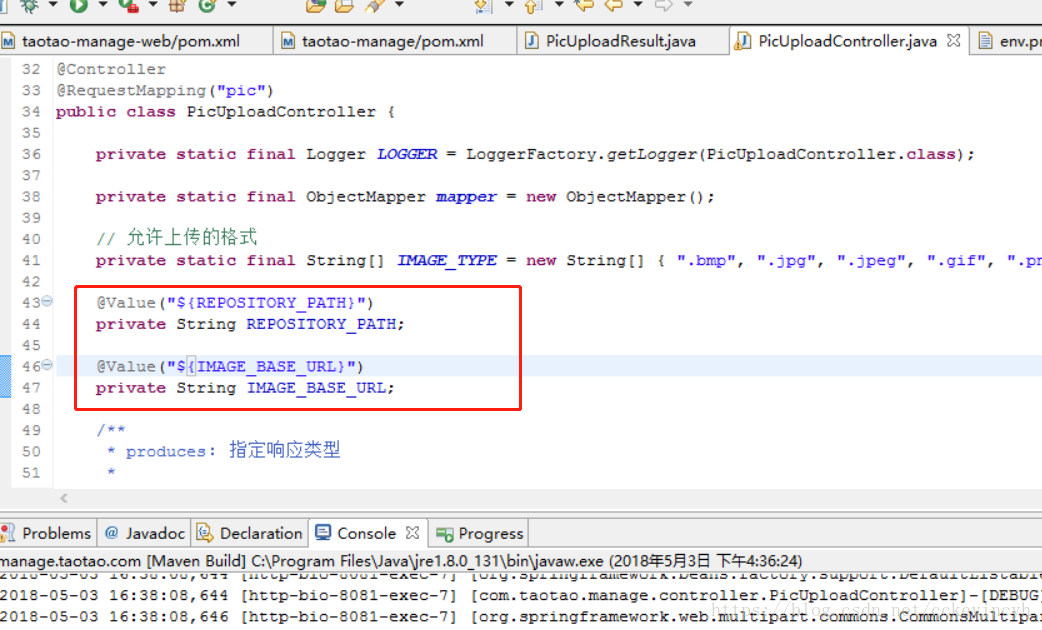
7.1. @value
@Value作用:获取配置文件的值。
然后我们利用@Value注解:
然后我们debug方式运行看看能不能获取到配置文件中的值:

很遗憾我们发现并没有成功注入配置文件中的值:

为什么没有注入进去呢?@value是在什么时候注入的?
原因:
注入值:在Spring容器初始化(所有的bean)之后,在当前的所在容器中获取值,然后注入。
7.2. Spring父子容器
当前启动的tomcat有两个容器:
Spring容器 – 父容器
SpringMVC容器 – 子容器
为什么Spring 和 Spring MVC整合的时候不会写配置文件?
因为Spring MVC在启动的时候,会查找当前应用(application)中是否有一个Spring容器存在,如果存在,就把这个Spring容器作为父容器,如果不存在,Spring MVC会自己创建一个父容器。所以Spring MVC和Spring的整合是自动完成的,不需要我们去配置。
父子容器的关系:
1、 子容器能够访问父容器的资源(bean)
a) 示例:Controller可以注入Service
因为Serivce在父容器:

因为在Spring的配置文件中,扫描包扫描到了com.taotao.manage.service.
Controller在子容器,因为:
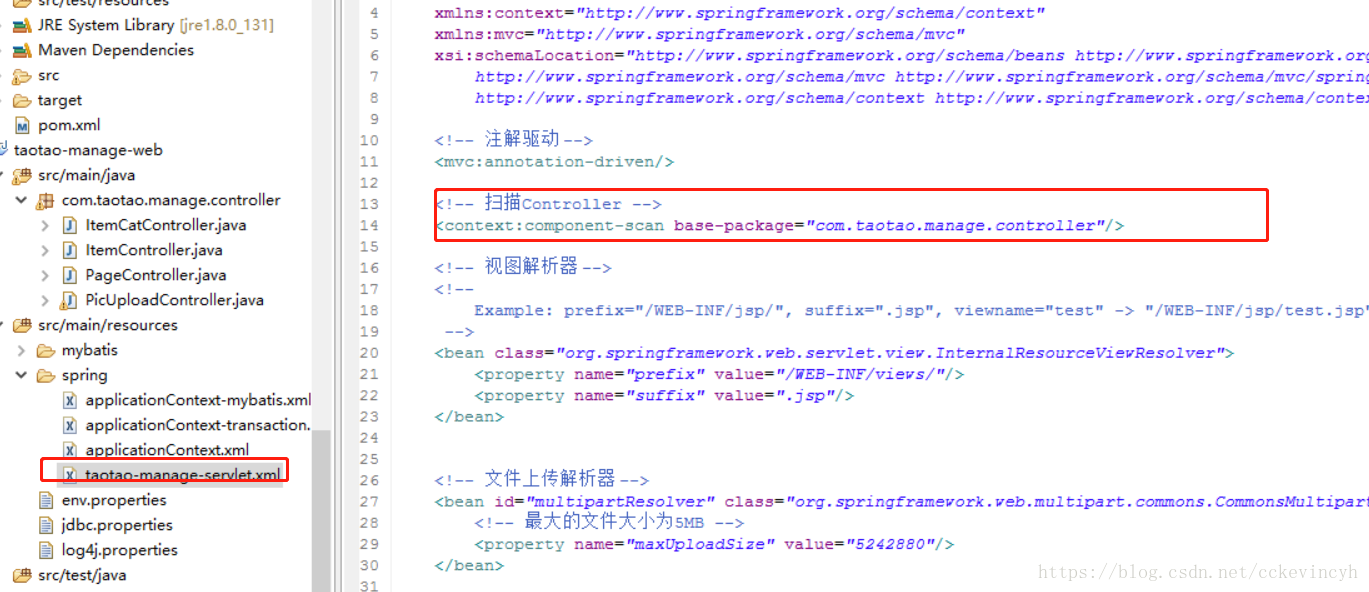
正因为如此,所以在Spring MVC下的配置文件、
<!-- 扫描Controller -->
 <context:component-scan base-package="com.taotao.manage.controller"/>
才不能省略。因为这是两个容器,虽然Spring配置文件中
<!-- 扫描包 -->
 <context:component-scan base-package="com.taotao"/>
包含了controller,但是Spring MVC处理用户请求的Bean一定是在自己容器中查找并去处理,并不会去父容器查找处理,所以Spring配置的扫描包是不能够代替的。子容器没有扫描包就没有bean,就不能去处理用户请求。
Spring MVC配置文件,扫描包扫描到了controller,所以Controller在子容器。
2、 父容器不能访问子容器的资源(bean)
@Value无法注入的解释:
我们现在是在Controller中使用注解@Value

@Value找的是当前容器去获取值,而我们使在Spring配置文件中去加载我们的外部配置文件:
所以我们的值在父容器,所以我们@Value只能找到当前的子容器获取值,获取不到父容器的值。
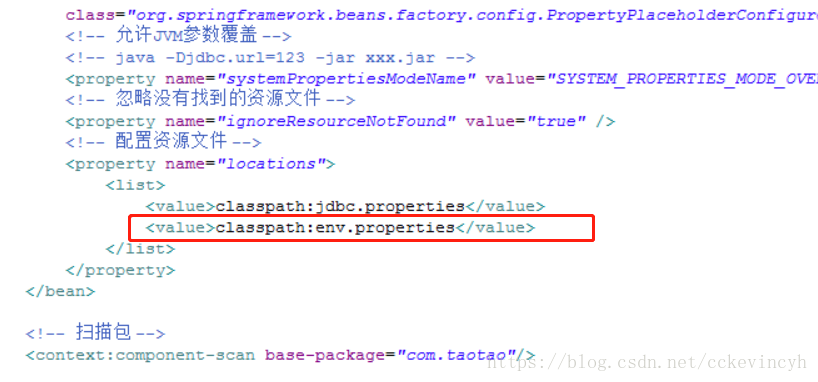
我们可以尝试把读取配置文件写到Spring MVC的配置中,来验证@Value是从当前容器获取值:
我们在Spring MVC配置中也加入一个配置文件的读取:
我们再次debug运行:

我们可以发现@value可以获取到值了。说明了@value只能在当前容器获取值。
但是我们现在的解决方式是在父子容器中都加入配置文件的读取,我们希望只在父容器中加入配置文件,所以我们可以通过“子容器能够访问父容器的资源”这一条件来解决我们的问题。
我们可以通过Service中使用@Vlaue,即是在父容器中使用@Value注解,那么@Value注解就可以获取到父容器读取的文件,在根据子容器可以访问父容器的资源,我们可以使用Controller去获取到Service这个bean,然后间接得到父容器中的值。
实现:
1、 定义ProperttiesService:
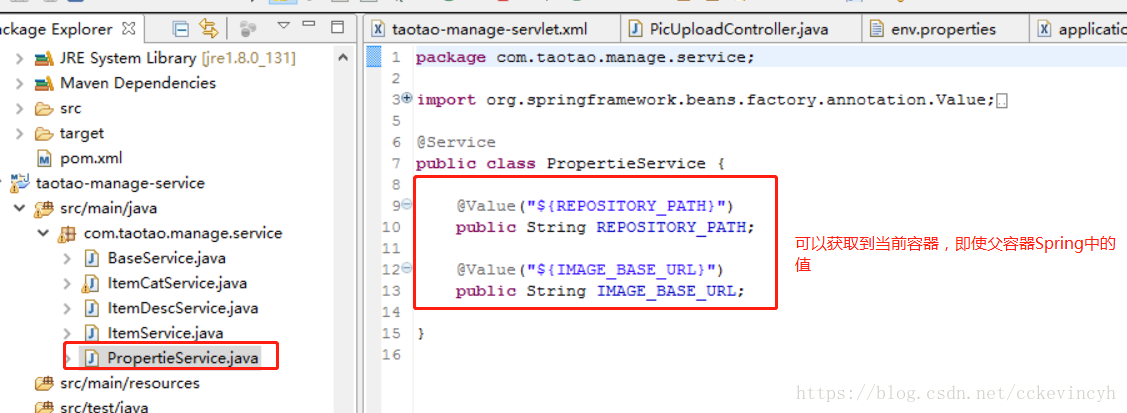
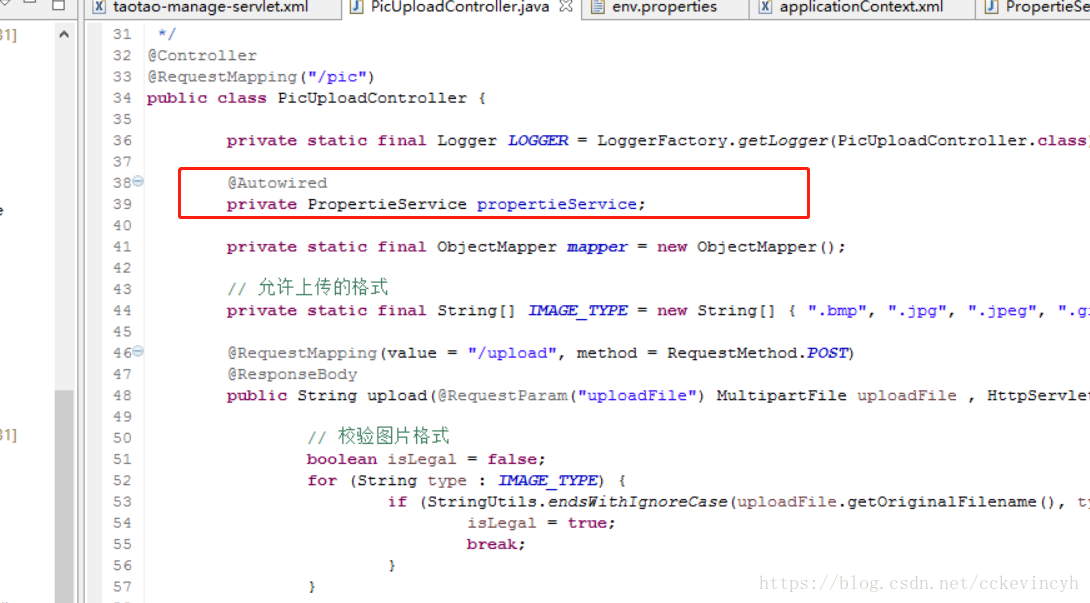
2、 在Controller中注入Service:
package com.taotao.manage.controller;

import java.awt.image.BufferedImage;
import java.io.File;
import java.io.IOException;
import java.util.Date;

import javax.imageio.ImageIO;
import javax.servlet.http.HttpServletResponse;

import org.apache.commons.lang3.RandomUtils;
import org.apache.commons.lang3.StringUtils;
import org.joda.time.DateTime;
import org.slf4j.Logger;
import org.slf4j.LoggerFactory;
import org.springframework.beans.factory.annotation.Autowired;
import org.springframework.http.MediaType;
import org.springframework.stereotype.Controller;
import org.springframework.web.bind.annotation.RequestMapping;
import org.springframework.web.bind.annotation.RequestMethod;
import org.springframework.web.bind.annotation.RequestParam;
import org.springframework.web.bind.annotation.ResponseBody;
import org.springframework.web.multipart.MultipartFile;

import com.fasterxml.jackson.databind.ObjectMapper;
import com.taotao.common.bean.PicUploadResult;
import com.taotao.manage.service.PropertieService;

/**
 * 图片上传
 */
@Controller
@RequestMapping("/pic")
public class PicUploadController {

    private static final Logger LOGGER = LoggerFactory.getLogger(PicUploadController.class);

    @Autowired
    private PropertieService propertieService;

    private static final ObjectMapper mapper = new ObjectMapper();

    // 允许上传的格式
    private static final String[] IMAGE_TYPE = new String[] { ".bmp", ".jpg", ".jpeg", ".gif", ".png" };

    @RequestMapping(value = "/upload", method = RequestMethod.POST)
    @ResponseBody
    public String upload(@RequestParam("uploadFile") MultipartFile uploadFile , HttpServletResponse response) throws Exception {

        // 校验图片格式
        boolean isLegal = false;
        for (String type : IMAGE_TYPE) {
            if (StringUtils.endsWithIgnoreCase(uploadFile.getOriginalFilename(), type)) {
                isLegal = true;
                break;
            }
        }

        // 封装Result对象,并且将文件的byte数组放置到result对象中
        PicUploadResult fileUploadResult = new PicUploadResult();

        // 状态
        fileUploadResult.setError(isLegal ? 0 : 1);

        // 文件新路径
        String filePath = getFilePath(uploadFile.getOriginalFilename());

        if (LOGGER.isDebugEnabled()) {
            LOGGER.debug("Pic file upload .[{}] to [{}] .", uploadFile.getOriginalFilename(), filePath);
        }

        // 生成图片的绝对引用地址
        String picUrl = StringUtils.replace(StringUtils.substringAfter(filePath, propertieService.REPOSITORY_PATH), "\\", "/");
        fileUploadResult.setUrl(propertieService.IMAGE_BASE_URL + picUrl);

        File newFile = new File(filePath);

        // 写文件到磁盘
        uploadFile.transferTo(newFile);

        // 校验图片是否合法
        isLegal = false;
        try {
            BufferedImage image = ImageIO.read(newFile);
            if (image != null) {
                fileUploadResult.setWidth(image.getWidth() + "");
                fileUploadResult.setHeight(image.getHeight() + "");
                isLegal = true;
            }
        } catch (IOException e) {
        }

        // 状态
        fileUploadResult.setError(isLegal ? 0 : 1);

        if (!isLegal) {
            // 不合法,将磁盘上的文件删除
            newFile.delete();
        }

        response.setContentType(MediaType.TEXT_HTML_VALUE);
        return mapper.writeValueAsString(fileUploadResult);
    }

    private String getFilePath(String sourceFileName) {
        String baseFolder = propertieService.REPOSITORY_PATH + File.separator + "images";
        Date nowDate = new Date();
        // yyyy/MM/dd
        String fileFolder = baseFolder + File.separator + new DateTime(nowDate).toString("yyyy") + File.separator + new DateTime(nowDate).toString("MM") + File.separator
                + new DateTime(nowDate).toString("dd");
        File file = new File(fileFolder);
        if (!file.isDirectory()) {
            // 如果目录不存在,则创建目录
            file.mkdirs();
        }
        // 生成新的文件名
        String fileName = new DateTime(nowDate).toString("yyyyMMddhhmmssSSSS") + RandomUtils.nextInt(100, 9999) + "." + StringUtils.substringAfterLast(sourceFileName, ".");
        return fileFolder + File.separator + fileName;
    }

}
我们再次debug运行查看:
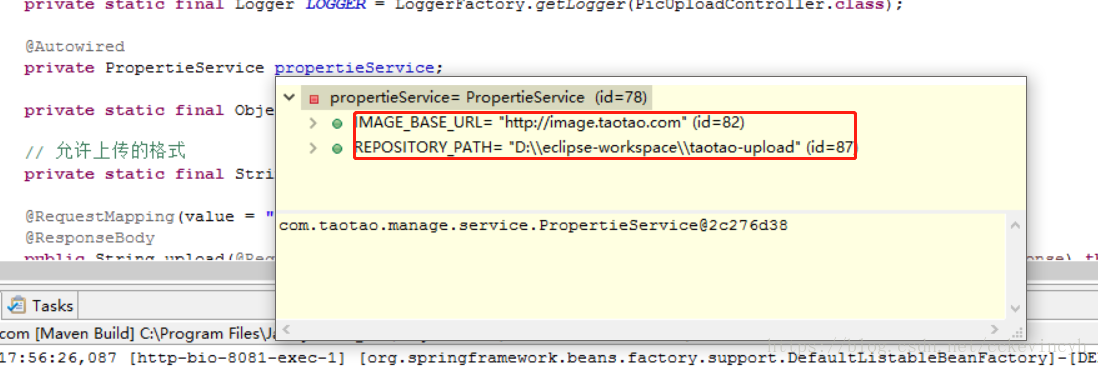
现在可以看到我们可以获取到值了。