本节学习VINS-Mono前端对图像数据的处理过程,解读回调函数img_callback()中的操作。
VINS-Mono/Fusion代码学习系列:
从零学习VINS-Mono/Fusion源代码(一):主函数
从零学习VINS-Mono/Fusion源代码(二):前端图像跟踪
从零学习VINS-Mono/Fusion源代码(三):IMU预积分公式推导
从零学习VINS-Mono/Fusion源代码(四):误差卡尔曼滤波
从零学习VINS-Mono/Fusion源代码(五):VIO初始化
从零学习VINS-Mono/Fusion源代码(六):后端优化
从零学习VINS-Mono/Fusion源代码(二):主函数
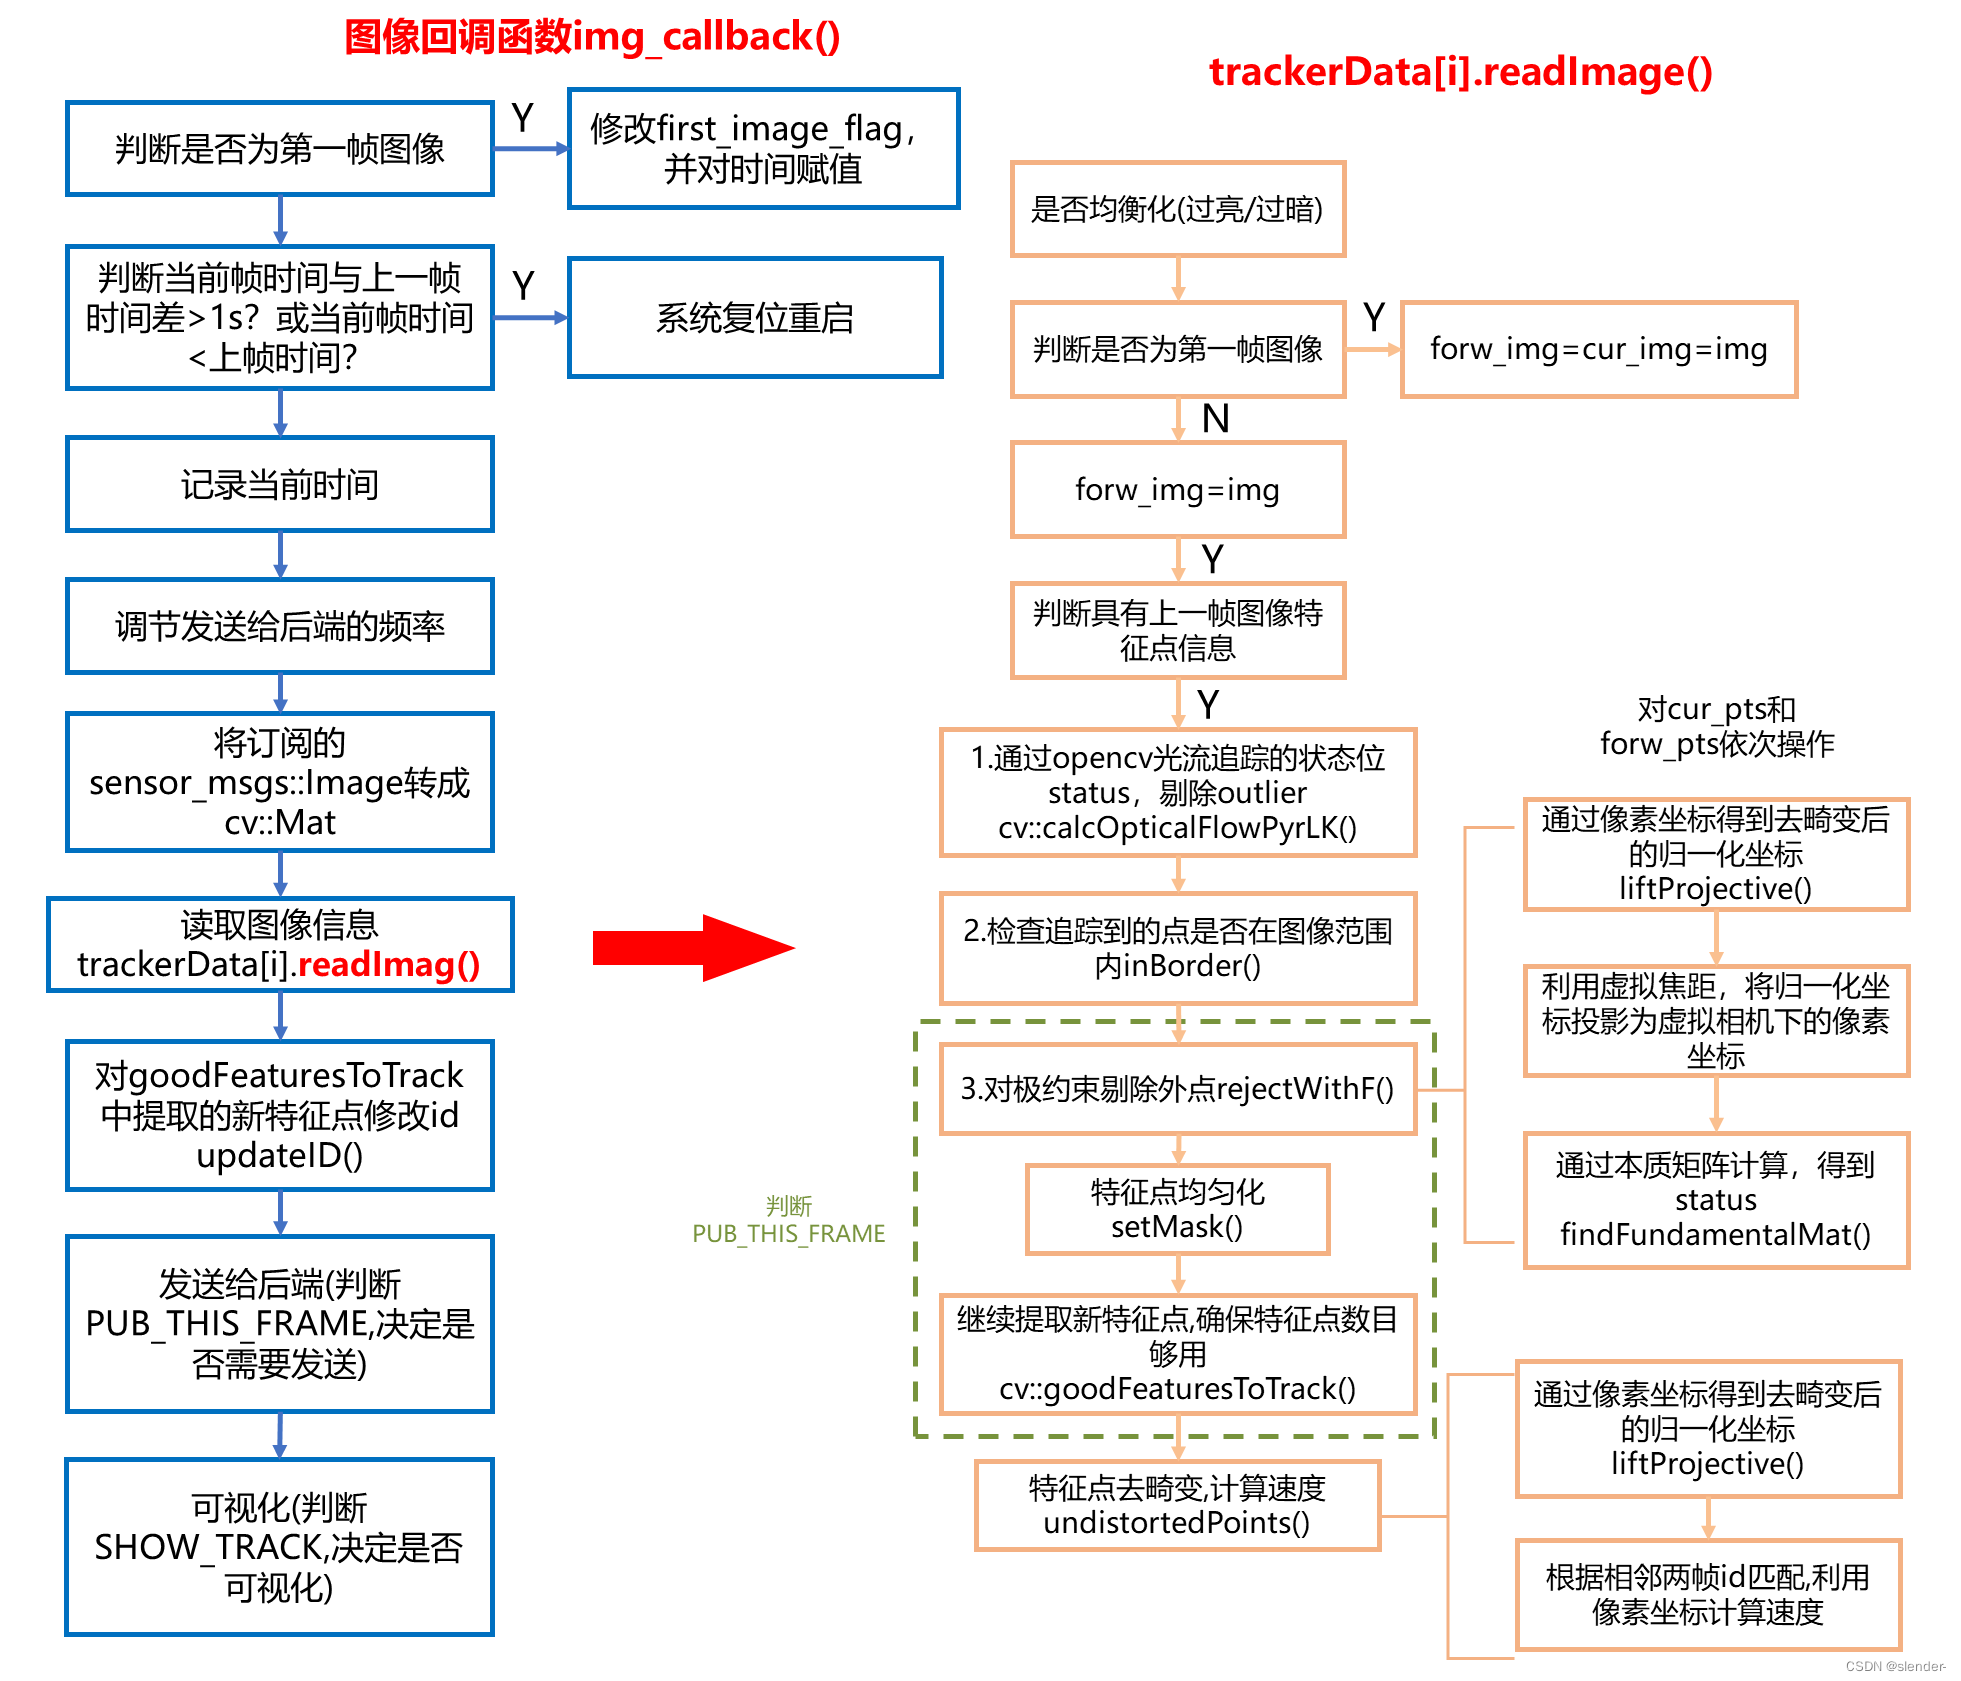
1 图像回调函数img_callback()
在feature_tracker节点的主函数中,读取了图像topic,调用img_callback()回调函数进行处理。
ros::Subscriber sub_img = n.subscribe(IMAGE_TOPIC, 100, img_callback);
img_callback()中完成的几个任务:
- 检查图像数据流的连续性
- 控制发送给后端的图像数据频率
- ros格式到opencv格式的转换
- 读取图像信息(readImage函数)
- 图像帧发布/可视化(根据预设判断是否需要)
- 检查图像数据流的连续性
	if(first_image_flag)//判断是不是第一帧图像
    {


    	//是第一帧,修改flag,记录时间戳
        first_image_flag = false;
        first_image_time = img_msg->header.stamp.toSec();
        last_image_time = img_msg->header.stamp.toSec();
        return;
    }
    //检查数据流连续性
    //当前帧和上一帧时间差是不是超过1s?间隔时间过长,连续性差
    //当前帧时间戳是不是小于上一帧时间戳?发生数据错乱?
    if (img_msg->header.stamp.toSec() - last_image_time > 1.0 || img_msg->header.stamp.toSec() < last_image_time)
    {


    	//对系统重置了,restart
        ROS_WARN("image discontinue! reset the feature tracker!");
        first_image_flag = true;
        last_image_time = 0;
        pub_count = 1;
        std_msgs::Bool restart_flag;
        restart_flag.data = true;
        pub_restart.publish(restart_flag);
        return;
    }
    last_image_time = img_msg->header.stamp.toSec();
- 控制发送给后端的图像数据频率
	//pub_count记录向后端发送了多少次
	//这里就是计算发送的频率(次数/时间)是否小于预设频率FREQ(一般是10Hz)
    if (round(1.0 * pub_count / (img_msg->header.stamp.toSec() - first_image_time)) <= FREQ)
    {


        PUB_THIS_FRAME = true;
        //检查发送频率和预设是否过分接近
        //如果过分接近就要重启一次,避免短时间内发送大量图像数据
        if (abs(1.0 * pub_count / (img_msg->header.stamp.toSec() - first_image_time) - FREQ) < 0.01 * FREQ)
        {


            first_image_time = img_msg->header.stamp.toSec();
            pub_count = 0;
        }
    }
    else
        PUB_THIS_FRAME = false;
- ros格式到opencv格式的转换
cv_bridge::CvImageConstPtr ptr;//使用opencv的图像指针
    if (img_msg->encoding == "8UC1")//灰度图
    {


        sensor_msgs::Image img;
        img.header = img_msg->header;
        img.height = img_msg->height;
        img.width = img_msg->width;
        img.is_bigendian = img_msg->is_bigendian;
        img.step = img_msg->step;
        img.data = img_msg->data;
        img.encoding = "mono8";
        ptr = cv_bridge::toCvCopy(img, sensor_msgs::image_encodings::MONO8);
    }
    else
        ptr = cv_bridge::toCvCopy(img_msg, sensor_msgs::image_encodings::MONO8);
2 图像读取readImage()
	for (int i = 0; i < NUM_OF_CAM; i++)//NUM_OF_CAM=1
    {


        ROS_DEBUG("processing camera %d", i);
        if (i != 1 || !STEREO_TRACK)
        	//对每个相机读取图像信息,这里就一个相机
        	//注意它针对多个相机的存储方式rowRange(ROW * i, ROW * (i + 1))
            trackerData[i].readImage(ptr->image.rowRange(ROW * i, ROW * (i + 1)), img_msg->header.stamp.toSec());
        else
        {


            if (EQUALIZE)//是否要做图像均衡化
            {


                cv::Ptr<cv::CLAHE> clahe = cv::createCLAHE();
                clahe->apply(ptr->image.rowRange(ROW * i, ROW * (i + 1)), trackerData[i].cur_img);
            }
            else
            	//不做均衡化,直接赋值
                trackerData[i].cur_img = ptr->image.rowRange(ROW * i, ROW * (i + 1));
        }
    }
readImage()内部实现的任务:
- 图像均衡化(EQUALIZE)
- 光流法跟踪(cv::calcOpticalFlowPyrLK)
- 提取新特征点(cv::goodFeaturesToTrack)
- 去畸变,计算特征点速度(undistortedPoints)
2.1 图像均衡化
	if (EQUALIZE)
    {


        cv::Ptr<cv::CLAHE> clahe = cv::createCLAHE(3.0, cv::Size(8, 8));
        TicToc t_c;
        clahe->apply(_img, img);
        ROS_DEBUG("CLAHE costs: %fms", t_c.toc());
    }
    else
        img = _img;
2.2 光流法跟踪
调用opencv函数cv::calcOpticalFlowPyrLK实现光流跟踪。
forw_img —— 当前新获得的图像
cur_img —— 上一帧
forw_pts —— 容器,存放当前帧图像特征点信息
cur_pts —— 上一帧图像特征点
跟踪部分采用了三种方法,对失败点和outliers点进行去除:
(1)calcOpticalFlowPyrLK 状态位status判断
(2)inBorder 检查跟踪后的点是否超出图片界限
(3)rejectWithF 通过对极约束剔除外点
 	if (cur_pts.size() > 0)
    {


        TicToc t_o;
        vector<uchar> status;
        vector<float> err;
        //对当前帧forw_img和上一帧cur_img进行LK光流追踪,状态位status记录各个特征点追踪情况
        //status为1就表明该特征点被成功跟踪
        cv::calcOpticalFlowPyrLK(cur_img, forw_img, cur_pts, forw_pts, status, err, cv::Size(21, 21), 3);

        for (int i = 0; i < int(forw_pts.size()); i++)
        	//inBorder判断当前帧跟踪到的特征点是否超出了图像范围
            if (status[i] && !inBorder(forw_pts[i]))
                status[i] = 0;
        //reduceVector根据status,将跟失败的点去除
        //采用双指针思路,第一个索引遍历整个Vector,第二个索引记录成功点
        //保留下来的就是跟踪成功的点
        reduceVector(prev_pts, status);
        reduceVector(cur_pts, status);
        reduceVector(forw_pts, status);
        reduceVector(ids, status);//特征点id
        reduceVector(cur_un_pts, status);//去畸变的点坐标
        reduceVector(track_cnt, status);//跟踪到的次数
        ROS_DEBUG("temporal optical flow costs: %fms", t_o.toc());
    }
rejectWithF()中将相邻两帧的特征点投影到虚拟的像素坐标系下,再计算本质矩阵,同样获得status,来判断跟踪情况。
FOCAL_LENGTH=460是预先设置的虚拟焦距,这做的好处是对于不同的相机参数,无需对ransac的门限阈值F_THRESHOLD进行调整。
void FeatureTracker::rejectWithF()
{


    if (forw_pts.size() >= 8)
    {


        ROS_DEBUG("FM ransac begins");
        TicToc t_f;
        vector<cv::Point2f> un_cur_pts(cur_pts.size()), un_forw_pts(forw_pts.size());
        for (unsigned int i = 0; i < cur_pts.size(); i++)
        {


            Eigen::Vector3d tmp_p;
            m_camera->liftProjective(Eigen::Vector2d(cur_pts[i].x, cur_pts[i].y), tmp_p);
            tmp_p.x() = FOCAL_LENGTH * tmp_p.x() / tmp_p.z() + COL / 2.0;
            tmp_p.y() = FOCAL_LENGTH * tmp_p.y() / tmp_p.z() + ROW / 2.0;
            un_cur_pts[i] = cv::Point2f(tmp_p.x(), tmp_p.y());

            m_camera->liftProjective(Eigen::Vector2d(forw_pts[i].x, forw_pts[i].y), tmp_p);
            tmp_p.x() = FOCAL_LENGTH * tmp_p.x() / tmp_p.z() + COL / 2.0;
            tmp_p.y() = FOCAL_LENGTH * tmp_p.y() / tmp_p.z() + ROW / 2.0;
            un_forw_pts[i] = cv::Point2f(tmp_p.x(), tmp_p.y());
        }

        vector<uchar> status;
        cv::findFundamentalMat(un_cur_pts, un_forw_pts, cv::FM_RANSAC, F_THRESHOLD, 0.99, status);
        int size_a = cur_pts.size();
        reduceVector(prev_pts, status);
        reduceVector(cur_pts, status);
        reduceVector(forw_pts, status);
        reduceVector(cur_un_pts, status);
        reduceVector(ids, status);
        reduceVector(track_cnt, status);
        ROS_DEBUG("FM ransac: %d -> %lu: %f", size_a, forw_pts.size(), 1.0 * forw_pts.size() / size_a);
        ROS_DEBUG("FM ransac costs: %fms", t_f.toc());
    }
}
setMask()特征点均匀化,对于针孔模型,将图像灰度值全部设置成255。然后根据跟踪次数对图像特征点进行sort排序,跟踪到的次数多久排在前面,说明该特征点稳定。
排完序后,从第一个特征点开始,画一个半径为MIN_DIST的圆形,灰度值设置为0,这样后续的点就不能再落在这个圆内,从而使得特征点均匀分布。
void FeatureTracker::setMask()
{


    if(FISHEYE)
        mask = fisheye_mask.clone();
    else
        mask = cv::Mat(ROW, COL, CV_8UC1, cv::Scalar(255));


    // prefer to keep features that are tracked for long time
    vector<pair<int, pair<cv::Point2f, int>>> cnt_pts_id;

    for (unsigned int i = 0; i < forw_pts.size(); i++)
        cnt_pts_id.push_back(make_pair(track_cnt[i], make_pair(forw_pts[i], ids[i])));

    sort(cnt_pts_id.begin(), cnt_pts_id.end(), [](const pair<int, pair<cv::Point2f, int>> &a, const pair<int, pair<cv::Point2f, int>> &b)
         {


            return a.first > b.first;
         });

    forw_pts.clear();
    ids.clear();
    track_cnt.clear();

    for (auto &it : cnt_pts_id)
    {


        if (mask.at<uchar>(it.second.first) == 255)
        {


            forw_pts.push_back(it.second.first);
            ids.push_back(it.second.second);
            track_cnt.push_back(it.first);
            cv::circle(mask, it.second.first, MIN_DIST, 0, -1);
        }
    }
}
2.3 新特征点提取
利用opencv函数goodFeaturesToTrack进一步提取更多的特征点。
cv::goodFeaturesToTrack(forw_img, n_pts, MAX_CNT - forw_pts.size(), 0.01, MIN_DIST, mask);
下一步addPoints(),就把新提取到的特征点加入容器,它的id统一设置为-1,跟踪次数为1次。
void FeatureTracker::addPoints()
{


    for (auto &p : n_pts)
    {


        forw_pts.push_back(p);
        ids.push_back(-1);
        track_cnt.push_back(1);
    }
}
2.4 去畸变
畸变本身是一个高度非线性的关系式,离图像中心越远,畸变就越严重。
vins-mono定义了undistortedPoints()函数去畸变,并计算特征点速度。这里的去畸变方法比较神奇,是一种迭代逼近的思路。
设一个畸变点a’,实际像素坐标为a,令a’这个位置对应去畸变点为b,这样就有bb’<aa’,因为b更靠近图像中心。从a’出发前进bb’,得到c点,这个c点就在aa’中间。按照这个思路循环多次,最终不断逼近a点。
上述这个过程就是在liftProjective()里实现。
	//PinholeCamera::liftProjective()
	int n = 8;
	Eigen::Vector2d d_u;
    distortion(Eigen::Vector2d(mx_d, my_d), d_u);
    mx_u = mx_d - d_u(0);
    my_u = my_d - d_u(1);

	for (int i = 1; i < n; ++i)//默认迭代8次
	{


		distortion(Eigen::Vector2d(mx_u, my_u), d_u);
        mx_u = mx_d - d_u(0);//注意减号,代表方向
        my_u = my_d - d_u(1);//这个d_u本质上就是(x_d-x,y_d-y)
	}
void
PinholeCamera::distortion(const Eigen::Vector2d& p_u, Eigen::Vector2d& d_u) const
{


    double k1 = mParameters.k1();
    double k2 = mParameters.k2();
    double p1 = mParameters.p1();
    double p2 = mParameters.p2();

    double mx2_u, my2_u, mxy_u, rho2_u, rad_dist_u;

    mx2_u = p_u(0) * p_u(0);//x^2
    my2_u = p_u(1) * p_u(1);//y^2
    mxy_u = p_u(0) * p_u(1);//x*y
    rho2_u = mx2_u + my2_u;//r^2
    rad_dist_u = k1 * rho2_u + k2 * rho2_u * rho2_u;
    d_u << p_u(0) * rad_dist_u + 2.0 * p1 * mxy_u + p2 * (rho2_u + 2.0 * mx2_u),
           p_u(1) * rad_dist_u + 2.0 * p2 * mxy_u + p1 * (rho2_u + 2.0 * my2_u);
}