目录
urllib.parse.urlencode() 常用于进行 URL 的 get 请求参数拼接
什么是爬虫
网络爬虫:又被称为网络蜘蛛、网络机器人。它可以实现按照指令的规则或程序的算法自动浏览网络并且获取网络中的信息
优点
快速开发
跨平台
解释性
多种网络爬虫框架
示例:
import urllib.request
response = urllib.request.urlopen('https://www.baidu.com/')
print(response.read().decode('utf-8'))
网络爬虫的常用技术
网络请求:有三个常用网络请求模块
Urllib模块:python原生系统中标准库模块
urllib中的子模块
| 模块名称 |
说明 |
| urllib.request |
该模块定义了打开URL (主要是HTTP)的方法和类,例如,身 份验证、重定向、cookie等等 |
| urllib.error |
该模块中主要包含异常类,基本的异常类是URLError |
| urllib.parse |
该模块定义的功能分为两大类:URL解析和URL引用 |
| urllib.robotparser |
该模块用于解析robots.txt文件。 #robots.txt文件:我们在爬取一个网站时,首先会访问网站根目录下的这个文件。该文件会设置爬虫规则来告诉爬虫哪些信息可以爬取,如果没有这个文件默认可以爬取所有内容 |
urllib.parse.urlencode() 常用于进行 URL 的 get 请求参数拼接
函数原型:
函数原型
def urlencode(query, doseq=False, safe='', encoding=None, errors=None, quote_via=quote_plus)
#encoding=None 编码
#errors=None 错误默认值
示例1
import urllib.parse

query = {}  # 空dict
print(urllib.parse.urlencode(query))
query = {'a': 1, 'b': 2}  # dict
print(urllib.parse.urlencode(query))
query = (('a', 1), ('b', 2))  # 二元素的tuple序列
print(urllib.parse.urlencode(query))
query = (('a', [1, 2]), ('b', [2, 3]))  # 值是序列,且doseq为True,单独转换
print(urllib.parse.urlencode(query, doseq=True))
query = {b'a': b'1', b'b': b'2'}  # 字节类型
print(urllib.parse.urlencode(query))
#
# a=1&b=2
# a=1&b=2
# a=1&a=2&b=2&b=3
# a=1&b=2
示例2
import urllib.parse

url = 'http://www.baidu.com/s'
query = {
    'wd': 'Python3标准库',
    'ie': 'UTF-8'
}
print(url + '?' + urllib.parse.urlencode(query))
#
#http://www.baidu.com/s?wd=Python3%E6%A0%87%E5%87%86%E5%BA%93&ie=UTF-8
示例3:模拟post请求
import urllib.request
import urllib.parse
data = bytes(urllib.parse.urlencode({'word':'hellow'}),encoding='utf-8')
respond = urllib.request.urlopen('http://httpbin.org/post',data=data)
http = respond.read()
print(http)
#
#b'{\n  "args": {}, \n  "data": "", \n  "files": {}, \n  "form": {\n    "word": "hellow"\n  }, \n  "headers": {\n    "Accept-Encoding": "identity", \n    "Content-Length": "11", \n    "Content-Type": "application/x-www-form-urlencoded", \n    "Host": "httpbin.org", \n    "User-Agent": "Python-urllib/3.6", \n    "X-Amzn-Trace-Id": "Root=1-64a3fe11-542cddfb499ab3800ce32f36"\n  }, \n  "json": null, \n  "origin": "123.57.85.224", \n  "url": "http://httpbin.org/post"\n}\n'
Urllib3模块:Urllib模块的升级版
相对于Urllib库新增了很多特性和功能:
线程安全
使用大部分编码上传文件
支持连接池
100%的测试覆盖率
安装:
python -m pip install urllib3
示例:
import urllib3
#创建PoolManager对象,用来处理与线程的连接以及线程安全
http = urllib3.PoolManager()
#发送网络请求
response = http.request('POST','http://httpbin.org/post',fields={'word':'hello'})
print(response.data.decode())
Requests模块:第三方模块
功能特性:
自动内容解码
分块请求
连接超时
文件分块上传
自动解压
示例:
import requests
response = requests.get('http://www.baidu.com/')
print('获取响应状态码',response.status_code)
print('获取响应头',response.headers)
print('获取响应内容',response.content.decode('utf-8'))
请求headers处理
爬取数据时网站经常采用反爬虫设置拒绝访问,此时可以通过请求headers处理的方式模拟浏览器进行网页的请求
请求头部信息:
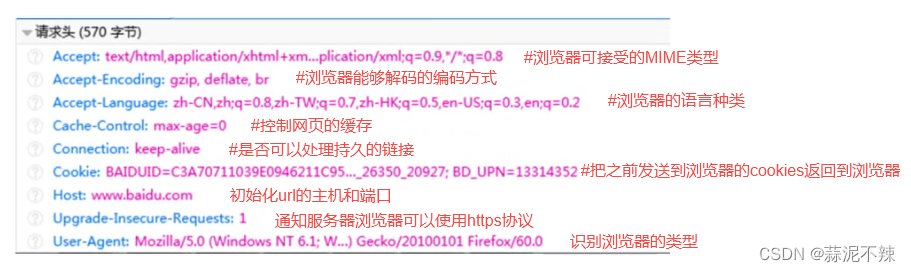
示例:伪装为浏览器
测试网站:https://www.whatismyip.com/
查看浏览器类型:
打开网址→F12 打开网页调试 →找到Network→刷新网页→找到User-Agent

代码:
import requests
headers = {'user-agent':'Mozilla/5.0 (Windows NT 10.0; Win64; x64) AppleWebKit/537.36 (KHTML, like Gecko) Chrome/114.0.0.0 Safari/537.36'}
responde = requests.get('https://www.whatismyip.com/',headers = headers)
print(responde.content.decode('utf-8'))
网络超时
网络超时:在设置的时间内未收到请求的响应
出现原因:
网络断开
网络不稳定
网络堵塞
网络速度慢
示例
打印所有异常
import requests
for i in range(0,5):
    try:
        response = requests.get('http://httpbin.org/',timeout=1)
        print('获取响应状态码',response.status_code)
    except Exception as e:
        print('异常',e)
优化:导入超时等异常模块后可以进行判断后打印
import requests
#导入可以捕获超时、HTTP协议异常、请求异常的模块
from requests.exceptions import ReadTimeout,HTTPError,RequestException
for i in range(0,5):
    try:
        response = requests.get('http://httpbin.org/',timeout=2)
        print('获取响应状态码',response.status_code)
    except ReadTimeout:
        print('timeout')
    except HTTPError:
        print('httperror')
    except RequestException:
        print('reqerror')
代理服务
应用场景:在爬取网页内容时多次爬取后会出现403或要求输入验证码。这是因为自己的IP被爬取的网站所发现,设置了代理IP后就相当于隐藏了爬虫
proxies参数:代替本机的IP地址, 去对接网络的IP地址;其作用是,隐藏真实IP,避免被目标网站封掉。
需要借助于代理IP网站
网址:国内高匿HTTP免费代理IP_代理IP_HTTP代理 - 快代理
需要寻找存活时间比较长的代理IP然后填入其中的代理IP和端口
示例:
import requests
from fake_useragent import UserAgent

url = "http://httpbin.org/get"  # 测试网站url地址
headers = {'User-Agent': UserAgent().random}  # 请求头
proxies = {
    'http': 'http://222.74.73.202:42055',
    'https': 'https://222.74.73.202:42055'
}
html = requests.get(url=url, headers=headers, proxies=proxies).text  # 获取响应内容
print(html)
#
# {
#   "args": {},
#   "headers": {
#     "Accept": "*/*",
#     "Accept-Encoding": "gzip, deflate",
#     "Host": "httpbin.org",
#     "User-Agent": "Mozilla/5.0 (Windows NT 10.0) AppleWebKit/537.36 (KHTML, like Gecko) Chrome/86.0.8810.3391 Safari/537.36 Edge/18.14383",
#     "X-Amzn-Trace-Id": "Root=1-64ad4157-0c5187c3267e127a59fcbda0"
#   },
#   "origin": "222.74.73.202",     #表示访问地址
#   "url": "http://httpbin.org/get"
# }
解析html
常见python中解析html代码模块:
LXML模块:解析速度快,但是需要安装C语言库
Requests-HTML模块:第三方模块
HtmlParser模块:python标准库模块。执行速度适中但容错能力较差
BeautifulSoup模块:不仅支持python标准库的html解析器还支持很多第三方解析器,其中还包含LXML解析器
BeautifulSoup模块安装方法:
pip install bs4
源码安装:
源码地址:
https://www.crummy.com/software/BeautifulSoup/bs4/download/
安装源码:
python setup.py install
BeautifulSoup模块的使用
需要安装LXML解析器
>>>pip install lxml -i https://pypi.tuna.tsinghua.edu.cn/simple/
示例1:分析html代码
from bs4 import BeautifulSoup
html_doc = """<html><head><title>The Dormouse's story</title></head>
<body>
<p class="title"><b>The Dormouse's story</b></p>

<p class="story">Once upon a time there were three little sisters; and their names were
<a href="http://example.com/elsie" class="sister" id="link1">Elsie</a>,
<a href="http://example.com/lacie" class="sister" id="link2">Lacie</a> and
<a href="http://example.com/tillie" class="sister" id="link3">Tillie</a>;
and they lived at the bottom of a well.</p>

<p class="story">...</p>
"""
soup = BeautifulSoup(html_doc,features='lxml')#选择lxml解析器解析html_doc
print(soup.title)
print(soup.prettify())#格式化
示例2:读取网页文件进行解析
file = open('test.html','w')
file.write("""<html><head><title>The Dormouse's story</title></head>
<body>
<p class="title"><b>The Dormouse's story</b></p>

<p class="story">Once upon a time there were three little sisters; and their names were
<a href="http://example.com/elsie" class="sister" id="link1">Elsie</a>,
<a href="http://example.com/lacie" class="sister" id="link2">Lacie</a> and
<a href="http://example.com/tillie" class="sister" id="link3">Tillie</a>;
and they lived at the bottom of a well.</p>

<p class="story">...</p>
""")
file.close()
from bs4 import BeautifulSoup
soup = BeautifulSoup(open('test.html'),features='lxml')
print(soup.title)
示例3:爬取并解析百度
from bs4 import BeautifulSoup
import requests
response = requests.get('http://news.baidu.com')
soup = BeautifulSoup(response.text,features='lxml')
print(soup.title)
爬虫的常用框架
Scrapy爬虫框架:
Scrapy框架是一套比较成熟的Python爬虫框架,简单轻巧,并且非常方便,可以高效率地爬取Web页面并从页面中提取结构化的数据。
Crawley爬虫框架:
Crawley也是Python开发出的爬虫框架,该框架致力于改变人们从互联网中提取数据的方式。
PySpider爬虫框架:
相对于Scrapy框架而言,PySpider框架还是新秀。PySpider框架釆用Python语言编写,分布式架构,支持多种数据库后端,强大的WebUI支持脚本编辑器, 任务监视器,项目管理器以及结果查看器
Scrapy爬虫框架
搭建Scrapy爬虫框架
安装Twisted模块
twisted:异步网络框架,可加快下载速度。优点是用少量的代码实现快速的抓取。
下载:由于scrapy需要twisted的环境,我们直接去下载whl文件根据自己的Python版本选择
下载完之后按住shift然后鼠标右键打开命令行
pip install twisted_iocpsupport-1.0.2-cp310-cp310-win_amd64.whl
安装scrapy框架
pip install scrapy
安装pywin32
pywin32:是一个第三方模块库,它直接包装了几乎所有windowsAPI ,可以方便的从python直接调用
pip install pywin32
测试:
命令行执行:scrapy
创建Scrapy项目
进入要创建项目的路径然后shift鼠标右击打开命令行窗口:
scrapy startproject scrapyDemo
#scrapyDemo:自定义项目名
然后使用PyCharm打开此项目

测试项目:爬取scrapy官方提供的测试网页
地址:https://quotes.toscrape.com/page/1/
补充:
yield:带有 yield 的函数不再是一个普通函数,而是一个生成器generator,可用于迭代。
Scrapy(爬虫框架)中,Spider类中parse()方法的工作机制
示例1:需要要命令行启动定义的爬虫
import scrapy  # 导入框架


class QuotesSpider(scrapy.Spider):
    name = "quotes"  # 定义爬虫名称

    def start_requests(self):
        # 设置爬取目标的地址
        urls = [
            'http://quotes.toscrape.com/page/1/',
            'http://quotes.toscrape.com/page/2/',
        ]
        # 获取所有地址,有几个地址发送几次请求
        for url in urls:
            # 构造请求,scrapy.Request(url,callback)
            #callback:表示当前的url的响应交给哪个函数去处理,callback=self.parse一般都是交给自身的parse函数处理
            yield scrapy.Request(url=url, callback=self.parse)
    #处理结果
    #parse(self,response):当请求url返回网页没有指定回调函数,默认的Request对象的回调函数,用来处理网页返回的response,和生成的Item或者Request对象
    def parse(self, response):
        # 获取页数
        page = response.url.split('/')[-2]
        # 根据页数设置文件名称
        filename = 'quotes-%s.html' %page
        #以写入文件模式打开文件,如果没有该文件将创建该文件
        with open(filename, 'wb') as f:
            # 向文件中写入获取的html代码
            f.write(response.body)
        # 输出保存文件的名称
        self.log('Saved file %s' % filename)
最后命令行启动定义的爬虫名字:
>>>scrapy crawl quotes
示例2:代码中设置程序执行入口,并设置启动爬虫
import scrapy  # 导入框架


class QuotesSpider(scrapy.Spider):
    name = "quotes"  # 定义爬虫名称

    def start_requests(self):
        # 设置爬取目标的地址
        urls = [
            'http://quotes.toscrape.com/page/1/',
            'http://quotes.toscrape.com/page/2/',
        ]
        # 获取所有地址,有几个地址发送几次请求
        for url in urls:
            # 发送网络请求
            yield scrapy.Request(url=url, callback=self.parse)
    #处理结果
    def parse(self, response):
        # 获取页数
        page = response.url.split('/')[-2]
        # 根据页数设置文件名称
        filename = 'quotes-%s.html' %page
        #以写入文件模式打开文件,如果没有该文件将创建该文件
        with open(filename, 'wb') as f:
            # 向文件中写入获取的html代码
            f.write(response.body)
        # 输出保存文件的名称
        self.log('Saved file %s' % filename)
#导入CrawlerProcess类
from scrapy.crawler import CrawlerProcess
#获取项目的设置信息
from scrapy.utils.project import get_project_settings

if __name__ == '__main__':
    #创建CrawlerProcess类对象,并将获取的设置信息传入
    process = CrawlerProcess(get_project_settings())
    #设置需要启动的爬虫名字
    process.crawl('quotes')
    #启动爬虫
    process.start()
实践项目:快手爬票
运行效果

通过UI编辑器QT实现