在上一节课中,我们已经学会了将按钮与函数进行绑定,从而自己可以对函数进行扩展,那么今天我们将会学习另一个方法将按钮与函数进行绑定!上一节课的复习链接:点我—>PyQty5—第二课
首相我们把上一节课的代码中的绑定函数以及对象注释掉
代码(untitled.py):
import sys
from PyQt5 import QtCore, QtGui, QtWidgets
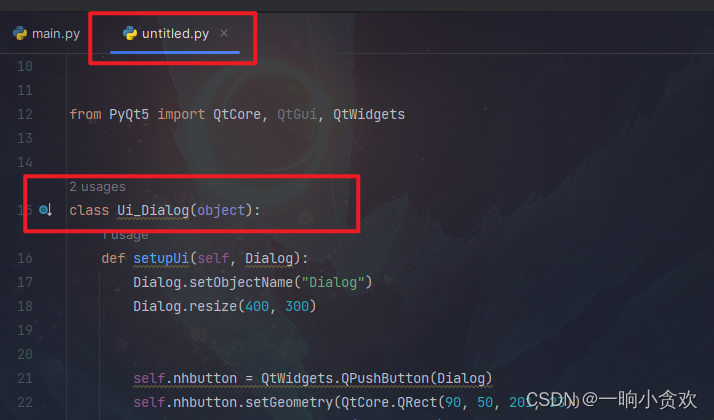
class Ui_Dialog(object):
def setupUi(self, Dialog):
Dialog.setObjectName("Dialog")
Dialog.resize(400, 300)
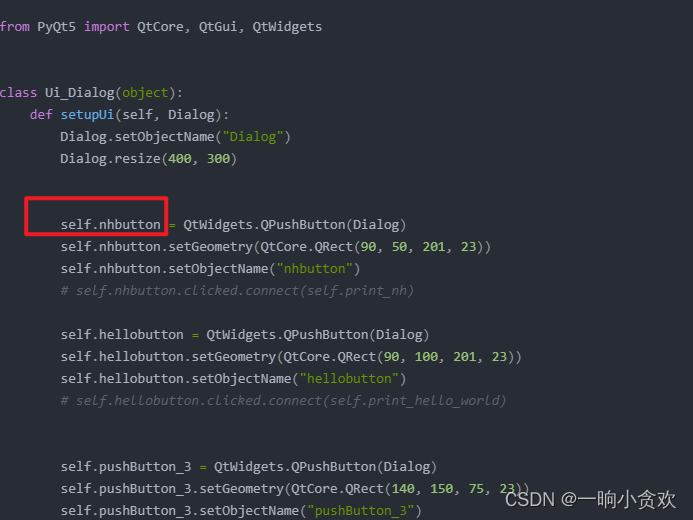
self.nhbutton = QtWidgets.QPushButton(Dialog)
self.nhbutton.setGeometry(QtCore.QRect(90, 50, 201, 23))
self.nhbutton.setObjectName("nhbutton")
self.hellobutton = QtWidgets.QPushButton(Dialog)
self.hellobutton.setGeometry(QtCore.QRect(90, 100, 201, 23))
self.hellobutton.setObjectName("hellobutton")
self.pushButton_3 = QtWidgets.QPushButton(Dialog)
self.pushButton_3.setGeometry(QtCore.QRect(140, 150, 75, 23))
self.pushButton_3.setObjectName("pushButton_3")
self.retranslateUi(Dialog)
self.pushButton_3.clicked.connect(Dialog.reject)
QtCore.QMetaObject.connectSlotsByName(Dialog)
def retranslateUi(self, Dialog):
_translate = QtCore.QCoreApplication.translate
Dialog.setWindowTitle(_translate("Dialog", "Dialog"))
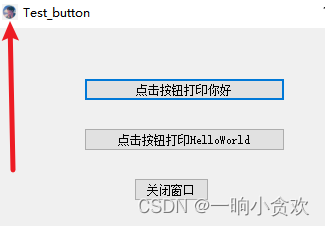
self.nhbutton.setText(_translate("Dialog", "点击按钮打印你好"))
self.hellobutton.setText(_translate("Dialog", "点击按钮打印HelloWorld"))
self.pushButton_3.setText(_translate("Dialog", "关闭窗口"))
1、首先我们新建一个py文件,取名(main.py)也可以随意
将我们需要的库进行导入:
from test_button import Ui_MainWindow
import sys
from PyQt5.QtGui import QIcon
from PyQt5.QtWidgets import QWidget,QMainWindow,QApplication
from PyQt5.QtCore import pyqtSlot
2、接着我们创建一个类
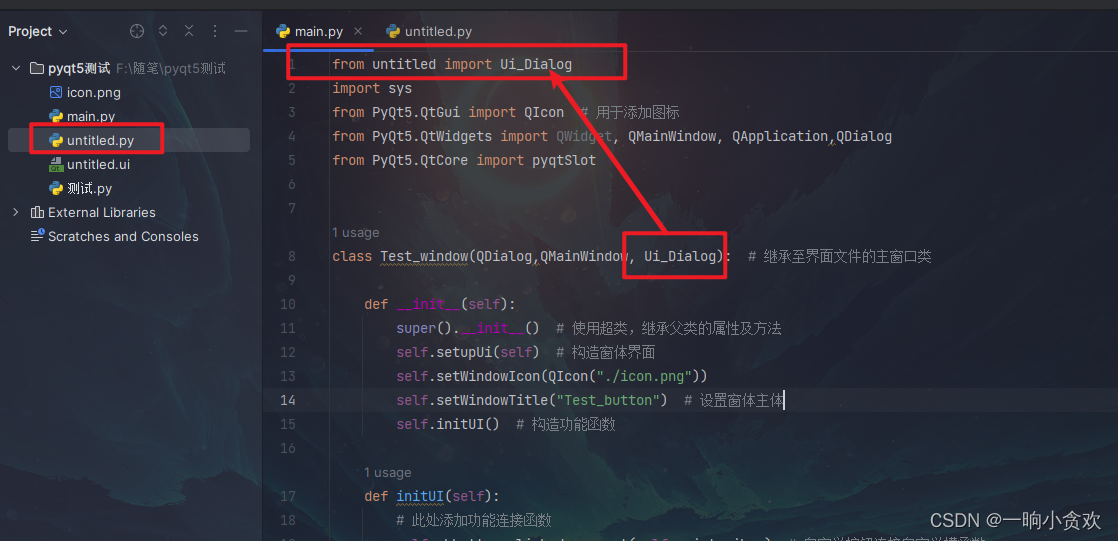
from untitled import Ui_Dialog
import sys
from PyQt5.QtGui import QIcon
from PyQt5.QtWidgets import QWidget, QMainWindow, QApplication,QDialog
from PyQt5.QtCore import pyqtSlot
class Test_window(QDialog,QMainWindow, Ui_Dialog):
def __init__(self):
super().__init__()
self.setupUi(self)
self.setWindowTitle("Test_button")
self.initUI()
def initUI(self):
self.hellobutton.clicked.connect(self.print_hello_world)
@pyqtSlot()
def on_nhbutton_clicked(self):
print("你好!!")
def print_hello_world(self):
print("Hello,World!")
2-1 类的初始化属性\函数 解释
super().__init__() # 使用超类,继承父类的属性及方法
self.setupUi(self) # 构造窗体界面 就是 untitled.py的那个函数
self.setWindowIcon(QIcon("./img/result.png")),就是左上角的图标,没有照片就把这一行注释掉
self.setWindowTitle("Test_button") # 设置窗体主题
2-2 def initUI(self):
这个函数就是我们按钮绑定的函数
self.nhbutton.clicked.connect(self.print_nihao):这个就是我们【untitled.py】里的 self.nhbutton 绑定*print_nihao*函数
重点:@pyqtSlot()的解释!(下面解释来自ChatGPT)
setupUi()方法会调用 QtCore .QMetaObject.connectSlotsByName(),这是一个静态方法,会在窗体窗口部件的各个信号和我们那个使用了特定命名规范的子类方法之间创建一些信号槽连接。窗体中任何 on_widgetName_ signalName(on_控件名字_信号名字)形式的方法名,都会用窗口部件的信号与之相连接
@pyqtSlot()是一个装饰器,用于显示地指定一个方法为PyQt的槽函数。PyQt中的槽函数用于处理信号的连接,当信号被触发时,槽函数会被调用。
在我的代码中,@pyqtSlot() 装饰器用于指定 on_nhbutton_clicked 方法作为槽函数,该方法会在 【nhbutton】被点击时被调用。因此 on_nhbutton_clicked函数没有被connect链接,此外,由于我使用了 print_hello_world 方法作为自定义按钮 hellobutton的槽函数,但没有对其应用装饰器,依然能够正常工作,因为其是正常的链接!
实际上,如果你没有在方法前面使用 @pyqtSlot() 装饰器,PyQt会自动将该方法视为槽函数(加不加都是槽函数),这是因为 PyQt根据方法的名称和参数进行了命名约定。因此,即使你没有明确指定方法为槽函数,当你将其连接到信号时,PyQt仍然会将其视为槽函数来进行调用。
总结来说,使用 @pyqtSlot()装饰器来显示地指定方法为槽函数可以提高代码的可读性,明确地表明该方法是为了处理信号而设计的。但如果没有使用该装饰器,PyQt仍然会将方法视为槽函数,因此在你的代码中,不加装饰器也一样能够实现功能。(我的总结:加不加都是槽函数,加了就需要注意函数名的特殊写法从而进行信号绑定,不加就是普通槽函数,就需要connec绑定按钮)
所以我们我们发现:on_nhbutton_clicked这个函数我没有绑定,却正常的运行了,那是因为该函数是一个槽函数且进行信号绑定,且函数名符合 QtCore .QMetaObject.connectSlotsByName()的特殊命名!!因为:on_nhbutton_clicked中的【nhbutton】就是untitled.py中的,如下图:
所以 print_hello_world就是普通的槽函数,没有信号绑定,但是我们在initUI函数中,对其进行了与按钮【self.hellobutton】绑定,所以依旧可以正常运行!!
完整版代码1:untitled.py,在上面自取
完整版代码2:main.py
from untitled import Ui_Dialog
import sys
from PyQt5.QtGui import QIcon
from PyQt5.QtWidgets import QWidget, QMainWindow, QApplication,QDialog
from PyQt5.QtCore import pyqtSlot
class Test_window(QDialog,QMainWindow, Ui_Dialog):
def __init__(self):
super().__init__()
self.setupUi(self)
self.setWindowIcon(QIcon("./icon.png"))
self.setWindowTitle("Test_button")
self.initUI()
def initUI(self):
self.hellobutton.clicked.connect(self.print_hello_world)
@pyqtSlot()
def on_nhbutton_clicked(self):
print("你好!!")
def print_hello_world(self):
print("Hello,World!")
if __name__ == "__main__":
app = QApplication(sys.argv)
ui2 = Test_window()
ui2.show()
sys.exit(app.exec_())
演示视频:
这是我们今天学习PyQty5的第 3 课,今天我们学习了绑定的函数的另一种写法,大家可以多多练习!!我也会努力的!
希望对大家有帮助
致力于办公自动化的小小程序员一枚#
都看到这了,关注+点赞+收藏=不迷路!!
如果你想知道更多关于Python办公自动化的知识各位大佬给个关注吧!