前端路由的原理
自己来监听URL的改变,改变url,渲染不同的组件(页面),但是页面不要进行强制刷新(a元素不行)。
- hash模式,localhost:3000/#/abc
- 优势就是兼容性更好,在老版IE中都可以运行
- 缺点是有一个#,显得不像一个真实的路径
- 通过HTML5中的history修改URL
1. URL的hash
原理:通过监听hashchange变化
<!DOCTYPE html>
<html lang="en">
  <head>
    <meta charset="UTF-8" />
    <meta name="viewport" content="width=device-width, initial-scale=1.0" />
    <title>Document</title>
  </head>
  <body>
    <div id="app">
      <a href="#/home">首页</a>
      <a href="#/about">关于</a>

      <div class="router-view"></div>
    </div>
    <script>
      // 获取router-view的DOM
      const routerViewEl = document.getElementsByClassName("router-view")[0];

      // 监听URL的改变
      window.addEventListener("hashchange", () => {


        switch (location.hash) {


          case "#/home":
            routerViewEl.innerHTML = "首页";
            break;
          case "#/about":
            routerViewEl.innerHTML = "关于";
            break;
          default:
            routerViewEl.innerHTML = "";
        }
      });
    </script>
  </body>
</html>
2. HTML5的history
history接口是HTML5新增的,常见方法和事件如下:
- pushState: 使用新的路径
- replaceState: 替换原来的路径
- popstate事件
- go: 向前或向后改变路径
- forward: 向前改变路径
- back: 向后改变路径
其中,pushState、replaceState、go、forward、back改变URL而不刷新页面,参考:https://blog.csdn.net/pj598707063/article/details/90720767
<!DOCTYPE html>
<html lang="en">
  <head>
    <meta charset="UTF-8" />
    <meta name="viewport" content="width=device-width, initial-scale=1.0" />
    <title>Document</title>
  </head>
  <body>
    <div id="app">
      <a href="/home">首页</a>
      <a href="/about">关于</a>

      <div class="router-view"></div>
    </div>

    <script>
      // 1.获取router-view的DOM
      const routerViewEl = document.getElementsByClassName("router-view")[0];

      // 获取所有的a元素, 自己来监听a元素的改变
      const aEls = document.getElementsByTagName("a");
      for (let el of aEls) {


        el.addEventListener("click", (e) => {


          e.preventDefault();
          const href = el.getAttribute("href");
          history.pushState({

      }, "", href);
          urlChange();
        });
      }

      // 执行返回操作时, 依然来到urlChange
      window.addEventListener("popstate", urlChange);

      // 监听URL的改变
      function urlChange() {


        switch (location.pathname) {


          case "/home":
            routerViewEl.innerHTML = "首页";
            break;
          case "/about":
            routerViewEl.innerHTML = "关于";
            break;
          default:
            routerViewEl.innerHTML = "";
        }
      }
    </script>
  </body>
</html>
react-router
react-router的版本4开始,路由不再集中在一个包进行管理了,而是进行了分包:
- react-router是router的核心代码
- react-router-dom是用于浏览器的
- react-router-native是用于RN应用的
提示:安装react-router-dom会自动安装react-router
1. react-router基础
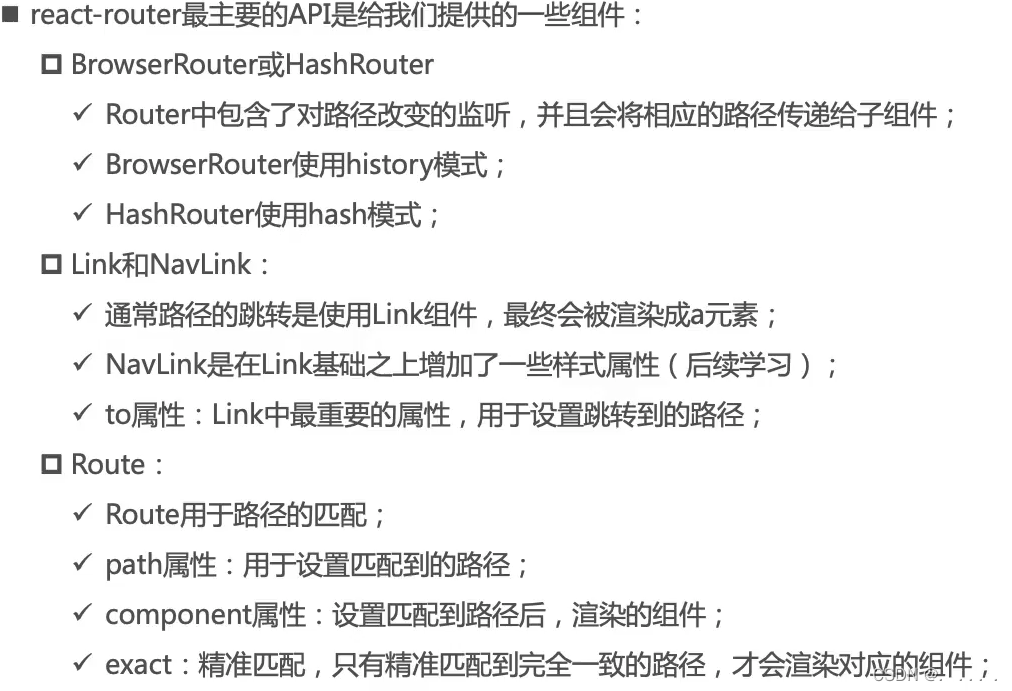
2. NavLink
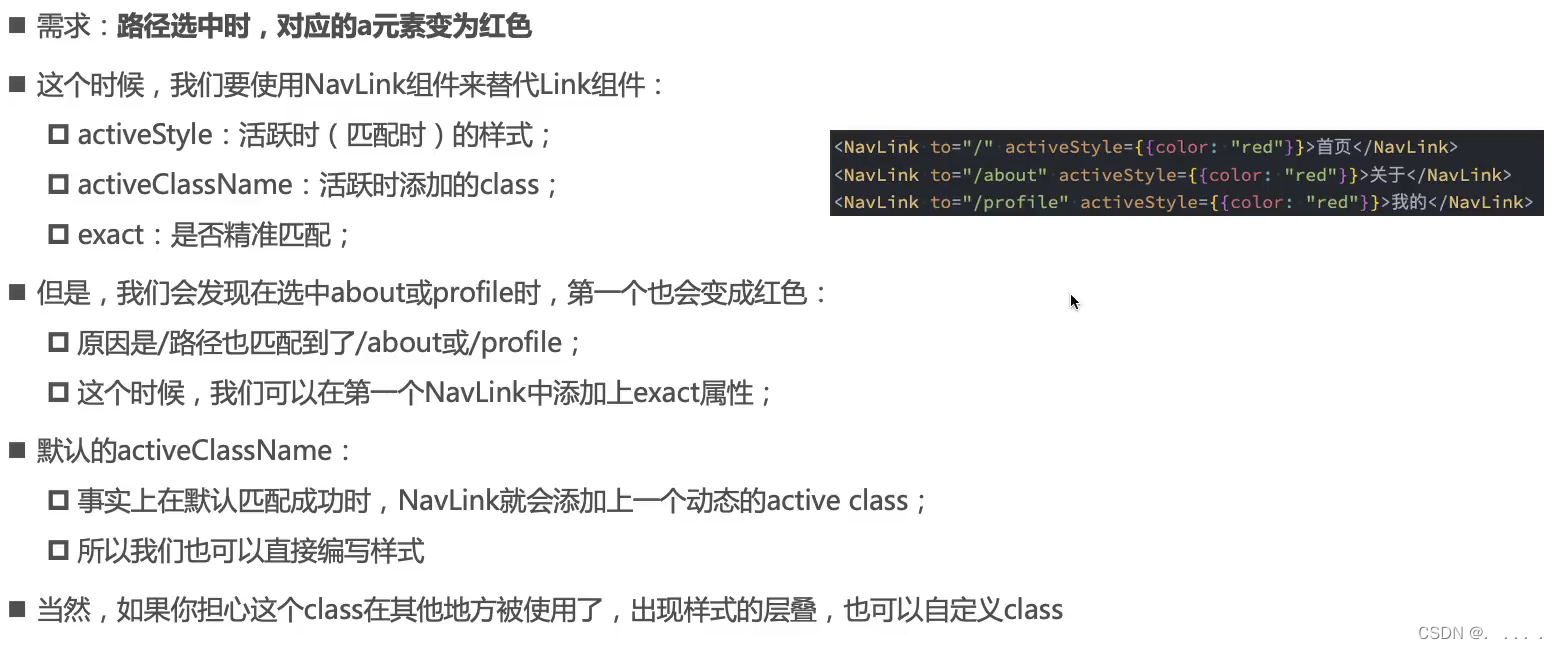
NavLink是对Link的一个封装,支持更多属性,例如exact、activeStyle、activeClassName(这个属性的默认值为active)等
3. 动态路由
<NavLink to={

    `/detail/${

      id}`} activeClassName="link-active">详情</NavLink>
// const match = this.props.match;
// console.log(match.params);

<NavLink to={

    `/detail2?name=xiaoming&age=18`} activeClassName="link-active">详情2</NavLink>
// <h2>Detail2: {this.props.location.search}</h2>
<NavLink to={

    {


          pathname: "/detail3",
          search: "name=abc",
          state: info
         }}
        activeClassName="link-active">
  详情3
</NavLink>
// to后面的对象将被保留到this.props.location中
// <h2>Detail3: {this.props.location.state.name}</h2>
4. redirect
import React, {

     PureComponent } from 'react'
import {

     Redirect } from 'react-router-dom';

export default class User extends PureComponent {


  constructor(props) {


    super(props);
    this.state = {


      isLogin: true
    }
  }
  render() {


    return this.state.isLogin ? (
      <div>
        <h2>User</h2>
        <h2>用户名: coderwhy</h2>
      </div>
    ): <Redirect to="/login"/>
  }
}
5. 嵌套路由(19-45分)
对于嵌套路由,为了避免子路由里重父组件上的路径,可以通过basename处理,参考https://v5.reactrouter.com/web/api/BrowserRouter/basename-string

6. 手动路由跳转(19-59)
// App.jsx
<Route exact path="/" component={

    Home} />
<Route path="/about" component={

    About} />
<Route path="/profile" component={

    Profile} />
<Route path="/:id" component={

    User} />
因为About组件是在Route的component里渲染的,所以Route可以给About组件灌入很多属性,包括history、match等
// About.jsx
export default class About extends PureComponent {


  render() {


    console.log(this.props.route);
    const branch = matchRoutes(this.props.route.routes, "/about");
    console.log(branch);

    return (
      <div>
        <NavLink exact to="/about" activeClassName="about-active">企业历史</NavLink>
        <NavLink exact to="/about/culture" activeClassName="about-active">企业文化</NavLink>
        <NavLink exact to="/about/contact" activeClassName="about-active">联系我们</NavLink>
        <button onClick={

    e => this.jumpToJoin()}>加入我们</button>

        <Switch>
          <Route exact path="/about" component={

    AboutHisotry}/>
          <Route path="/about/culture" component={

    AboutCulture}/>
          <Route path="/about/contact" component={

    AboutContact}/>
          <Route path="/about/join" component={

    AboutJoin}/>
        </Switch>
      </div>
    )
  }
  jumpToJoin() {


    // console.log(this.props.history);
    // console.log(this.props.location);
    // console.log(this.props.match);
    this.props.history.push("/about/join");
  }
}
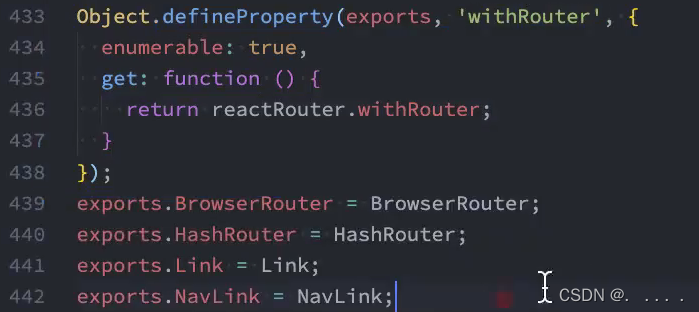
withRouter (19 - 1:21)
源码阅读:react-router-dom再调用了react-router
7. 路由统一管理react-router-config
对于上面的嵌套路由显得太零散,因此需要对路径进行统一管理。
// router.js
import Home from '../pages/home';
import About, {

     AboutHisotry, AboutCulture, AboutContact, AboutJoin } from '../pages/about';
import Profile from '../pages/profile';
import User from '../pages/user';

const routes = [
  {


    path: "/",
    exact: true,
    component: Home
  },
  {


    path: "/about",
    component: About,
    // 子路由
    routes: [
      {


        path: "/about",
        exact: true,
        component: AboutHisotry
      },
      {


        path: "/about/culture",
        component: AboutCulture
      },
      {


        path: "/about/contact",
        component: AboutContact
      },
      {


        path: "/about/join",
        component: AboutJoin
      },
    ]
  },
  {


    path: "/profile",
    component: Profile
  },
  {


    path: "/user",
    component: User
  }
]
export default routes;
// App.js
import {

     renderRoutes } from 'react-router-config';
import routes from './router';
render() {


	return (
		<div>{

    renderRoutes(routes)}</div>
	)
}
// About.js
import {

     renderRoutes } from 'react-router-config';
render() {


    return (
      <div>
        <NavLink exact to="/about" activeClassName="about-active">企业历史</NavLink>
        <NavLink exact to="/about/culture" activeClassName="about-active">企业文化</NavLink>
        <NavLink exact to="/about/contact" activeClassName="about-active">联系我们</NavLink>
        <button onClick={

    e => this.jumpToJoin()}>加入我们</button>

        {

    /* <Switch>
          <Route exact path="/about" component={AboutHisotry}/>
          <Route path="/about/culture" component={AboutCulture}/>
          <Route path="/about/contact" component={AboutContact}/>
          <Route path="/about/join" component={AboutJoin}/>
        </Switch> */}
		// 因为父组件是通过renderRoutes渲染的,所以能够拿到this.props.route
        {

    renderRoutes(this.props.route.routes)}
      </div>
    )
  }
react-router-config