这两天跑了以下google的cartographer算法,效果不错,比gmapping效果要好。
cartographer的安装网上很多教程,主要按照张明明的方法,https://github.com/hitcm/,安装好后,下个数据集,运行roslaunch cartographer_ros demo_backpack_2d.launch bag_filename:=yourpath/cartographer_paper_deutsches_museum.bag,就可以看到网上流行的那张图,

仿真数据跑成功后,就要用自己的机器人跑算法了。就我的实际经验,跑仿真数据很容易,照着教程,一步步来,基本都能看到建图效果
//////////******************************************************************************************************************************************/////////////
我使用的是adept机器人,其实不同的机器人差别不大,主要是看用了哪些传感器数据。我用的这款adept有激光和里程计。
和网上其他教程基本一样,主要修改demo_revo_lds.launch和revo_lds.lua
其中,demo_revo_lds.launch里面,
<launch>
<param name="/use_sim_time" value="true" />
<node name="cartographer_node" pkg="cartographer_ros"
type="cartographer_node" args="
-configuration_directory $(find cartographer_ros)/configuration_files
-configuration_basename revo_lds.lua"
output="screen">
<remap from="scan" to="scan" />
</node>主要是修改
<remap from="scan" to="scan" />将后面的scan修改成机器人发布的激光topic
我的revo_lds.lua配置如下
include "map_builder.lua"
options = { map_builder = MAP_BUILDER,
map_frame = "map",
tracking_frame = "base_link",
published_frame = "base_link",
odom_frame = "odom",
provide_odom_frame = true,
use_odometry_data = false,
use_constant_odometry_variance = false,
constant_odometry_translational_variance = 0.,
constant_odometry_rotational_variance = 0.,
use_horizontal_laser = true,
use_horizontal_multi_echo_laser = false,
horizontal_laser_min_range = 0.3,
horizontal_laser_max_range = 8.,
horizontal_laser_missing_echo_ray_length = 0.,
num_lasers_3d = 0,
lookup_transform_timeout_sec = 0.2,
submap_publish_period_sec = 0.3,
pose_publish_period_sec = 5e-3,
}
MAP_BUILDER.use_trajectory_builder_2d = true
TRAJECTORY_BUILDER_2D.use_imu_data = false
TRAJECTORY_BUILDER_2D.use_online_correlative_scan_matching = true
SPARSE_POSE_GRAPH.optimization_problem.huber_scale = 1e2
return options
其中比较关键的是开始的几个frame的设置,网上转载比较多的是
map_frame = "map",
tracking_frame = "laser",
published_frame = "laser",
odom_frame = "odom",
这样设置的原因应该是只用了一个激光器,而不是机器人,所以用“laser”,这个“laser”也需要查看激光器在tf_tree中的名称,用实际的名称替换,否则rviz中看不到地图,因为tf有问题。我通过rosrun rqt_tf_tree rqt_tf_tree 查看机器人发布的tf_tree

按照网上牛人的说明blog.csdn.net/mllearnertj/article/details/72871169,我的配置文件里tracking_frame = "base_link",
(一) 定义的各种坐标系间的关系
1. map_frame = “map”,cartographer中使用的全局坐标系,最好保持默认,否则ROS的Rviz不认识其它的定义,导致无法可视化建图过程。
2.tracking_frame=”base_link”,机器人中心坐标系,很重要,其它传感器数据都是以这个为基础进行插入的。cartographer_ros里面有个tf_bridge的类就是专门用来查询其它坐标系到此坐标系的转换关系的。
2. published_frame = “base_link”
3. odom_frame = “odom” ,3与4是配合使用的,如果参数provide_odom_frame = true 那么最后可视化时,发布的转换消息是从 published_frame->odom_frame->map_frame, 也即cartographer内部计算出了未经回环检测的局部图坐标到优化后的全局图坐标之间的转换关系并发布了出来。在跑官网的二维背包例子时,在map坐标周围一直跳动的odom就是这个玩意。
接下来 roslaunch cartographer_ros demo_revo_lds.launch 就能成功看到地图了。
///////******************************************************************************************//////////////////
保存地图
按照网上说法 rosservice call /finish_trajectory "stem: '地图名称'" 就可以在~/.ros/文件夹下生成pgm和yaml文件。但我运行时,提示了错误,
"Key '"sensor_bridge "' was used the wrong number of times."
我把配置文件中的sensor_bridge 删除后,地图可以正常保存了。效果如下
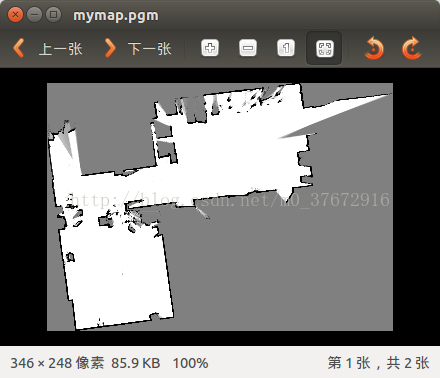
cartographer能够在地图中发现小的目标,这点比基于pf粒子滤波的gmapping强。