实时目标检测:使用 OpenCV 和 YOLOv3
在这篇博客文章中,我们将探讨如何使用 OpenCV 和 YOLOv3 进行实时目标检测。我们将从头到尾演示整个过程,包括加载模型、处理图像和识别对象。
需要的库和工具
首先,我们需要导入以下库:
- OpenCV: 用于图像处理和计算机视觉的开源库。
- NumPy: 用于科学计算的库。
pythonCopy codeimport cv2 as cv
import numpy as np
设置摄像头和模型参数
我们首先设置摄像头并定义一些参数,如输入图像的宽高、置信度阈值和非极大值抑制阈值。
pythonCopy codecap = cv.VideoCapture(0) # 打开摄像头
whT = 320 # 定义输入图像的宽高
confThreshold = 0.5 # 置信度阈值
nmsThreshold = 0.2 # 非极大值抑制阈值
加载模型
我们需要加载 YOLOv3 模型,并设置其配置和权重文件的路径。
pythonCopy code# Coco 类别文件路径
classesFile = "coco_classes.txt"
# 用于存储类别名
classNames = []
# 读取类别名
with open(classesFile, 'rt') as f:
    classNames = f.read().rstrip('\n').split('\n')
# YOLOv3 配置文件路径
modelConfiguration = "yolov3.cfg"
# YOLOv3 权重文件路径
modelWeights = "yolov3.weights"
# 读取网络
net = cv.dnn.readNetFromDarknet(modelConfiguration, modelWeights)
# 设置首选后端为 OpenCV
net.setPreferableBackend(cv.dnn.DNN_BACKEND_OPENCV)
# 设置首选计算目标为 CPU
net.setPreferableTarget(cv.dnn.DNN_TARGET_CPU)
定义目标检测函数:findObjects
findObjects 函数是代码的核心部分,负责处理网络的输出并在图像上找到并绘制目标对象。以下是函数的详细分析:
pythonCopy codedef findObjects(outputs, img):
    hT, wT, cT = img.shape
    bbox = []
    classIds = []
    confs = []
    for output in outputs:
        for det in output:
            scores = det[5:]
            classId = np.argmax(scores)
            confidence = scores[classId]
            if confidence > confThreshold:
                w, h = int(det[2] * wT), int(det[3] * hT)
                x, y = int((det[0] * wT) - w / 2), int((det[1] * hT) - h / 2)
                bbox.append([x, y, w, h])
                classIds.append(classId)
                confs.append(float(confidence))

    indices = cv.dnn.NMSBoxes(bbox, confs, confThreshold, nmsThreshold)
    for i in indices:
        box = bbox[i]
        x, y, w, h = box[0], box[1], box[2], box[3]
        cv.rectangle(img, (x, y), (x + w, y + h), (255, 0, 255), 2)
        cv.putText(img, f'{

      classNames[classIds[i]].upper()} {

      int(confs[i] * 100)}%',
                   (x, y - 10), cv.FONT_HERSHEY_SIMPLEX, 0.6, (255, 0, 255), 2)
a) 获取图像尺寸
pythonCopy code
hT, wT, cT = img.shape
从输入图像获取高度(hT)、宽度(wT)和通道数(cT)。这些尺寸用于后续的计算。
b) 初始化存储结构
pythonCopy codebbox = []
classIds = []
confs = []
bbox用于存储边界框的坐标和尺寸。classIds用于存储每个边界框对应的类别 ID。confs用于存储每个边界框的置信度。
c) 解析网络输出
pythonCopy codefor output in outputs:
    for det in output:
        scores = det[5:]
        classId = np.argmax(scores)
        confidence = scores[classId]
        if confidence > confThreshold:
            # ...
网络的输出包括每个边界框的位置、尺寸、置信度和类别分数。我们遍历每个输出,找到置信度大于阈值的检测结果,并存储相关信息。
d) 计算边界框的位置和尺寸
pythonCopy codew, h = int(det[2] * wT), int(det[3] * hT)
x, y = int((det[0] * wT) - w / 2), int((det[1] * hT) - h / 2)
bbox.append([x, y, w, h])
classIds.append(classId)
confs.append(float(confidence))
我们将网络输出的归一化坐标转换为图像的实际坐标,并存储边界框的位置和尺寸。
e) 应用非极大值抑制
pythonCopy code
indices = cv.dnn.NMSBoxes(bbox, confs, confThreshold, nmsThreshold)
使用非极大值抑制来消除多余的、重叠的框。这确保我们的输出更加精确和干净。
f) 绘制边界框和标签
pythonCopy codefor i in indices:
    box = bbox[i]
    x, y, w, h = box[0], box[1], box[2], box[3]
    cv.rectangle(img, (x, y), (x + w, y + h), (255, 0, 255), 2)
    cv.putText(img, f'{

      classNames[classIds[i]].upper()} {

      int(confs[i] * 100)}%',
               (x, y - 10), cv.FONT_HERSHEY_SIMPLEX, 0.6, (255, 0, 255), 2)
最后,我们遍历非极大值抑制后的索引,对每个检测到的对象,在图像上绘制一个边界框,并添加一个包含类别名和置信度的标签。
主循环:实时目标检测
pythonCopy codewhile True:
    success, img = cap.read()
    blob = cv.dnn.blobFromImage(img, 1 / 255, (whT, whT), [0, 0, 0], 1, crop=False)
    net.setInput(blob)
    layersNames = net.getLayerNames()
    unconnected_out_layers_indices = list(set(net.getUnconnectedOutLayers().flatten()))
    outputNames = [layersNames[i - 1] for i in unconnected_out_layers_indices]
    outputs = net.forward(outputNames)
    findObjects(outputs, img)
    cv.imshow('Image', img)
    cv.waitKey(1)
a) 从摄像头读取图像
pythonCopy code
success, img = cap.read()
使用 OpenCV 的 cap.read() 函数从摄像头读取一帧图像。success 是一个布尔值,表示是否成功读取图像。img 是读取的图像帧。
b) 创建 blob
pythonCopy code
blob = cv.dnn.blobFromImage(img, 1 / 255, (whT, whT), [0, 0, 0], 1, crop=False)
使用 cv.dnn.blobFromImage 函数创建一个 blob,该 blob 是网络输入的适当格式。参数包括:
img: 输入图像。1 / 255: 缩放因子,用于将像素值从 [0, 255] 缩放到 [0, 1]。(whT, whT): 目标尺寸,与网络输入的尺寸相匹配。[0, 0, 0]: 均值减法,用于去均值化。1: 缩放系数。crop=False: 是否裁剪图像。
c) 设置网络输入
pythonCopy code
net.setInput(blob)
将创建的 blob 设置为网络的输入。
d) 获取网络的输出层名称
pythonCopy codelayersNames = net.getLayerNames()
unconnected_out_layers_indices = list(set(net.getUnconnectedOutLayers().flatten()))
outputNames = [layersNames[i - 1] for i in unconnected_out_layers_indices]
获取网络的层名称,并找出未连接的输出层的索引。这些输出层包含了检测对象的信息。
e) 前向传播
pythonCopy code
outputs = net.forward(outputNames)
通过调用 net.forward 函数并传入输出层名称来执行前向传播。这一步骤将图像通过网络传播,并生成检测结果。
f) 调用目标检测函数
pythonCopy code
findObjects(outputs, img)
将网络输出传递给之前定义的 findObjects 函数,并在图像上找到并标记目标对象。
g) 显示图像
pythonCopy codecv.imshow('Image', img)
cv.waitKey(1)
使用 cv.imshow 显示带有标记的图像。cv.waitKey(1) 是一个暂停命令,等待 1 毫秒的时间。
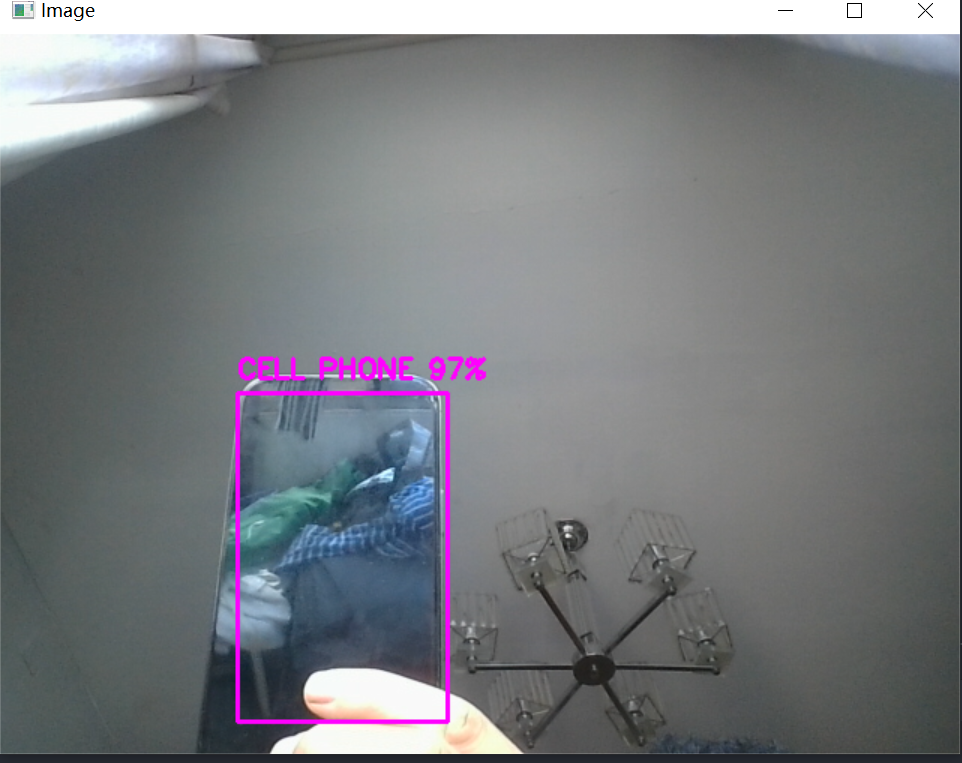
效果
总结
本项目展示了如何结合深度学习和传统计算机视觉技术来实现实时目标检测。通过 OpenCV 和 YOLOv3,我们能够在普通计算机上实时检测摄像头捕获的图像中的对象。
- 实用性: 代码可用于许多实际应用,如监控、人机交互、机器人导航等。
- 灵活性: 通过修改参数和模型,代码可以轻松适应不同的场景和需求。
- 可访问性: 代码使用了开源和广泛使用的库和模型,使其容易理解和扩展。
整个项目展示了现代计算机视觉项目的典型结构和流程,从图像获取和预处理到深度学习推断和结果可视化。希望这个分析能够帮助你理解如何构建和优化自己的目标检测系统,无论是用于学术研究、工业应用还是个人项目。
完整代码
# 导入 OpenCV 库
import cv2 as cv
# 导入 NumPy 库
import numpy as np

# 打开摄像头
cap = cv.VideoCapture(0)
# 定义输入图像的宽高
whT = 320
# 置信度阈值
confThreshold = 0.5
# 非极大值抑制阈值
nmsThreshold = 0.2

# Coco 类别文件路径
classesFile = "coco_classes.txt"
# 用于存储类别名
classNames = []
# 读取类别名
with open(classesFile, 'rt') as f:
    classNames = f.read().rstrip('\n').split('\n')
# YOLOv3 配置文件路径
modelConfiguration = "yolov3.cfg"
# YOLOv3 权重文件路径
modelWeights = "yolov3.weights"
# 读取网络
net = cv.dnn.readNetFromDarknet(modelConfiguration, modelWeights)
# 设置首选后端为 OpenCV
net.setPreferableBackend(cv.dnn.DNN_BACKEND_OPENCV)
# 设置首选计算目标为 CPU
net.setPreferableTarget(cv.dnn.DNN_TARGET_CPU)

# 定义函数用于在图像中寻找目标
def findObjects(outputs, img):
    # 获取图像的高、宽和通道数
    hT, wT, cT = img.shape
    # 存储边界框
    bbox = []
    # 存储类别ID
    classIds = []
    # 存储置信度
    confs = []
    # 遍历网络输出
    for output in outputs:
        # 遍历检测结果
        for det in output:
            # 获取分数
            scores = det[5:]
            # 找到最大置信度的类别ID
            classId = np.argmax(scores)
            # 获取置信度
            confidence = scores[classId]
            # 如果置信度大于阈值
            if confidence > confThreshold:
                # 计算边界框的宽和高
                w, h = int(det[2] * wT), int(det[3] * hT)
                # 计算边界框的x和y坐标
                x, y = int((det[0] * wT) - w / 2), int((det[1] * hT) - h / 2)
                # 存储边界框
                bbox.append([x, y, w, h])
                # 存储类别ID
                classIds.append(classId)
                # 存储置信度
                confs.append(float(confidence))

    # 使用非极大值抑制
    indices = cv.dnn.NMSBoxes(bbox, confs, confThreshold, nmsThreshold)
    # 遍历索引
    for i in indices:
        # 获取边界框
        box = bbox[i]
        # 获取坐标和尺寸
        x, y, w, h = box[0], box[1], box[2], box[3]
        # 画矩形
        cv.rectangle(img, (x, y), (x + w, y + h), (255, 0, 255), 2)
        # 添加文本
        cv.putText(img, f'{

      classNames[classIds[i]].upper()} {

      int(confs[i] * 100)}%',
                   (x, y - 10), cv.FONT_HERSHEY_SIMPLEX, 0.6, (255, 0, 255), 2)

# 循环捕获图像
while True:
    # 读取图像
    success, img = cap.read()
    # 创建 blob
    blob = cv.dnn.blobFromImage(img, 1 / 255, (whT, whT), [0, 0, 0], 1, crop=False)
    # 设置网络输入
    net.setInput(blob)
    # 获取层名称
    layersNames = net.getLayerNames()
    # 获取未连接的输出层索引
    unconnected_out_layers_indices = list(set(net.getUnconnectedOutLayers().flatten()))
    # 获取输出层名称
    outputNames = [layersNames[i - 1] for i in unconnected_out_layers_indices]
    # 前向传播
    outputs = net.forward(outputNames)
    # 在图像中找到对象
    findObjects(outputs, img)
    # 显示图像
    cv.imshow('Image', img)
    # 等待 1 毫秒
    cv.waitKey(1)