【原文链接】基于ARM架构openEuler系统通过qemu模拟器自动安装启动ARM架构的openEuler虚拟机
一、基础准备工作
(1)下载ARM架构的openEuler操作系统镜像
mkdir -p /opt/os
cd /opt/os
wget https://repo.openeuler.org/openEuler-22.03-LTS/ISO/aarch64/openEuler-22.03-LTS-aarch64-dvd.iso --no-check-certificate
chmod 777 /opt/os/openEuler-22.03-LTS-aarch64-dvd.iso
(3)下载ARM架构的EFI
路径为 /usr/share/AAVMF/AAVMF_CODE.fd
yum install -y http://mirror.centos.org/altarch/7/os/aarch64/Packages/AAVMF-20180508-6.gitee3198e672e2.el7.noarch.rpm
(4)安装基础依赖
yum install -y kvm qemu virt-viewer virt-manager libvirt libvirt-python python-virtinst
yum install libguestfs-tools -y
yum install virt-install.noarch -y
systemctl enable libvirtd
systemctl start libvirtd
usermod -aG libvirt $(whoami)
yum install virt-install virt-viewer virt-manager -y
(5)修改配置文件
将如下两行放开注释
vi /etc/libvirt/qemu.conf

然后搜索 nvram,并将如下几行放开注释
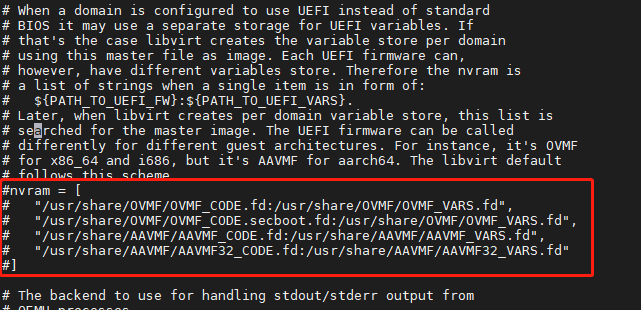
然后重启
reboot
(6)下载qemu
cd /opt
wget https://download.qemu.org/qemu-4.2.0.tar.xz
(7)安装基础依赖
yum install zlib-devel glib2-devel pixman-devel gcc -y
(8)解压qemu
cd /opt/
tar xf qemu-4.2.0.tar.xz
(9)安装qemu
cd qemu-4.2.0/
./configure --target-list=aarch64-softmmu --prefix=/usr
make -j8
make install
二、自动创建基于dhcp自动获取ip地址的openEuler虚拟机
(1)创建磁盘
rm -rf /var/lib/libvirt/images/test.qcow2
systemctl restart libvirtd
qemu-img create -f qcow2 /var/lib/libvirt/images/test.qcow2 30G
(2)创建ks文件
rm -rf /opt/openEuler/dhcp/ks.cfg
mkdir -p /opt/openEuler/dhcp/
vi /opt/openEuler/dhcp/ks.cfg
ks文件内容如下:
#version=DEVEL
# System authorization information
auth --enableshadow --passalgo=sha512
# Use CDROM installation media
cdrom
# Use graphical install
text
# Run the Setup Agent on first boot
firstboot --enable
ignoredisk --only-use=sda
# Keyboard layouts
keyboard --vckeymap=cn --xlayouts='cn'
# System language
lang zh_CN.UTF-8
# Network information
network  --bootproto=dhcp
network  --hostname=test
# Root password
rootpw --iscrypted $6$iqWsh8SEbDTI2rvb$ri6nTjR79jQ9MDrzcKGkEhy6k8TQg2jV3P8JJ4E.WNaIfL1kFSUlIWBtA5bDjCajH213TKUeBQT6SaYbtnKzN/
# System services
services --enabled="chronyd"
# System timezone
timezone Asia/Shanghai --isUtc
# System bootloader configuration
bootloader --append=" crashkernel=auto" --location=mbr --boot-drive=sda
# Partition clearing information
clearpart --none --initlabel
# Disk partitioning information
part /boot --fstype="xfs" --ondisk=sda --size=1024
part /boot/efi --fstype="efi" --ondisk=sda --size=600 --fsoptions="umask=0077,shortname=winnt"
part pv.252 --fstype="lvmpv" --ondisk=sda --size=18050
volgroup centos --pesize=4096 pv.252
logvol swap  --fstype="swap" --size=2048 --name=swap --vgname=centos
logvol /  --fstype="xfs" --size=16000 --name=root --vgname=centos
%packages
@^minimal-environment
@standard
@core
chrony
kexec-tools
%end
reboot
%anaconda
pwpolicy root --minlen=6 --minquality=1 --notstrict --nochanges --notempty
pwpolicy user --minlen=6 --minquality=1 --notstrict --nochanges --emptyok
pwpolicy luks --minlen=6 --minquality=1 --notstrict --nochanges --notempty
%end
(3)通过virt-install启动虚拟机
virt-install\
     --name test\
     --memory 2048\
     --vcpus=1\
     --os-type linux\
     --location /opt/os/openEuler-22.03-LTS-aarch64-dvd.iso \
     --disk path=/var/lib/libvirt/images/test.qcow2,size=20,format=qcow2  \
     --graphics=none \
     --console pty,target_type=serial \
     --initrd-inject ks.cfg --extra-args "inst.ks=file:/ks.cfg console=ttyS0,115200n8"
三、自动创建配置静态IP地址的openEuler虚拟
(1)创建磁盘,在创建之前如果已经存在则先删除
rm -rf /var/lib/libvirt/images/test.qcow2
qemu-img create -f qcow2 /var/lib/libvirt/images/test.qcow2 30G
(2)创建ks.cfg文件
rm -rf /opt/openEuler/static/ks.cfg
mkdir -p /opt/openEuler/static/
vi /opt/openEuler/static/ks.cfg
然后向ks.cfg中写入如下内容
#version=DEVEL
# System authorization information
auth --enableshadow --passalgo=sha512
# Use CDROM installation media
cdrom
# Use graphical install
text
# Run the Setup Agent on first boot
firstboot --enable
ignoredisk --only-use=sda
# Keyboard layouts
keyboard --vckeymap=cn --xlayouts='cn'
# System language
lang zh_CN.UTF-8

# Network information
network  --bootproto=static --device=ens3 --gateway=192.168.1.1 --ip=192.168.1.100 --nameserver=8.8.8.8 --netmask=255.255.255.0
network  --hostname=test

# Root password
rootpw --iscrypted $6$iqWsh8SEbDTI2rvb$ri6nTjR79jQ9MDrzcKGkEhy6k8TQg2jV3P8JJ4E.WNaIfL1kFSUlIWBtA5bDjCajH213TKUeBQT6SaYbtnKzN/
# System services
services --enabled="chronyd"
# System timezone
timezone Asia/Shanghai --isUtc
# System bootloader configuration
bootloader --append=" crashkernel=auto" --location=mbr --boot-drive=sda
# Partition clearing information
clearpart --none --initlabel
# Disk partitioning information
part /boot --fstype="xfs" --ondisk=sda --size=1024
part /boot/efi --fstype="efi" --ondisk=sda --size=600 --fsoptions="umask=0077,shortname=winnt"
part pv.252 --fstype="lvmpv" --ondisk=sda --size=19455
volgroup centos --pesize=4096 pv.252
logvol swap  --fstype="swap" --size=2048 --name=swap --vgname=centos
logvol /  --fstype="xfs" --size=17404 --name=root --vgname=centos

%packages
@^minimal-environment
@standard
@core
chrony
kexec-tools

%end
reboot

%anaconda
pwpolicy root --minlen=6 --minquality=1 --notstrict --nochanges --notempty
pwpolicy user --minlen=6 --minquality=1 --notstrict --nochanges --emptyok
pwpolicy luks --minlen=6 --minquality=1 --notstrict --nochanges --notempty
%end
(3)然后通过virt-install命令启动虚拟机
virt-install \
     --name test \
     --memory=1024 \
     --vcpus=1 \
     --os-type linux \
     --location /opt/os/openEuler-22.03-LTS-x86_64-dvd.iso \
     --disk path=/var/lib/libvirt/images/test.qcow2,size=20,format=qcow2  \
     --graphics=none \
     --console pty,target_type=serial \
     --initrd-inject ks.cfg --extra-args "inst.ks=file:/ks.cfg console=ttyS0,115200n8"
(4)比如这里配置了创建的虚拟机的ip地址为192.168.1.100,则虚拟机创建完成后,不需要登录查看ip,直接使用ip进行ping或者ssh均是可以的。