本文尝试在VMWare vSphere 7.0.3环境中,通过PowerCLI批量发布openeuler22.03LTS系统虚拟机,以减轻维护人员的工作量。
一、在维护机上安装PowerCLI
1、点击以下链接,跳转到VMWarePowerCLI官方页面
2、点击下载链接,当前版本为13.1.0

3、将下载包进行解压

4、可以看到解压后的文件共有810MB,还是蛮大的,因此需检查C盘是否有足够的空间

5、执行$env:PSModulePath查看PowerShell的缺省模块路径
Windows PowerShell
版权所有 (C) 2014 Microsoft Corporation。保留所有权利。

PS C:\Users\Administrator> $env:PSModulePath
C:\Users\Administrator\Documents\WindowsPowerShell\Modules;C:\Program Files\WindowsPowerShell\Modules;C:\Windows\system
32\WindowsPowerShell\v1.0\Modules\
PS C:\Users\Administrator>
6、将解压后的文件移动到C:\Windows\system32\WindowsPowerShell\v1.0\Modules\目录下

7、使用以下"Import-Module VMware.PowerCLI"命令安装 VMWare PowerCLI:
Import-Module VMware.PowerCLI
8、收到“提示至少需要使用 Windows PowerShell 版本‘5.1’才能运行”的错误信息
Windows Server 2012R2自带的PowerShell版本为Powershell 4.0。(可以打开 PowerShell 控制台,并键入 `$PSVersionTable.PSVersion` 命令, PowerShell 版本)。而PowerCLI 13.1.0需要PowerShell 5.1,因此需要对Powershell进行升级。
9、从 Microsoft 官方网站下载 Windows PowerShell 5.1
转到以下网址并下载适用于维护机系统Windows的 WMF(Windows Management Framework):

9、维护机是Windows server 2012 R2 x64,因此选择Win8.1-x64的版本

10、安装 PowerShell 5.1


11、安装完成需重启,重启后可以查看当前版本已更新

12、继续安装PowerCLI

13、Ctrl+C,结束任务,配置忽略证书验证
指令:Set-PowerCLIConfiguration -InvalidCertificateAction Ignore
14、继续安装

显示以上信息,即表示PowerCLI安装完成
二、通过PowerCLI连接vCenter
1、测试连接VCenter,指令:
Connect-VIServer -Protocol https -User '[email protected]' -Password "yourpassword" -Server 192.168.X.Y

报“无法为SSL/TLS安全通道与颁发机构XXXXX建立信任关系”
2、设置忽略无效证书
PS C:\Windows\system32> Set-PowerCLIConfiguration -InvalidCertificateAction Igno
re

Perform operation?
Performing operation 'Update VMware.PowerCLI configuration.'?
[Y] 是(Y)  [A] 全是(A)  [N] 否(N)  [L] 全否(L)  [S] 暂停(S)  [?] 帮助
(默认值为“Y”):

Scope    ProxyPolicy     DefaultVIServerMode InvalidCertificateAction  DisplayD
                                                                       eprecati
                                                                       onWarnin
                                                                       gs
-----    -----------     ------------------- ------------------------  --------
Session  UseSystemProxy  Multiple            Ignore                    True
User                                         Ignore
AllUsers
3、再次测试连接vCenter

返回以上信息即表示连接VC成功
4、尝试获取宿主机信息进行功能测试:
指令:Get-VMHost

可以正常看到返回的宿主机清单
三、创建openeuler虚拟机的自定义规范
1、在VC上点击主页-策略和配置文件

2、选择虚拟机自定义规范

3、新建虚拟机自定义规范

4、输入自定义域名

5、输入时区信息

6、输入网络配置信息 
7、输入DNS信息

8、完成虚拟机自定义规范

9、确认相关数据

四、通过配置通过PowerCLI批量自动化新建虚拟机
1、编写batmkvms.ps1文件,内容如下:
#filename:batmkvms.ps1
##__author__='daigjianbing'

$vcenterip = "192.168.188.82"
$vcenteruser = "[email protected]"
#获取密码,避免明文保存
$vcenterpw  = Read-Host "Please enter your password of the vcenter: $vcenterip  username:  $vcenteruser"

#连接服务器
Write-Host "Connect-VIServer -Protocol https -User $vcenteruser -Password $vcenterpw -Server $vcenterip"
#测试下句前面加#,实作时去掉
#Connect-VIServer -Protocol https -User $vcenteruser -Password $vcenterpw -Server $vcenterip

#虚拟机清单文件为脚本同目录下的“batmkvms.csv”文件
$vms_listfile = ".\batmkvms.csv"
$vms = import-csv $vms_listfile
foreach ($vm in $vms)
    {
    #读取配置文件中的相关配置
	#模板
	$template = $vm.Template
	#拟放置宿主机
	$vmhost = $vm.Host
	#虚拟机名称
    $vmname = $vm.Name
	#vCpu核数
	$cpu = $vm.CPU
	#内存大小,以GB为容量单位
	$memory = $vm.Memory
	#缺省使用系统盘,如果需要数据盘,配置Disk4Data值,以GB为容量单位
	$Disk4Data = $vm.Disk4Data
	#拟放置虚机存储位置
	$datastore = $vm.Datastore
	#虚拟网络名称
	$network = $vm.Vlan
	#IP
	$IP = $vm.IP
	#子网掩码
	$NetMask = $vm.MASK
	#网关
	$Gateway = $vm.Gateway
	#描述
	$Notes = $vm.Description
	#虚拟机自定义规范
    $myspec = $vm.VMspec


    #将IP信息添加到自定义规范里面
    Write-Host "Get-OSCustomizationSpec $myspec | Get-OSCustomizationNicMapping | Set-OSCustomizationNicMapping -IpMode UseStaticIP -IpAddress $IP -SubnetMask $NetMask -DefaultGateway $Gateway"
    #测试下句前面加#,实作时去掉
    #Get-OSCustomizationSpec $myspec | Get-OSCustomizationNicMapping | Set-OSCustomizationNicMapping -IpMode UseStaticIP -IpAddress $IP -SubnetMask $NetMask -DefaultGateway $Gateway


    #使用模板及规范新建虚机
    Write-Host "New-VM -Name $vmname -vmhost $vmhost -Portgroup $network -Datastore $datastore -Template $template -OSCustomizationSpec $myspec"
    #测试下句前面加#,实作时去掉
    #New-VM -Name $vmname -vmhost $vmhost -Portgroup $network -Datastore $datastore -Template $template -OSCustomizationSpec $myspec


    #设置虚机CPU、内存和描述
    Write-Host "Get-VM -Name $vmname|Set-VM  -NumCPU $cpu -MemoryGB $memory -Notes $Notes -Confirm:$false"
    #测试下句前面加#,实作时去掉
    #Get-VM -Name $vmname|Set-VM  -NumCPU $cpu -MemoryGB $memory -Notes $Notes -Confirm:$false

    #如果数据盘大小不为0则增加数据盘
    #测试下面2句前加#,实做时去掉
    #if ($Disk4data -gt 0)
    #   { Get-VM -Name $vmname  | New-HardDisk -CapacityGB $DiskDisk4data -Persistence persistent }

    #调整完成后自动启动虚拟机
    #测试下句前面加#,实作时去掉
    #Get-VM -Name $vmname |Start-VM

    }

#断开vCenter连接
Disconnect-VIServer -Server $vcenterip -Confirm:$false
2、编写“batmkvms.csv”文件,内容如下:

3、 “batmkvms.csv”文件可用WPS或Excel编写,实际存储为csv文件,也可用记事本等文本编辑器打开,内容如下:
Template,Host,Name,CPU,Memory,Disk4Data,IP,MASK,Gateway,Vlan,Description,Datastore,VMspec
Temp-openEuler-22.03-withJX-ssh9.3,192.168.121.4,GZGL_192.168.122.6_euler,4,8,0,192.168.122.6,255.255.255.0,192.168.122.1,VLAN_2183,,EBS-CT-VMware-ShuiTu6-ZTE1-Lun-45,euler22.03LTS
4、测试脚本
Microsoft Windows [版本 6.3.9600]
(c) 2013 Microsoft Corporation。保留所有权利。

d:\vmware\批量创建虚拟机脚本>powershell
Windows PowerShell
版权所有 (C) 2016 Microsoft Corporation。保留所有权利。

PS D:\vmware\批量创建虚拟机脚本> .\batmkvms.ps1
Please enter your password of the vcenter: 192.168.188.82  username:  administrat
[email protected]: mypasswd
Connect-VIServer -Protocol https -User [email protected] -Password mypasswd -Server 192.168.188.82
Get-OSCustomizationSpec euler22.03LTS | Get-OSCustomizationNicMapping | Set-OSCu
stomizationNicMapping -IpMode UseStaticIP -IpAddress 192.168.122.6 -SubnetMask 2
55.255.255.0 -DefaultGateway 192.168.122.1
New-VM -Name GZGL_192.168.122.6_euler -vmhost 192.168.121.4 -Portgroup VLAN_2183
 -Datastore EBS-CT-VMware-ShuiTu6-ZTE1-Lun-45 -Template Temp-openEuler-22.03-wit
hJX-ssh9.3 -OSCustomizationSpec euler22.03LTS
Get-VM -Name GZGL_192.168.122.6_euler|Set-VM  -NumCPU 4 -MemoryGB 8 -Notes  -Con
firm:False
PS D:\vmware\批量创建虚拟机脚本>
可见生成指令正常。
5、将脚本中标注了“测试下句前面加#,实作时去掉”字样下面语句前的#注释去掉,进行实际执行测试,报错:
New-VM : 2023/8/1 17:32:24 New-VM Could not find Template with nam
e 'Temp-openEuler-22.03-withJX-ssh9.3'.

6、用指令:Get-Template列出所有模板,确实没有找到'Temp-openEuler-22.03-withJX-ssh9.3',检查发现,'Temp-openEuler-22.03-withJX-ssh9.3'是虚拟机,未转成模板
6、将'Temp-openEuler-22.03-withJX-ssh9.3'虚拟机转换为模板,继续测试,报错:
New-VM : 2023/8/1 17:37:05 New-VM Could not find VirtualPortGroupB
ase with name

7、使用指令: Get-VirtualPortGroup 命令列出所有可用的虚拟端口组,发现有VLAN_2183端口组,查阅VMWare官方文档,发现Portgroup是针对分布式交换机的端口组,而本环境中使用了标准交换机,应使用NetworkName参数,官方文档解释如下:
| NetworkName | String[] | Specifies the networks to which you want to connect the new virtual machine. Specifying a distributed port group name is obsolete. Use the Portgroup parameter instead. |
8、将脚本中的所有“-Portgroup”替换为“-NetworkName”,再次运行脚本,界面上出来克隆虚拟机进度条,成功在望
 9、稍等一会儿,虚拟机克隆完成,相关信息如下
PS D:\vmware\批量创建虚拟机脚本> .\batmkvms.ps1
Please enter your password of the vcenter: 192.168.188.82  username:  [email protected]: mypasswd
Connect-VIServer -Protocol https -User [email protected] -Password mypasswd -Server 192.168.188.82

Name                           Port  User
----                           ----  ----
192.168.188.82                 443   VSPHERE.LOCAL\Administrator
Get-OSCustomizationSpec euler22.03LTS | Get-OSCustomizationNicMapping | Set-OSCustomizationNicMapping -IpMode UseStaticI
P -IpAddress 192.168.122.6 -SubnetMask 255.255.255.0 -DefaultGateway 192.168.122.1

Dns                       :
Wins                      :
SpecId                    : euler22.03LTS
Spec                      : euler22.03LTS
SpecType                  : Persistent
NetworkAdapterMac         :
Position                  : 1
IPMode                    : UseStaticIP
IPAddress                 : 192.168.122.6
SubnetMask                : 255.255.255.0
DefaultGateway            : 192.168.122.1
AlternateGateway          :
Ipv6Prefix                :
Ipv6Address               :
Ipv6Mode                  : UseDhcp
Ipv6VcApplicationArgument :
VCApplicationArgument     :
Id                        : /VIServer=vsphere.local\[email protected]:443/OSCustomizationNicMapping=OSCustom
                            izationNicMappingImpl-euler22.03LTS-Persistent-1/
Ipv6Gateway               :
Ipv6AlternateGateway      :
Uid                       : /VIServer=vsphere.local\[email protected]:443/OSCustomizationNicMapping=OSCustom
                            izationNicMappingImpl-euler22.03LTS-Persistent-1/
ExtensionData             : VMware.Vim.CustomizationAdapterMapping
Version                   : 1

New-VM -Name GZGL_192.168.122.6_euler -vmhost 192.168.121.4 -NetworkName VLAN_2183 -Datastore EBS-CT-VMware-ShuiTu6-ZTE1-Lu
n-45 -Template Temp-openEuler-22.03-withJX-ssh9.3 -OSCustomizationSpec euler22.03LTS
警告: The 'Version' property of VirtualMachine type is deprecated. Use the 'HardwareVersion' property instead.

PowerState              : PoweredOff
Version                 : Unknown
HardwareVersion         : vmx-15
Notes                   :
Guest                   : GZGL_192.168.122.6_euler:
NumCpu                  : 2
CoresPerSocket          : 1
MemoryMB                : 2048
MemoryGB                : 2
VMHostId                : HostSystem-host-4429
VMHost                  : 192.168.121.4
VApp                    :
FolderId                : Folder-group-v22
Folder                  : vm
ResourcePoolId          : ResourcePool-resgroup-4102
ResourcePool            : Resources
PersistentId            : 502b1bdf-0a44-dfed-defe-68dc5684ab47
UsedSpaceGB             : 16.000760157592594623565673828
ProvisionedSpaceGB      : 18.192433938384056091308593750
DatastoreIdList         : {Datastore-datastore-19849}
HARestartPriority       : ClusterRestartPriority
HAIsolationResponse     : AsSpecifiedByCluster
DrsAutomationLevel      : AsSpecifiedByCluster
VMSwapfilePolicy        : Inherit
VMResourceConfiguration : CpuShares:Normal/2000 MemShares:Normal/20480
GuestId                 : other4xLinux64Guest
CreateDate              : 2023/8/1 11:10:08
SEVEnabled              :
BootDelayMillisecond    : 0
MigrationEncryption     : Opportunistic
MemoryHotAddEnabled     : False
MemoryHotAddIncrement   :
MemoryHotAddLimit       :
CpuHotAddEnabled        : False
CpuHotRemoveEnabled     : False
Name                    : GZGL_192.168.122.6_euler
CustomFields            : {[NB_LAST_BACKUP, ]}
ExtensionData           : VMware.Vim.VirtualMachine
Id                      : VirtualMachine-vm-27255
Uid                     : /VIServer=vsphere.local\[email protected]:443/VirtualMachine=VirtualMachine-vm-272
                          55/

Get-VM -Name GZGL_192.168.122.6_euler|Set-VM  -NumCPU 4 -MemoryGB 8 -Notes  -Confirm:False

PowerState              : PoweredOff
Version                 : Unknown
HardwareVersion         : vmx-15
Notes                   :
Guest                   : GZGL_192.168.122.6_euler:
NumCpu                  : 4
CoresPerSocket          : 1
MemoryMB                : 8192
MemoryGB                : 8
VMHostId                : HostSystem-host-4429
VMHost                  : 192.168.121.4
VApp                    :
FolderId                : Folder-group-v22
Folder                  : vm
ResourcePoolId          : ResourcePool-resgroup-4102
ResourcePool            : Resources
PersistentId            : 502b1bdf-0a44-dfed-defe-68dc5684ab47
UsedSpaceGB             : 16.000760157592594623565673828
ProvisionedSpaceGB      : 18.192433938384056091308593750
DatastoreIdList         : {Datastore-datastore-19849}
HARestartPriority       : ClusterRestartPriority
HAIsolationResponse     : AsSpecifiedByCluster
DrsAutomationLevel      : AsSpecifiedByCluster
VMSwapfilePolicy        : Inherit
VMResourceConfiguration : CpuShares:Normal/2000 MemShares:Normal/20480
GuestId                 : other4xLinux64Guest
CreateDate              : 2023/8/1 11:10:08
SEVEnabled              :
BootDelayMillisecond    : 0
MigrationEncryption     : Opportunistic
MemoryHotAddEnabled     : False
MemoryHotAddIncrement   :
MemoryHotAddLimit       :
CpuHotAddEnabled        : False
CpuHotRemoveEnabled     : False
Name                    : GZGL_192.168.122.6_euler
CustomFields            : {[NB_LAST_BACKUP, ]}
ExtensionData           : VMware.Vim.VirtualMachine
Id                      : VirtualMachine-vm-27255
Uid                     : /VIServer=vsphere.local\[email protected]:443/VirtualMachine=VirtualMachine-vm-272
                          55/


PowerState              : PoweredOn
Version                 : Unknown
HardwareVersion         : vmx-15
Notes                   :
Guest                   : GZGL_192.168.122.6_euler:
NumCpu                  : 4
CoresPerSocket          : 1
MemoryMB                : 8192
MemoryGB                : 8
VMHostId                : HostSystem-host-4429
VMHost                  : 192.168.121.4
VApp                    :
FolderId                : Folder-group-v22
Folder                  : vm
ResourcePoolId          : ResourcePool-resgroup-4102
ResourcePool            : Resources
PersistentId            : 502b1bdf-0a44-dfed-defe-68dc5684ab47
UsedSpaceGB             : 24.084744532592594623565673828
ProvisionedSpaceGB      : 24.084745034575462341308593750
DatastoreIdList         : {Datastore-datastore-19849}
HARestartPriority       : ClusterRestartPriority
HAIsolationResponse     : AsSpecifiedByCluster
DrsAutomationLevel      : AsSpecifiedByCluster
VMSwapfilePolicy        : Inherit
VMResourceConfiguration : CpuShares:Normal/2000 MemShares:Normal/20480
GuestId                 : other4xLinux64Guest
CreateDate              : 2023/8/1 11:10:08
SEVEnabled              :
BootDelayMillisecond    : 0
MigrationEncryption     : Opportunistic
MemoryHotAddEnabled     : False
MemoryHotAddIncrement   : 0
MemoryHotAddLimit       : 8192
CpuHotAddEnabled        : False
CpuHotRemoveEnabled     : False
Name                    : GZGL_192.168.122.6_euler
CustomFields            : {[NB_LAST_BACKUP, ]}
ExtensionData           : VMware.Vim.VirtualMachine
Id                      : VirtualMachine-vm-27255
Uid                     : /VIServer=vsphere.local\[email protected]:443/VirtualMachine=VirtualMachine-vm-272
                          55/


PS D:\vmware\批量创建虚拟机脚本>
10、登录VC页面,可以看到虚拟机已正常生成并自动开机

11、修改“batmkvms.csv”文件,添加多台虚拟机信息,再次执行脚本,可以看到,批量虚拟机自动生成成功:
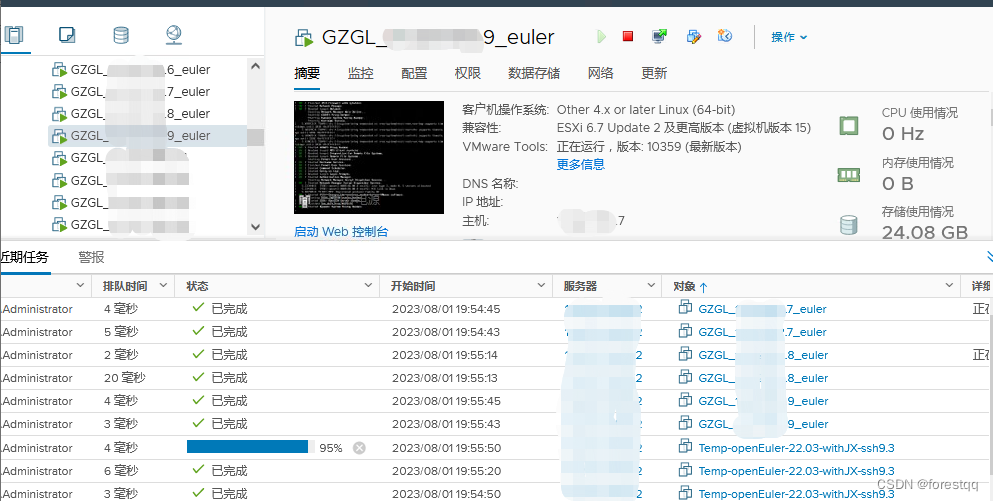
实测,指令一旦运行,数十台虚拟机即可在无人参与的情况下完全自动生成。
本例存在一个不尽如人意之处,即CSV中配置的IP并未生效,估计和openeuler操作系统或模板安装方法有关,欢迎大家留言探讨。