版权声明:本文为博主原创文章,转载请标明出处。
SpringBoot2 | SpringBoot启动流程源码分析(一)
SpringBoot2 | SpringBoot启动流程源码分析(二)
SpringBoot2 | @SpringBootApplication注解 自动化配置流程源码分析(三)
概述:
前阵子看到了SpringCloud社区的一个开源项目,主要是对服务发现增强的功能。研究项目的时候发现代码简练,优雅,最主要是spring ioc和aop特性应用的得心应手。若非对源码有深入研究,不可能写出这么优秀的开源项目。另外在现有的springboot专栏中,大多数博文旨在应用,对一些中间件的整合之类,源码分析的博客数量有限。鉴于以上两方面,该系列应运而生。
该系列主要还是Spring的核心源码,不过目前Springboot大行其道,所以就从Springboot开始分析。最新版本是Springboot2.0.4,Spring5,所以新特性本系列后面也会着重分析。
整个系列会围绕springboot启动流程进行源码分析,在整个流程中,会遇到一些核心类或者核心流程,会着重讲解,所以篇幅可能会增多,做好准备。
源码分析
首先是项目启动类:
    public static void main(String[] args) {
        SpringApplication.run(MarsApplication.class, args);
    }
public SpringApplication(Object... sources) {
//初始化
initialize(sources);
}
初始化时,会加载META-INF/spring.factories文件:
    private void initialize(Object[] sources) {
        if (sources != null && sources.length > 0) {
            this.sources.addAll(Arrays.asList(sources));
        }
        //设置servlet环境
        this.webEnvironment = deduceWebEnvironment();
        //获取ApplicationContextInitializer
        setInitializers((Collection) getSpringFactoriesInstances(
                ApplicationContextInitializer.class));
        //获取监听器
        setListeners((Collection) getSpringFactoriesInstances(ApplicationListener.class));
        this.mainApplicationClass = deduceMainApplicationClass();
}来看一下deduceWebEnvironment()方法:
    private WebApplicationType deduceWebApplicationType() {
        if (ClassUtils.isPresent(REACTIVE_WEB_ENVIRONMENT_CLASS, null)
                && !ClassUtils.isPresent(MVC_WEB_ENVIRONMENT_CLASS, null)) {
            return WebApplicationType.REACTIVE;
        }
        for (String className : WEB_ENVIRONMENT_CLASSES) {
            if (!ClassUtils.isPresent(className, null)) {
                return WebApplicationType.NONE;
            }
        }
        return WebApplicationType.SERVLET;
}这里主要是通过判断REACTIVE相关的字节码是否存在,如果不存在,则web环境即为SERVLET类型。这里设置好web环境类型,在后面会根据类型初始化对应环境。
ApplicationContextInitializer是spring组件spring-context组件中的一个接口,主要是spring ioc容器刷新之前的一个回调接口,用于处于自定义逻辑。
spring.factories文件中的实现类:
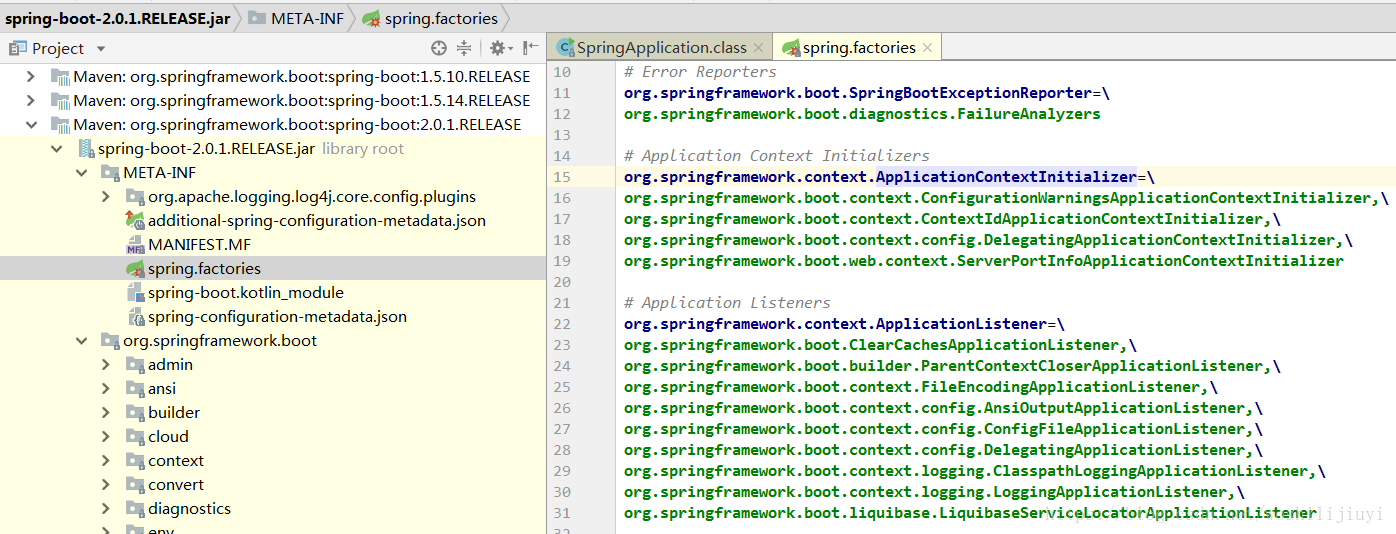
这里监听器为9个:
# Application Listeners
org.springframework.context.ApplicationListener=\
org.springframework.boot.ClearCachesApplicationListener,\
org.springframework.boot.builder.ParentContextCloserApplicationListener,\
org.springframework.boot.context.FileEncodingApplicationListener,\
org.springframework.boot.context.config.AnsiOutputApplicationListener,\
org.springframework.boot.context.config.ConfigFileApplicationListener,\
org.springframework.boot.context.config.DelegatingApplicationListener,\
org.springframework.boot.context.logging.ClasspathLoggingApplicationListener,\
org.springframework.boot.context.logging.LoggingApplicationListener,\
org.springframework.boot.liquibase.LiquibaseServiceLocatorApplicationListener
还有1个为:org.springframework.boot.autoconfigure.BackgroundPreinitializer
这10个监听器会贯穿springBoot整个生命周期。稍后会介绍。
这里先继续后面的流程。来看一下run方法:
public ConfigurableApplicationContext run(String... args) {
        //时间监控
        StopWatch stopWatch = new StopWatch();
        stopWatch.start();
        ConfigurableApplicationContext context = null;
        Collection<SpringBootExceptionReporter> exceptionReporters = new ArrayList<>();
        //java.awt.headless是J2SE的一种模式用于在缺少显示屏、键盘或者鼠标时的系统配置,很多监控工具如jconsole 需要将该值设置为true,系统变量默认为true
        configureHeadlessProperty();
        //获取spring.factories中的监听器变量,args为指定的参数数组,默认为当前类SpringApplication
        //第一步:获取并启动监听器
        SpringApplicationRunListeners listeners = getRunListeners(args);
        listeners.starting();
        try {
            ApplicationArguments applicationArguments = new DefaultApplicationArguments(
                    args);
            //第二步:构造容器环境
            ConfigurableEnvironment environment = prepareEnvironment(listeners,
                    applicationArguments);
            //设置需要忽略的bean
            configureIgnoreBeanInfo(environment);
            //打印banner
            Banner printedBanner = printBanner(environment);
            //第三步:创建容器
            context = createApplicationContext();
            //第四步:实例化SpringBootExceptionReporter.class,用来支持报告关于启动的错误
            exceptionReporters = getSpringFactoriesInstances(
                    SpringBootExceptionReporter.class,
                    new Class[] { ConfigurableApplicationContext.class }, context);
            //第五步:准备容器
            prepareContext(context, environment, listeners, applicationArguments,
                    printedBanner);
            //第六步:刷新容器
            refreshContext(context);
            //第七步:刷新容器后的扩展接口
            afterRefresh(context, applicationArguments);
            stopWatch.stop();
            if (this.logStartupInfo) {
                new StartupInfoLogger(this.mainApplicationClass)
                        .logStarted(getApplicationLog(), stopWatch);
            }
            listeners.started(context);
            callRunners(context, applicationArguments);
        }
        catch (Throwable ex) {
            handleRunFailure(context, ex, exceptionReporters, listeners);
            throw new IllegalStateException(ex);
        }

        try {
            listeners.running(context);
        }
        catch (Throwable ex) {
            handleRunFailure(context, ex, exceptionReporters, null);
            throw new IllegalStateException(ex);
        }
        return context;
    }
具体分析一下:
一:获取并启动监听器
1)获取监听器
SpringApplicationRunListeners listeners = getRunListeners(args);
跟进getRunListeners方法:
    private SpringApplicationRunListeners getRunListeners(String[] args) {
        Class<?>[] types = new Class<?>[] { SpringApplication.class, String[].class };
        return new SpringApplicationRunListeners(logger, getSpringFactoriesInstances(
                SpringApplicationRunListener.class, types, this, args));
}上面可以看到,args本身默认为空,但是在获取监听器的方法中,getSpringFactoriesInstances( 将当前对象作为参数,该方法用来获取
SpringApplicationRunListener.class, types, this, args)spring.factories对应的监听器:
# Run Listeners
org.springframework.boot.SpringApplicationRunListener=\
org.springframework.boot.context.event.EventPublishingRunListener
整个 springBoot 框架中获取factories的方式统一如下:
    @SuppressWarnings("unchecked")
    private <T> List<T> createSpringFactoriesInstances(Class<T> type,
            Class<?>[] parameterTypes, ClassLoader classLoader, Object[] args,
            Set<String> names) {
        List<T> instances = new ArrayList<>(names.size());
        for (String name : names) {
            try {
                //装载class文件到内存
                Class<?> instanceClass = ClassUtils.forName(name, classLoader);
                Assert.isAssignable(type, instanceClass);
                Constructor<?> constructor = instanceClass
                        .getDeclaredConstructor(parameterTypes);
                //主要通过反射创建实例
                T instance = (T) BeanUtils.instantiateClass(constructor, args);
                instances.add(instance);
            }
            catch (Throwable ex) {
                throw new IllegalArgumentException(
                        "Cannot instantiate " + type + " : " + name, ex);
            }
        }
        return instances;
}上面通过反射获取实例时会触发EventPublishingRunListener的构造函数:
public EventPublishingRunListener(SpringApplication application, String[] args) {
this.application = application;
this.args = args;
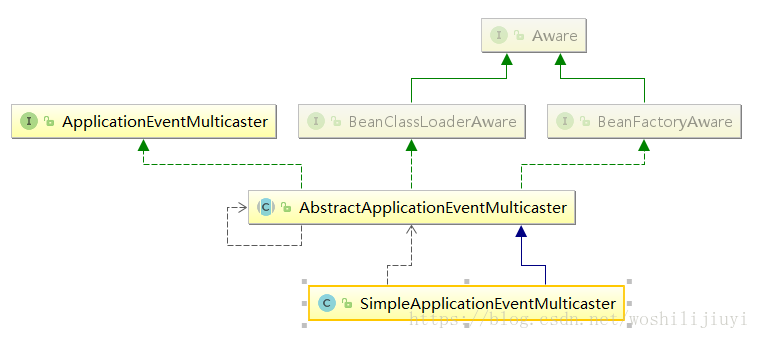
this.initialMulticaster = new SimpleApplicationEventMulticaster();
for (ApplicationListener<?> listener : application.getListeners()) {
this.initialMulticaster.addApplicationListener(listener);
}
}重点来看一下addApplicationListener方法:
    @Override
    public void addApplicationListener(ApplicationListener<?> listener) {
        synchronized (this.retrievalMutex) {
            // Explicitly remove target for a proxy, if registered already,
            // in order to avoid double invocations of the same listener.
            Object singletonTarget = AopProxyUtils.getSingletonTarget(listener);
            if (singletonTarget instanceof ApplicationListener) {
                this.defaultRetriever.applicationListeners.remove(singletonTarget);
            }
            //内部类对象
            this.defaultRetriever.applicationListeners.add(listener);
            this.retrieverCache.clear();
        }
}上述方法定义在SimpleApplicationEventMulticaster父类AbstractApplicationEventMulticaster中。关键代码为this.defaultRetriever.applicationListeners.add(listener);,这是一个内部类,用来保存所有的监听器。也就是在这一步,将spring.factories中的监听器传递到SimpleApplicationEventMulticaster中。
继承关系如下:
2)启动监听器:
listeners.starting();,获取的监听器为EventPublishingRunListener,从名字可以看出是启动事件发布监听器,主要用来发布启动事件。
    @Override
    public void starting() {
    //关键代码,这里是创建application启动事件`ApplicationStartingEvent`
        this.initialMulticaster.multicastEvent(
                new ApplicationStartingEvent(this.application, this.args));
}EventPublishingRunListener这个是springBoot框架中最早执行的监听器,在该监听器执行started()方法时,会继续发布事件,也就是事件传递。这种实现主要还是基于spring的事件机制。
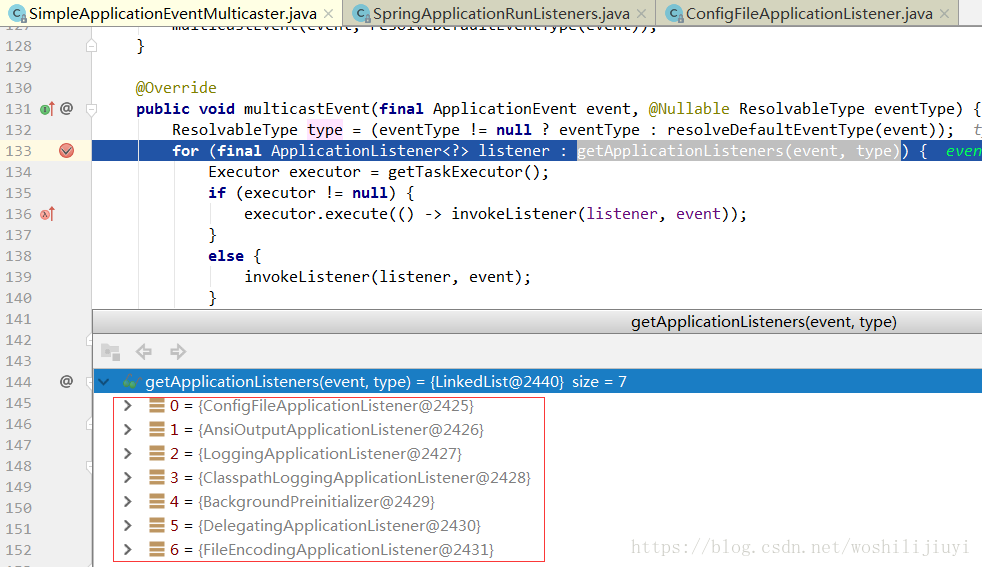
继续跟进SimpleApplicationEventMulticaster,有个核心方法:
    @Override
    public void multicastEvent(final ApplicationEvent event, @Nullable ResolvableType eventType) {
        ResolvableType type = (eventType != null ? eventType : resolveDefaultEventType(event));
        for (final ApplicationListener<?> listener : getApplicationListeners(event, type)) {
            //获取线程池,如果为空则同步处理。这里线程池为空,还未没初始化。
            Executor executor = getTaskExecutor();
            if (executor != null) {
                //异步发送事件
                executor.execute(() -> invokeListener(listener, event));
            }
            else {
                //同步发送事件
                invokeListener(listener, event);
            }
        }
}这里会根据事件类型ApplicationStartingEvent获取对应的监听器,在容器启动之后执行响应的动作,有如下4种监听器:

这是springBoot启动过程中,第一处根据类型,执行监听器的地方。根据发布的事件类型从上述10种监听器中选择对应的监听器进行事件发布,当然如果继承了 springCloud或者别的框架,就不止10个了。这里选了一个 springBoot 的日志监听器来进行讲解,核心代码如下:
 @Override
    public void onApplicationEvent(ApplicationEvent event) {
        //在springboot启动的时候
        if (event instanceof ApplicationStartedEvent) {
            onApplicationStartedEvent((ApplicationStartedEvent) event);
        }
        //springboot的Environment环境准备完成的时候
        else if (event instanceof ApplicationEnvironmentPreparedEvent) {
            onApplicationEnvironmentPreparedEvent(
                    (ApplicationEnvironmentPreparedEvent) event);
        }
        //在springboot容器的环境设置完成以后
        else if (event instanceof ApplicationPreparedEvent) {
            onApplicationPreparedEvent((ApplicationPreparedEvent) event);
        }
        //容器关闭的时候
        else if (event instanceof ContextClosedEvent && ((ContextClosedEvent) event)
                .getApplicationContext().getParent() == null) {
            onContextClosedEvent();
        }
        //容器启动失败的时候
        else if (event instanceof ApplicationFailedEvent) {
            onApplicationFailedEvent();
        }
}因为我们的事件类型为ApplicationEvent,所以会执行onApplicationStartedEvent((ApplicationStartedEvent) event);。springBoot会在运行过程中的不同阶段,发送各种事件,来执行对应监听器的对应方法。大同小异,别的监听器执行流程这里不再赘述,后面会有单独的详解。
继续后面的流程。
二:环境构建:
ConfigurableEnvironment environment = prepareEnvironment(listeners,applicationArguments);
跟进去该方法:
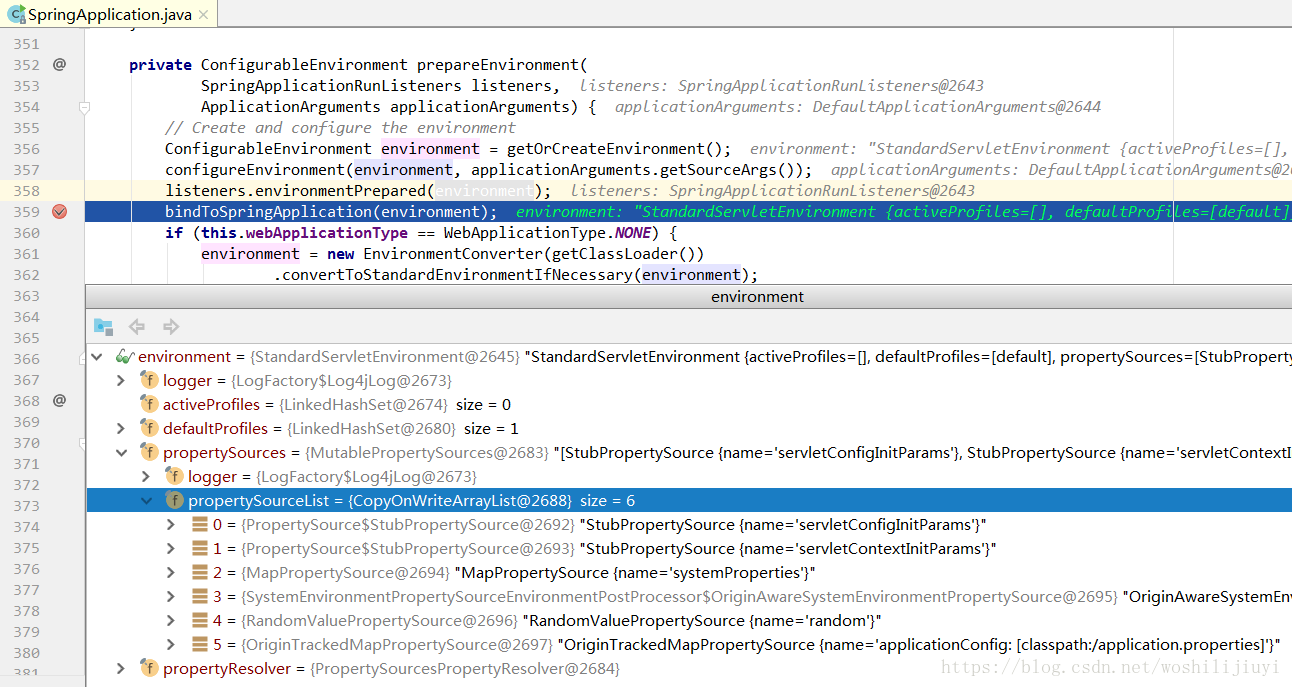
    private ConfigurableEnvironment prepareEnvironment(
            SpringApplicationRunListeners listeners,
            ApplicationArguments applicationArguments) {
        // Create and configure the environment
        //获取对应的ConfigurableEnvironment
        ConfigurableEnvironment environment = getOrCreateEnvironment();
        //配置
        configureEnvironment(environment, applicationArguments.getSourceArgs());
        //发布环境已准备事件,这是第二次发布事件
        listeners.environmentPrepared(environment);
        bindToSpringApplication(environment);
        if (this.webApplicationType == WebApplicationType.NONE) {
            environment = new EnvironmentConverter(getClassLoader())
                    .convertToStandardEnvironmentIfNecessary(environment);
        }
        ConfigurationPropertySources.attach(environment);
        return environment;
}来看一下getOrCreateEnvironment()方法,前面已经提到,environment已经被设置了servlet类型,所以这里创建的是环境对象是StandardServletEnvironment。
    private ConfigurableEnvironment getOrCreateEnvironment() {
        if (this.environment != null) {
            return this.environment;
        }
        if (this.webApplicationType == WebApplicationType.SERVLET) {
            return new StandardServletEnvironment();
        }
        return new StandardEnvironment();
}枚举类WebApplicationType是springBoot2新增的特性,主要针对spring5引入的reactive特性。枚举类型如下:
public enum WebApplicationType {
    //不需要再web容器的环境下运行,普通项目
    NONE,
    //基于servlet的web项目
    SERVLET,
    //这个是spring5版本开始的新特性
    REACTIVE
}Environment接口提供了4种实现方式,StandardEnvironment、StandardServletEnvironment和MockEnvironment、StandardReactiveWebEnvironment,分别代表普通程序、Web程序、测试程序的环境、响应式web环境,具体后面会详细讲解。
这里只需要知道在返回return new StandardServletEnvironment();对象的时候,会完成一系列初始化动作,主要就是将运行机器的系统变量和环境变量,加入到其父类AbstractEnvironment定义的对象MutablePropertySources中,MutablePropertySources对象中定义了一个属性集合:
private final List<PropertySource<?>> propertySourceList = new CopyOnWriteArrayList<PropertySource<?>>();执行到这里,系统变量和环境变量已经被载入到配置文件的集合中,接下来就行解析项目中的配置文件。
来看一下listeners.environmentPrepared(environment);,上面已经提到了,这里是第二次发布事件。什么事件呢?
顾名思义,系统环境初始化完成的事件。
发布事件的流程上面已经讲过了,这里不在赘述。来看一下根据事件类型获取到的监听器:
可以看到获取到的监听器和第一次发布启动事件获取的监听器有几个是重复的,这也验证了监听器是可以多次获取,根据事件类型来区分具体处理逻辑。上面介绍日志监听器的时候已经提到。
主要来看一下ConfigFileApplicationListener,该监听器非常核心,主要用来处理项目配置。项目中的 properties 和yml文件都是其内部类所加载。具体来看一下:
首先方法执行入口:

首先还是会去读spring.factories 文件,List<EnvironmentPostProcessor> postProcessors = loadPostProcessors();获取的处理类有以下四种:
# Environment Post Processors
org.springframework.boot.env.EnvironmentPostProcessor=  //一个@FunctionalInterface函数式接口
org.springframework.boot.cloud.CloudFoundryVcapEnvironmentPostProcessor,//为springCloud提供的扩展类
org.springframework.boot.env.SpringApplicationJsonEnvironmentPostProcessor,//支持json环境变量
org.springframework.boot.env.SystemEnvironmentPropertySourceEnvironmentPostProcessor //springBoo2提供的一个包装类,主要将`StandardServletEnvironment`包装成`SystemEnvironmentPropertySourceEnvironmentPostProcessor`对象在执行完上述三个监听器流程后,ConfigFileApplicationListener会执行该类本身的逻辑。由其内部类Loader加载项目制定路径下的配置文件:
private static final String DEFAULT_SEARCH_LOCATIONS = "classpath:/,classpath:/config/,file:./,file:./config/";至此,项目的变量配置已全部加载完毕,来一起看一下:
这里一共6个配置文件,取值顺序由上到下。也就是说前面的配置变量会覆盖后面同名的配置变量。项目配置变量的时候需要注意这点。
本篇先介绍到这里。未完待续。