1、直方图均衡化
代码
%直方图均衡化
img=imread("img\rice.png");

%显示
subplot(2,2,1),imshow(img),xlabel("原图");
subplot(2,2,2),imhist(img),xlabel("原图的灰度直方图");
% 均衡化直方图转换
J=histeq(img);
subplot(2,2,3),imshow(J),xlabel("均衡化后的图像");
subplot(2,2,4),imhist(J),xlabel("均衡化后的图像灰度直方图");
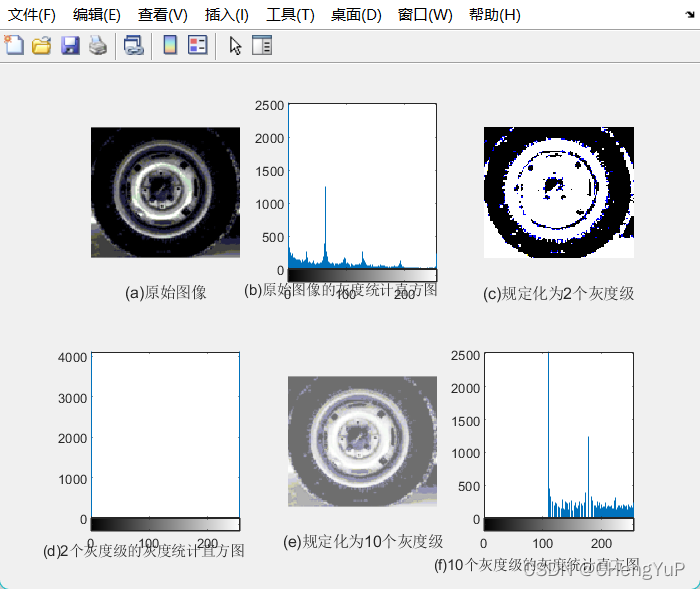
2、直方图规定化
效果
代码
% 直方图规定化。
img=imread("test1.png");
subplot(2,3,1),imshow(img),xlabel('(a)原始图像');
subplot(2,3,2),imhist(img),xlabel('(b)原始图像的灰度统计直方图','position',[90,-160]);

%规定化为只有2个灰度级
Ju=histeq(img,2);
subplot(2,3,3),imshow(Ju),xlabel('(c)规定化为2个灰度级');
subplot(2,3,4),imhist(Ju),xlabel('(d)2个灰度级的灰度统计直方图','position',[90,-560]);

%规定化为只有10个灰度级
K=histeq(img,210);
subplot(2,3,5),imshow(K),xlabel('(e)规定化为10个灰度级');
subplot(2,3,6),imhist(K),xlabel('(f)10个灰度级的灰度统计直方图','position',[90,-560]);
3、直接正比例变换
效果
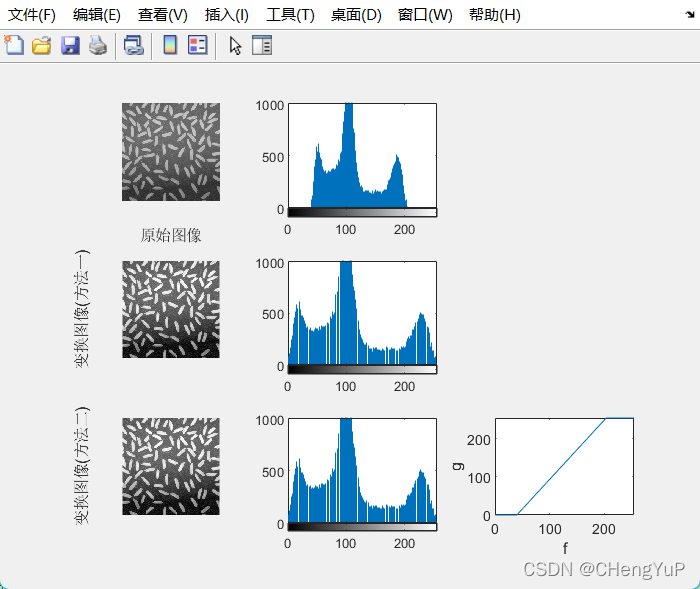
代码
% 直接正比例变换。
img=imread("rice.png");
subplot(3,3,1),imshow(img),xlabel('原始图像');
subplot(3,3,2),imhist(img);

%方法一系统函数
ju=imadjust(img,[40/255 204/255],[0 1]);%图像的最小灰度值为40,最大灰度值为204
subplot(3,3,4),imshow(ju),ylabel('变换图像(方法一)');
subplot(3,3,5),imhist(ju);

%方法二编程实现
%把灰度值范围从[40,204]映射到[0,255]
f0=0;g0=0;      %分段曲线的第1个点
f1=40;g1=0;     %分段曲线的第2个点
f2=204;g2=255;  %分段曲线的第3个点
f3=255;g3=255;  %分段曲线的第4个点
subplot(3,3,9),plot([f0,f1,f2,f3],[g0,g1,g2,g3]),xlabel("f"),ylabel('g'),axis([0 255 0 255]);

%绘制变换曲线
r1=(g1-g0)/(f1-f0); %曲线1的斜率
b1=g0-r1*f0;        %曲线1的截距
r2=(g2-g1)/(f2-f1); %曲线2的斜率
b2=g1-r2*f1;        %曲线2的截距
r3=(g3-g2)/(f3-f2); %曲线3的斜率
b3=g2-r3*f2;        %曲线3的截距

[m,n]=size(img);
K=double(img);
for i=1:m
    for j=1:n
        f=K(i,j);
        g(i,j)=0;
        if (f>=f0)&(f<=f1)
            g(i,j)=r1*f+b1;         %曲线1的方程y=r1*x+b1
        else
            if (f>=f1)&(f<=f2)
                g(i,j)=r2*f+b2;     %曲线2的方程y=r2*x+b2
            else
                if (f>=f2)&(f<=f3)
                    g(i,j)=r3*f+b3; %曲线3的方程y=r3*x+b3
                end
            end

        end
    end
end
subplot(3,3,7),imshow(uint8(g)),ylabel('变换图像(方法二)');
subplot(3,3,8),imhist(uint8(g));
4、截取式正比例变换
效果
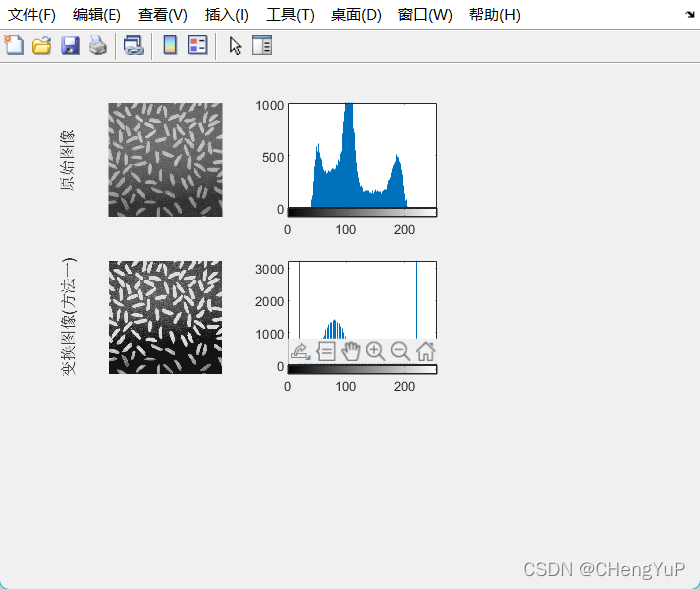
代码
% 截取式正比例变换。
img=imread("rice.png");
subplot(3,3,1),imshow(img),ylabel('原始图像');
subplot(3,3,2),imhist(img);

%方法一系统函数
%把灰度值范围从[80,160]映射到[20,220],灰度值小于80的映射为20,灰度值大于160映射为220
ju=imadjust(img,[80/255 160/255],[20/255 220/255]);
subplot(3,3,4),imshow(ju),ylabel('变换图像(方法一)');
subplot(3,3,5),imhist(ju);
5、对数变换
效果

代码
% 对数变换。
img=imread("rice.png");
subplot(3,3,1),imshow(img),ylabel('原始图像');
subplot(3,3,2),imhist(img);

%对数变换
c=255/log(1+255);
x=0:1:255;
y=c*log(1+x);
subplot(3,3,6),plot(x,y),axis tight,xlabel("f"),ylabel("g");
%绘制变换曲线
[m,n]=size(img);
K=double(img);

g=c*log(K+1);
subplot(3,3,4),imshow(uint8(g)),ylabel('对数变换');
subplot(3,3,5),imhist(uint8(g));

%系统函数调用
ju=imadjust(img,[],[],0.216);
subplot(3,3,7),imshow(ju),ylabel("对数变换(系统调用)");
subplot(3,3,8),imhist(img);
点击源码素材