Vscode配置opencv
一、准备:
资源
提取码: iemf
Mingw, 编译工具
Opencv 软件

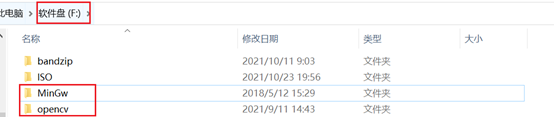
1、 把MinGw.zip,opencv.zip 解压 F (解压,记住位置)我这里是F
2、 添加环境变量
F:\opencv\build\x64\vc15\bin
F:\opencv\build\x64\MinGw\bin
F:\MinGw\bin
这里的F换自己的路径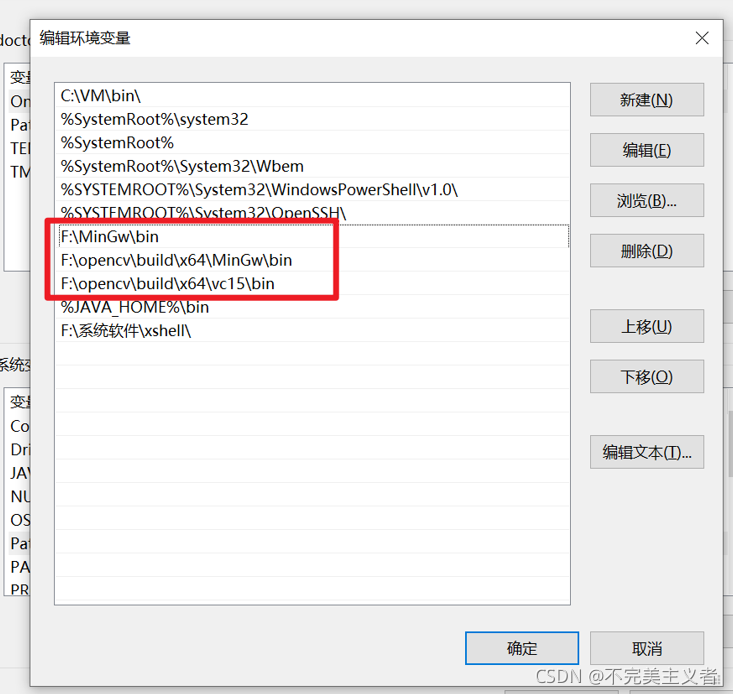
二、vscode配置
1、launch.json
(自行配置的属性: miDebuggerPath)
{

    "version": "0.2.0",
    "configurations": [
        {
            "name": "opencv debuge",
            "type": "cppdbg",
            "request": "launch",
            "program": "${workspaceFolder}\\Debugger\\${fileBasenameNoExtension}.exe",
            //上面这个Debugger是我自己定义的,为了方便放置生成的exe文件
            "args": [],
            "stopAtEntry": false, //这里如果为 false,则说明调试直接运行。(反之则停止)
            "cwd": "${workspaceFolder}",
            "environment": [],
            "externalConsole": true,//是否调用外部cmd
            "MIMode": "gdb",
            "miDebuggerPath": "F:\\MinGw\\bin\\gdb.exe",//自己进行设置
            "setupCommands": [
                {
                    "description": "为 gdb 启用整齐打印",
                    "text": "-enable-pretty-printing",
                    "ignoreFailures": false
                }
            ],
            "preLaunchTask": "opencv3.5.2"
        }
    ]
}
2、c_cpp_properties.json
includePath 的第一个不用动,后面的要设置成自己的路径。
{
    "configurations": [
        {
            "name": "win",
            "includePath": [
                "${workspaceFolder}/**",
                "F:/opencv/build/x64/mingw/install/include",
                "F:/opencv/build/x64/mingw/install/include/opencv2"
            ],
            "defines": [],
            "compilerPath": "F:MinGw/bin/g++.exe",
            "cStandard": "c11",
            "cppStandard": "c++17",
            "intelliSenseMode": "${default}"
        }
    ],
    "version": 4
}
3、tasks.json
{
    "version": "2.0.0",
    "tasks": [
        {
            "type": "shell",
            "label": "opencv3.5.2",
            "command": "F:/MinGw/bin/g++.exe",
            "args": [
                "-g",
                "${file}",
                "-o",
                "${workspaceFolder}\\Debugger\\${fileBasenameNoExtension}.exe",
                //上面这个Debugger是我自己定义的,为了方便放置生成的exe文件
                "F:/opencv/build/x64/mingw/bin/libopencv_world452.dll",
                "-I",
                "F:/opencv/build/x64/mingw/install/include",
                "-I",
                "F:/opencv/build/x64/mingw/install/include/opencv2",
            ],
            "options": {
                "cwd": "F:/MinGw/bin"
            },
            "problemMatcher": [
                "$gcc"
            ],
            "group": {
                "kind": "build",
                "isDefault": true
            }
        }
    ]
}
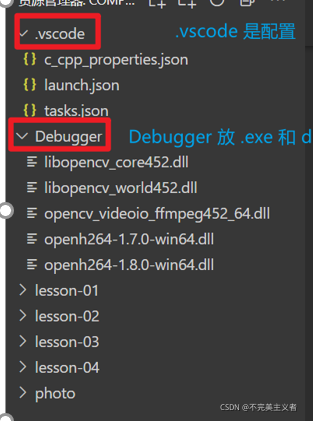
文 中的.vscode , 解压在 F 下的同学可以直接用,
解压在 别的路径 的要修改
三、测试
刚才文件中的Debugger文件夹我们要创建好。里边会放置自动生成的exe文件。
exe文件执行需要依赖文件。我们还要把依赖文件放到该文件夹中,这样生成exe文件的时候才能调用该依赖而不出错。没有该依赖的话,就无法生成exe文件。
找到该依赖文件:
F:\opencv\build\x64\MinGw\install\x64\mingw\bin
里有两个ddl文件:
(也可以用文件中的 ddl文件)
libopencv_world452.dll
opencv_videoio_ffmpeg452_64.dll
读者也去相似的目录去寻找,然后把该文件复制到Debugger目录下。
然后创建测试文件:(调用摄像头)
如果读者有opencv基础,可以自行测试。我提供一个测试摄像头的cpp文件。
#include <opencv2/opencv.hpp>
#include <iostream>

using namespace cv;
using namespace std;

int main()
{
    VideoCapture cap(0);
    Mat img;

    while (1)
    {
        cap >> img;
        if (img.empty())
            break;
        namedWindow("img", WINDOW_NORMAL);
        imshow("img", img);
        if (27 == waitKey(20))
            break;
    }

    return 0;
}
按F5进行运行
有不明白的可以看这个