文中若有代码、术语等错误,欢迎指正
文章目录
前言
-
为什么要做Texture Sheet图集
由于OpenGL一次渲染只有32个纹理槽
如果一次渲染的纹理数数超过了32,需要分几次渲染(需解绑,再绑定)带来一定麻烦
所以需要纹理Sheet
-
素材网站
https://kenney.nl/
纹理集初探
分析一张纹理集
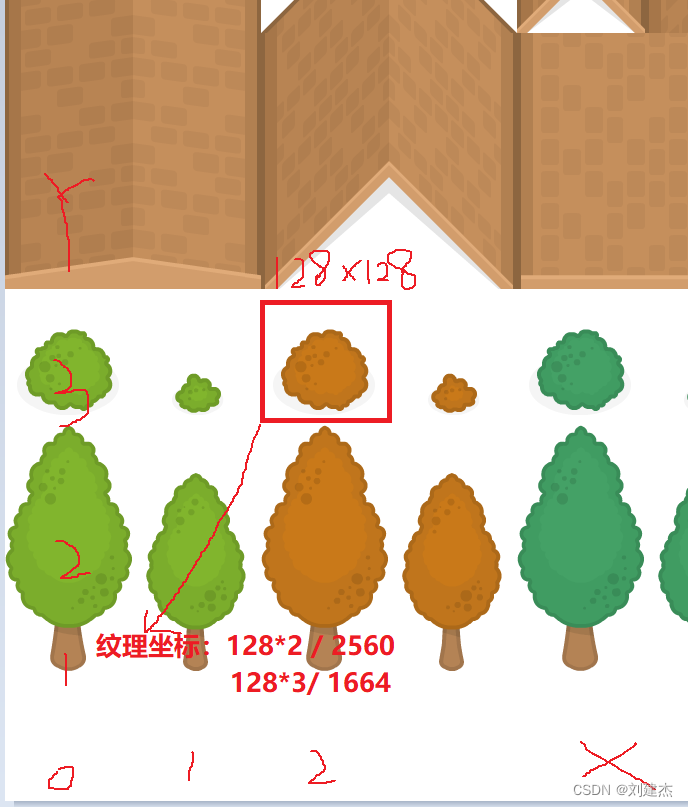
纹理的大小为2560*1664
扫描二维码关注公众号,回复:
15998258 查看本文章

由上图推导红框框住的棕色草丛罐的纹理坐标
-
左下角纹理坐标为,{128*2/ 2560 , 128 * 3 / 1664}
-
右下角纹理坐标为,{128*(2**+1**)/2560, 128*3/1664}
-
右上角纹理坐标为,{128*(2**+1**)/2560 , 128 * (3**+1**) / 1664}
-
左上角纹理坐标为,{128*2/ 2560 , 128 * (3**+1**) / 1664}
代码:渲染一张纹理集的一小部分
void Renderer2D::DrawQuad(const glm::vec3& position, const glm::vec2& size, const Ref<Texture2D>& texture, float tilingFactor, const glm::vec4& tintColor)
{


    HZ_PROFILE_FUNCTION();

    // 对应上图红框框住的棕色草丛罐的 x y 值
    // 测试纹理集代码
    constexpr float x = 2, y = 3;
    constexpr float sheetWidth = 2560.0f, sheetHeight = 1664.0f;
    constexpr float spriteWidth = 128.0f, spriteHeight = 128.0f;

    constexpr size_t quadVertexCount = 4;
    /
    // 由前分析推导的定位纹理坐标
    constexpr glm::vec2 textureCoords[] = {


        {

     x * spriteWidth / sheetWidth, y * spriteHeight / sheetHeight},
        {

     (x + 1) * spriteWidth / sheetWidth, y * spriteHeight / sheetHeight},
        {

     (x + 1) * spriteWidth / sheetWidth, (y + 1) * spriteHeight / sheetHeight},
        {

     x * spriteWidth / sheetWidth, (y + 1) * spriteHeight / sheetHeight},
    };

    if (s_Data.QuadIndexCount >= Renderer2DData::MaxIndices) {


        FlushAndReset();
    }

    constexpr glm::vec4 color = {

     1.0f, 1.0f, 1.0f, 1.0f };

    float textureIndex = 0.0f;
    for (uint32_t i = 1; i < s_Data.TextureSlotIndex; i++)
    {


        // 当前纹理,如果已经存储在纹理槽,就直接读取
        if (*s_Data.TextureSlots[i].get() == *texture.get()) {


            textureIndex = (float)i;
            break;
        }
    }
    if (textureIndex == 0.0f) {


        textureIndex = (float)s_Data.TextureSlotIndex;
        //
        // 将加载的纹理集放到纹理数组中
        s_Data.TextureSlots[s_Data.TextureSlotIndex] = texture;
        s_Data.TextureSlotIndex++;// 记得++
    }
    // 设置transform
    glm::mat4 tranform = glm::translate(glm::mat4(1.0f), position) *
        glm::scale(glm::mat4(1.0f), {

     size.x, size.y, 1.0f });

    // quad的左下角为起点
    s_Data.QuadVertexBufferPtr->Position = tranform * s_Data.QuadVertexPosition[0];
    s_Data.QuadVertexBufferPtr->Color = color;
    s_Data.QuadVertexBufferPtr->TexCoord = textureCoords[0];
    s_Data.QuadVertexBufferPtr->TexIndex = textureIndex;
    s_Data.QuadVertexBufferPtr->TilingFactor = tilingFactor;
    s_Data.QuadVertexBufferPtr++;

    s_Data.QuadVertexBufferPtr->Position = tranform * s_Data.QuadVertexPosition[1];
    s_Data.QuadVertexBufferPtr->Color = color;
    s_Data.QuadVertexBufferPtr->TexCoord = textureCoords[1];
    s_Data.QuadVertexBufferPtr->TexIndex = textureIndex;
    s_Data.QuadVertexBufferPtr->TilingFactor = tilingFactor;
    s_Data.QuadVertexBufferPtr++;

    s_Data.QuadVertexBufferPtr->Position = tranform * s_Data.QuadVertexPosition[2];
    s_Data.QuadVertexBufferPtr->Color = color;
    s_Data.QuadVertexBufferPtr->TexCoord = textureCoords[2];
    s_Data.QuadVertexBufferPtr->TexIndex = textureIndex;
    s_Data.QuadVertexBufferPtr->TilingFactor = tilingFactor;
    s_Data.QuadVertexBufferPtr++;

    s_Data.QuadVertexBufferPtr->Position = tranform * s_Data.QuadVertexPosition[3];
    s_Data.QuadVertexBufferPtr->Color = color;
    s_Data.QuadVertexBufferPtr->TexCoord = textureCoords[3];
    s_Data.QuadVertexBufferPtr->TexIndex = textureIndex;
    s_Data.QuadVertexBufferPtr->TilingFactor = tilingFactor;
    s_Data.QuadVertexBufferPtr++;

    s_Data.QuadIndexCount += 6;// 每一个quad用6个索引

    s_Data.Stats.QuadCount++;
}
效果

对应的加载的纹理图集
