机器学习是世界上发展最快的领域之一,经常会有一系列的新算法发布,最近发现微软之前推出的一个boosting框架–LightGBM,已经被广泛应用在 kaggle 数据竞赛中,看来是想要挑战xgboost的江湖地位,但对于数据挖掘(竞赛)爱好者来说,又多了一项好工具。本文将用通俗易懂的方式介绍什么是 LightGBM算法以及如何使用LightGBM进行实战?
什么是LightGBM?
LightGBM 是一个梯度提升 boosting 框架,使用基于学习算法的决策树。它旨在实现分布式和高效率,具有以下优点:
-
更快的训练效率
-
低内存使用
-
更好的准确率
-
支持并行学习和 GPU 学习
-
可处理大规模数据
-
分类特征支持
随着数据量与日俱增,传统的数据科学算法运行的速度有点跟不上节奏,而LightGBM的高速度并支持GPU学习等优点,使得数据科学家们广泛使用此算法进行数据科学应用的开发。
与其他基于树的算法有什么不同?
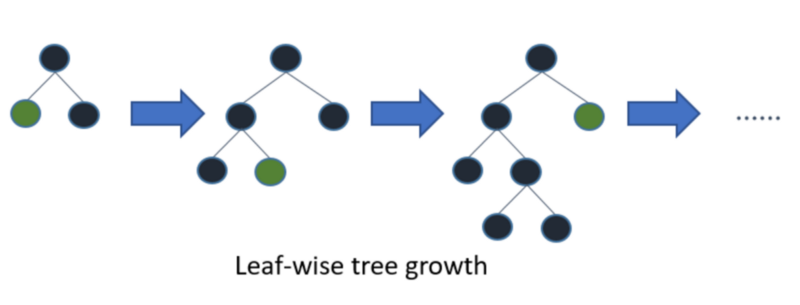
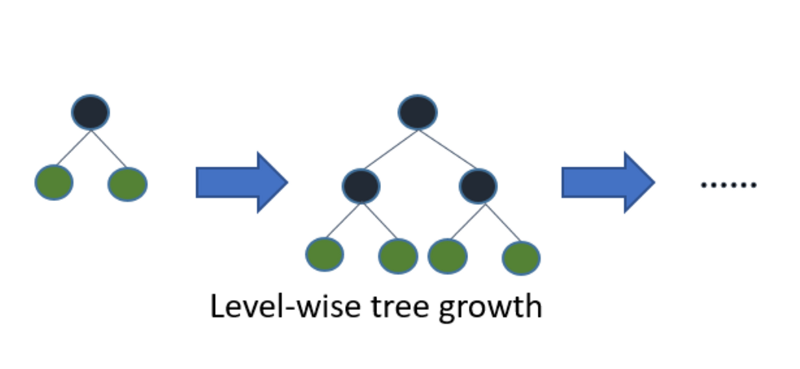
LightGBM 算法垂直生长树,而其他算法水平生长树,这意味着 LightGBM 算法按树叶顺序生长,而其他算法按水平顺序生长,它会选择损失最大的叶子生长,在同一片叶子上生长时,分叶算法比分层算法减少了更多的损失。
下图可以直观的看出 LightGBM 和其他 boosting 算法的主要不同:
LightGBM很容易过拟合小数据,在小型数据集上不建议使用LightGBM。一般建议只对超过10000行的数据使用它。
LightGBM 的使用其实简单,唯一复杂的事情就是参数调整,LightGBM包括了100多个参数,但是不用担心,我们不需要学习所有的参数。
参数讲解及调优
Control Parameters 控制参数
- num_leaves:此参数用于设置树中形成的叶子节点数。 从理论上讲,num_leaves= 2^(max_depth)。 然而,这不是一个很好的估计情况下,对LightGBM来说,num_leaves必须小于2 ^ (max_depth) ,否则它可能导致过拟合;
max_depth: 树的最大深度。 此参数用于处理模型过拟合,任何时候你觉得你的模型overfitted了,你首先考虑要降低最大深度。
min_data_in_leaf: 这是叶子节点可能拥有的记录的最小数量。 默认值是的最佳值为 20。 它也用于处理over fitting。
early_stopping_round: 这个参数可以帮助你加快分析的速度。 如果一个验证数据中的一个指标在最后一轮停止回合中没有改善,模型将停止训练,可以减少模型的迭代次数。
lambda: 正规化。 典型值范围从0到1。
Core Parameters 核心参数
application :这是最重要的参数,它指定了模型的应用,包括回归、分类问题。 Lightgbm 默认将模型视为回归模型。
- regression: for regression 回归问题
- binary: for binary classification 二分类
- multiclass: for multiclass classification problem 多分类
boosting: 定义要运行的算法类型,默认为 gdbt
- gbdt: traditional Gradient Boosting Decision Tree 传统的梯度提升决策树
- rf: random forest 随机森林
- dart: Dropouts meet Multiple Additive Regression Trees Dropouts + 多元加性回归树
- goss: Gradient-based One-Side Sampling Goss: 基于梯度的单边采样
num_boost_round: 增强迭代次数,通常为100 +
learning_rate: 这决定了每棵树对最终结果的影响。 GBM的工作方式是从初始估计开始,然后使用每棵树的输出更新估计值,学习参数是用来控制估计值中这种变化的大小。 一般的值为: 0.1, 0.001, 0.003…
device: 默认是使用cpu,也可以传入 gpu
Metric parameter 度量参数
metric: 同样是一个重要的参数,因为它指定了模型的损失评估方式。 以下是几个一般回归和分类的损失函数。
- mae: mean absolute error 平均绝对误差
- mse: mean squared error 均方差
- binary_logloss: loss for binary classification 二分类的损失
- multi_logloss: loss for multi classification 多分类的损失
安装LightGBM
安装 LightGBM 的 CPU 版本很简单,可以通过 pip 进行安装,而 GPU 版本还有更多的步骤,需要安装 Cuda、 Boost、 CMake、 MS Build 或 Visual Studio 和 MinGW。
对于不同的平台安装方式各不一样,详情请参考官方文档:
https://lightgbm.readthedocs.io/en/latest/Installation-Guide.html
这里跟大家分享一种更加简单的方式,如果你安装了Anaconda,在Anaconda安装 LightGBM 将会方便很多,只需要一行命令即可安装:
conda install -c conda-forge lightgbm

使用LightGBM
数据集
本文使用的数据集包含了来自不同国家的个人信息,我们的目标是根据其他可获得的信息来预测一个人每年是挣的钱是 <=50k or >50k,数据集由32561个训练数据和14个特征组成。可以从这里下载数据集:
http://archive.ics.uci.edu/ml/datasets/Adult.
预处理
#importing standard libraries
import numpy as np
import pandas as pd
from pandas import Series, DataFrame

#import lightgbm and xgboost
import lightgbm as lgb

#loading our training dataset
data=pd.read_csv("../input/train_data.csv",header=None)

#Assigning names to the columns
data.columns=['age','workclass','fnlwgt','education','education-num','marital_Status','occupation','relationship','race','sex','capital_gain','capital_loss','hours_per_week','native_country','Income']

# Label Encoding our target variable
from sklearn.preprocessing import LabelEncoder,OneHotEncoder
le=LabelEncoder()
le.fit(data.Income)
#label encoding our target variable
data.Income=Series(le.transform(data.Income))
#One Hot Encoding of the Categorical features
one_hot_workclass=pd.get_dummies(data.workclass)
one_hot_education=pd.get_dummies(data.education)
one_hot_marital_Status=pd.get_dummies(data.marital_Status)
one_hot_occupation=pd.get_dummies(data.occupation)
one_hot_relationship=pd.get_dummies(data.relationship)
one_hot_race=pd.get_dummies(data.race)
one_hot_sex=pd.get_dummies(data.sex)
one_hot_native_country=pd.get_dummies(data.native_country)

#removing categorical features
data.drop(['workclass','education','marital_Status','occupation','relationship','race','sex','native_country'],axis=1,inplace=True)
#Merging one hot encoded features with our dataset 'data'
data=pd.concat([data,one_hot_workclass,one_hot_education,one_hot_marital_Status,one_hot_occupation,one_hot_relationship,one_hot_race,one_hot_sex,one_hot_native_country],axis=1)
data.head()

#removing dulpicate columns
 _, i = np.unique(data.columns, return_index=True)
data=data.iloc[:, i]

#Here our target variable is 'Income' with values as 1 or 0.
#Separating our data into features dataset x and our target dataset y
x=data.drop('Income',axis=1)
y=data.Income

#Imputing missing values 用众数(就是频数最高的那个)来填充缺失项
y.fillna(y.mode()[0],inplace=True)

#Now splitting our dataset into test and train
from sklearn.model_selection import train_test_split
x_train,x_test,y_train,y_test=train_test_split(x,y,test_size=.3)
模型构建和训练
我们需要将我们的训练数据转换为 LightGBM 支持的数据集格式,之后创建了一个带有参数及其值的 python 字典,模型的准确性完全取决于为参数提供的值。
import lightgbm as lgb
# Light GBM
train_data=lgb.Dataset(x_train,label=y_train)
#setting parameters for lightgbm
param = {

    'num_leaves':150,
         'objective':'binary',
         'max_depth':7,
         'learning_rate':0.05,
         'max_bin':200}
param['metric'] = ['auc', 'binary_logloss']

#training our model using light gbm
num_round=50
from datetime import datetime
start=datetime.now()
lgbm=lgb.train(param,train_data,num_round)
stop=datetime.now()

#Execution time of the model
execution_time_lgbm = stop-start
execution_time_lgbm
#datetime.timedelta( , , ) representation => (days , seconds , microseconds)
参数简单解释:
- objective的值为 binary 二分类问题
- metric度量使用 binary_logloss 二分类对数损失
- type"是 gbdt(你可以试试 random forest)
模型预测
输出将是一个概率列表, 我将概率转通过阈值0.5进行二元分类装换。
#Prediction
#now predicting our model on test set
ypred=lgbm.predict(x_test)
#convert into binary values
#converting probabilities into 0 or 1
for i in range(0,9769):
    if ypred[i]>=0.5:       # setting threshold to 0.5
       ypred[i]=1
    else:
       ypred[i]=0
评估模型
我们可以直接计算精度来检查结果,也可以计算ROC的值来评估。
#calculating accuracy of our model
from sklearn.metrics import accuracy_score
accuracy_lgbm = accuracy_score(ypred,y_test)
accuracy_lgbm # 0.8624219469751254

from sklearn.metrics import roc_auc_score
#calculating roc_auc_score for xgboost
auc_xgb =  roc_auc_score(y_test,ypred)
auc_xgb # 0.7629644010391523
可以这种算法已经展示出较好的结果,并且优于现有的 boosting 算法,你可以使用 LightGBM 与其他算法(比如xgboost等)做一个详细的对比,可以看出其中的差别,但LightGBM跟其他机器学习算法一样,也需要你在训练模型之前正确调参!
参考资料
https://www.zhihu.com/question/51644470
https://lightgbm.readthedocs.io/en/latest/Python-Intro.html
