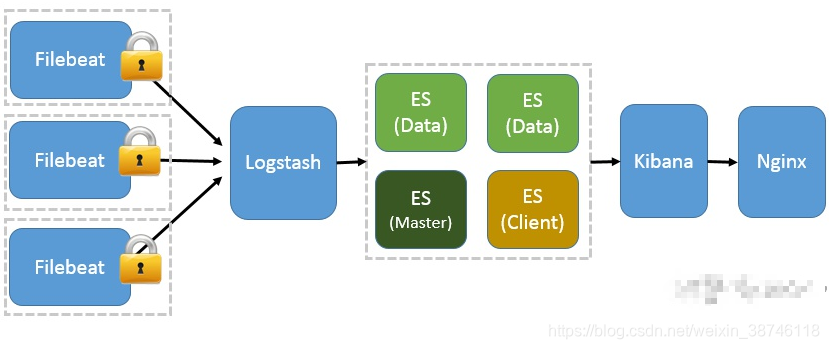
ELKF 部署结构
1.安装 Elasticsearch 和配置
1.1 . 解压安装包到安装路径下。
比如 /usr/local/elk下
tar -zxvf elasticsearch-6.3.0-linux-x86_64.tar.gz -C /usr/local/elk/
或者直接解压
tar -zxvf elasticsearch-6.3.0-linux-x86_64.tar.gz
1.2 修改配置文件
vi /usr/local/elk/elasticsearch-6.3.0/config/elasticsearch.yml
# ----------------------------------- Paths ------------------------------------
#
# Path to directory where to store the data (separate multiple locations by comma):
#
path.data: /data/elasticsearch/data
#
# Path to log files:
#
path.logs: /data/elasticsearch/logs
#
# ---------------------------------- Network -----------------------------------
#
# Set the bind address to a specific IP (IPv4 or IPv6):
#
network.host: 0.0.0.0           ##服务器ip 本机
#
# Set a custom port for HTTP:
#
http.port: 9200                 ##服务端口
#
# For more information, consult the network module documentation.
目录 /data/elasticsearch/data 和 /data/elasticsearch/logs 需要自己创建
1.3 修改系统限制配置文件
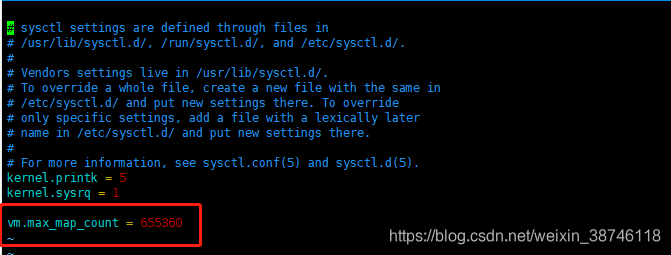
1.3.1 修改sysctl.conf文件
vim /etc/sysctl.conf
在文件后面加入 vm.max_map_count = 655360
重新载入配置
sysctl -p /etc/sysctl.conf
1.3.2 修改 limits.conf 文件
vim /etc/security/limits.conf
在文件最后加入下面内容
#<domain>      <type>  <item>         <value>
#

#*               soft    core            0
#*               hard    rss             10000
#@student        hard    nproc           20
#@faculty        soft    nproc           20
#@faculty        hard    nproc           50
#ftp             hard    nproc           0
#@student        -       maxlogins       4

# End of file

* soft nofile 65536
* hard nofile 131072
* soft nproc  65536
* hard nproc  131072
1.3.3 设置用户资源参数
vim /etc/security/limits.d/20-nproc.conf
加入下面内容
es_user soft nproc 65536
1.3 启动elasticsearch
/data/elasticsearch/ 这个目录是配置文件 elasticsearch.yml 里面配置的
注意 Elastic Search启动:由于ES的启动不能用root账号直接启动,需要新创建用户,然后切换新用户去启动,执行命令如下:
-- 创建新用户及授权
 useradd  es_user
 groupadd esgroup
 chown -R es_user:esgroup elasticsearch-6.3.0
 chown -R es_user:esgroup /data/elasticsearch/
-- 切换用户,启动
 su es_user
 cd elasticsearch-6.3.0/bin
=======================================================
-- 两种方式启动
/usr/local/elk/elasticsearch-6.3.0/bin/elasticsearch   #命令窗运行
/usr/local/elk/elasticsearch-6.3.0/bin/elasticsearch  -d  #后台线程运行
=======================================================================
-- 对应关闭命令
ctrl+c              #命令窗关闭

ps -ef | grep elastic                    #后台线程关闭
kill -9 [pid]                             ##pid为查处线程的pid
常见问题解决 elasticsearch启动常见问题
2.安装 Logstash 和配置
2.1 解压文件
tar -zvxf /usr/local/elk/logstash-7.2.0.tar.gz -C /usr/local/elk/
或者
tar -zvxf /usr/local/elk/logstash-7.2.0.tar.gz
2.2 新建 logs 文件
mkdir /usr/local/elk/logstash/logs
2.3 修改 logstash.conf 文件
cd config
--新建 flexcc-logstash.conf 文件
touch flexcc-logstash.conf
添加下面内容
PS: localhsot 需要改为自己的 Elasticsearch 安装所在的服务器地址。
input {


    beats {


        port => 18401 #filebeat端口
    }
}


filter {


    if [fields][log-source] == "callin-server" {


                json {


            source => "message"
            #target => "doc"
            #remove_field => ["message"]
                }
        }

        if [fields][log-source] == "callout-server" {


                json {


            source => "message"
            #target => "doc"
            #remove_field => ["message"]
                }
        }

        if [fields][log-source] == "sysmanager-server" {


                json {


            source => "message"
            #target => "doc"
            #remove_field => ["message"]
                }
        }

        if [fields][log-source] == "report-server" {


                json {


            source => "message"
            #target => "doc"
            #remove_field => ["message"]
                }
        }

output {


        if [fields][log-source] == "callin-server" {


          elasticsearch {


               hosts => ["localhsot:18200"]
               index => "rpc-callin-%{+YYYY.MM.dd}"
               user => admin
               password => admin
          }
    }

        if [fields][log-source] == "callout-server" {


          elasticsearch {


               hosts => ["localhost:18200"]
               index => "rpc-callout-%{+YYYY.MM.dd}"
               user => admin
               password => admin
          }
    }

        if [fields][log-source] == "sysmanager-server" {


          elasticsearch {


               hosts => ["localhost:18200"]
               index => "rpc-sys-%{+YYYY.MM.dd}"
               user => admin
               password => admin
          }
    }


        if [fields][log-source] == "report-server" {


          elasticsearch {


               hosts => ["localhost:18200"]
               index => "rpc-report-%{+YYYY.MM.dd}"
               user => admin
               password => admin
          }
    }
}
}
2.4 修改 logstash.sh 文件
cd  /usr/local/elk/logstash-6.3.1/bin
touch flexcc-logstash.sh
添加下面内容
路径啥的一定要根据自己的情况来
nohup ./logstash -f /usr/local/elk/logstash-6.3.1/config/flexcc-logstash.conf > /usr/local/elk/logstash/logs/flexcc-logstash.log 2>&1 &
继续执行
sh flexcc-logstash.sh
3 安装 Kibana 和配置
3.1 解压
tar -zxvf kibana-6.3.1-linux-x86_64.tar.gz
3.2 修改配置
vim /usr/local/elk/kibana-6.3.1-linux-x86_64/config/kibana.yml
server.port: 5601       ##服务端口
server.host: "0.0.0.0"  ##服务器ip  本机

elasticsearch.url: "http://localhost:9200" ##elasticsearch服务地址 与elasticsearch对应
3.3 启动kibana
/usr/local/elk/kibana-6.3.1-linux-x86_64/bin/kibana       #命令窗启动
或者
nohup ./kibana-6.3.1-linux-x86_64/bin/kibana &   #后台线程启动
3.4 关闭kibana
ctrl+c                                   #命令窗关闭
或者
netstat -tunlp|grep 5601                    #后台线程关闭   5601为kibana的启动端口
kill -9 pid                             ##pid 为查处线程的pid

3.5 验证kibana启动
http://localhost:5601/
4 安装 Filebeat 和配置
如果是多台机器,可以重复部署 Filebeat 。但是要修改 filebeat.yml 文件中的Logstash 所在的服务器和端口
4.1 解压
tar -zxvf filebeat -6.3.0-linux-x86_64.tar.gz
4.2 编辑 filebeat.yml
cd /usr/local/elk/filebeat-6.3.1-linux-x86_64

vim filebeat.yml
修改如下内容:
paths: 自己服务日志所在路径
hosts: [“localhost:18401”] : Logstash 所在的服务器和端口
#=========================== Filebeat inputs =============================

filebeat.inputs:

# Each - is an input. Most options can be set at the input level, so
# you can use different inputs for various configurations.
# Below are the input specific configurations.

- type: log

  # Change to true to enable this input configuration.
  enabled: true

  # Paths that should be crawled and fetched. Glob based paths.
  paths:
    - /home/xiandai/callin/nohup.out
    - /home/xiandai/callout/nohup.out
    - /home/xiandai/sysmanager/nohup.out
    - /home/xiandai/report/nohup.out
    - /home/xiandai/knowledge/nohup.out
    #- c:\programdata\elasticsearch\logs\*

  # Exclude lines. A list of regular expressions to match. It drops the lines that are
  # matching any regular expression from the list.
  #exclude_lines: ['^DBG']

  # The regexp Pattern that has to be matched. The example pattern matches all lines starting with [
  #multiline.pattern: ^\[
  multiline.pattern: '^\{\"level\":'
  multiline.negate: true
  multiline.match: after
  # Defines if the pattern set under pattern should be negated or not. Default is false.
  #multiline.negate: false


#============================= Filebeat modules ===============================

filebeat.config.modules:
  # Glob pattern for configuration loading
  path: ${

    path.config}/modules.d/*.yml

  # Set to true to enable config reloading
  reload.enabled: false

  # Period on which files under path should be checked for changes
  #reload.period: 10s

#==================== Elasticsearch template setting ==========================

setup.template.settings:
  index.number_of_shards: 3
  #index.codec: best_compression
  #_source.enabled: false


#================================ Outputs =====================================

#----------------------------- Logstash output --------------------------------
output.logstash:
  # The Logstash hosts
  hosts: ["localhost:18401"]

  # Optional SSL. By default is off.
  # List of root certificates for HTTPS server verifications
  #ssl.certificate_authorities: ["/etc/pki/root/ca.pem"]
4.3 测试
在 filebeat-6.3.1-linux-x86_64 路径下
./filebeat -e -c filebeat.yml -d "Publish"
如果能看到一堆东西输出,表示正在向elasticsearch或logstash发送日志。
测试正常后,Ctrl+C结束
4.4 启动
nohup ./filebeat -e -c filebeat.yml >/dev/null 2>&1 &