基于logStash更轻量级的日志传输工具,合适集群
LogStash:
负责日志的收集,脱离filebeat也可以单独实现日志的收集(LogStash+ElasticSearch+Kibana)
ElasticSearch:
使用JAVA开发、基于Lucene搜索引擎库的全文搜索工具
Kibana:
通过界面实现数据的展示与统计,可实现复杂展示
集群案例可以自行设计多台服务器架构的结构,这里只有最简单的单机测试案例
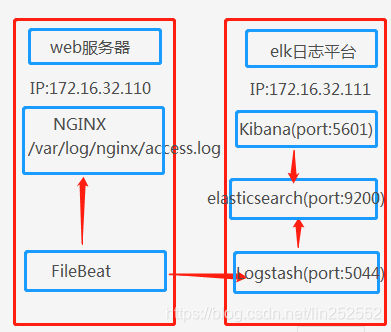
基本数据流程
- 业务请求到达服务器的Nginx;
- Nginx在access.log文件中新增日志;
- FileBeat搜集新增的日志,通过LogStash的5044端口传输日志;
- LogStash将日志通过9200端口传入到ElasticSerach;
- 通过浏览器访问Kibana界面,端口是5601;
- Kibana通过9200端口向ElasticSerach请求日志数据;
简单集群流程
复杂集群的多种部署方案可以参考该文章的最后架构图
https://blog.csdn.net/baidu_24545901/article/details/81170113
6.0以上版本相应控件需要jdk1.8支持
wget https://artifacts.elastic.co/downloads/beats/filebeat/filebeat-6.0.0-linux-x86_64.tar.gz
wget https://artifacts.elastic.co/downloads/logstash/logstash-6.0.0.tar.gz
wget https://artifacts.elastic.co/downloads/elasticsearch/elasticsearch-6.0.0.tar.gz
wget https://artifacts.elastic.co/downloads/kibana/kibana-6.0.0-linux-x86_64.tar.gz
![]()
nginx安装省略
安装Elasticsearch
因为elasticsearch6.0之后不能直接root用户启动所以要添加es执行的用户账号。
6.0之前可以用bin/elasticsearch -Des.insecure.allow.root=true启动
tar -zxvf elasticsearch-6.0.0.tar.gz
cd elasticsearch-6.0.0
创建用户
groupadd es
useradd es -g es
passwd es
chown -R es:es ./elasticsearch-6.0.0
修改配置文件config/elasticsearch.yml
network.host: 0.0.0.0
http.port: 9200
bootstrap.memory_lock: false
bootstrap.system_call_filter: false
/bin/elasticsearch前台启动
nohup /bin/elasticsearch & 后台启动
报错解决
ERROR: [2] bootstrap checks failed
[1]: max file descriptors [65535] for elasticsearch process is too low, increase to at least [65536]
切换到root用户修改配置
vi /etc/security/limits.conf
添加
* soft nofile 65536
* hard nofile 131072
* soft nproc 2048
* hard nproc 4096
切回es用户启动
[2]: max virtual memory areas vm.max_map_count [65530] is too low, increase to at least [262144]
切换到root用户修改配置sysctl.conf
vi /etc/sysctl.conf
添加配置:
vm.max_map_count=655360
执行命令:
sysctl -p
启动成功直接访问
http://x.x.x.x:9200
查看所有索引
http://x.x.x.x:9200/_cat/indices?v
健康检查
http://x.x.x.x:9200/_cat/health?v
查询索引
http://x.x.x.x:9200/[index_name]/_search?
安装Logstash
tar -zxvf logstash-6.0.0.tar.gz
cd /logstash-6.0.0
vi test001.conf
不考虑格式过滤
input {
  beats {
    port => 5044
  }
}
 filter {

}
 output {
    elasticsearch {
      hosts => "x.x.x.x:9200"
      manage_template => false
      index => "logstash_%{+YYYY.MM.dd}"
    }
}
/bin/logstash -f test.conf前台启动
nohup /bin/logstash -f test.conf & 后台启动
安装Kibana
tar –zxvf kibana-6.0.0-linux-x86_64.tar.gz
cd kibana-6.0.0-linux-x86_64
vi config/kibana.yml修改以下配置
server.port: 5601
server.host: "x.x.x.x"
elasticsearch.url: "http://x.x.x.x:9200"
bin/kibana 前台启动
nohup bin/kibana & 后台启动
启动成功访问http://x.x.x.x:5601
安装FileBeat
tar xzvf filebeat-6.0.0-linux-x86_64.tar.gzcd filebeat-6.0.0-linux-x86_64
vi filebeat.yml
查找相应位置修改配置文件
filebeat.inputs:
- type: log
enabled: true
paths:
- /var/log/nginx/*.log
#----------------------------- Logstash output --------------------------------
output.logstash:
hosts: ["127.0.0.1:5044"]
./filebeat -c filebeat.yml前台启动
nohup ./filebeat -c filebeat.yml & 后台启动
Kibana管理界面还有很多需要另外学习掌握的东西,参考
https://www.cnblogs.com/guozhe/p/5206216.html
Kibana界面管理
index pattern匹配logstash的tset001.conf中的index
若服务有问题或者index不匹配就无法添加索引模版

流量展示
