Tensorrt项目下载地址:tensorrtx/yolov5_trt.py at master · wang-xinyu/tensorrtx (github.com)
yolov5项目自行下载(注释:yolov5_6.1项目现另有export.py文件可以一键生成yolov5s.engine文件,本文适合通用版本套用)
安装步骤:
1.环境配置python3.6,cuda10.2,cudnn7.6.5
2.opencv 安装
链接:pip install -i https://pypi.tuna.tsinghua.edu.cn/simple --trusted-host pypi.tuna.tsinghua.edu.cn opencv-python
测试 : python
import cv2
print(cv2.__version__)
打印型号则安装成功
3.pytorch 安装
Start Locally | PyTorch![]() https://pytorch.org/get-started/locally/
https://pytorch.org/get-started/locally/
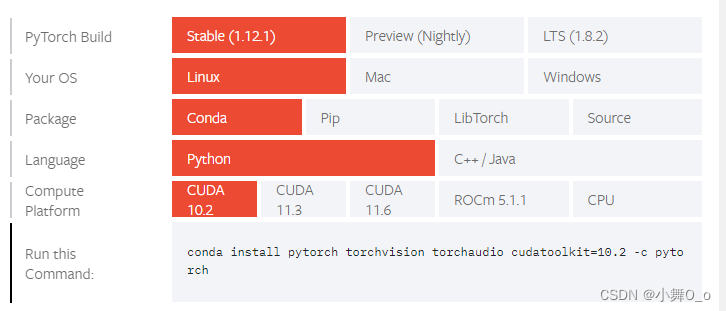
跟据环境型号选择,复制安装(其它低版本安装选择https://pytorch.org/get-started/previous-versions/)
4.tensorrt安装
NVIDIA TensorRT 6.x Download | NVIDIA Developer

跟据环境型号选择,
tar xvf TensorRT-6.0.1.8.Ubuntu-18.04.x86_64-gnu.cuda-10.2.cudnn7.6.tar
cd python
pip install tensorrt-6.0.1.8-cp37-none-linux_x86_64.whl
cd ../graphsurgeon
pip install graphsurgeon-0.4.1-py2.py3-none-any.whl
cd ../uff
pip install uff-0.6.5-py2.py3-none-any.whl
cd ..
sudo cp -r ./lib/* /usr/lib
sudo cp -r ./include/* /usr/include
测试:import tensorrt
tensorrt.__version__
assert tensorrt.Builder(tensorrt.Logger())
无'False'则RT可使用。
5.项目编译:
(1) 将tensorrt/yolov5下的gen_wts.py 复制到最初训练的yolov5项目目录下,python gen_wts.py --weights weights/yolov5s.pt命令生成yolov5s.wts文件
(2)创建build
在tensorrt/yolov5目录下创建build:
mkdir build
cd build
拷贝 yolov5s.wts 到tensorrtx/yolov5/build
记得更改yololayer.h内CLASS_NUM数量
cmake ..
make
(3)生成引擎文件
序列化模型:sudo yolov5 -s yolov5s.wts yolov5s.engine s
推理测试:sudo yolov5s.engine ../samples
python测试:python yolov5_trt.py
6.问题记录:
rror (Engine deserialization failed.)
Traceback (most recent call last):
File "yolov5_trt.py", line 424, in <module>
yolov5_wrapper = YoLov5TRT(engine_file_path)
File "yolov5_trt.py", line 86, in __init__
context = engine.create_execution_context()
AttributeError: 'NoneType' object has no attribute 'create_execution_context'
-------------------------------------------------------------------
PyCUDA ERROR: The context stack was not empty upon module cleanup.
-------------------------------------------------------------------
A context was still active when the context stack was being
cleaned up. At this point in our execution, CUDA may already
have been deinitialized, so there is no way we can finish
cleanly. The program will be aborted now.
Use Context.pop() to avoid this problem.
或是:
Traceback (most recent call last):
File "yolov5_trt.py", line 424, in <module>
yolov5_wrapper = YoLov5TRT(engine_file_path)
File "yolov5_trt.py", line 81, in __init__
runtime = trt.Runtime(TRT_LOGGER)
TypeError: pybind11::init(): factory function returned nullptr
出现以上问题,最大可能是python、tensorrt选择版本不匹配,列如:我ubuntu18.04,cuda10.4适合python3.6、tensorrt7.x.x.x或以下版本。
型号匹配链接:Frameworks Support Matrix :: NVIDIA Deep Learning Frameworks Documentation