17.2 方法
| 方法 | 描述 |
|---|---|
| add(child, **options) | 增加子组件。 child: 子组件标识 options: 添加子组件的方法。见后面的表格 |
| config() | 参加属性说明。 |
| forget(child) | |
| remove(child) | 删除一个子窗口。 |
| Child | 子窗口的标识 |
| identify(x, y) | 给定一个坐标(x, y),返回该坐标所在的元素名称 如果该坐标位于子组件上,返回空字符串 如果该坐标位于分割线上,返回一个二元组(n, ‘sash’),n为0表示第一个分割线 如果该坐标位于手柄上,返回一个二元组(n, ‘handle’),n为0表示第一个手柄 |
| panecget(child, option) | 获得子窗口可选项的值 |
| paneconfig(child, **options) paneconfigure(child, **options) |
设置子窗口的属性。具体属性的定义,参加add(child,**options)函数 |
| panes() | 返回子窗口列表 |
| proxy_coord() | 获得代理的坐标 |
| proxy_forget() | 删除代理 |
| proxy_place(x, y) | 在坐标(x,y)处放置一个代理 |
| sash_coord(index) | 获得index指定的分割线的位置坐标 |
| sash_mark(index, x, y) | 注册鼠标位置到(x,y)处。 |
| sash_place(index, x, y) | 将分割线移动到坐标(x,y)指定的位置。 |
添加子组件方法
| 方法 | 说明 |
|---|---|
| after | 添加新的子组件到指定子组件后边 |
| before | 添加新的子组件到指定子组件前边 |
| height | 指定子组件的高度 |
| minsize | 该选项控制窗格不得低于的值 如果orient=HORIZONTAL,表示窗格的宽度不得低于该选项的值 如果orient=VERTICAL,表示窗格的高度不得低于该选项的值 |
| padx | 指定子组件的水平间距 |
| pady | 指定子组件的垂直间距 |
| sticky | 当窗格的尺寸大于子组件时,该选项指定子组件位于窗格的位置 可选的值有:E、S、W、N(东南西北)以及他们的组合值 |
| width | 指定子组件的宽度 |
| 17.2.1 add(child, kw) | |
| 增加子组件。窗格定义好分隔的风格与大小后,具体每个子窗格中的组件,使用add()方法添加。增加子组件的参数有: | |
| (1)After | |
| 在after指定的子控件后面添加。比如: | |
| right=tk.Label(pane,text=’右面’) | |
| left=tk.Label(pane,text=’左面’) | |
| pane.add(right,after=left) | |
| 这条语句的意思在right子控件在left子控件之后添加。如果水平分布的窗格,right控件就是在left控件的右边。 | |
| (2)before | |
| 在before指定的子控件前面添加。比如: | |
| right=tk.Label(pane,text=’右面’) | |
| left=tk.Label(pane,text=’左面’) | |
| pane.add(right,before=left) | |
| 还同样是水平分布的窗格,这个时候right控件就在left控件的左边了。因为指定right控件在left控件之前插入到窗格中。 | |
| (3)height | |
| 设置子控件的高度。那么有的子控件本身也是有高度的,比如Text等,以那个为准呢?答案是那个控件高度大以那个为准。也就是说,如果Text子控件的高度比height指定的高度要大,就使用Text的。如果是height的数值大(如果单位不一致,会转换成同一单位的高度值比较),那么就使用height定义的数值。 | |
| (4)minsize | |
| 指定最小窗格的数值。窗格的配置会不小于这个数值。 |
import tkinter as tk
from tkinter import ttk

root=tk.Tk()
root.geometry('320x240')
b1=tk.PanedWindow(showhandle=True,
                  sashrelief=tk.SUNKEN,
                  width=240,sashwidth=20)
left=tk.Text(b1,height=5,width=5,bg='red')
b1.add(left,minsize=140)
right=tk.Text(b1,height=5,width=5)
b1.add(right)
b1.pack()
root.mainloop()
结果:
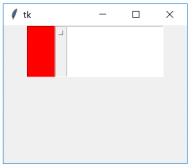
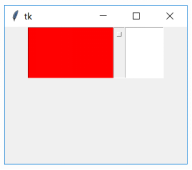
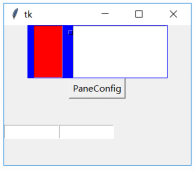
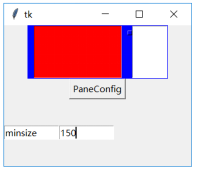
图一是没有使用minsize参数的情况,图二是使用了minsize的情况,可以看见是有不同的。right子控件使用了minsize之后,由于要保证最小的宽度是150个像素,明显比没有使用的时候要宽了。对于水平分布的窗格,minsize是指的宽度,而对于垂直分隔的窗格,minsize指的是高度。使用的时候要注意区分窗格的分布。
(5)padx
设置水平方向上的子控件的内边距值。
import tkinter as tk
from tkinter import ttk
root=tk.Tk()
root.geometry('320x240')
b1=tk.PanedWindow(showhandle=True,
                  sashrelief=tk.SUNKEN,width=240,
                  sashwidth=20,bg='blue')
left=tk.Text(b1,height=5,width=5)
b1.add(left,minsize=40)
right=tk.Text(b1,height=5,width=5,bg='red')
b1.add(right,padx=10)
b1.pack()
root.mainloop()
结果:
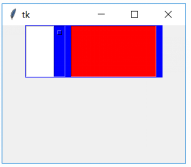
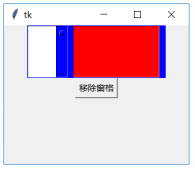
说明:padx=10,可以发现在右侧的子控件的两边有蓝色的边,而左侧的子控件没有使用padx,就没有明显的蓝色的边。
(6)pady
垂直方向的内边距值。用法参见padx。
(7)sticky
sticky的用法与grid布局管理器的用法是一致的。如果子控件比窗格要小的话,就可以使用sticky来放置子控件到相应的方位上。具体的用法参见第三章的grid布局管理器。
(8)width
定义子控件的宽度。与height用法类似。
17.2.2 config()
动态改变窗格的属性。属性见17.1节的定义。
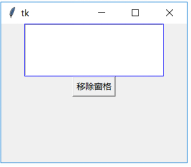
17.2.3 forget(child) 和remove(child)
移除一个窗格。
import tkinter as tk
from tkinter import ttk
root=tk.Tk()
root.geometry('320x240')
b1=tk.PanedWindow(showhandle=True,
                  sashrelief=tk.SUNKEN,
                  width=240,sashwidth=20,bg='blue')
left=tk.Text(b1,height=5,width=5)
b1.add(left,minsize=40)
right=tk.Text(b1,height=5,width=5,bg='red')
b1.add(right,padx=10)
b1.pack()
def remove():
    b1.remove(right)
b2=tk.Button(root,text='移除窗格',command=remove)
b2.pack()
root.mainloop()
结果:
17.2.4 identify(x, y)
返回给定坐标点的处于什么窗格的部件上:
(1)空字符串
表示位于子控件上
(2)(n,‘sash’)
表示位于分隔条上。n表示第几个分隔条,从0开始计数。
(3)(n,’handle’)
表示位于手柄上。n表示第几个手柄,从0开始计数
import tkinter as tk
from tkinter import ttk

root=tk.Tk()
root.geometry('320x240')
b1=tk.PanedWindow(showhandle=True,
                  sashrelief=tk.SUNKEN,
                  sashwidth=90,width=240,bg='blue')
left=tk.Text(b1,height=5,width=5)
b1.add(left,minsize=40)
right=tk.Text(b1,height=5,width=5,bg='red')
b1.add(right,padx=10)
b1.pack()
b3=tk.Label(root)
b4=tk.Entry(root,width=5)
b5=tk.Entry(root,width=5)

def identify():
    r=b1.identify(b4.get(),b5.get())
    if r == '':
        b3['text']='子控件'
    else:
        b3['text']=str(r)

b2=tk.Button(root,text='identify',command=identify)
b2.pack()
b4.pack(side='left')
b5.pack(side='right')
b3.pack()
def b(event):
    print(event)

root.bind('<Button-1>',b)
root.mainloop()
结果:
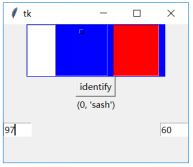
说明:先点中分隔条,根据在命令行窗口得到的鼠标位置,把x坐标值输入左边的输入框,y坐标值输入右边的输入框,点击按钮后,就可以得到相应的结果了。手柄和子控件同样的方法。
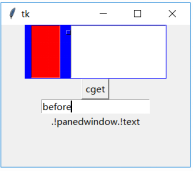
17.2.5 panecget(child, option)
获取子窗格的属性,属性的定义在17.2.1中已经详细介绍了。
import tkinter as tk
from tkinter import ttk
root=tk.Tk()
root.geometry('320x240')
b1=tk.PanedWindow(showhandle=True,
                  sashrelief=tk.SUNKEN,
                  sashwidth=1,width=240,bg='blue')
left=tk.Text(b1,height=5,width=5)
b1.add(left,minsize=40)
right=tk.Text(b1,height=5,width=5,bg='red')
b1.add(right,padx=10,before=left)
b1.pack()
b3=tk.Label(root)
b4=tk.Entry(root)

def cget():
    b3['text']=b1.panecget(right,b4.get())

b2=tk.Button(root,text='cget',command=cget)
b2.pack()
b4.pack()
b3.pack()
root.mainloop()
结果:
17.2.6 paneconfigure(child, **options)和paneconfig(child, **options)
import tkinter as tk
from tkinter import ttk
root=tk.Tk()
root.geometry('320x240')
b1=tk.PanedWindow(showhandle=True,
                  sashrelief=tk.SUNKEN,sashwidth=1,
                  width=240,bg='blue')
left=tk.Text(b1,height=5,width=5)
b1.add(left,minsize=40)
right=tk.Text(b1,height=5,width=5,bg='red')
b1.add(right,padx=10,before=left)
b1.pack()
b3=tk.Label(root)
b4=tk.Entry(root,width=10)
b5=tk.Entry(root,width=10)
def config():
    key={}
    key[b4.get()]=b5.get()
    b3['text']=b1.paneconfig(right,key)

b2=tk.Button(root,text='PaneConfig',command=config)
b2.pack()
b4.pack(side='left')
b5.pack(side='left')
b3.pack()
root.mainloop()
结果:
动态调整子窗格的属性。
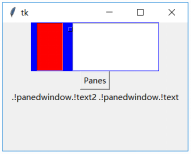
17.2.7 panes()
返回子窗口列表。
import tkinter as tk
from tkinter import ttk
root=tk.Tk()
root.geometry('320x240')
b1=tk.PanedWindow(showhandle=True,
                  sashrelief=tk.SUNKEN,
                  sashwidth=1,width=240,bg='blue')
left=tk.Text(b1,height=5,width=5)
b1.add(left,minsize=40)
right=tk.Text(b1,height=5,width=5,bg='red')
b1.add(right,padx=10,before=left)
b1.pack()
b3=tk.Label(root)
def panes():
    b3['text']=b1.panes()

b2=tk.Button(root,text='Panes',command=panes)
b2.pack()
b3.pack()
root.mainloop()
结果:
17.2.8 sash_coord(index)
获得分隔线的坐标。index的值是0,因为一个窗格实例,只有一个分隔线。
import tkinter as tk
from tkinter import ttk

root=tk.Tk()
root.geometry('320x240')
b1=tk.PanedWindow(showhandle=True,
                  sashrelief=tk.SUNKEN,
                  sashwidth=1,width=240,bg='blue')
left=tk.Text(b1,height=5,width=5)
b1.add(left,minsize=40)
right=tk.Label(b1,text='实验室')
b1.add(right)
b1.pack()
b3=tk.Label(root,text=str(b1.sash_coord(0)))
b3.pack()
root.mainloop()
结果:

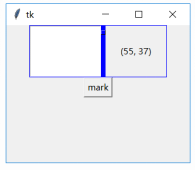
17.2.9 sash_mark(index)
返回鼠标上次拖拽分隔线的坐标。
import tkinter as tk
from tkinter import ttk

root=tk.Tk()
root.geometry('320x240')
b1=tk.PanedWindow(showhandle=True,
                  sashrelief=tk.SUNKEN,
                  sashwidth=1,width=240,bg='blue')
left=tk.Text(b1,height=5,width=5)
b1.add(left,minsize=40)
right=tk.Label(b1,text='实验室')
b1.add(right)
b1.pack()
def mark():
    right['text']=str(b1.sash_mark(0))
b3=tk.Button(root,text='mark',command=mark)
b3.pack()
root.mainloop()
结果:
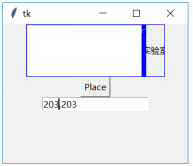
17.2.10 sash_place(index,x,y)
移动分隔到指定的位置(x,y)处。
import tkinter as tk
from tkinter import ttk

root=tk.Tk()
root.geometry('320x240')
b1=tk.PanedWindow(showhandle=True,
                  sashrelief=tk.SUNKEN,
                  sashwidth=1,width=240,bg='blue')
left=tk.Text(b1,height=5,width=5)
b1.add(left,minsize=40)
right=tk.Label(b1,text='实验室')
b1.add(right)
b1.pack()
b4=tk.Entry(root)
def place():
    (x,y)=b4.get().split(',')
    b1.sash_place(0,x,y)
b3=tk.Button(root,text='Place',command=place)
b3.pack()
b4.pack()
root.mainloop()
结果: