一、实验介绍
1. 实验内容
本实验将学习高斯模糊。
2. 实验要点
- 高斯模糊图像
- 使用高通滤波器测试性能
3. 实验环境
- Python 3.6.6
- numpy
- matplotlib
- cv2
二、实验步骤
1 导入资源并显示图像
import numpy as np
import matplotlib.pyplot as plt
import cv2
%matplotlib inline
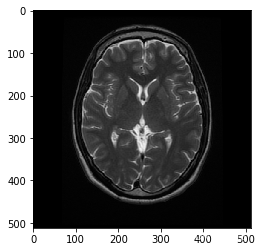
# 读入图像
image = cv2.imread('images/brain_MR.jpg')
# 制作图像副本
image_copy = np.copy(image)
# 将颜色更改为RGB(从BGR)
image_copy = cv2.cvtColor(image_copy, cv2.COLOR_BGR2RGB)
plt.imshow(image_copy)
<matplotlib.image.AxesImage at 0x7f9b454dae48>
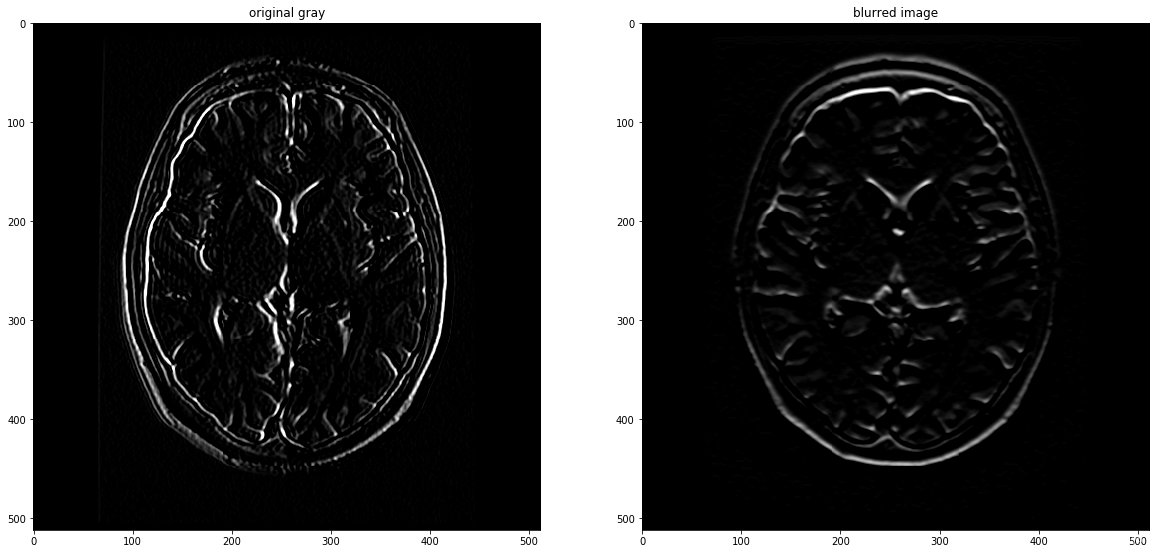
2 高斯模糊图像
# 转换为灰度用于过滤
gray = cv2.cvtColor(image_copy, cv2.COLOR_RGB2GRAY)

# 创建高斯模糊图像
gray_blur = cv2.GaussianBlur(gray, (9, 9), 0)

f, (ax1, ax2) = plt.subplots(1, 2, figsize=(20,10))

ax1.set_title('original gray')
ax1.imshow(gray, cmap='gray')

ax2.set_title('blurred image')
ax2.imshow(gray_blur, cmap='gray')
<matplotlib.image.AxesImage at 0x7f9b453f16d8>

3 使用高通滤波器测试性能
# 高通滤波器

# 3x3 Sobel滤波器用于边缘检测
sobel_x = np.array([[ -1, 0, 1],
                   [ -2, 0, 2],
                   [ -1, 0, 1]])


sobel_y = np.array([[ -1, -2, -1],
                   [ 0, 0, 0],
                   [ 1, 2, 1]])


# 使用filter2D过滤原始和模糊的灰度图像
filtered = cv2.filter2D(gray, -1, sobel_x)

filtered_blurred = cv2.filter2D(gray_blur, -1, sobel_y)
f, (ax1, ax2) = plt.subplots(1, 2, figsize=(20,10))

ax1.set_title('original gray')
ax1.imshow(filtered, cmap='gray')

ax2.set_title('blurred image')
ax2.imshow(filtered_blurred, cmap='gray')
<matplotlib.image.AxesImage at 0x7f9b453713c8>
# 创建一个阈值,将所有过滤的像素设置为白色
# 在一定的阈值之上

retval, binary_image = cv2.threshold(filtered_blurred, 50, 255, cv2.THRESH_BINARY)

plt.imshow(binary_image, cmap='gray')
<matplotlib.image.AxesImage at 0x7ff2b018be10>
总结
高斯模糊是一种常用的图像处理技术,它通过对图像中所有像素与周围像素进行加权平均的方式来实现模糊效果。通常情况下,加权系数是根据高斯函数计算得到的,这样可以使得图像变得更加平滑,从而去除噪声和细节信息。高斯模糊在计算机视觉、图像处理、图像识别等领域有广泛的应用,比如人脸识别、车牌识别、边缘检测等。同时,为了保证模糊效果的质量和速度,需要注意高斯核大小的选择、灰度值的归一化、并发算法的设计等问题。