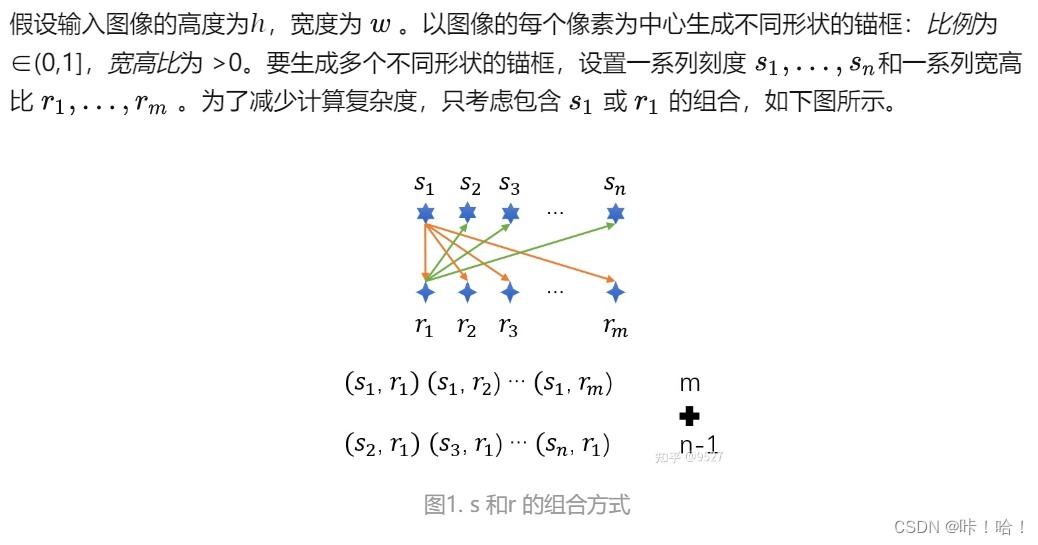
以每个像素为中心,生成多个缩放比(scale)和宽高比(aspect ratio)不同的边界框。 这些边界框被称为锚框(anchor box)。 ---- 《动手学深度学习v2》
为什么要这样做?
当使用缩放比和宽高比的所有组合以每个像素为中心时,输入图像将总共拥有whnm个锚框。这种情况下计算复杂性很容易过高。
而采用了以上方法只会生成wh*(n+m-1)个锚框,减少了计算量。
简单来说就是锚框太多,没有必要,所以去掉一些。
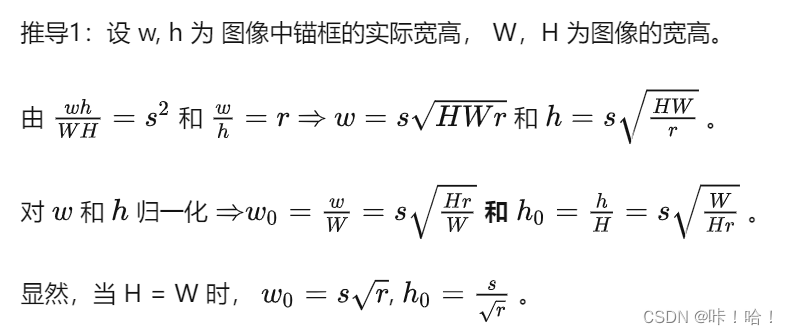
为什么使用归一化的w_0,h_0?
绝对坐标的表示方式,是以原始图像的像素值为基础的,这就需要知道图像的实际尺度,如果图像进行缩放,这种表示就无法准确的进行定位了。
坐标进行归一化,这样只要知道图像的scale就能够很容易在当前尺度下使用矩形框定位。
import torch
'''
	输入参数:
		data:需要进行锚框的图片,形状为(batch_size, channel_num, h, w),其中	batch_size代表图片数量,channel_num代表图片通道数,
			  h代表图片的高,w代表图片的宽
		sizes:缩放比,以标量、元组、列表形式均可(一般缩放比都具有多个)
		ratios:宽高比,以标量、元组、列表形式均可(一般宽高比都具有多个)
	返回值:形状为(batch_size, anchors_num, 4);其中anchors_num代表锚框总数量,对该维度下标[0,n+m-1),[n+m-1, 2n+2m-2)表示第二个像
		  素中心的锚框,... ,[anchors_num-n-m+1, anchors_num)表示最后一个像素中心对应的锚框;最后一个维度4表示用方法1来进行表示的锚框。
'''

def multibox_prior(data, sizes, ratios):
    """生成以每个像素为中心具有不同形状的锚框"""
    in_height, in_width = data.shape[-2:]
    device, num_sizes, num_ratios = data.device, len(sizes), len(ratios)  # 3, 3
    boxes_per_pixel = (num_sizes + num_ratios - 1)  # 每个像素的锚框数
    size_tensor = torch.tensor(sizes, device=device)  # list 转为 tensor
    ratio_tensor = torch.tensor(ratios, device=device)

    # 为了将锚点移动到像素的中心,需要设置偏移量。
    # 因为一个像素的的高为1且宽为1,我们选择偏移我们的中心0.5
    offset_h, offset_w = 0.5, 0.5
    steps_h = 1.0 / in_height  # 在y轴上缩放步长
    steps_w = 1.0 / in_width  # 在x轴上缩放步长

    # 生成锚框的所有中心点
    center_h = (torch.arange(in_height, device=device) + offset_h) * steps_h
    center_w = (torch.arange(in_width, device=device) + offset_w) * steps_w
    shift_y, shift_x = torch.meshgrid(center_h, center_w)  # 生成网格

    shift_y, shift_x = shift_y.reshape(-1), shift_x.reshape(-1)  # 展平为一维

    # 生成“boxes_per_pixel”个高和宽,
    # 之后用于创建锚框的四角坐标(xmin,xmax,ymin,ymax)

    ## 动手学深度学习V2 原始代码
    # w = torch.cat((size_tensor * torch.sqrt(ratio_tensor[0]),
    #                sizes[0] * torch.sqrt(ratio_tensor[1:])))\
    #                * in_height / in_width  # 处理矩形输入
    # h = torch.cat((size_tensor / torch.sqrt(ratio_tensor[0]),
    #                sizes[0] / torch.sqrt(ratio_tensor[1:])))
    # # 除以2来获得半高和半宽
    # anchor_manipulations = torch.stack((-w, -h, w, h)).T.repeat(
    #                                     in_height * in_width, 1) / 2

    ## 更新后的代码
    w_0 = torch.cat((sizes[0] * torch.sqrt(in_height * ratio_tensor[:] / in_width),
                     size_tensor[1:] * torch.sqrt(in_height * ratio_tensor[0] / in_width)))  # 归一化后的宽
    h_0 = torch.cat((sizes[0] * torch.sqrt(in_width / ratio_tensor[:] / in_height),
                     size_tensor[1:] * torch.sqrt(in_width / ratio_tensor[0] / in_height)))  # 归一化后的高
    # 除以2来获得半高和半宽(因为后续想获得左上角和右下角的坐标)
    '''
    torch.stack((-w_0, -h_0, w_0, h_0)).T
    如果不转置:
    [[-w_0,-w_0,...,-w_0],
     [-h_0,-h_0,...,-h_0],
     [w_0,w_0,...,w_0],
     [h_0,h_0,...,h_0]]
    转置后:
    [[-w_0, -h_0, w_0, h_0],
     [-w_0, -h_0, w_0, h_0],
     ...
     [-w_0, -h_0, w_0, h_0]]

    repeat不同于repeat_interleave,repeat是整块整块重复的
    '''
    anchor_manipulations = torch.stack((-w_0, -h_0, w_0, h_0)).T.repeat(
        in_height * in_width, 1) / 2

    '''
    torch.stack([shift_x, shift_y, shift_x, shift_y],dim=1)
    由于shift_x、shift_y都是一维的,又由于dim=1,那么上面这句代码就相当于给接上后再转置
    例如:
        shift_x=[x1,x2,x3]
        shift_y=[y1,y2,y3]
        那么接上后为:[shift_x, shift_y, shift_x, shift_y]为:
             [[x1,x2,x3],
              [y1,y2,y3],
              [x1,x2,x3],
              [y1,y2,y3]]
        转置后为:
            [[x1,y1,x1,y1],
             [x2,y2,x2,y2],
             [x3,y3,x3,y3]]

        再给转置后的张量进行重复:repeat_interleave(boxes_per_pixel, dim=0):
        有趣的是它是这样重复的:
            [[x1,y1,x1,y1],
             [x1,y1,x1,y1],
             [x1,y1,x1,y1],

             [x2,y2,x2,y2],
             [x2,y2,x2,y2],
             [x2,y2,x2,y2],

             [x3,y3,x3,y3],
             [x3,y3,x3,y3],
             [x3,y3,x3,y3]]

    '''
    # 每个中心点都将有“boxes_per_pixel”个锚框,
    # 所以生成含所有锚框中心的网格,重复了“boxes_per_pixel”次
    out_grid = torch.stack([shift_x, shift_y, shift_x, shift_y],
                           dim=1).repeat_interleave(boxes_per_pixel, dim=0)
    '''
    【注:】s为sizes中元素的个数,r为ratios中元素的个数
    out_grid一行会重复s+r-1次,刚好对应anchor_manipulations中的s+r-1个框
    out_grid大小为:wh*(s+r-1)
    anchor_manipulations大小为:(s+r-1)*wh
    '''
    output = out_grid + anchor_manipulations  # output结果包含了左上角的坐标(前两个元素),右下角的坐标(后两个元素)
    return output.unsqueeze(0)