AnchorGenerator模块
首先,根据点云场景将其划分为一个个grid,这个grid size是可以通过配置文件设定的点云场景方位和voxel大小计算出来的。
POINT_CLOUD_RANGE: [0, -39.68, -3, 69.12, 39.68, 1]
VOXEL_SIZE: [0.16, 0.16, 4]
在dense_head的初始化过程,就会在基类进行anchor的生成。
# 功能:dense head模块的基类
class AnchorHeadTemplate(nn.Module):
def __init__(self, model_cfg, num_class, class_names, grid_size, point_cloud_range, predict_boxes_when_training):
......
# anchor生成配置
anchor_generator_cfg = self.model_cfg.ANCHOR_GENERATOR_CONFIG # list:存储每个类别的anchor生成设置
anchors, self.num_anchors_per_location = self.generate_anchors(
anchor_generator_cfg, grid_size=grid_size, point_cloud_range=point_cloud_range,
anchor_ndim=self.box_coder.code_size
)
......
@staticmethod
def generate_anchors(anchor_generator_cfg, grid_size, point_cloud_range, anchor_ndim=7):
"""
Args:
anchor_generator_cfg: 每个类别的anchor配置
grid_size: 网格大小 [432 496 1]
point_cloud_range: 点云范围 [ 0. -39.68 -3. 69.12 39.68 1. ]
anchor_ndim: anchor维度: 7 位置 + 大小 + 方向 [x,y,z,dx,dy,dz,rot]
"""
anchor_generator = AnchorGenerator(
anchor_range=point_cloud_range,
anchor_generator_config=anchor_generator_cfg
)
# 对每个类别生成anchor的feature map [array([216, 248]), array([216, 248]), array([216, 248])]
feature_map_size = [grid_size[:2] // config['feature_map_stride'] for config in anchor_generator_cfg]
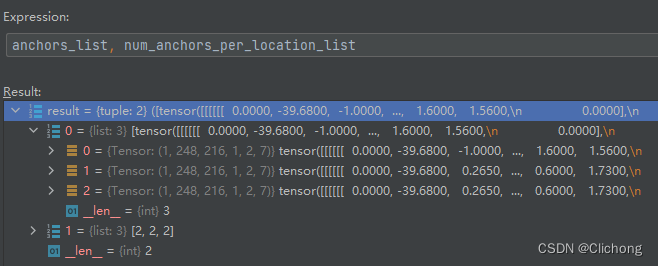
# 返回每个类别构建好的anchor[(1,248,216,1,2,7), ...] 和 每个位置anchor的数量[2, 2, 2]
anchors_list, num_anchors_per_location_list = anchor_generator.generate_anchors(feature_map_size)
if anchor_ndim != 7: # 默认情况是为7, 如果anchor的维度不等于7,则补0
for idx, anchors in enumerate(anchors_list):
pad_zeros = anchors.new_zeros([*anchors.shape[0:-1], anchor_ndim - 7])
new_anchors = torch.cat((anchors, pad_zeros), dim=-1)
anchors_list[idx] = new_anchors
return anchors_list, num_anchors_per_location_list
这里3d点云检测的anchor生成和yolov5等目标检测2d算法在图像网格点生成anchor类似。由于这里有3个类别,那么首先对每个列表都构建一个feature map,每个feature map尺度在这里和点特征矩阵的尺寸是一样的。随后,将这个feature map列表送入AnchorGenerator.generate_anchors函数来进行具体的anchor生成。
AnchorGenerator.generate_anchors函数解析如下。
AnchorGenerator.generate_anchors函数
以点云场景限制为:[ 0. -39.68 -3. 69.12 39.68 1. ] 为例。由于设定了grid size,那么就可以知道每个grid之间的步长,那么根据这个步长就有可以将整个点云场景均匀的划分为一个个等大的grid。
# 步长的确定:PointPillars不在z轴进行划分,所以z轴步长不需要考虑
x_stride = (self.anchor_range[3] - self.anchor_range[0]) / (grid_size[0] - 1)   # x方向步长
y_stride = (self.anchor_range[4] - self.anchor_range[1]) / (grid_size[1] - 1)   # y方向步长
x_offset, y_offset = 0, 0

# 根据步长构建xy方向的间隔点
x_shifts = torch.arange(    # (69.12 - 0) / (216 - 1) = 0.321488  间隔点有216个,所以步长为0.321488
    self.anchor_range[0] + x_offset, self.anchor_range[3] + 1e-5, step=x_stride, dtype=torch.float32,
).cuda()
y_shifts = torch.arange(    # (39.68 - (-39.68)) / (248 - 1) = 0.321295 间隔点有248个,所以步长为0.321295
    self.anchor_range[1] + y_offset, self.anchor_range[4] + 1e-5, step=y_stride, dtype=torch.float32,
).cuda()
z_shifts = x_shifts.new_tensor(anchor_height)   # [-1.78] PointPillar不对z轴进行区间划分
更具步长来构建一个三维的网格坐标是通过meshgrid函数来实现的。meshgrid可以理解为在原来的维度上进行扩展(此时3者的坐标维度是一样的)。随后将其进行拼接在一起,此时就获得了在点云场景中的一个三维坐标表示。拼接后的维度是[216,248,1,3],前三维信息是表示xyz轴,最后一维表示分别的坐标。
# 根据xyz步长构建三维网格坐标 [x_grid, y_grid, z_grid] --> [(216,248,1), (216,248,1),(216,248,1)]
x_shifts, y_shifts, z_shifts = torch.meshgrid([
    x_shifts, y_shifts, z_shifts
])  # [x_grid, y_grid, z_grid]
# meshgrid可以理解为在原来的维度上进行扩展, (np.meshgrid 和 torch.meshgrid 是返回结果不一样的)
# 例如:
# x原来为(216,)-->(216,1, 1)--> (216,248,1)
# y原来为(248,)--> (1,248,1)--> (216,248,1)
# z原来为 (1,) --> (1,1,1) --> (216,248,1)

# xyz位置信息堆叠,完成anchor位置信息的构建: (216,248,1,3)
anchors = torch.stack((x_shifts, y_shifts, z_shifts), dim=-1)  # [x,y,z,3]-->[216,248,1,3]
anchor坐标位置构建完后,随后与anchor的尺寸大小、旋转角信息进行组合:
# 将anchor的位置信息与尺寸大小进行组合: (216,248,1,1,6)
anchors = anchors[:, :, :, None, :].repeat(1, 1, 1, anchor_size.shape[0], 1)        # (216,248,1,3) -> (216,248,1,1,3)
anchor_size = anchor_size.view(1, 1, 1, -1, 3).repeat([*anchors.shape[0:3], 1, 1])  # (1,1,1,1,3) -> (216,248,1,1,3)
anchors = torch.cat((anchors, anchor_size), dim=-1)     # anchors的位置+大小 --> (216,248,1,1,6)

# 将anchor的位置信息、尺寸大小、旋转角信息进行组合: (216,248,1,1,2,7)
anchors = anchors[:, :, :, :, None, :].repeat(1, 1, 1, 1, num_anchor_rotation, 1)   # (216,248,1,1,1,6) -> (216,248,1,1,2,6)
anchor_rotation = anchor_rotation.view(1, 1, 1, 1, -1, 1).repeat([*anchors.shape[0:3], num_anchor_size, 1, 1])  # (1,1,1,1,2,1) -> (216,248,1,1,2,1)
anchors = torch.cat((anchors, anchor_rotation), dim=-1)  # anchors的位置+大小+旋转方向 --> (216,248,1,1,2,7)

# 最后调整anchor的维度: (1,248,216,1,2,7)
# 最后一维的7表示的特征信息为: [x, y, z, dx, dy, dz, rot], [位置信息xyz, 尺寸信息, 旋转角度]
anchors = anchors.permute(2, 1, 0, 3, 4, 5).contiguous()    # (216,248,1,1,2,7) ->  (1,248,216,1,2,7)
#anchors = anchors.view(-1, anchors.shape[-1])
最后获取的anchor的维度: (1,248,216,1,2,7)。其中(1,248,216)表示点云场景每个grid的位置。2表示每个grid位置有两种方向的anhcor。然后7表示每种方向的anchor的具体位置信息、尺寸大小、旋转角度。如此,依次对每个类别进行anchor的生成,最后返回的是anchors_list。
ps:这里的anhcor的z轴位置信息还回加上anchor的高度,以汽车类别为例,由于每个anchor的z轴gird位置设置为'anchor_bottom_heights': [-1.78],然后再加上anchor高度的一半也就是1.56 // 2 = 0.78,z轴的位置信息就被更新为1,这个就是anchor的具体在z轴上的位置。下面就是某个grid位置的anchor配置信息,可以看见一个位置的一类anchor会有两个方向的尺寸位置一样的配置。

函数的最后返回的是anchor_list列表以及每个位置每个类别有多少种anchor的列表,如下所示:
至此,完成了每个grid每个类别的anchor生成配置。思路上是比较清晰的,具体的细节就是各种anchor信息在各位置的拼接处理。