模型部署定义
深度学习模型部署是指训练好的模型在特定环境中运行的过程。
模型部署的流水线如下:
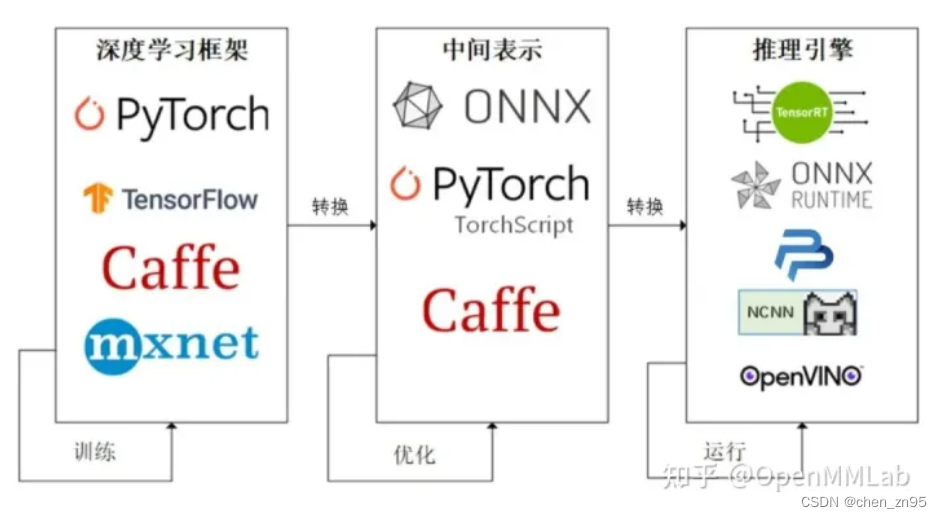
- 使用任意一种深度学习框架来定义网络结构并训练模型
- 训练好的模型的网络结构和参数会被转换成一种只描述网络结构的中间表示(如,onnx、torchscript等),一些针对模型的优化会在中间表示上进行(如,onnxsimplify,读取onnx模型,将一些需要动态计算的值转换为静态值,从而对模型进行简化;onnx节点裁剪等)
- 用面向硬件的高性能编程框架(如,CUDA,OpenCL等)编写能够高效执行深度学习算子的推理引擎,把中间表示转换成特定的文件格式,并在对应硬件平台上高效运行模型
模型部署示例
1、创建模型部署的虚拟环境
conda create -n modeldeploy python=3.8 -y
conda activate modeldeploy
2、安装模型部署需要用到的第三方库
conda install pytorch torchvision cpuonly -c pytorch
pip install onnxruntime onnx opencv-python
3、定义超分辨率SRCNN的pytorch模型,并对模型进行测试
"""
该代码来自: https://zhuanlan.zhihu.com/p/477743341
"""

import cv2
import numpy as np
import torch
import torch.nn as nn


class SuperResolutionNet(nn.Module):
    def __init__(self, upscale_factor):
        super().__init__()
        self.upscale_factor = upscale_factor
        self.img_upsampler = nn.Upsample(
            scale_factor=self.upscale_factor,
            mode='bicubic',
            align_corners=False)
        self.conv1 = nn.Conv2d(3,64,kernel_size=9,padding=4)
        self.conv2 = nn.Conv2d(64,32,kernel_size=1,padding=0)
        self.conv3 = nn.Conv2d(32,3,kernel_size=5,padding=2)
        self.relu = nn.ReLU()

    def forward(self, x):
        x = self.img_upsampler(x)
        out = self.relu(self.conv1(x))
        out = self.relu(self.conv2(out))
        out = self.conv3(out)
        return out


def init_torch_model():
    torch_model = SuperResolutionNet(upscale_factor=3)

    state_dict = torch.load('srcnn.pth')['state_dict']

    # Adapt the checkpoint
    for old_key in list(state_dict.keys()):
        new_key = '.'.join(old_key.split('.')[1:])
        state_dict[new_key] = state_dict.pop(old_key)

    torch_model.load_state_dict(state_dict)
    torch_model.eval()
    return torch_model

model = init_torch_model()
input_img = cv2.imread('face.png').astype(np.float32)
input_img = cv2.resize(input_img, [256, 256])

# HWC to NCHW
input_img = np.transpose(input_img, [2, 0, 1])
input_img = np.expand_dims(input_img, 0)

# Inference
torch_output = model(torch.from_numpy(input_img)).detach().numpy()

# NCHW to HWC
torch_output = np.squeeze(torch_output, 0)
torch_output = np.clip(torch_output, 0, 255)
torch_output = np.transpose(torch_output, [1, 2, 0]).astype(np.uint8)

# Show image
cv2.imwrite("face_torch.png", torch_output)
4、pth模型转onnx模型
# convert pth to onnx
x = torch.randn(1, 3, 256, 256)
with torch.no_grad():
    # opset_version为onnx算子集的版本, 版本越高, 支持的算子越多
    torch.onnx.export(model, x, "srcnn.onnx", opset_version=11,
                    input_names=['input'], output_names=['output'])
5、检验转换后的onnx模型文件是否正确
# verify
import onnx
onnx_model = onnx.load("srcnn.onnx")
try:
    onnx.checker.check_model(onnx_model)
except Exception:
    print("Model incorrect")
else:
    print("Model correct")


"""
================ Diagnostic Run torch.onnx.export version 2.0.1 ================
verbose: False, log level: Level.ERROR
======================= 0 NONE 0 NOTE 0 WARNING 0 ERROR ========================

Model correct
"""
6、利用onnxruntime推理引擎推理onnx模型
# inference
import onnxruntime
ort_session = onnxruntime.InferenceSession("srcnn.onnx")
ort_inputs = {'input': input_img}
ort_output = ort_session.run(['output'], ort_inputs)[0]
ort_output = np.squeeze(ort_output, 0)
ort_output = np.clip(ort_output, 0, 255)
ort_output = np.transpose(ort_output, [1, 2, 0]).astype(np.uint8)
cv2.imwrite("face_ort.png", ort_output)
print(torch.equal(torch.from_numpy(ort_output), torch.from_numpy(torch_output)))【参考文章】