目录
前言:
uiautomator2是基于Android平台的UI自动化测试框架,pytest是一种功能丰富的Python测试框架,而allure是一种用于生成漂亮测试报告的工具。结合使用这三个工具,您可以进行Android的UI自动化测试,并生成直观且可视化的测试报告。
本文主要讲解使用 uiautomator2+pytest+allure 进行 Android 的 UI 自动化测试,其实主要目的是写一些实战的脚本来更深入学习 pytest 框架.
另外也顺便介绍一下 uiautomator2 这款自动化框架,在使用上也是非常的顺畅.
之前我已经使用 appium+testng 写了一套自动化脚本了并且在公司实际使用了.这次就不用公司的 app 测试了,使用上家公司 58 同城的 app 进行自动化测试.
介绍
做 UI 自动化肯定需要选择一种适合的测试框架,比如 java 的 testng、python 的 unittest,主要目的是让代码的层级明确、简洁、复用性强,本次介绍下 python 的 pytest 框架.
pytest
pytest 官方:pytest: helps you write better programs — pytest documentation
The pytest framework makes it easy to write small tests, yet scales to support complex functional testing for applications and libraries.
官方的一段介绍,简单来说就是让写测试代码更容易并且没有那么多约束.当然这块不重点介绍 pytest 为什么好、怎么好,只需要记住 pytest 就是一个测试框架就够了.
uiautomator2
uiautomator2 是一个 Android UI 自动化框架,支持 Python 编写测试脚本对设备进行自动.底层基于 Google uiautomator,隶属于最近比较火热的 openatx 项目中.
下图是运行示意图:
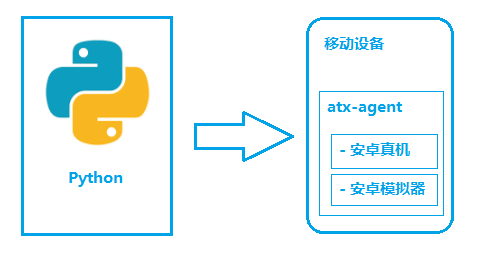
设备中需要安装 atx-agent 作为 uiautomator2 的服务端,解析收到的请求,并转化成 uiautomator2 的代码.总体看来交互过程没有那么繁琐,在实际使用上的确比 appium 快不少.
allure
allure 是一款测试报告,炫酷的页面加上多种数据统计,比 HTMLTestRunner 报告强百倍,当然也支持多语言.
环境搭建
使用 mac 电脑搭建环境
pytest
最新版本出到 4.0 了,但是实际使用 4.0 和 allure 有些不兼容.
所以推荐使用 3.7 版本的 pytest
pip install pytest==3.7
uiautomator2
uiautomator2 也是 python 的一个类库,用 pip 安装即可.
pip install uiautomator2
allure
brew install allure
pip install pytest-allure-adaptor
有了测试框架、自动化框架、测试报告,基本上就能 coding 了.
pytest 插件
pytest 插件可以实现失败重试、打印进度、指定顺序
pip install pytest-sugar # 打印进度

pip install pytest-rerunfailures # 失败重试

pip install pytest-ordering # 执行顺序
当然插件还有很多,这里就不一一介绍了.
实例
初始化 driver
做 UI 自动化都需要初始化一个 driver 对象,这个 driver 对象可以点击事件、滑动、双击等操作
uiautomator2 的初始化 driver 方式
相比 appium 配置很少,同时可以设置全局隐式等待元素时间
import uiautomator2  as ut2
def init_driver(self,device_name):
    '''
    初始化driver
    :return:driver
    '''
    try:
        logger.info(device_name)
        d = ut2.connect(device_name)
        #logger.info("设备信息:{}".format(d.info))
        # 设置全局寻找元素超时时间
        d.wait_timeout = wait_timeout  # default 20.0
        # 设置点击元素延迟时间
        d.click_post_delay = click_post_delay
        #d.service("uiautomator").stop()
        # 停止uiautomator 可能和atx agent冲突
        logger.info("连接设备:{}".format(device_name))
        return d
    except Exception as e:
        logger.info("初始化driver异常!{}".format(e))
fixture 机制
unittest 框架有 setup 和 teardown 方法,用来做初始化和结束测试操作.pytest 是用@pytest.fixture方法来实现 setup 和 teardown.
下面这段代码就是定义一个 driver_setup 方法,来初始化和结束.
# 当设置autouse为True时,
# 在一个session内的所有的test都会自动调用这个fixture
@pytest.fixture()
def driver_setup(request):
    logger.info("自动化测试开始!")
    request.instance.driver = Driver().init_driver(device_name)
    logger.info("driver初始化")
    request.instance.driver.app_start(pck_name, lanuch_activity, stop=True)
    time.sleep(lanuch_time)
    allow(request.instance.driver)
    def driver_teardown():
        logger.info("自动化测试结束!")
        request.instance.driver.app_stop(pck_name)
    request.addfinalizer(driver_teardown)
另外还有一种方式实现,可以理解为 setup 和 teardown 在一个方法内,通过 yield 关键字停顿.
@pytest.fixture()
def init(self,scope="class"):
    self.home = Home(self.driver)
    self.home.news_tab()
    self.news = News(self.driver)
    logger.info("初始化消息模块")
    yield self.news
    logger.info("结束消息模块")
yield 关键字是在 python 语法生成器和迭代器中使用,用来节省内存.
比如 for 循环一个大列表,一次性都循环出来非常浪费性能.
所以通过 yield 关键字来控制循环.
下面演示下 yield:
#!/usr/bin/env python
# -*- coding: utf-8 -*-

def yt():
    print "第一次打印"
    yield 0
    print("第二次打印")

if __name__ == '__main__':
    a = yt()
    print next(a)
    print next(a)
如果直接调用 yt 函数会发现啥也打印不出来,因为此时只是声明了 yt 函数并没有真正的使用.
使用 next 方法调用第一次,输入结果如下:
yield 在此时相当于 return 0,此时不会输出"第二次打印",会在这块停住.
第一次打印
0
使用 next 方法调用第二次,输入结果如下:
第二次打印
再来回顾下上面那个例子:
在 yield 之前完成了 setup 操作并且返回 self.news 对象
在 yied 之后完成了 teardown 操作
@pytest.fixture()
def init(self,scope="class"):
    self.home = Home(self.driver)
    self.home.news_tab()
    self.news = News(self.driver)
    logger.info("初始化消息模块")
    yield self.news
    logger.info("结束消息模块")
数据共享
在 pytest 中只需要写 conftest.py 类,可以实现数据共享,不需要 import 就能自动找到一些配置.
刚才讲到的初始化 driver_setup 函数,就可以定在 conftest.py 类中,此时这个函数是全局可以函数,在测试类中使用如下:
使用@pytest.mark.usefixtures 装饰器就能引用到 driver_setup 函数
@allure.feature("测试发布")
@pytest.mark.usefixtures('driver_setup')
class TestNews:

    @pytest.fixture(params=item)
    def item(self, request):
        return request.param
测试类
pytest 检测如果是 test 开头或者 test 结尾的类,都认为是可以执行测试类.
在测试类中写 test 开头的测试方法
@allure.story('测试首页搜索')
def test_home_search(self,init):
    init.home_search()
参数化
假设场景是首页搜索多个词,需要借助参数化来完成
使用@pytest.mark.parametrize
@pytest.mark.parametrize(('kewords'), [(u"司机"), (u"老师"), (u"公寓")])
def test_home_moresearch(self, init,kewords):
    init.home_more_search(kewords)
指定顺序
假设发布用例,需要先登录才可以.可以通过用例排序的方式先登录,再发布
使用@pytest.mark.run,odrer 从小到大优先执行
@pytest.mark.usefixtures('driver_setup')
@pytest.mark.run(order=1)
# 指定login先执行
class TestLogin:
运行指定级别
假设已经写了很多用例,有些用例是冒烟用例,可以指定级别运行.
使用@pytest.mark.P0
@allure.story('测试首页更多')
@pytest.mark.P0
def test_home_more(self, init):
    init.home_more()
命令行执行: pytest -v -m "P0", 会执行所有 P0 级别的用例
重试
这个时候需要借助 pytest-rerunfailures 插件,用法如下:
@pytest.mark.flaky(reruns=5, reruns_delay=2)
@allure.story('测试精选活动')
def test_news_good(self,init):
    init.news_good()
当然这种方法是指定某个 case 失败重试
还可以全局设置用户如下:
pytest --reruns 2 --reruns_delay 2
reruns:重试次数
reruns_delay:重试的间隔时间
hook 函数
在 conftest.py 文件中定义@pytest.hookimpl函数,这个函数可以 hook 住 pytest 运行的状况
@pytest.hookimpl(tryfirst=True, hookwrapper=True)
def pytest_runtest_makereport(item, call):
    '''
    hook pytest失败
    :param item:
    :param call:
    :return:
    '''
    # execute all other hooks to obtain the report object
    outcome = yield
    rep = outcome.get_result()
    # we only look at actual failing test calls, not setup/teardown
    if rep.when == "call" and rep.failed:
        mode = "a" if os.path.exists("failures") else "w"
        with open("failures", mode) as f:
            # let's also access a fixture for the fun of it
            if "tmpdir" in item.fixturenames:
                extra = " (%s)" % item.funcargs["tmpdir"]
            else:
                extra = ""
            f.write(rep.nodeid + extra + "\n")
从代码中可以看出可以获取失败情况的相关信息,当时有了失败信息就可以搞事情了,比如当用例失败的时候截图或者记录失败数量做数据统计.
断言
在跑用例的时候最后一步都会断言一下,比如断言元素是否存在等
def assert_exited(self, element):
    '''
    断言当前页面存在要查找的元素,存在则判断成功
    :param driver:
    :return:
    '''
    if self.find_elements(element):
        logger.info("断言{}元素存在,成功!".format(element))
        assert True
    else:
        logger.info("断言{}元素存在,失败!".format(element))
        assert False
还可以这样优化代码:
def assert_exited(self, element):
  '''
  断言当前页面存在要查找的元素,存在则判断成功
  :param driver:
  :return:
  '''
  assert self.find_elements(element) == True,"断言{}元素存在,失败!".format(element)
  logger.info("断言{}元素存在,成功!".format(element))
assert 失败后会跑出 AssertionError 和定义的文案
AssertionError: 断言xxxxx元素存在,失败!
运行
介绍下几种常用命令行运行
运行某个文件夹下的用例
运行某个文件下的所有用例
pytest android/testcase
运行某个方法
类文件地址::方法名
pytest test_home.py::test_home_more
或者使用-k 参数 + 方法名
pytest -k test_home_more
运行某个类
有的时候需要调试正个测试类中所有测试方法
直接跟上类文件地址
pytest test_home.py
运行 P0 级
pytest -v -m "P0"
运行非 P0 级
pytest -v -m "not P0"
main 方式
在 run.py 中写如下代码,这种方式相当于把命令行参数封装到脚本中.
pytest.main(["-s","--reruns=2", "android/testcase","--alluredir=data"])
报告
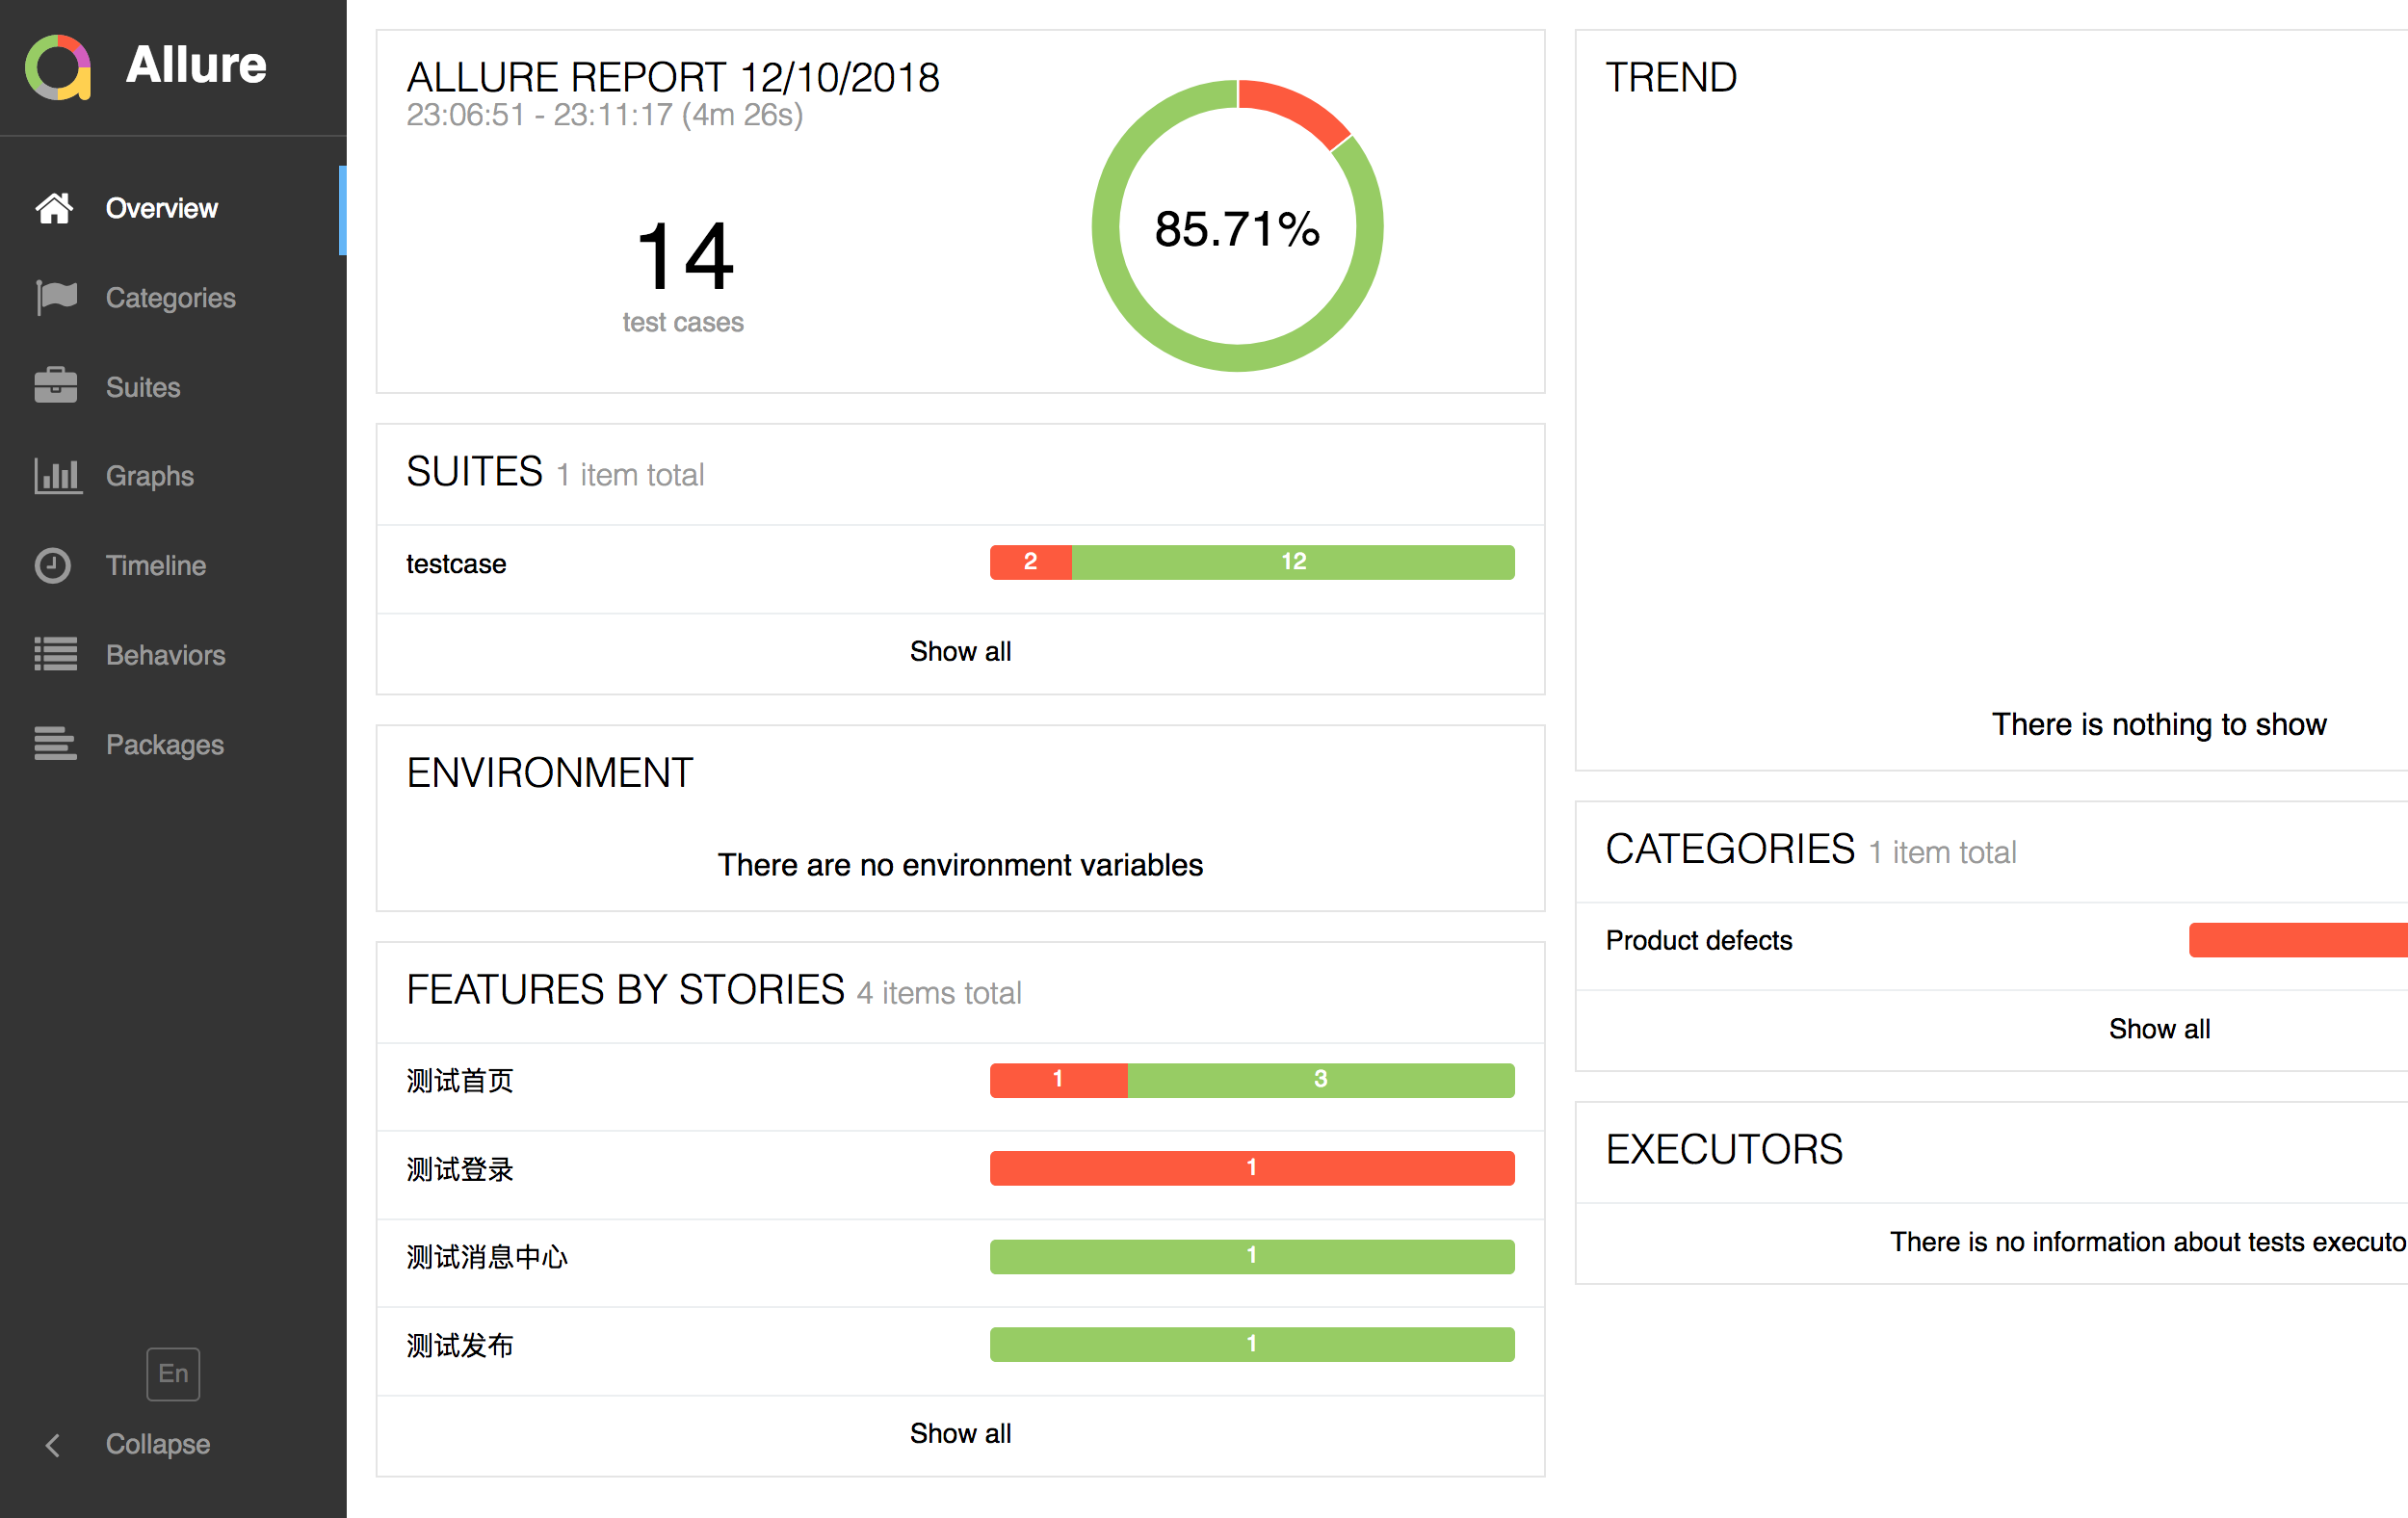
测试代码写完了,还差一个非常好看的报告.以前我们一般都用 HTMLTestRunner 报告,但是 HTMLTestRunner 报告功能比较单一并且也不支持失败截图.
偶然在社区中看到了 allure 的帖子,看了展示报告简直是吊炸天,先附一张跑完用例的截图.

另外可以在代码中设置报告层次,用法如下:
@allure.feature("测试首页")
@pytest.mark.usefixtures('driver_setup')
class TestHome:

    @pytest.fixture()
    def init(self,scope="class"):
        self.home = Home(self.driver)
        logger.info("初始化首页模块")
        yield self.home
        logger.info("结束首页模块")


    @allure.story('测试首页搜索')
    def test_home_search(self,init):
        init.home_search()
设置 allure.feature 和 allure.story,相当于上下级关系.
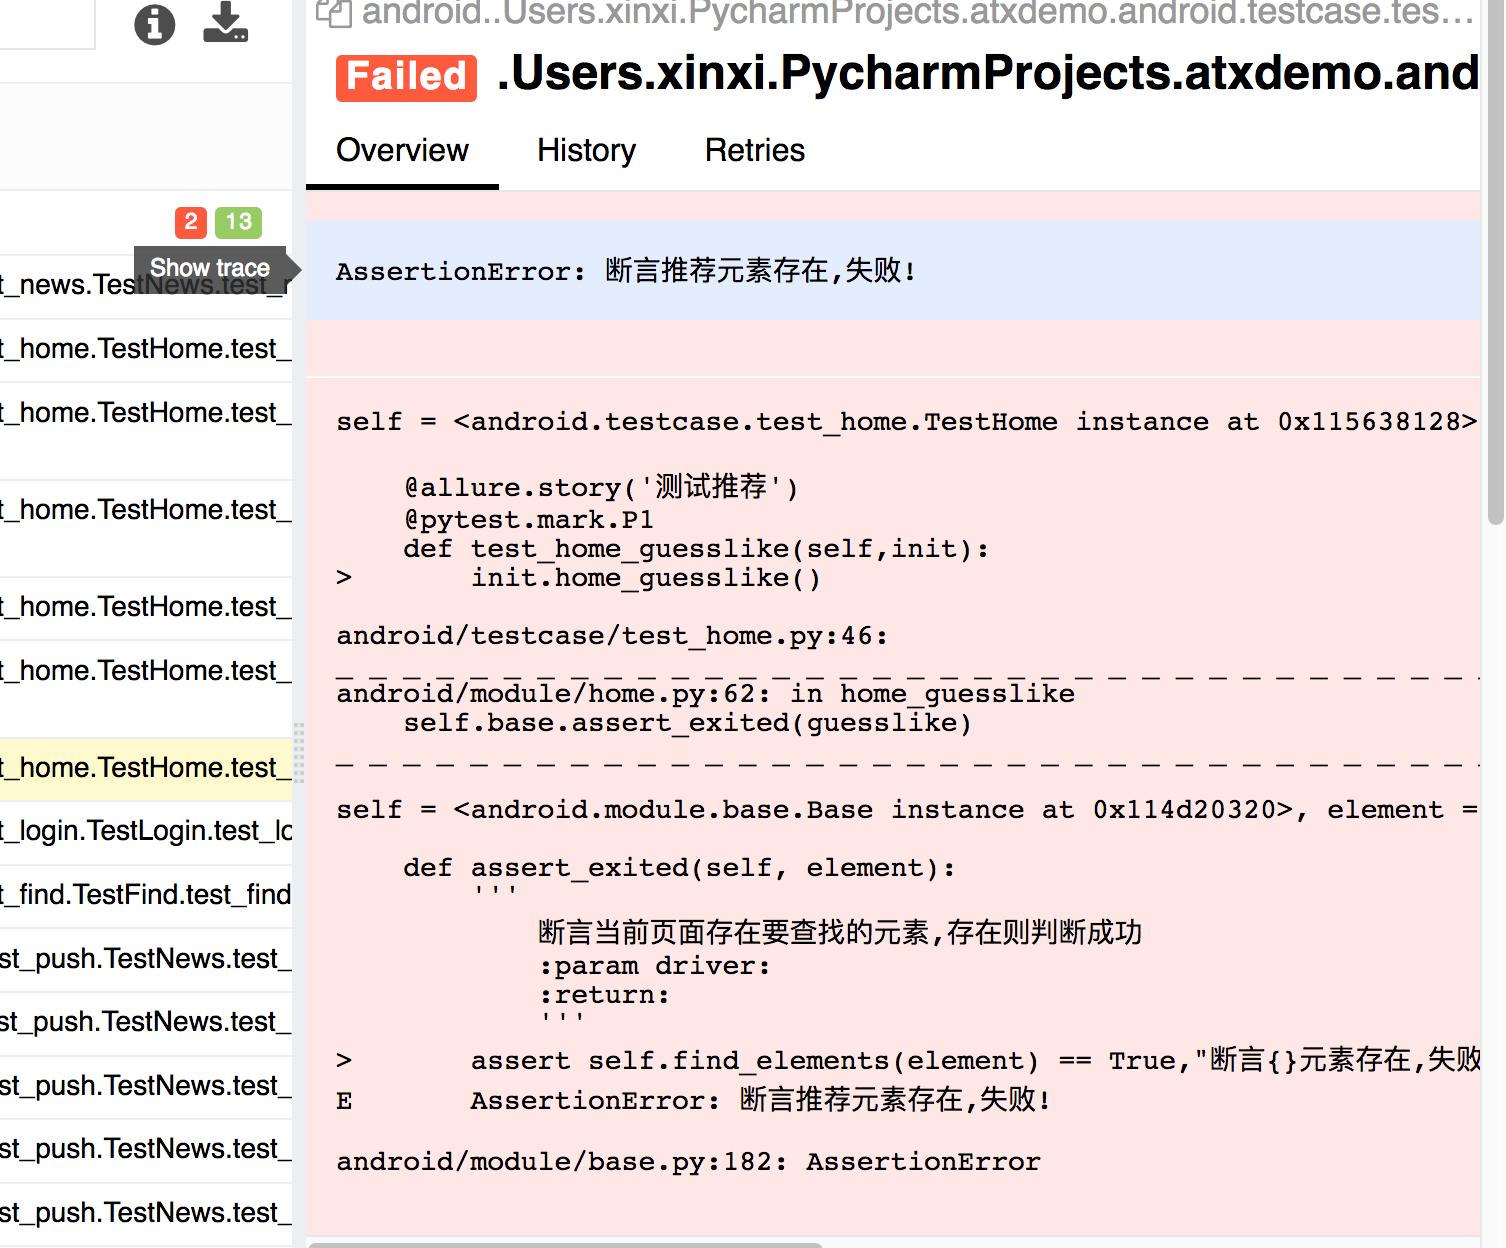
失败详情
点击失败用例就能看到失败的相关信息
失败截图
在跑自动化的过程已经遇到失败情况,需要一张截图描述当时的情况.
在上面提到@pytest.hookimpl函数中,最后调用截图方法,使用
allure.attach 把截图加上.
需要注意的是 attach 中的第二个参数是图片的二进制信息.
@pytest.hookimpl(tryfirst=True, hookwrapper=True)
def pytest_runtest_makereport(item, call):
    '''
    hook pytest失败
    :param item:
    :param call:
    :return:
    '''
    # execute all other hooks to obtain the report object
    outcome = yield
    rep = outcome.get_result()
    # we only look at actual failing test calls, not setup/teardown
    if rep.when == "call" and rep.failed:
        mode = "a" if os.path.exists("failures") else "w"
        with open("failures", mode) as f:
            # let's also access a fixture for the fun of it
            if "tmpdir" in item.fixturenames:
                extra = " (%s)" % item.funcargs["tmpdir"]
            else:
                extra = ""
            f.write(rep.nodeid + extra + "\n")
        pic_info = adb_screen_shot()
        with allure.step('添加失败截图...'):
            allure.attach("失败截图", pic_info, allure.attach_type.JPG)

uiautomator2 基本操作
启动服务
执行如下命令:
python -m uiautomator2 init
会在手机上安装 atx-agent.apk 并且会在手机上启动服务
2018-12-14 18:03:50,691 - __main__.py:327 - INFO - Detect pluged devices: [u'a3f8ca3a']
2018-12-14 18:03:50,693 - __main__.py:343 - INFO - Device(a3f8ca3a) initialing ...
2018-12-14 18:03:51,154 - __main__.py:133 - INFO - install minicap
2018-12-14 18:03:51,314 - __main__.py:140 - INFO - install minitouch
2018-12-14 18:03:51,743 - __main__.py:168 - INFO - apk(1.1.7) already installed, skip
2018-12-14 18:03:51,744 - __main__.py:350 - INFO - atx-agent is already running, force stop
2018-12-14 18:03:52,308 - __main__.py:213 - INFO - atx-agent(0.5.0) already installed, skip
2018-12-14 18:03:52,490 - __main__.py:254 - INFO - launch atx-agent daemon
2018-12-14 18:03:54,568 - __main__.py:273 - INFO - atx-agent version: 0.5.0
atx-agent output: 2018/12/14 18:03:52 [INFO][github.com/openatx/atx-agent] main.go:508: atx-agent listening on 192.168.129.93:7912
监听的是手机上的 ip+ 默认 7921.
事件
事件类型比如点击和滑动等,介绍几个常用的.
点击
根据 id、xpath、text 定位元素,和 appium 使用上差别不大.
self.d(resourceId=element).click()
self.d.xpath(element).click()
self.d(text=element).click()
滑动
前 4 个参数是坐标,time 是控制滑动时间
self.d.drag(self.width / 2, self.height * 3 / 4, self.width / 2, self.height / 4, time)
监听
这个用于首次启动 app 点击权限或者开屏幕广告
when 方法就相当于 if 判断,满足条件才会点击,可以生去一大堆逻辑代码.
driver.watcher("允许").when(text="允许").click(text="允许")
driver.watcher("跳过 >").when(text="跳过 >").click(text="跳过 >")
driver.watcher("不要啦").when(text="不要啦").click(text="不要啦")
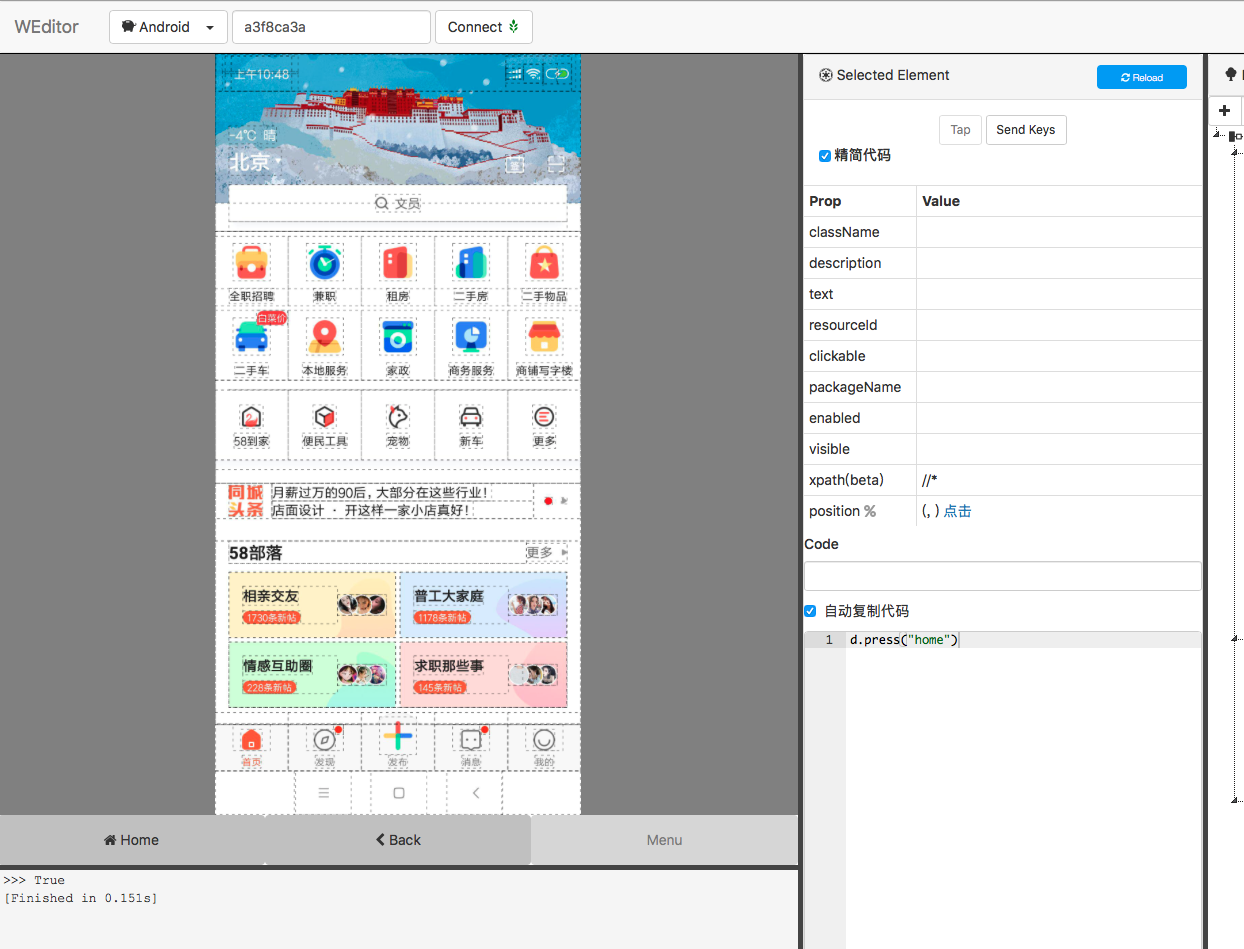
查看元素
安装
需要安装 weditor 库
pip install weditor
启动工具
python -m weditor
会在自动打开浏览器并且展示元素,相当于 web 版本的 uiautomatorviewer,使用起来比较方便.
无线运行
上边提到的手机 ip,有个这个手机 ip 就可以进行无线运行脚本
把 connect 中的方法替换成手机 ip 就可以了
# d = ut2.connect(device_name)
d = ut2.connect("192.168.129.93")
![]()
作为一位过来人也是希望大家少走一些弯路
在这里我给大家分享一些自动化测试前进之路的必须品,希望能对你带来帮助。
(软件测试相关资料,自动化测试相关资料,技术问题答疑等等)
相信能使你更好的进步!
点击下方小卡片