背景
待测Android项目源码:https://github.com/zhongchenyu/jokes
测试项目源码: https://github.com/zhongchenyu/jokes-appium
创建项目
先随便新建一个空的Android项目,然后在项目根目录下:右键-new-module,选择Java Library:

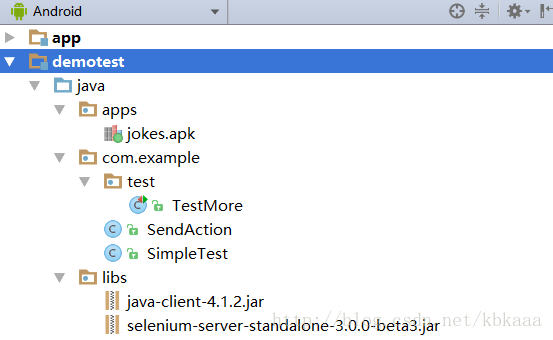
这里我们将Module命名为demotest,然后将待测应用的apk文件放到apps路径下,将java client和selenium server的库放到libs路径下,如图:
封装SimpleTest类
创建一个SimpleTest类,将测试时需要重复使用的代码放到这个类中。
配置Appium
public class SimpleTest {
protected AppiumDriver<AndroidElement> driver;

  @Before
  public void setUp() throws Exception {
    File classpathRoot = new File(System.getProperty("user.dir"));
    File appDir = new File(classpathRoot, "demotest/src/main/java/apps");
    File app = new File(appDir, "jokes.apk");
    DesiredCapabilities capabilities = new DesiredCapabilities();
    capabilities.setCapability("deviceName", "emulator-5554");
    capabilities.setCapability("platformVersion", "6.0");
    capabilities.setCapability("app", app.getAbsolutePath());
    capabilities.setCapability("appPackage", "chenyu.jokes");
    capabilities.setCapability("appActivity", ".feature.main.MainActivity");
    capabilities.setCapability("noReset", true);

    driver = new AndroidDriver<>(new URL("http://127.0.0.1:4723/wd/hub"), capabilities);
  }

  @After
  public void tearDown() throws Exception {
    driver.quit();
  }
初始化一个AppiumDriver,并在setUp函数中进行一系列配置,包括apk路径,包名,Android设备信息等。在tearDown函数中退出driver,否则会影响下次测试时连接服务器。
这里用到了Junit4的注解 @Before 和@After:
- @Before:初始化方法 ,每一个测试方法执行前运行一次
- @After:释放资源,每一个测试方法执行后都要运行一次
封装连续点击操作
protected void clickIfExitId(String id) {
    try {
      driver.findElementById(id).click();
    } catch (NoSuchElementException e) {
      System.out.println("Can not find element with id " + id + " . Skip!");
    }
  }

  protected void clickIfExitIds(String[] ids) {
    for (String id : ids) {
      clickIfExitId(id);
    }
  }
clickIfExitId函数,通过ID找到单个元素,并进行一次点击操作,如果元素不存在,则跳过此次操作。由于findElementById函数如果不能根据ID找不到相应的元素,则会直接抛出异常,因此将查找语句放到try{}中,并捕获NoSuchElementException 。
clickIfExitIds,则是输入ID的数组,再对每个ID分别执行clickIfExitId,实现连续点击的效果。
这两个函数主要用在准备操作,或者可有可无的操作上,操作失败也是直接跳过,不会导致用例fail。
封装连续点击和输入
  protected void sendWithId(SendAction action) {
    WebElement element = driver.findElementById(action.id);
    if (action.text == null || action.text.length() == 0) {
      element.click();
    } else {
      element.sendKeys(action.text);
    }
  }

  protected void sendWithIds(SendAction[] actions) {
    for (SendAction action : actions) {
      sendWithId(action);
    }
  }

  protected void sendWithIds(String[][] actions) {
    for (String[] action : actions) {
      sendWithId(new SendAction(action[0], action[1]));
    }
  }
sendWithId函数,输入参数为SendAction,这是我们单独定义的一个类:
public class SendAction {
  public String id;
  public String text;

  public SendAction(String id, String text) {
    this.id = id;
    this.text = text;
  }
}
SendAction包含两个String变量,一个是元素ID,一个是要输入的内容text,如果text为空,则代表仅点击。
sendWithId函数首先根据action中的id查找元素,再根据action的text作判断,如果text为空,则点击元素,如果action非空,则想元素输入字符串text。
这里没有使用try catch,因此查找失败时会抛出异常,用例执行失败,主要应用在用例需要关注的操作步骤中。
sendWithIds有两个多态函数,输入参数分别是SendAction的数组和String的二维数据,实现的效果都是一样的,都是将输入的action分解后依次执行sendWithId。
封装多个文字比较的断言
protected void assertTextWithIds(String[][] assertions) {
    for (String[] assertion : assertions) {
      if (assertion[1] == null || assertion[1].length() == 0) {
        Assert.assertNotNull(assertion[0], driver.findElementById(assertion[2]));
      } else {
        Assert.assertEquals(assertion[0], assertion[1],
            driver.findElementById(assertion[2]).getText());
      }
    }
  }
我们将单个断言的格式定义为一个长度为3的字符串数组,每个字符串分别代表message,预期文本,元素ID,如果预期文本为空,则只判断元素是否存在。
assertTextWithIds的输入为二维字符串数组,每一行代表一个断言,函数对每个断言依次判断。
编写用例代码
现在我们准备测试一下Jokes应用的登录功能。
操作步骤有:
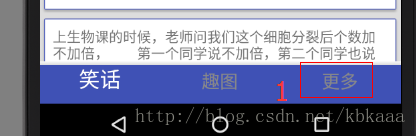
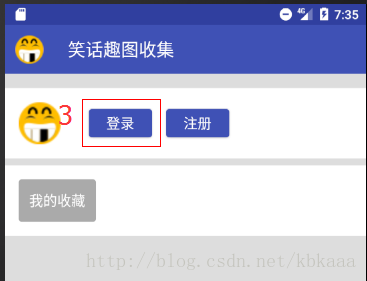
1: 点击底部导航“更多”标签
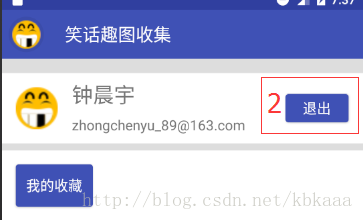
2:如果已经是登录状态,则点击“退出”按钮退出登录,否则跳过这一步
3: 点击“登录”按钮
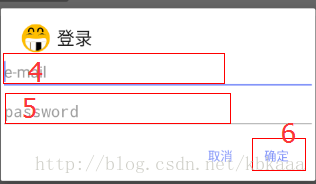
4-6:输入账号密码,点击“确定”按钮
登录成功后最后需要判断:
1:姓名正确获取
2:邮箱正确获取
3:出现退出按钮

上述操作和断言,转化成代码如下:
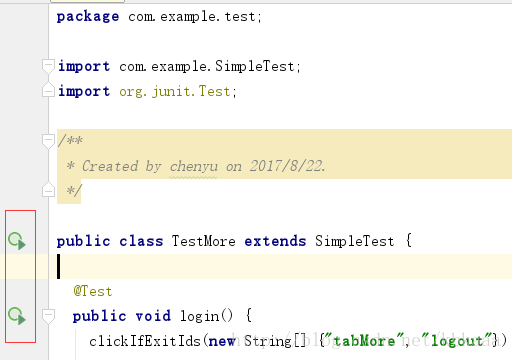
public class TestMore extends SimpleTest {

  @Test
  public void login() {
    clickIfExitIds(new String[] {"tabMore", "logout"});

    sendWithIds(new String[][] {
        {"login", ""},
        {"email", "[email protected]"},
        {"password", "654321"},
        {"android:id/button1", ""}
    });

    assertTextWithIds(new String[][] {
        {"Get name successfully", "钟晨宇", "name"},
        {"Get e-mail successfully", "[email protected]", "email"},
        {"Find quit button", "", "logout"}
    });

  }
}
clickIfExitIds用来处理点击更多和退出,因为点击更多不是本用例的关注点,点击退出并不是每次都需要操作,没有退出按钮是跳过即可。
sendWithIds则用来处理登录相关的一系列操作,这个过程中如果出现异常,用例也会fail。
assertTextWithIds用来处理文本比较的断言,这里用来判断登录成功后几个元素的文本是否符合预期。
执行用例
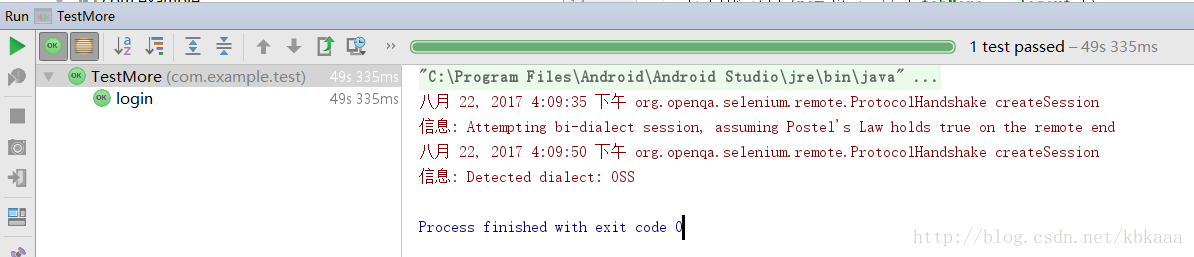
打开Appium和Android模拟器,点击Appium右上角运行图标
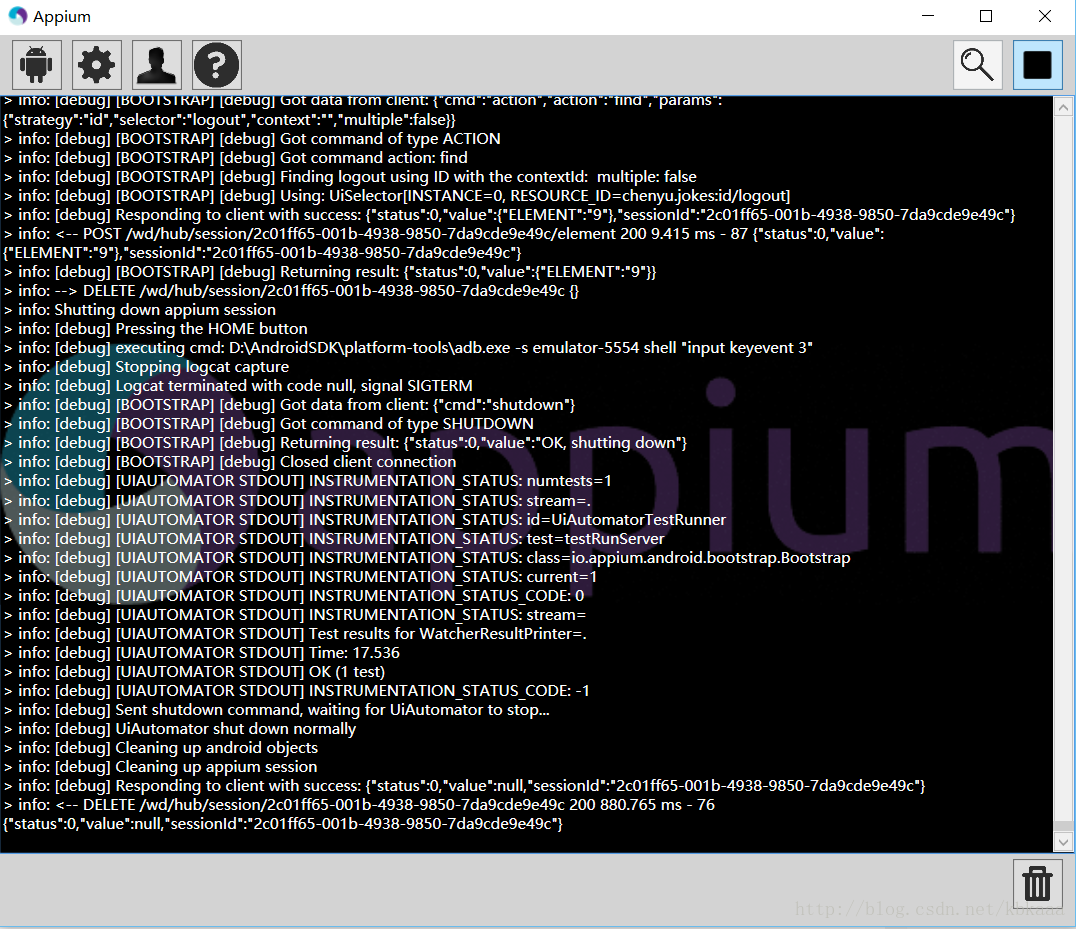
在Android Studio下运行用例文件,AS会自动识别Junit4的用例,点击运行
运行成功,测试通过: