错误示范
本人是参考以下链接配置了mmdection的环境,但是出现了问题。
参考链接:MMDetection-简介
问题是:

就是说显卡算力和pytorch版本不匹配。
要测试显卡算力与当前pytorch是否匹配,可以进入python命令行,依次输入如下两行代码:
import torch
torch.zeros(1).cuda()
解决方案是:
参考链接:nvidia显卡和CUDA版本关系
摘取主要内容如下
With versions 11.0 of the CUDA Toolkit, nvcc can generate cubin native to the NVIDIA Ampere GPU architecture (compute capability 8.0).
CUDA11.0最高支持算力8.0(注:这感觉应该是8.x)
综上可知,cuda应该采用11.0以上的版本,但是又不需采用最高版本的cuda,这里我选用了11.3版本的cuda
正确示范
1.根据显卡的算力,找到符合显卡算力的cuda版本,方法见上文
我的显卡是3080 Ti ,算力8.6,需要11.0以上版本的cuda,我选择了11.3
2.下载mmrotate
网址:https://github.com/open-mmlab/mmdetection.git
进入目录下
git clone https://github.com/open-mmlab/mmdetection.git
cd mmdetection
3.创建虚拟环境并激活
conda create -n mmdetection python=3.7 -y
conda activate mmdetection
4.下载 torch和torchvision
首先确定cuda版本,然后到以下网址确定对应的torch和torchvision版本
https://pytorch.org/get-started/previous-versions/
我选用的以下版本,即torch=1.10.0,torchvision==0.11.0
conda install pytorch==1.10.0 torchvision==0.11.0 torchaudio==0.10.0 cudatoolkit=11.3 -c pytorch -c conda-forge
如果下载现在过慢,可以选择手动下载
我这里选择本地下载,根据cuda,torch,torchvision,python版本,到以下网址选择对应版本的.whl文件
https://download.pytorch.org/whl/torch_stable.html
这是我最终下载的版本

然后进入.whl路径,依次pip install torch和torchvision
5.安装 mmcv_full
mmcv的版本要跟cuda,torch的版本对应
pip install mmcv-full -f https://download.openmmlab.com/mmcv/dist/{cu_version}/{torch_version}/index.html
以下是我的安装指令
pip install mmcv-full -f https://download.openmmlab.com/mmcv/dist/cu113/torch1.10.0/index.html
也可以到网页中自己选择对应版本的.whl进行手动安装,注意,最低版本不得低于1.5.3
6.安装 mmdetection
pip install -r requirements/build.txt
pip install -v -e .
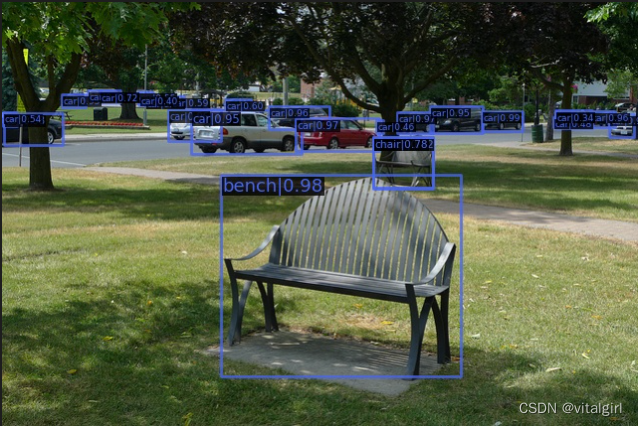
测试
提前新建checkpoints文件夹,在configs文件下对应的算法下面的readme找对应的权重
在mmdetection路径下,执行以下指令
python demo/image_demo.py demo/demo.jpg configs/faster_rcnn/faster_rcnn_r50_fpn_1x_coco.py checkpoints/faster_rcnn_r50_fpn_1x_coco_20200130-047c8118.pth --out-file result2.jpg