目录
效果:

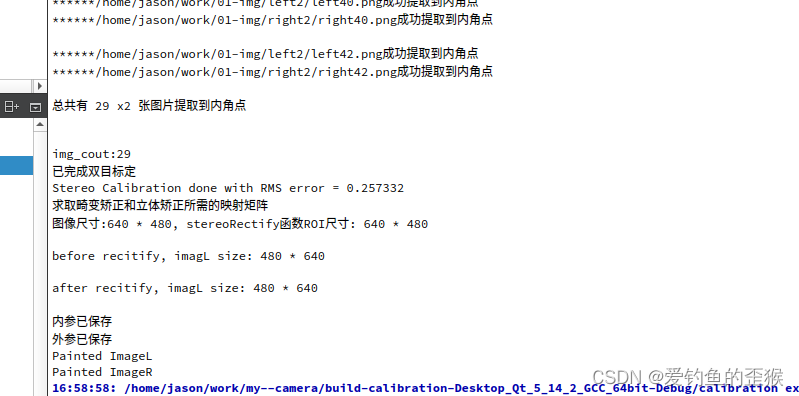
1、立体矫正不改变图像尺寸
左右相机图像立体矫正后,图像尺寸为变化,但是图像像素的位置会发生变化,如双目标定输出信息图:
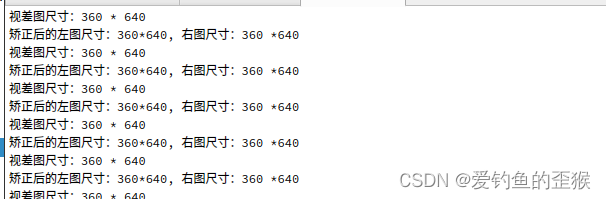
2、视差图尺寸与原图尺寸一致
运用SGBM算法得到的视差图,其尺寸与立体矫正后的图像尺寸不一致,如获取深度图代码信息输出图
基于以上两个结果,可以用立体矫正后的图像,作为YOLOv8的输入图像。用 目标的中心点坐标即可去深度图索取深度信息。
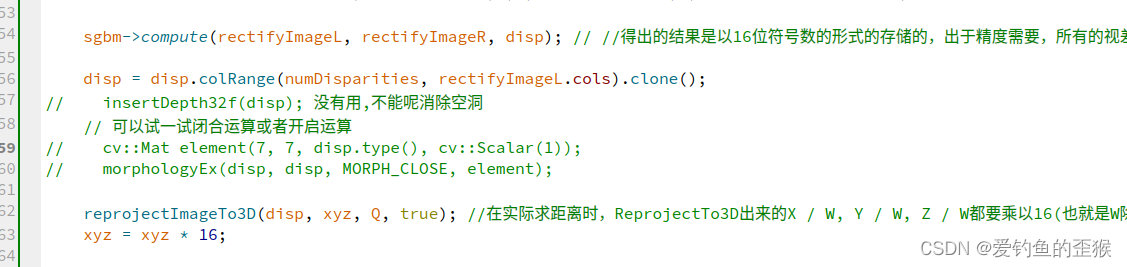
3、视差图、深度信息图
视差图由SGBM算法获得,深度信息图由reproJectImageTo3D()函数获得
4、几个重要的函数
createTracker()
函数 原型:
int createTrackbar(const String& trackbarname, const String& winname,
                              int* value, int count,
                              TrackbarCallback onChange = 0,
                              void* userdata = 0);
参数1:轨迹条名字
参数2:窗口名字
参数3:滑块初始位置
参数4:表示滑块达到最大位置的值
参数5:默认值为0,指向回调函数
参数6:默认值为0,用户传给回调函数的数据值
这里用这个函数来调节SFBM算法的参数:
5、代码
main.cpp
#include <iostream>
#include <opencv2/opencv.hpp>
#include "detect.h"
#include <sys/time.h>
#include <vector>
using namespace std;
using namespace cv;
using namespace cv::dnn;
// 双目摄像机内参
Mat cameraMatrix_L,cameraMatrix_R;
Mat discoeff_L, discoeff_R;
// 双目摄像机外参
Mat R, T;
// 立体校正用
Mat Rl, Rr, Pl, Pr, Q;
Mat mapLx, mapLy, mapRx, mapRy;
Rect validROIL, validROIR;
// 图像
Mat rgbImageL, grayImageL;
Mat rgbImageR, grayImageR;
Mat grayRectifyL, grayRectifyR;
Mat rgbRectifyL,rgbRectifyR;
// 图像尺寸
const int imageWidth = 1280/2;
const int imageheight = 480;
Size imageSize = Size(imageWidth, imageheight);
Mat xyz; //三维坐标(包含深度信息)
Mat disp; // 视差图
Mat disp8; //CV_8UC3视差图
Point origin; //鼠标按下的起始点
Rect selection; //定义矩形选框
bool selectObject = false; //是否选择对象
int blockSize = 0, uniquenessRatio =0, numDisparities=0;
int P1; /* 控制视差平滑度的第一个参数,8*number_of_image_channels*blockSize*blockSize */
int P2;/*第二个参数控制视差平滑度,32*number_of_image_channels*blockSize*blockSize*/
cv::Ptr<cv::StereoSGBM> sgbm = cv::StereoSGBM::create();
// 设置相机内外参数文件路径
void setParameterPath(string path)
{
string parameterPath1 = path + "intrisics.yml";
FileStorage fs(parameterPath1, FileStorage::READ);
if(fs.isOpened())
{
fs["cameraMatrixL"] >> cameraMatrix_L;
fs["cameradistCoeffsL"] >> discoeff_L;
fs["cameraMatrixR"] >> cameraMatrix_R;
fs["cameradistCoeffsR"] >> discoeff_R;
fs.release();
cout<<"*****左右摄像机 内参 已读取"<<endl;
}
else
{
cout << "******" << parameterPath1
<< " can not open" << endl;
}
string parameterPath2 = path + "extrinsics.yml";
fs.open(parameterPath2, FileStorage::READ);
if(fs.isOpened())
{
fs["R"] >> R;
fs["T"] >> T;
fs["Rl"] >> Rl;
fs["Rr"] >> Rr;
fs["Pl"] >> Pl;
fs["Pr"] >> Pr;
fs["Q"] >> Q;
fs["mapLx"] >> mapLx;
fs["mapLy"] >> mapLy;
fs["mapRx"] >> mapRx;
fs["mapRy"] >> mapRy;
fs["validROIL"] >> validROIL;
fs["validROIR"] >> validROIR;
fs.release();
cout<<"*****左右摄像机 外参 已读取"<<endl<<endl<<endl;
}
else
{
cout << "******" << parameterPath2
<< " can not open" << endl;
}
}
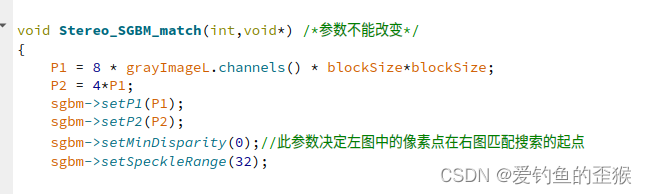
void Stereo_SGBM_match(int,void*) /*参数不能改变*/
{
P1 = 8 * grayImageL.channels() * blockSize*blockSize;
P2 = 4*P1;
sgbm->setP1(P1);
sgbm->setP2(P2);
sgbm->setMinDisparity(0);//此参数决定左图中的像素点在右图匹配搜索的起点
sgbm->setSpeckleRange(32);
// 下面6个参数用按钮来调节
sgbm->setNumDisparities(numDisparities*16+16); // 必须能被16整除; 视差搜索范围
sgbm->setBlockSize(blockSize); // > = 1的奇数 3~21
sgbm->setDisp12MaxDiff(1); //左右一致性检测最大容许误差阈值
sgbm->setPreFilterCap(63);
sgbm->setUniquenessRatio(10); // 5~15
sgbm->setSpeckleWindowSize(100); // 50~200
// 对左右视图的左边进行边界延拓,以获取与原始视图相同大小的有效视差区域
/* 加大numDisparities值,深度图左边会变黑,但是整图尺寸变大!很有效哦*/
/*https://blog.csdn.net/u011574296/article/details/87546622*/
copyMakeBorder(grayRectifyL,grayRectifyL,0,0,numDisparities,0,cv::BORDER_REPLICATE);
copyMakeBorder(grayRectifyR,grayRectifyR,0,0,numDisparities,0,cv::BORDER_REPLICATE);
sgbm->compute(grayRectifyL, grayRectifyR, disp); // //得出的结果是以16位符号数的形式的存储的,出于精度需要,所有的视差在输出时都扩大了16倍(2^4)
disp = disp.colRange(numDisparities, grayRectifyL.cols).clone();
// 视觉差图-> 深度图
reprojectImageTo3D(disp, xyz, Q, true); //在实际求距离时,ReprojectTo3D出来的X / W, Y / W, Z / W都要乘以16(也就是W除以16),才能得到正确的三维坐标信息。
xyz = xyz * 16;
// 转格式
disp.convertTo(disp8, CV_8U, 255 / ((numDisparities * 16 + 16)*16.));//计算出的视差是CV_16S格式,
imshow("disparity", disp8);
applyColorMap(disp8, disp8, COLORMAP_RAINBOW);
imshow("color", disp8);
}
int main(){
// 读取模型
string detect_model_path = "/home/jason/PycharmProjects/pytorch_learn/yolo/ultralytics-main-yolov8/yolov8n.onnx";
Yolov8Onnx yolov8;
if (yolov8.ReadModel(detect_model_path))
cout << "read Net ok!\n";
else {
return -1;
}
//生成随机颜色;每个类别都有自己的颜色
vector<Scalar> color;
srand((time(0)));
for (int i=0; i<80; i++){
int b = rand() % 256; //随机数为0~255
int g = rand() % 256;
int r = rand() % 256;
color.push_back(Scalar(b,g,r));
}
// 读取相机内外参数/
setParameterPath("/home/jason/work/my--camera/calibration/");
// 相机尺寸设置
VideoCapture capture(0);
capture.set(CAP_PROP_FRAME_WIDTH, imageWidth*2);
capture.set(CAP_PROP_FRAME_HEIGHT, imageheight);
capture.set(CAP_PROP_FPS, 30);
//在double-camera && YOLOv8窗口提供 调节SGBM算法 窗口按钮
namedWindow("double-camera && YOLOv8", cv::WINDOW_AUTOSIZE);
createTrackbar("NumDisparities:\n", "double-camera && YOLOv8", &numDisparities, 16, Stereo_SGBM_match);
createTrackbar("BlockSize:\n", "double-camera && YOLOv8",&blockSize, 8, Stereo_SGBM_match);
Mat frame;
struct timeval t1, t2;
double timeuse;
while (1) {
//
capture>>frame;
// 左相机图、右边相机图
rgbImageL = frame(Rect(Point(0,0), Point(imageWidth, imageheight))).clone();
rgbImageR = frame(Rect(Point(imageWidth, 0), Point(imageWidth*2, imageheight))).clone();
// printf("left camera:%d * %d right camre:%d * %d\n\n",
// rgbImageL.rows, rgbImageL.cols, rgbImageR.rows, rgbImageR.cols);
// 转灰度,用于SGBM
cvtColor(rgbImageL, grayImageL, COLOR_BGR2GRAY);
cvtColor(rgbImageR, grayImageR, COLOR_BGR2GRAY);
imshow("before Rectify", frame);
//remap之后,左右相机的图像已经共面并行对准了
// 用于SGBM
remap(grayImageL, grayRectifyL, mapLx, mapLy, INTER_LINEAR);
remap(grayImageR, grayRectifyR, mapRx, mapRy, INTER_LINEAR);
// printf("rectify grayLeft :%d * %d rectify grayRight:%d * %d\n\n",
// grayRectifyL.rows, grayRectifyL.cols, grayRectifyR.rows, grayRectifyR.cols);
// SGBM算法计算视差图,获得深度图
Stereo_SGBM_match(0,0);
// 左右相机图像,用读取的映射矩阵进行畸变矫正、立体矫正 用于YOLOv8
remap(rgbImageL,rgbRectifyL, mapLx, mapLy, INTER_LINEAR);
remap(rgbImageR, rgbRectifyR, mapRx, mapRy, INTER_LINEAR);
// printf("rectify left :%d * %d rectify right:%d * %d\n\n",
// rgbRectifyL.rows, rgbRectifyL.cols, rgbRectifyR.rows, rgbRectifyR.cols);
imshow("rectify L", rgbRectifyL);
imshow("rectify R",rgbRectifyR);
//rgbRectifyL rgbRectifyR显示在同一张图上,如果你的标定没问题,会行对准
Mat canvas = Mat::zeros(imageheight, imageWidth*2, CV_8UC3);
Rect l = Rect(0, 0, imageWidth, imageheight);
Rect r = Rect(imageWidth, 0, imageWidth, imageheight);
rgbRectifyL.copyTo(canvas(l));//左图像画到画布上
rgbRectifyR.copyTo(canvas(r));//右图像画到画布上
for (int i=0; i<canvas.rows; i+=50)
{
Point pt1 = Point(0,i);
Point pt2 = Point(canvas.cols, i);
line(canvas, pt1, pt2, Scalar(0, 255, 0), 1, 8);
}
imshow("after rectify",canvas);
// YOLOv8检测
vector<OutputDet> result;
gettimeofday(&t1, NULL);
bool find = yolov8.OnnxDetect(rgbRectifyL, result);
gettimeofday(&t2, NULL);
vector<string> ObejctDepthInfo;
if(find)
{
// 目标中心点深度信息
for(size_t i=0; i<result.size(); i++){
int centerX = result[i].box.x + result[i].box.width/2;
int centerY = result[i].box.y + result[i].box.height/2;
Point center = Point(centerX, centerY);
float depth = xyz.at<Vec3f>(center)[0];
string depthInfo = to_string(depth);
cout << depthInfo << "\n";
ObejctDepthInfo.push_back(depthInfo);
}
// 画框
DrawPred(rgbRectifyL, result, yolov8._className, color,ObejctDepthInfo);
}
else {
cout << "Don't find !\n";
}
// 打印检测耗时
timeuse = (t2.tv_sec - t1.tv_sec) +
(double)(t2.tv_usec -t1.tv_usec)/1000000; //s
string label = "duration:" + to_string(timeuse*1000); // ms
putText(rgbRectifyL, label, Point(30,30), FONT_HERSHEY_SIMPLEX,
0.5, Scalar(0,0,255), 2, 8);
//左相机图与disp8组合在一起
Mat combination = Mat::zeros(imageheight, imageWidth*2, CV_8UC3);
Rect L = Rect(0, 0, imageWidth, imageheight);
Rect R = Rect(imageWidth, 0, imageWidth, imageheight);
rgbRectifyL.copyTo(combination(L));//左图像画到画布上
disp8.copyTo(combination(R));//右图像画到画布上
imshow("double-camera && YOLOv8", combination);
if (waitKey(1)=='q') break;
}
return 0;
}
utils.cpp
YOLOv8 ONNX RUNTIME 部署代码中的utils.cpp中有一个函数需要作修改
void DrawPred(cv::Mat& img, std::vector<OutputDet> result,
              std::vector<std::string> classNames,
              std::vector<cv::Scalar> color,
              std::vector<std::string> ObejectdepthInfo)
{
    for (size_t i=0; i<result.size(); i++){
        int  left,top;
        left = result[i].box.x;
        top = result[i].box.y;

        // 框出目标
        rectangle(img, result[i].box,color[result[i].id], 2, 8);

        // 在目标框左上角标识目标类别以及概率
        string depth;
        if (ObejectdepthInfo.size() > 0){
            depth  = ObejectdepthInfo[i];
        }
        else {
            depth  = "false";

        }
        string label = classNames[result[i].id] + ":" + to_string(result[i].confidence) + "  depth:"+depth;
        int baseLine;
        Size labelSize = getTextSize(label, FONT_HERSHEY_SIMPLEX, 0.5, 1, &baseLine);
        top = max(top, labelSize.height);
        putText(img, label, Point(left, top), FONT_HERSHEY_SIMPLEX, 0.5, color[result[i].id], 2);
    }
}参考:opencv中createTrackbar()函数用法总结(06)_opencv createtrackbar 输入多行的字符串_洛克家族的博客-CSDN博客