为了获取VINS 配置文件中的相关参数,也为了双目相机及IMU传感器实际输出数据更准确,对ZED2的相机进行标定,包括相机标定、IMU标定及联合标定。
一 安装标定工具
1、使用kalibr工具标定ZED2双目相机。
2、用imu_utils标定IMU,依次安装编译code_utils、imu_utils。
这一部分之前已经安装过,具体过程参考博客:https://blog.csdn.net/xiaojinger_123/article/details/120849737?spm=1001.2014.3001.5501
但由于系统从ubuntu18.04变成20.04,注意系统依赖问题,根据相应版本修改。
1 下载编译kalibr
sudo apt update
sudo apt-get install python3-setuptools python3-rosinstall ipython3 libeigen3-dev libboost-all-dev doxygen libopencv-dev ros-noetic-vision-opencv ros-noetic-image-transport-plugins ros-noetic-cmake-modules python3-software-properties software-properties-common libpoco-dev python3-matplotlib python3-scipy python3-git python3-pip libtbb-dev libblas-dev liblapack-dev libv4l-dev python3-catkin-tools python3-igraph libsuitesparse-dev
pip3 install wxPython
sudo pip3 install python-igraph --upgrade
mkdir ~/kalibr_ws/src
cd ~/kalibr_ws/src
git clone --recursive https://github.com/ori-drs/kalibr

cd ~/kalibr_ws
source /opt/ros/noetic/setup.bash
catkin init
catkin config --extend /opt/ros/noetic
catkin config --merge-devel # Necessary for catkin_tools >= 0.4.
catkin config --cmake-args -DCMAKE_BUILD_TYPE=Release

catkin build -DCMAKE_BUILD_TYPE=Release -j4
2 下载编译code_utils、imu_utils
1)报错Could not find a package configuration file provided by “Ceres“
解决:安装cereshttps://blog.csdn.net/weixin_48083022/article/details/118282363
2)ceres 编译报错 error: ‘integer_sequence’ is not a member of ‘std’
在编译一些用到ceres的项目的时候会报错 error: ‘integer_sequence’ is not a member of ‘std’,这是因为较新版本中的ceres对c++版本有要求
在报错的项目的CMakeList里的
set(CMAKE_CXX_FLAGS “-std=c++11”)
改成
set(CMAKE_CXX_STANDARD 14)
其他问题参考:https://github.com/gaowenliang/imu_utils/issues/32
二 选择标定板
关于标定板的选择,checkerboard和aprilgrid这两种是比较常用的。(相机需要距离标定板1-2m,标定板占据视野60%以上)。由于Aprilgrid能提供序号信息,能够防止姿态计算时出现跳跃的情况。所以建议采用Aprilgrid进行标定
注意:标定过程中,标定板不要离开相机视野范围,开始和结束要平稳进行,尽量使标定板出现在视野所有角落。
checkerboard:
targetCols、targetRows数的是内角点数目
target_type: 'checkerboard' #gridtype
targetCols: 6               #number of internal chessboard corners
targetRows: 8               #number of internal chessboard corners
rowSpacingMeters: 0.17      #size of one chessboard square [m]
colSpacingMeters: 0.17      #size of one chessboard square [m]
aprilgrid:
tagSpacing=小方格边长/大方格边长
target_type: 'aprilgrid' #gridtype
tagCols: 6               #number of apriltags
tagRows: 6               #number of apriltags
tagSize: 0.088           #size of apriltag, edge to edge [m]
tagSpacing: 0.3          #ratio of space between tags to tagSize
标定板下载:https://github.com/ethz-asl/kalibr/wiki/downloads#calibration-targets
三 ZED2标定数据录制
目前ZED2的分辨率,在ZED2_WS/src/zed-ros-wrapper/zed_wrapper/params文件夹下找到common.yaml,resolution为3,即VGA模式,实际分辨率大小为672*376.
启动ZED2的ROS节点:
roscore
roslaunch zed_wrapper zed2.launch
查看topic,开启可视化图像,确保标定板处于左右目图像中:
rostopic list
rosrun image_view image_view image:=/zed2/zed_node/left/image_rect_color
rosrun image_view image_view image:=/zed2/zed_node/right/image_rect_color
1)报错:Command ‘rosrun’ not found
解决:sudo apt install ros-noetic-rosbash
2)报错:[rospack] Error: package ‘image_view’ not found
解决:sudo apt-get install ros-noetic-image-view
因为zed相机通常以60Hz左右的频率进行录制,而kalibr标定又要求频率不能过高,推荐为4HZ,因此要降低原话题发布频率(标定的图像过多,导致计算量太大),参考降低图像数据到4Hz,(部分博客推荐20HZ,均可,处理时间较长),IMU数据至200Hz,ros的做法是先订阅,然后重新发布。
这里有一个降帧的命令
rosrun topic_tools throttle messages old_topic 4.0 new_topic//kalibr推荐的帧率为4HZ
这里还有一点,就是zed相机里有几个话题和原始图像对应,比如:
/zed2/zed_node/left/image_rect_color,这个话题也可以使用:分辨率没有发生变化,但是是对原始图像进行边缘裁剪后拉伸,这可能会导致丢失信息。
降低图像频率,查看当前频率:
rosrun topic_tools throttle messages /zed2/zed_node/imu/data_raw  200 /zed2/zed_node/imu/data_raw2
rosrun topic_tools throttle messages /zed2/zed_node/left/image_rect_color 4.0 /zed2/zed_node/left/image_rect_color2
rosrun topic_tools throttle messages /zed2/zed_node/right/image_rect_color 4.0 /zed2/zed_node/right/image_rect_color2

rostopic hz /zed2/zed_node/left/image_rect_color2
rostopic hz /zed2/zed_node/right/image_rect_color2
开始录制标定bag文件,参考Youtube视频:https://youtu.be/puNXsnrYWTY?t=57:
注意:录制过程保证标定板不会超出画面,录制的时候尽量保证图像清晰,不要剧烈移动,同时尽可能的激活IMU各个角度,各个方向。
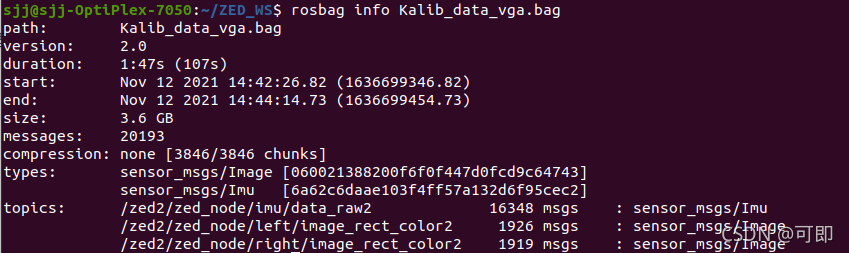
rosbag record -O Kalib_data_vga.bag /zed2/zed_node/imu/data_raw2 /zed2/zed_node/left/image_rect_color2 /zed2/zed_node/right/image_rect_color2
录制结束后会得到一个Kalib_data_vga.bag文件。
查看记录的数据
四 开始相机标定
这里使用的是Aprilgrid标定板,对应的april.yaml(april_6x6_80x80cm.yaml)中我的参数是文件内容为:
target_type: 'aprilgrid' #gridtype
tagCols: 6               #number of apriltags
tagRows: 6               #number of apriltags
tagSize: 0.021           #size of apriltag, edge to edge [m]
tagSpacing: 0.285714          #ratio of space between tags to tagSize
在kalibr文件夹下,执行标定,其中的april.yaml表示同标定板一起下下来的参数文件。
单目标定:
source ~/kalibr_workspace/devel/setup.bash
rosrun kalibr kalibr_calibrate_cameras --bag Kalib_data_vga.bag --topics /zed2/zed_node/left/image_rect_color2 --models pinhole-radtan --target april.yaml
在执行单目标定、单目+IMU联合表定时会报错如下:
Cameras are not connected through mutual observations, please check the dataset. Maybe adjust the approx. sync. tolerance.
Traceback (most recent call last):
  File "/home/ipsg/tool/kalibr_ws/devel/bin/kalibr_calibrate_cameras", line 15, in <module>
    exec(compile(fh.read(), python_script, 'exec'), context)
  File "/home/ipsg/tool/kalibr_ws/src/aslam_offline_calibration/kalibr/python/kalibr_calibrate_cameras", line 447, in <module>
    main()
  File "/home/ipsg/tool/kalibr_ws/src/aslam_offline_calibration/kalibr/python/kalibr_calibrate_cameras", line 204, in main
    graph.plotGraph()
  File "/home/ipsg/tool/kalibr_ws/src/aslam_offline_calibration/kalibr/python/kalibr_camera_calibration/MulticamGraph.py", line 311, in plotGraph
    edge_label=self.G.es["weight"],
KeyError: 'Attribute does not exist'
解决办法:
找到工作空间下src/Kalibr/aslam_offline_calibration/kalibr/python/kalibr_calibrate_cameras中的如下代码,然后注释掉(201行)
if not graph.isGraphConnected():
    obsdb.printTable()
    print "Cameras are not connected through mutual observations, please check the dataset. Maybe adjust the approx. sync. tolerance."
    graph.plotGraph()
    sys.exit(-1)
注释掉之后便可以得出标定结果。
双目标定:
source ~/kalibr_workspace/devel/setup.bash
rosrun kalibr kalibr_calibrate_cameras --bag Kalib_data_vga.bag --topics /zed2/zed_node/left/image_rect_color2 /zed2/zed_node/right/image_rect_color2 --models pinhole-radtan pinhole-radtan --target april.yaml
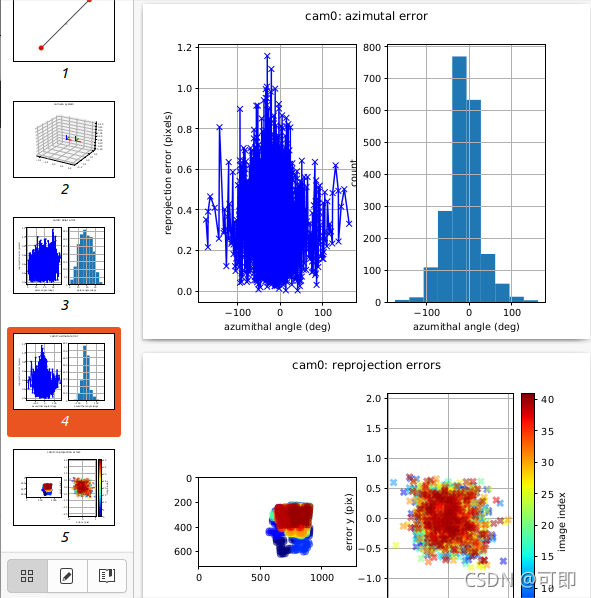
可添加–show-extraction,在标定过程中可以可视化角点检测情况是否良好,发现角点重投影出现严重错误; --approx-sync 0.04,其中0.04可以看情况调整到0.1,作用是使各个摄像头数据同步。
–bag-from-to 参数,如果数据集开始和最后有抬起相机的动作,请加上这个参数,去除这部分的数据。抬起放下的动作会对标定有一定影响。没有可不加。
报错1):
[FATAL] [1636711641.843028]: No corners could be extracted for camera /zed2/zed_node/left/image_rect_color2! Check the calibration target configuration and dataset.
Traceback (most recent call last):
  File "/home/sjj/kalibr_workspace/devel/lib/kalibr/kalibr_calibrate_cameras", line 15, in <module>
    exec(compile(fh.read(), python_script, 'exec'), context)
  File "/home/sjj/kalibr_workspace/src/kalibr/aslam_offline_calibration/kalibr/python/kalibr_calibrate_cameras", line 447, in <module>
    main()
  File "/home/sjj/kalibr_workspace/src/kalibr/aslam_offline_calibration/kalibr/python/kalibr_calibrate_cameras", line 185, in main
    if not cam.initGeometryFromObservations(observations):
  File "/home/sjj/kalibr_workspace/src/kalibr/aslam_offline_calibration/kalibr/python/kalibr_camera_calibration/CameraCalibrator.py", line 56, in initGeometryFromObservations
    success = self.geometry.initializeIntrinsics(observations)
RuntimeError: [Exception] /home/sjj/kalibr_workspace/src/kalibr/aslam_cv/aslam_cameras/include/aslam/cameras/implementation/PinholeProjection.hpp:716: initializeIntrinsics() assert(observations.size() != 0) failed: Need min. one observation
这个问题怀疑是由于标定板太小,相机分辨率不够,更改后可成功检测到角点信息。
报错2):
标定过程中,如果提示不能得到初始焦距的时候,可以设置:export KALIBR_MANUAL_FOCAL_LENGTH_INIT=1。然后运行程序,当程序运行失败的时候,它会提示要你手动输入一个焦距,Initialization of focal length failed. Provide manual initialization: 这时你手动输入比如 400。给比较大的值,也能收敛。
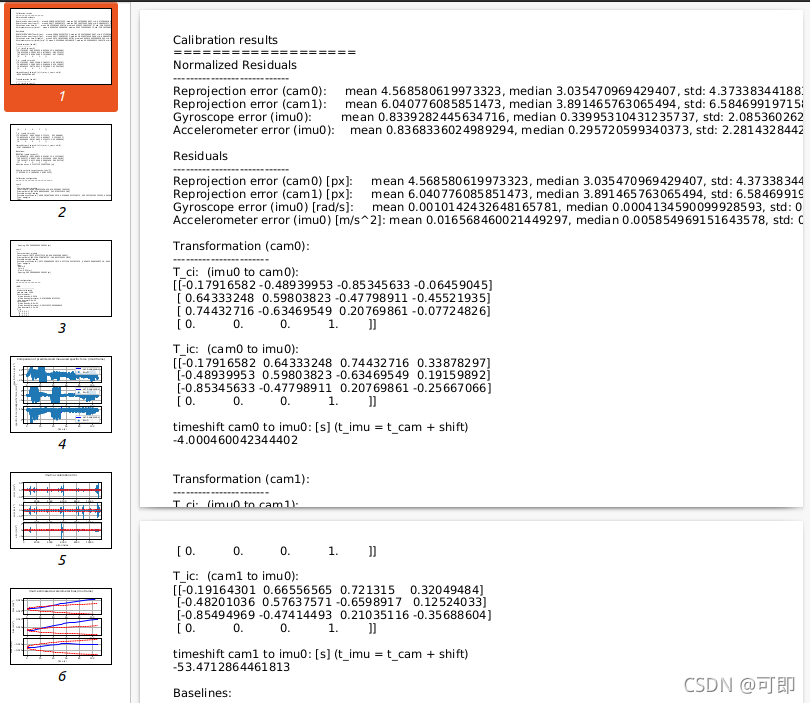
标定完成后,目录下将会生成3个文件
.yaml  主要作用为了后期IMU+相机联合标定
.pdf   以图的方式显示效果
.txt   含有相机的内参以及重投影误差
 附:.yaml文件介绍
camera_model//相机模型
T_cam_imu //IMU extrinsics:从IMU到相机坐标的转换(T_c_i)
camera projection type (pinhole / omni)
intrinsics//相机内参
vector containing the intrinsic parameters for the given projection type. elements are as follows:
pinhole: [fu fv pu pv]
omni: [xi fu fv pu pv]
distortion_model//畸变模型
lens distortion type (radtan / equidistant)
distortion_coeffs//畸变参数
parameter vector for the distortion model
T_cn_cnm1//左右摄像头的相对位姿
camera extrinsic transformation, always with respect to the last camera in the chain
(e.g. cam1: T_cn_cnm1 = T_c1_c0, takes cam0 to cam1 coordinates)
timeshift_cam_imu//在捕捉数据时,imu数据和图像时间偏移,相机和IMU时间戳之间的时间间隔,以秒为单位(t_imu = t_cam + shift)
timeshift between camera and IMU timestamps in seconds (t_imu = t_cam + shift)
rostopic //摄像机图像流的主题
topic of the camera's image stream
resolution //相机分辨率[width,height]
camera resolution [width,height]
标定结果检测:
The distortion_coeffs values should be small, even if not equal to zero
The last value of the first row of the T_cn_cnm1 matrix should be very near to -0.06
The last value of the second row of the T_cn_cnm1 matrix should be near to zero
The last value of the third row of the T_cn_cnm1 matrix should be near to zero
The values on the diagonal of the T_cn_cnm1 matrix should be very near to 1.0
The remaining values of the T_cn_cnm1 matrix should be near to zero
五 IMU参数标定
这部分可由以下两种方式获取:
1)通过录制静止数据(越2小时),修改launch文件,使用imu_utils进行标定,得到标定结果文件,从而创建对应的imu-params.yaml(取标定结果Acc及Gyr的平均值填入imu.yaml文件)
2)除了使用自己标定的IMU参数信息,也可以直接使用官网上提供的该参数,经验证,标定过后也是可以在系统中运行的
这里选取第二种方式设置imu.yaml,官方给的参数有一定的可信度,若后期实验数据不好,则可重新手动标定。参考:https://blog.csdn.net/sinat_16643223/article/details/115416277?spm=1001.2014.3001.5506
创建imu-params.yaml
gedit imu-params.yaml
并填写如下内容:
#Accelerometers
accelerometer_noise_density: 1.4e-03   #Noise density (continuous-time)
accelerometer_random_walk:   8.0e-05   #Bias random walk

#Gyroscopes
gyroscope_noise_density:     8.6e-05   #Noise density (continuous-time)
gyroscope_random_walk:       2.2e-06   #Bias random walk

rostopic:                    /zed2/zed_node/imu/data_raw2      #the IMU ROS topic
update_rate:                 200.0     #Hz (for discretization of the values above)
六 相机IMU联合标定
联合标定主要是为了获得相机和IMU轴系的转换关系
rosrun kalibr kalibr_calibrate_imu_camera --bag Kalib_data_vga.bag --cam camchain-Kalib_data_vga.yaml --imu imu-params.yaml --target april.yaml
报错:
[ERROR] [1637115378.140707]: Optimization failed!
Traceback (most recent call last):
  File "/home/sjj/kalibr_workspace/devel/lib/kalibr/kalibr_calibrate_imu_camera", line 15, in <module>
    exec(compile(fh.read(), python_script, 'exec'), context)
  File "/home/sjj/kalibr_workspace/src/kalibr/aslam_offline_calibration/kalibr/python/kalibr_calibrate_imu_camera", line 246, in <module>
    main()
  File "/home/sjj/kalibr_workspace/src/kalibr/aslam_offline_calibration/kalibr/python/kalibr_calibrate_imu_camera", line 209, in main
    iCal.optimize(maxIterations=parsed.max_iter, recoverCov=parsed.recover_cov)
  File "/home/sjj/kalibr_workspace/src/kalibr/aslam_offline_calibration/kalibr/python/kalibr_imu_camera_calibration/icc_calibrator.py", line 179, in optimize
    raise RuntimeError("Optimization failed!")
RuntimeError: Optimization failed!
这个报错上面可以成功读取自己对应的imu信息和单目信息。所以说数据大概率也没问题。最终在kalibr的issues里找到了解决问题办法。
如果kalibr运行时遇到问题,均可去官网搜索,一般你遇到的大部分问题都有人帮你埋坑的。
解决:
请打开kalibr/aslam_offline_calibration/kalibr/python/kalibr_calibrate_imu_camera.py文件,搜索timeOffsetPadding,我先是查看它的值看了一下是0.03,然后增大此变量的值即可,首先我增大到了0.3,不行,增大到3,优化时间太长,导致类似卡死的情况,可再降低,依据自己的情况调试。(PS:不能太大,我一开始改成了100,直接内存给干爆了)。
重新运行,即可得到联合标定结果camchain-imucam-Kalibr_data.yaml文件和完整的PDF报告。