目录
2. DispatcherServlet初始化过程(源码分析)
图书推荐:Spring Cloud Alibaba核心技术与实战案例
SpringMVC执行流程
1. SpringMVC常用组件
(1)DispatcherServlet:前端控制器,不需要工程师开发,由框架提供
作用:统一处理请求和响应,整个流程控制的中心,由它调用其它组件处理用户的请求。
解释:把当前的没有forward和redirect的请求拼接前后缀!
(2)HandlerMapping:处理器映射器,不需要工程师开发,由框架提供
作用:根据请求的url、method等信息查找Handler(就是Controller),即控制器方法。
解释:主要就是把当前DispatcherServlet处理的请求与控制器方法上的请求进行映射(找的过程)。
(3)Handler:处理器,需要工程师开发;就是控制器Controller
作用:在DispatcherServlet的控制下Handler对具体的用户请求进行处理。
(4)HandlerAdapter:处理器适配器,不需要工程师开发,由框架提供
作用:通过HandlerAdapter对处理器(控制器方法)进行执行。
解释:找到控制器方法,调用控制器上的方法(执行的过程)。
(5)ViewResolver:视图解析器,不需要工程师开发,由框架提供
作用:进行视图解析,得到相应的视图,例如:ThymeleafView、InternalResourceView、RedirectView。
(6)View:视图
作用:将模型数据通过页面展示给用户。
2. DispatcherServlet初始化过程(源码分析)
DispatcherServlet 本质上是一个 Servlet,所以天然的遵循 Servlet 的生命周期。所以宏观上是 Servlet 生命周期来进行调度!
首先理清一下继承关系:
(1)首先前端控制器DispatcherServlet类 继承了 FrameworkServlet类;
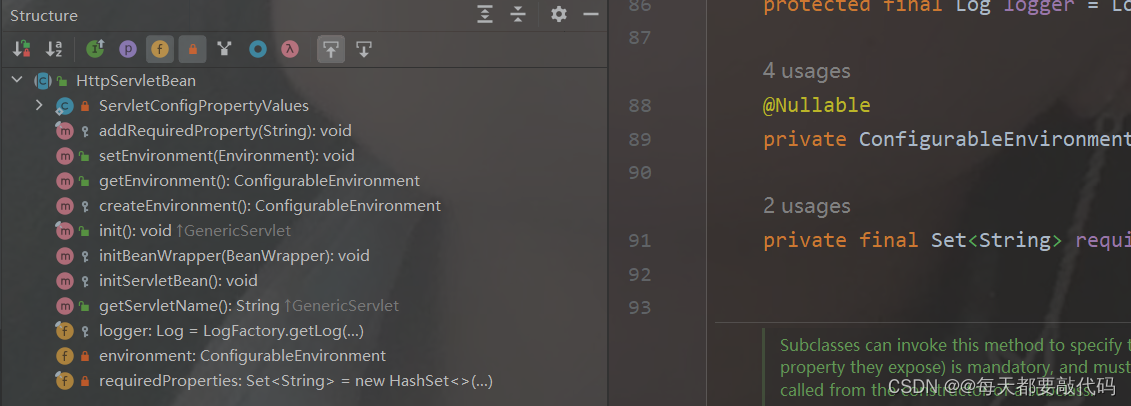
(2)FrameworkServlet类 继承了 HttpServletBean类 ;
(3)HttpServletBean类 继承了 HttpServlet类 ;
(4)HttpServlet类 继承了GenericServlet类 ;
(5)GenericServlet类 实现了 Servlet接口。
public class DispatcherServlet extends FrameworkServlet {}
public abstract class FrameworkServlet extends HttpServletBean implements ApplicationContextAware {}
public abstract class HttpServletBean extends HttpServlet implements EnvironmentCapable, EnvironmentAware {}
public abstract class HttpServlet extends GenericServlet {}
public abstract class GenericServlet implements Servlet, ServletConfig, Serializable {}
然后理清楚初始化方法调用的过程:
(1)首次在Servlet中有一个抽象的初始化方法

(2)所以子类GenericServlet中就应该重写抽象的init()方法

注:此时重写的init方法去调用了重载的init方法
// 重写的init方法
public void init(ServletConfig config) throws ServletException {
        this.config = config;
        this.init(); // 调用
    }
// 重载的init方法
public void init() throws ServletException {
    }
(3)子类HttpServlet并没有init方法,说明没有进行重写,使用的是默认从GenericServlet中继承过来的init方法

(4)因为HttpServlet没有重写init方法,所以子类HttpServletBean本质上是重写了GenericServlet中的init方法

注:此时的init方法调用了initServletBean方法
    @Override
	public final void init() throws ServletException {

		// Set bean properties from init parameters.
		PropertyValues pvs = new ServletConfigPropertyValues(getServletConfig(), this.requiredProperties);
		if (!pvs.isEmpty()) {
			try {
				BeanWrapper bw = PropertyAccessorFactory.forBeanPropertyAccess(this);
				ResourceLoader resourceLoader = new ServletContextResourceLoader(getServletContext());
				bw.registerCustomEditor(Resource.class, new ResourceEditor(resourceLoader, getEnvironment()));
				initBeanWrapper(bw);
				bw.setPropertyValues(pvs, true);
			}
			catch (BeansException ex) {
				if (logger.isErrorEnabled()) {
					logger.error("Failed to set bean properties on servlet '" + getServletName() + "'", ex);
				}
				throw ex;
			}
		}

		// 调用了initServletBean方法
		initServletBean();
	}

	protected void initServletBean() throws ServletException {
	}
(5)此时子类FrameworkServlet就应该重写initServletBean方法

注:此时在这个initServletBean方法中干了什么呢?
    @Override
	protected final void initServletBean() throws ServletException {
		getServletContext().log("Initializing Spring " + getClass().getSimpleName() + " '" + getServletName() + "'");
		if (logger.isInfoEnabled()) {
			logger.info("Initializing Servlet '" + getServletName() + "'");
		}
		long startTime = System.currentTimeMillis();

		try {
            // 初始化webApplicationContext
			this.webApplicationContext = initWebApplicationContext();
			initFrameworkServlet();
		}
		catch (ServletException | RuntimeException ex) {
			logger.error("Context initialization failed", ex);
			throw ex;
		}

		if (logger.isDebugEnabled()) {
			String value = this.enableLoggingRequestDetails ?
					"shown which may lead to unsafe logging of potentially sensitive data" :
					"masked to prevent unsafe logging of potentially sensitive data";
			logger.debug("enableLoggingRequestDetails='" + this.enableLoggingRequestDetails +
					"': request parameters and headers will be " + value);
		}

		if (logger.isInfoEnabled()) {
			logger.info("Completed initialization in " + (System.currentTimeMillis() - startTime) + " ms");
		}
	}
①首先调用initWebApplicationContext初始化WebApplocationContext
注:当时学习Spring时,创建的都是Java工程,创建的都是ApplicationContext对象;这里创建的是Web工程,所以创建的是WebApplicationContext对象。
protected WebApplicationContext initWebApplicationContext() {
        // 调用工具类,获取到WebApplicationContext对象
		WebApplicationContext rootContext =
				WebApplicationContextUtils.getWebApplicationContext(getServletContext());
		// 又创建一个WebApplicationContext对象wac为null
        WebApplicationContext wac = null;

        // 第一次执行,肯定为空
		if (this.webApplicationContext != null) {

			wac = this.webApplicationContext;
			if (wac instanceof ConfigurableWebApplicationContext) {
				ConfigurableWebApplicationContext cwac = (ConfigurableWebApplicationContext) wac;
				if (!cwac.isActive()) {

					if (cwac.getParent() == null) {
						cwac.setParent(rootContext);
					}
					configureAndRefreshWebApplicationContext(cwac);
				}
			}
		}
        // 为空去找一下,找不到
		if (wac == null) {
			wac = findWebApplicationContext();
		}
        // 找不到就去创建一个
		if (wac == null) {
			wac = createWebApplicationContext(rootContext);
		}

		if (!this.refreshEventReceived) {
			synchronized (this.onRefreshMonitor) {
                // 上面创建完,这里就触发刷新事件,
                // 实际上是让子类DispatcherServlet进行刷新
				onRefresh(wac);
			}
		}

		if (this.publishContext) {
            // 把WebApplicationContext对象进行共享
			String attrName = getServletContextAttributeName();
			getServletContext().setAttribute(attrName, wac);
		}

		return wac;
	}
②创建WebApplicationContext
注:前面已经分析,第一次去访问肯定访问不到为null,此时先去调用findWebApplicationContext()方法去找,肯定也是找不到;所以就只能调用createWebApplicationContext()方法去创建一个。
protected WebApplicationContext createWebApplicationContext(@Nullable ApplicationContext parent) {
    Class<?> contextClass = getContextClass();
    if (!ConfigurableWebApplicationContext.class.isAssignableFrom(contextClass)) {
        throw new ApplicationContextException(
            "Fatal initialization error in servlet with name '" + getServletName() +
            "': custom WebApplicationContext class [" + contextClass.getName() +
            "] is not of type ConfigurableWebApplicationContext");
    }
    // 通过反射创建 IOC 容器对象
    ConfigurableWebApplicationContext wac =
        (ConfigurableWebApplicationContext) BeanUtils.instantiateClass(contextClass);

    wac.setEnvironment(getEnvironment());
    // 设置父容器
    // 在SSM整合时,要考虑配置文件是用一个还是分开管理,因为Spring和SpringMVC是无缝连接的,
    // 所以需要考虑是否要整合到一块;如果此时分开管理,就需要创建两个IOC容器,此时的两个容器实际上
    // 是有一定关系的:SpringMVC是子容器,Spring容器是父容器。
    // 所以这里就是把SpringIOC的容器设置为SpringMVC的父容器。
    wac.setParent(parent);
    String configLocation = getContextConfigLocation();
    if (configLocation != null) {
        wac.setConfigLocation(configLocation);
    }
    configureAndRefreshWebApplicationContext(wac);

    return wac;
}
③DispatcherServlet初始化策略
FrameworkServlet创建WebApplicationContext后,需要刷新容器,去调用onRefresh(wac)【这个方法里什么都没有,只有注释交给子类DispatcherServlet去刷新】。这个onRefresh方法实际上在DispatcherServlet中进行了重写,调用了initStrategies(context)方法,表示初始化策略,即初始化DispatcherServlet的各个组件。
protected void initStrategies(ApplicationContext context) {
   // 初始化文件上传解析器
   initMultipartResolver(context);
   initLocaleResolver(context);
   initThemeResolver(context);
   // 初始化处理器映射器(找控制器方法)
   initHandlerMappings(context);
   // 初始化处理器适配器(调用控制器方法)
   initHandlerAdapters(context);
   // 初始化异常处理器
   initHandlerExceptionResolvers(context);
   initRequestToViewNameTranslator(context);
   // 初始化视图解析器
   initViewResolvers(context);
   initFlashMapManager(context);
}总结:所以在SpringMVC中加载这些配置时,是什么时候加载的?就是DispatcherServlet进行初始化时进行加载的!所以在注册DispatcherServlet时要使用<load-on-startup>1</load-on-startup>标签将前端控制器DispatcherServlet的初始化时间提前到服务器启动时;因为DispatcherSevlet初始化是一个非常复杂过程!如果全都放到第一次访问时去初始化,会严重影响第一次影响的速度!
总结初始化方法的执行流程:

3. DispatcherServlet调用组件处理请求
注:前面在初始化DispatcherServlet时,就把springmvc.xml中的配置组件加载进去、初始化好了;所以接下来就应该用DispathcerServlet去调用这些组件,处理请求,处理请求的方法实际上就是service方法!
(1)首先是顶级接口Servlet中的service方法,是一个抽象方法,没什么好说的
void service(ServletRequest var1, ServletResponse var2) throws ServletException, IOException;
(2)子类GenericServlet中也没有重写还是一个抽象方法
public abstract void service(ServletRequest var1, ServletResponse var2) throws ServletException, IOException;
(3)子类HttpServlet中进行了重写service方法
首先有两个service方法:一个重写父类的、一个重载的

重写父类的service方法
注:首先把ServletRequest向下转型为HttpServletRequest,然后调用重载的service方法!
public void service(ServletRequest req, ServletResponse res) throws ServletException, IOException {
        if (req instanceof HttpServletRequest && res instanceof HttpServletResponse) {
            HttpServletRequest request = (HttpServletRequest)req;
            HttpServletResponse response = (HttpServletResponse)res;
            this.service(request, response);
        } else {
            throw new ServletException("non-HTTP request or response");
        }
    }
重载的servcie方法
注:首先获取当前的请求方式,什么样的请求方式就调用doXxx什么样的方法!
 protected void service(HttpServletRequest req, HttpServletResponse resp) throws ServletException, IOException {
        String method = req.getMethod();
        long lastModified;
        if (method.equals("GET")) {
            lastModified = this.getLastModified(req);
            if (lastModified == -1L) {
                this.doGet(req, resp);
            } else {
                long ifModifiedSince = req.getDateHeader("If-Modified-Since");
                if (ifModifiedSince < lastModified) {
                    this.maybeSetLastModified(resp, lastModified);
                    this.doGet(req, resp);
                } else {
                    resp.setStatus(304);
                }
            }
        } else if (method.equals("HEAD")) {
            lastModified = this.getLastModified(req);
            this.maybeSetLastModified(resp, lastModified);
            this.doHead(req, resp);
        } else if (method.equals("POST")) {
            this.doPost(req, resp);
        } else if (method.equals("PUT")) {
            this.doPut(req, resp);
        } else if (method.equals("DELETE")) {
            this.doDelete(req, resp);
        } else if (method.equals("OPTIONS")) {
            this.doOptions(req, resp);
        } else if (method.equals("TRACE")) {
            this.doTrace(req, resp);
        } else {
            String errMsg = lStrings.getString("http.method_not_implemented");
            Object[] errArgs = new Object[]{method};
            errMsg = MessageFormat.format(errMsg, errArgs);
            resp.sendError(501, errMsg);
        }

    }
(4)子类HttpServletBean中没有重写service方法,所以就是默认继承HttpServlet中的service方法
(5)子类FrameworkServlet对当前HttpServlet中的service方法进行了重写
注:首先获取请求方式。如果判断当前请求方式是不是patch或者说为null;满足其中一个就调用processRequest方法(执行请求);如果请求方式不是patch并且不为null此时就会去调用父类的service方法(就是取调用上面的doXxx()方法,实际上FrameworkServlet对这些doXxx()方法也重写了),因为HttpServletBean没有重写,所以就是调用HttpServlet中的。
    @Override
	protected void service(HttpServletRequest request, HttpServletResponse response)
			throws ServletException, IOException {

		HttpMethod httpMethod = HttpMethod.resolve(request.getMethod());
		if (httpMethod == HttpMethod.PATCH || httpMethod == null) {
			processRequest(request, response);
		}
		else {
			super.service(request, response);
		}
	}
a>processRequest()
FrameworkServlet重写HttpServlet中的service()方法和doXxx()方法,这些方法中调用了processRequest(request, response) ;所以要搞明白这个方法的执行流程。
protected final void processRequest(HttpServletRequest request, HttpServletResponse response)
			throws ServletException, IOException {

		long startTime = System.currentTimeMillis();
		Throwable failureCause = null;

		LocaleContext previousLocaleContext = LocaleContextHolder.getLocaleContext();
		LocaleContext localeContext = buildLocaleContext(request);

		RequestAttributes previousAttributes = RequestContextHolder.getRequestAttributes();
		ServletRequestAttributes requestAttributes = buildRequestAttributes(request, response, previousAttributes);

		WebAsyncManager asyncManager = WebAsyncUtils.getAsyncManager(request);
		asyncManager.registerCallableInterceptor(FrameworkServlet.class.getName(), new RequestBindingInterceptor());

		initContextHolders(request, localeContext, requestAttributes);

		try {
            // processRequest这个方法实际上执行了一个核心的方法doService方法
			doService(request, response);
		}
		catch (ServletException | IOException ex) {
			failureCause = ex;
			throw ex;
		}
		catch (Throwable ex) {
			failureCause = ex;
			throw new NestedServletException("Request processing failed", ex);
		}

		finally {
			resetContextHolders(request, previousLocaleContext, previousAttributes);
			if (requestAttributes != null) {
				requestAttributes.requestCompleted();
			}
			logResult(request, response, failureCause, asyncManager);
			publishRequestHandledEvent(request, response, startTime, failureCause);
		}
	}
b>doService()
执行doService方法就表示执行服务的过程:处理请求和响应!
注:此时发现doService方法是一个抽象方法,所以此时就需要找它的子类DispathcerSevlet方法,因为子类DispathcerSevlet方法肯定会重写doService方法。
protected abstract void doService(HttpServletRequest request, HttpServletResponse response)
			throws Exception;
子类DispatcherServlet中重写的doService方法
注:doService方法又调用了doDispathcer方法,去处理请求和响应!
    @Override
	protected void doService(HttpServletRequest request, HttpServletResponse response) throws Exception {
		logRequest(request);

		// Keep a snapshot of the request attributes in case of an include,
		// to be able to restore the original attributes after the include.
		Map<String, Object> attributesSnapshot = null;
		if (WebUtils.isIncludeRequest(request)) {
			attributesSnapshot = new HashMap<>();
			Enumeration<?> attrNames = request.getAttributeNames();
			while (attrNames.hasMoreElements()) {
				String attrName = (String) attrNames.nextElement();
				if (this.cleanupAfterInclude || attrName.startsWith(DEFAULT_STRATEGIES_PREFIX)) {
					attributesSnapshot.put(attrName, request.getAttribute(attrName));
				}
			}
		}

		// Make framework objects available to handlers and view objects.
		request.setAttribute(WEB_APPLICATION_CONTEXT_ATTRIBUTE, getWebApplicationContext());
		request.setAttribute(LOCALE_RESOLVER_ATTRIBUTE, this.localeResolver);
		request.setAttribute(THEME_RESOLVER_ATTRIBUTE, this.themeResolver);
		request.setAttribute(THEME_SOURCE_ATTRIBUTE, getThemeSource());

		if (this.flashMapManager != null) {
			FlashMap inputFlashMap = this.flashMapManager.retrieveAndUpdate(request, response);
			if (inputFlashMap != null) {
				request.setAttribute(INPUT_FLASH_MAP_ATTRIBUTE, Collections.unmodifiableMap(inputFlashMap));
			}
			request.setAttribute(OUTPUT_FLASH_MAP_ATTRIBUTE, new FlashMap());
			request.setAttribute(FLASH_MAP_MANAGER_ATTRIBUTE, this.flashMapManager);
		}

		try {
            // 处理请求和响应
			doDispatch(request, response);
		}
		finally {
			if (!WebAsyncUtils.getAsyncManager(request).isConcurrentHandlingStarted()) {
				// Restore the original attribute snapshot, in case of an include.
				if (attributesSnapshot != null) {
					restoreAttributesAfterInclude(request, attributesSnapshot);
				}
			}
		}
	}
c>doDispatch()
注:doDipatcher方法就是前面我们分析拦截器所在的前两个方法在其中;执行流程如下:首先调用拦截器的preHandle方法进行拦截、然后调用handle方法,由处理器适配器调用具体的控制器方法,最终获得ModelAndView对象、再去调用拦截器的postHandle方法、然后再去调用processDispatcherRequest方法去处理模型数据和渲染视图!
protected void doDispatch(HttpServletRequest request, HttpServletResponse response) throws Exception {
    HttpServletRequest processedRequest = request;
    HandlerExecutionChain mappedHandler = null;
    boolean multipartRequestParsed = false;

    WebAsyncManager asyncManager = WebAsyncUtils.getAsyncManager(request);

    try {
        ModelAndView mv = null;
        Exception dispatchException = null;

        try {
            processedRequest = checkMultipart(request);
            multipartRequestParsed = (processedRequest != request);
            /*
            	mappedHandler:调用链
                包含handler、interceptorList、interceptorIndex
            	handler:浏览器发送的请求所匹配的控制器方法
            	interceptorList:处理控制器方法的所有拦截器集合
            	interceptorIndex:拦截器索引,控制拦截器afterCompletion()的执行
            */
            mappedHandler = getHandler(processedRequest);
            if (mappedHandler == null) {
                noHandlerFound(processedRequest, response);
                return;
            }

            // Determine handler adapter for the current request.
           	// 通过控制器方法创建相应的处理器适配器,调用所对应的控制器方法
            HandlerAdapter ha = getHandlerAdapter(mappedHandler.getHandler());

            // Process last-modified header, if supported by the handler.
            String method = request.getMethod();
            boolean isGet = "GET".equals(method);
            if (isGet || "HEAD".equals(method)) {
                long lastModified = ha.getLastModified(request, mappedHandler.getHandler());
                if (new ServletWebRequest(request, response).checkNotModified(lastModified) && isGet) {
                    return;
                }
            }

            // 调用拦截器的preHandle()
            if (!mappedHandler.applyPreHandle(processedRequest, response)) {
                return;
            }


            // 由处理器适配器调用具体的控制器方法,最终获得ModelAndView对象
            mv = ha.handle(processedRequest, response, mappedHandler.getHandler());

            if (asyncManager.isConcurrentHandlingStarted()) {
                return;
            }

            applyDefaultViewName(processedRequest, mv);
            // 调用拦截器的postHandle()
            mappedHandler.applyPostHandle(processedRequest, response, mv);
        }
        catch (Exception ex) {
            dispatchException = ex;
        }
        catch (Throwable err) {
            // As of 4.3, we're processing Errors thrown from handler methods as well,
            // making them available for @ExceptionHandler methods and other scenarios.
            dispatchException = new NestedServletException("Handler dispatch failed", err);
        }
        // 后续处理:处理模型数据和渲染视图
        processDispatchResult(processedRequest, response, mappedHandler, mv, dispatchException);
    }
    catch (Exception ex) {

        triggerAfterCompletion(processedRequest, response, mappedHandler, ex);
    }
    catch (Throwable err) {
        triggerAfterCompletion(processedRequest, response, mappedHandler,
                               new NestedServletException("Handler processing failed", err));
    }
    finally {
        if (asyncManager.isConcurrentHandlingStarted()) {

            if (mappedHandler != null) {
                mappedHandler.applyAfterConcurrentHandlingStarted(processedRequest, response);
            }
        }
        else {

            if (multipartRequestParsed) {
                cleanupMultipart(processedRequest);
            }
        }
    }
}
d>processDispatchResult()
在doDipatcher中去调用了processDispatcherRequest方法,进行后续处理的,实际上就是去处理ModelAndView的!处理完以后调用拦截器的第三个方法afterCompletion()方法。
private void processDispatchResult(HttpServletRequest request, HttpServletResponse response,
			@Nullable HandlerExecutionChain mappedHandler, @Nullable ModelAndView mv,
			@Nullable Exception exception) throws Exception {

		boolean errorView = false;

		if (exception != null) {
			if (exception instanceof ModelAndViewDefiningException) {
				logger.debug("ModelAndViewDefiningException encountered", exception);
				mv = ((ModelAndViewDefiningException) exception).getModelAndView();
			}
			else {
				Object handler = (mappedHandler != null ? mappedHandler.getHandler() : null);
				mv = processHandlerException(request, response, handler, exception);
				errorView = (mv != null);
			}
		}

		if (mv != null && !mv.wasCleared()) {
            // render方法就是渲染视图的
			render(mv, request, response);
			if (errorView) {
				WebUtils.clearErrorRequestAttributes(request);
			}
		}
		else {
			if (logger.isTraceEnabled()) {
				logger.trace("No view rendering, null ModelAndView returned.");
			}
		}

		if (WebAsyncUtils.getAsyncManager(request).isConcurrentHandlingStarted()) {
			return;
		}

		if (mappedHandler != null) {
            // 调用拦截器的第三个方法afterCompletion()
			mappedHandler.triggerAfterCompletion(request, response, null);
		}
	}
4. SpringMVC的完整执行流程
(1)用户向服务器发送请求,请求被SpringMVC 前端控制器 DispatcherServlet捕获。
(2)DispatcherServlet对请求URL进行解析,得到请求资源标识符(URI),判断请求URI对应的映射:
不存在
i. 再判断是否配置了mvc:default-servlet-handler(默认的Servlet处理静态资源)
ii. 如果没配置,则控制台报映射查找不到,客户端展示404错误(此时是前端控制器DispatcherServlet报的404错误)
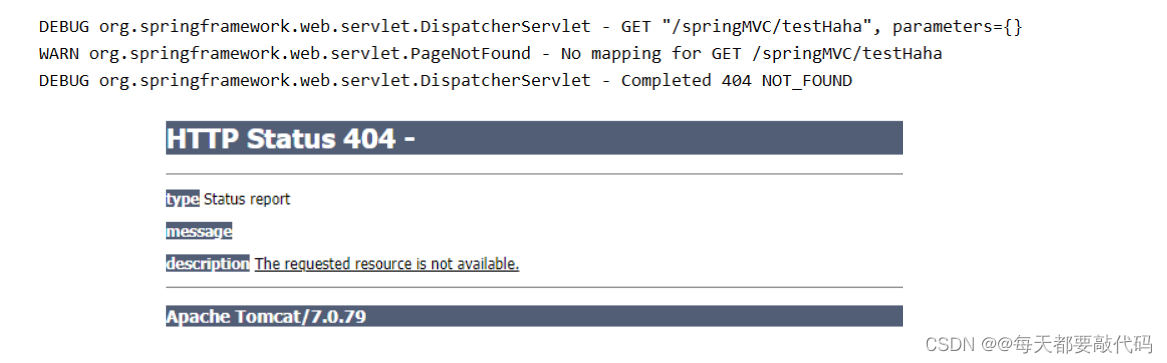
iii. 如果有配置,则访问目标资源(一般为静态资源,如:JS,CSS,HTML),找不到客户端也会展示404错误(此时是DefaultServletHttpRequestHandler报的404错误)

存在则执行下面的流程
(3)根据该URI,调用HandlerMapping(处理器映射器)获得该Handler配置的所有相关的对象(包括控制器对象、拦截器集合、拦截器索引),最后以HandlerExecutionChain执行链(包含控制器方法、拦截器集合、拦截器索引)对象的形式返回。
(4)DispatcherServlet 根据获得的Handler,选择一个合适的HandlerAdapter(处理器适配器)。
(5)如果成功获得HandlerAdapter,此时将开始执行拦截器的preHandler(…)方法【正向】
(6)提取Request中的模型数据,填充Handler入参,开始执行Handler(Controller)方法,处理请求。在填充Handler的入参过程中,根据你的配置,Spring将帮你做一些额外的工作:
a) HttpMessageConveter: 将请求消息(如Json、xml等数据)转换成一个对象,将对象转换为指定的响应信息
b) 数据转换:对请求消息进行数据转换。如String转换成Integer、Double等
c) 数据格式化:对请求消息进行数据格式化。 如将字符串转换成格式化数字或格式化日期等
d) 数据验证: 验证数据的有效性(长度、格式等),验证结果存储到BindingResult或Error中
(7)Handler执行完成后,向DispatcherServlet 返回一个ModelAndView对象。
(8)此时将开始执行拦截器的postHandle(...)方法【逆向】。
(9)根据返回的ModelAndView(此时会判断是否存在异常:如果存在异常,则执行HandlerExceptionResolver进行异常处理)选择一个适合的ViewResolver(加没加前缀forward和redirect)进行视图解析,根据Model和View,来渲染视图。
(10)渲染视图完毕执行拦截器的afterCompletion(…)方法【逆向】。
(11)将渲染结果返回给客户端。
图书推荐:Spring Cloud Alibaba核心技术与实战案例
参与方式:
本次送书 2 本!
活动时间:截止到 2023-07-13 00:00:00。抽奖方式:利用程序进行抽奖。
参与方式:关注博主(只限粉丝福利哦)、点赞、收藏,评论区随机抽取,最多三条评论!
本期图书:《Spring Cloud Alibaba核心技术与实战案例》
特色
不留遗漏:全面覆盖Dubbo核心知识点;
直击要害:实战化案例精准定位技术细节;
学以致用:精要式演示确保开发、学习不脱节;
潜移默化:研磨式知识讲解渗透技术要点;
提升效率:垂直式技术精讲不饶弯路;
循序提升:渐进式知识点编排确保连贯;
配套资源:赠送全书案例源文件助力学习;
内容简介
本书从分布式系统的基础概念讲起,逐步深入分布式系统中间件Spring Cloud Alibaba进阶实战,重点介绍了使用Spring Cloud Alibaba框架整合各种分布式组件的完整过程,让读者不但可以系统地学习分布式中间件的相关知识, 而且还能对业务逻辑的分析思路、实际应用开发有更为深入的理解。
全书共分5大章节,第1章开篇部分,讲解分布式系统的演进过程和Spring Cloud Alibaba概述及版本的选择,以及单体架构/微服务架构的优缺点;第2章讲解如何使用Spring Cloud Alibaba实现RPC通讯;第3章在介绍主流Nacos组件时,介绍了三元的概念以及使用Nacos实现注册中心和配置中心,包含环境的动态切换、配置的动态刷新、通用型配置、版本回滚等核心技术,为微服务环境提供基础的架构;第4章介绍了负责限流和熔断降级的Sentinel组件,包含收集系统运行状态、流量控制、熔断降级、热点、授权、系统规则、流控的异常处理、熔断的异常处理、规则持久化等;第4章介绍了网关常用案例,以及在软件项目中常用的高频使用技术点,力求为开发微服务项目的程序员提供一个快速学习的捷径。
本书内容由浅入深、结构清晰、实例丰富、通俗易懂、实用性强,适合需要全方位学习Spring Cloud Alibaba相关技术的人员,也适合培训学校作为培训教材,还可作为大、中专院校相关专业的教学参考书。