ansible自动化运维工具,具有以下特性
1、 模块化:调用特定的模块,完成特定任务
2、有Paramiko,PyYAML,Jinja2(模板语言)三个关键模块
3、支持自定义模块
4、基于Python语言实现
5、部署简单,基于python和SSH(默认已安装),agentless
6、安全,基于OpenSSH
7、支持playbook编排任务
8、幂等性:一个任务执行1遍和执行n遍效果一样,不因重复执行带来意外情况
9、无需代理不依赖PKI(无需ssl)
11、可使用任何编程语言写模块
12、YAML格式,编排任务,支持丰富的数据结构
13、较强大的多层解决方案
架构图如下: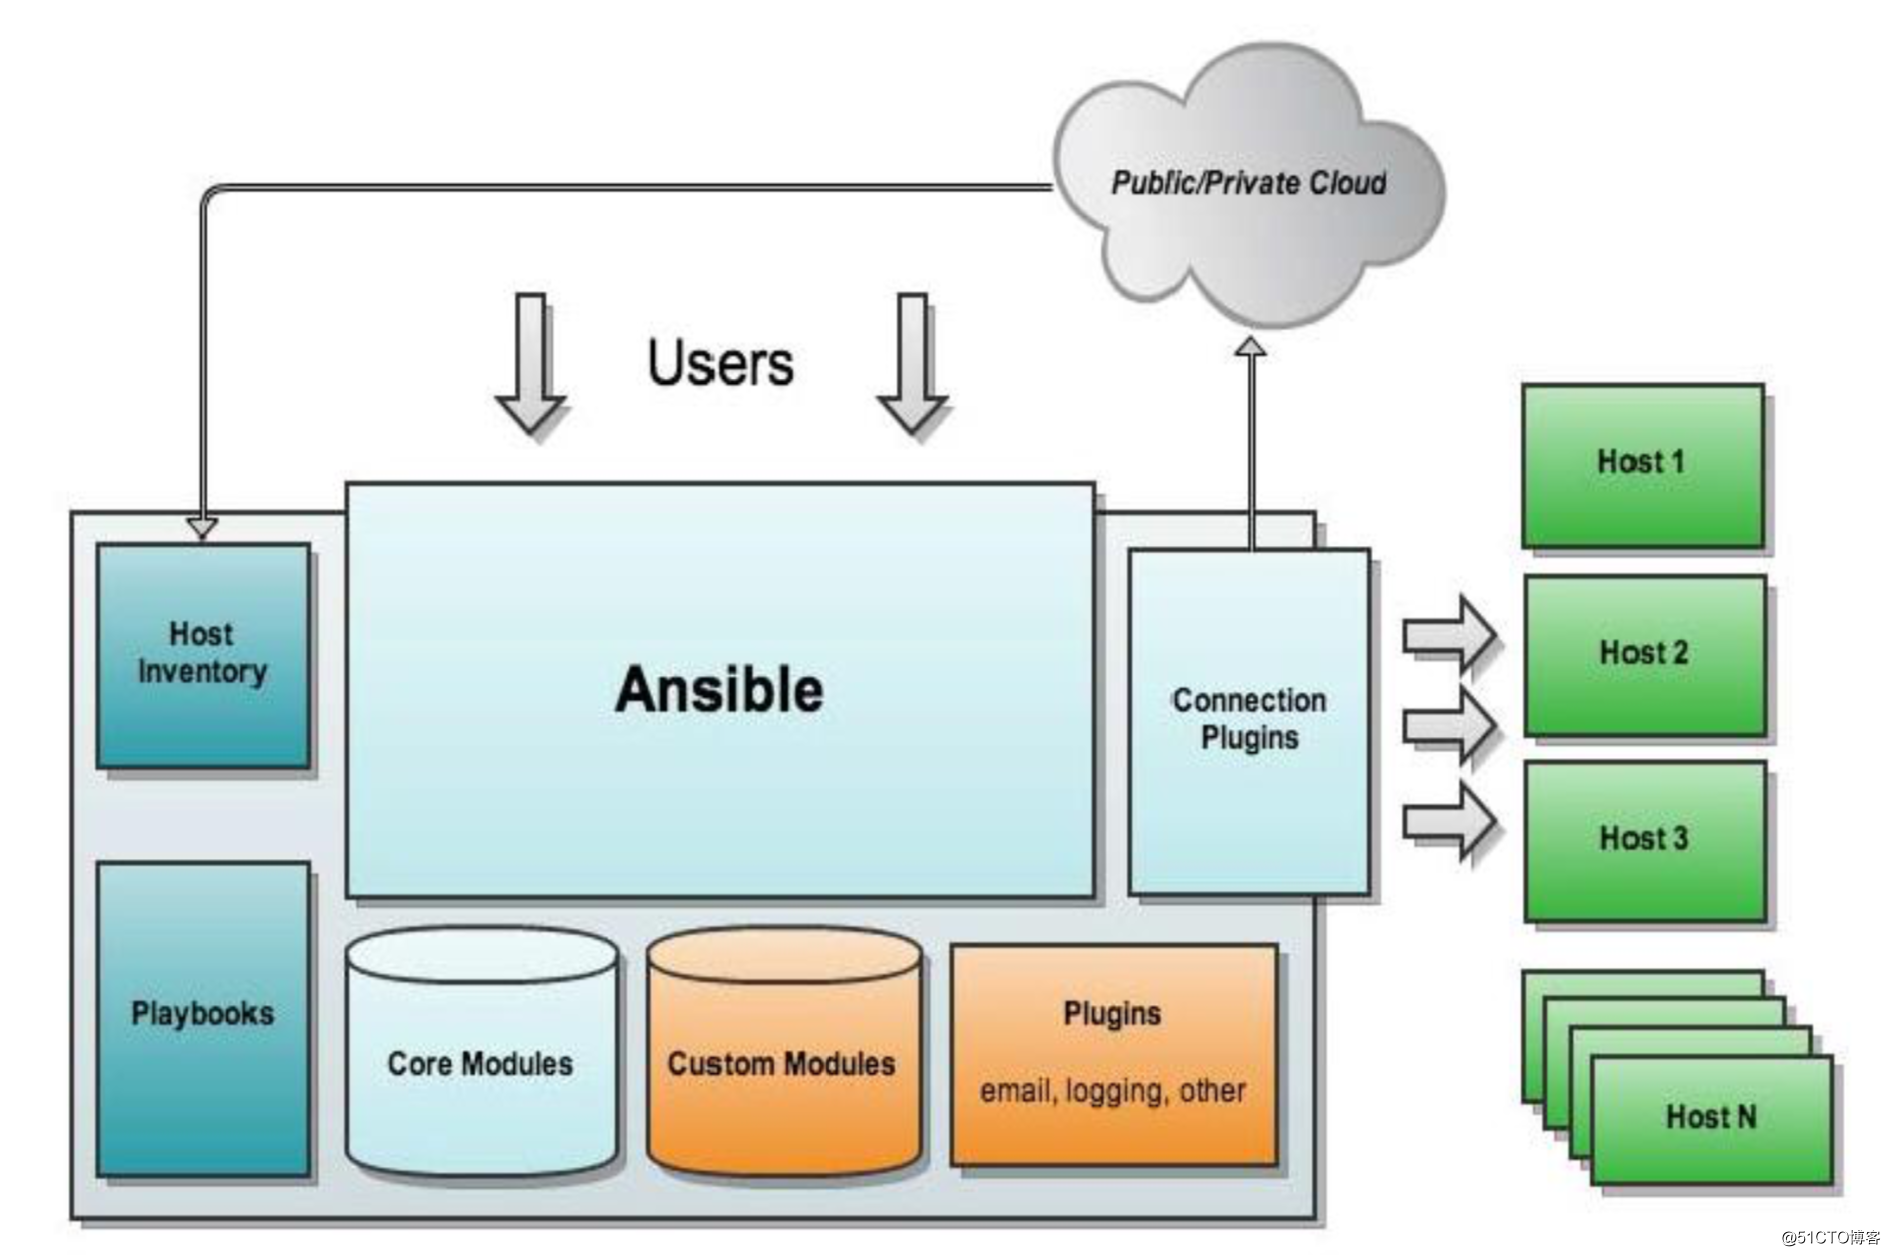
使用
安装
[root@node1 ~]# yum -y install ansible配置主机
 [root@node1 ansible]# vim /etc/ansible/hosts
[frontend]
192.168.1.1.201
192.168.1.1.202

[backend]
192.168.1.1.203
192.168.1.1.210
如何使用ansible
1、 模块查询
[root@node1 ansible]# ansible-doc -l2、 具体模块帮助
[root@node1 ansible]# ansible-doc -s group
- name: Add or remove groups
  group:
      gid:                   # Optional `GID' to set for the group.
      name:                  # (required) Name of the group to manage.
      state:                 # Whether the group should be present or not on the remote host.   创建present 删除absent
      system:                # If `yes', indicates that the group created is a system group.
3、 检测
[root@node1 ansible]# ansible all -m group -a "gid=3001 name=mygrp1 state=present system=no" -C
192.168.1.210 | SUCCESS => {
    "changed": true
}
...
4、执行
[root@node1 ansible]# ansible all -m group -a "gid=3000 name=mygrp state=present system=no"
192.168.1.210 | SUCCESS => {
    "changed": true,
    "gid": 3000,
    "name": "mygrp",
    "state": "present",
    "system": false
}
.....
4、撤销
[root@node1 ansible]# ansible all -m group -a "gid=3000 name=mygrp state=absent system=no"
192.168.1.210 | SUCCESS => {
    "changed": true,
    "name": "mygrp",
    "state": "absent"
}
....
很多模块都是类似这种操作
user模块
使用查看
[root@node1 ansible]# ansible-doc -s user添加(absent 删除)
[root@node1 ansible]# ansible all -m user -a 'uid=5000 name=testuser state=present groups=mygrp'
192.168.1.202 | SUCCESS => {
    "changed": true,
    "comment": "",
    "create_home": true,
    "group": 5000,
    "groups": "mygrp",
    "home": "/home/testuser",
    "name": "testuser",
    "shell": "/bin/bash",
    "state": "present",
    "system": false,
    "uid": 5000
}
验证
[root@node2 ~]# id testuser
uid=5000(testuser) gid=5000(testuser) groups=5000(testuser),3000(mygrp)
copy模块
使用查看
[root@node1 ansible]# ansible-doc -s copy复制目录
[root@node1 ~]# ansible all -m copy -a 'src=/root/aa dest=/root/ mode=600'
192.168.1.210 | SUCCESS => {
    "changed": true,
    "dest": "/root/",
    "src": "/root/aa"
}
#src   若果没有/   复制整个目录;如果带/,复制目录中的文件
复制文件
[root@node1 ~]# ansible all -m copy -a 'src=/root/b.exp dest=/root/bb.exp mode=600'
192.168.1.210 | SUCCESS => {
    "changed": true,
    "checksum": "4e838c8f13d7ca2f3dd9c46383160aded4b75bd9",
    "dest": "/root/bb.exp",
    "gid": 0,
    "group": "root",
    "md5sum": "d05c1a3a2690061ef62cc018c2226bd5",
    "mode": "0600",
    "owner": "root",
    "size": 378,
    "src": "~None/.ansible/tmp/ansible-tmp-1528591498.22-24846919673848/source",
    "state": "file",
    "uid": 0
}
[root@node1 ~]# ansible all -m copy -a 'content="hello world\n" dest=/root/hi.txt mode=600'
192.168.1.210 | SUCCESS => {
"changed": true,
"checksum": "22596363b3de40b06f981fb85d82312e8c0ed511",
"dest": "/root/hi.txt",
"gid": 0,
"group": "root",
"md5sum": "6f5902ac237024bdd0c176cb93063dc4",
"mode": "0600",
"owner": "root",
"size": 12,
"src": "~None/.ansible/tmp/ansible-tmp-1528591685.59-213464252719003/source",
"state": "file",
"uid": 0
}fetch拉取
[root@node1 ~]# ansible-doc -s fetch[root@node1 ~]# ansible 192.168.1.201 -m fetch -a 'dest=/root/ src=/root/rules.sh'
192.168.1.201 | SUCCESS => {
"changed": true,
"checksum": "68fa058075bcabe9640367e48b934482bb96f64d",
"dest": "/root/192.168.1.201/root/rules.sh",
"md5sum": "af3fbce7c4b620497adf4324f7d92afa",
"remote_checksum": "68fa058075bcabe9640367e48b934482bb96f64d",
"remote_md5sum": null
}
[root@node1 ~]# ls 192.168.1.201/root/rules.shcommand shell模块
command:不做shell解析
shell:更好用[root@node1 ~]# ansible-doc -s command [root@node1 ~]# ansible-doc -s shell
[root@node1 ~]# ansible all -m command  -a 'chdir=/root ls'
192.168.1.210 | SUCCESS | rc=0 >>
aa
anaconda-ks.cfg
bb.exp
hi.txt
~None
original-ks.cfg
command不支持管道操作
[root@node1 ~]# ansible all -m command  -a 'echo "zander"|passwd testuser --stdin'
192.168.1.210 | SUCCESS | rc=0 >>
zander|passwd testuser --stdin
shell可以解析shell命令
[root@node1 ~]# ansible all -m shell  -a 'echo "zander"|passwd testuser --stdin '
192.168.1.210 | SUCCESS | rc=0 >>
Changing password for user testuser.
passwd: all authentication tokens updated successfully.
file模块
[root@node1 ~]# ansible-doc -s file递归创建
[root@node1 ~]# ansible all -m file -a 'path=/var/tmp/aaa/hello.dir state=directory'
192.168.1.210 | SUCCESS => {
    "changed": true,
    "gid": 0,
    "group": "root",
    "mode": "0755",
    "owner": "root",
    "path": "/var/tmp/aaa/hello.dir",
    "size": 6,
    "state": "directory",
    "uid": 0
}
创建空文件不行,file适合设置文件属性 空文件可以用copy
[root@node1 ~]# ansible all -m file -a 'path=/var/tmp/aaa/hello.txt state=file'
192.168.1.210 | FAILED! => {
    "changed": false,
    "msg": "file (/var/tmp/aaa/hello.txt) is absent, cannot continue",
    "path": "/var/tmp/aaa/hello.txt",
    "state": "absent"
}
设置软连接
[root@node1 ~]# ansible all -m file -a 'src=/root/hi.txt  path=/var/tmp/aaa/hello.txt state=link'
192.168.1.210 | SUCCESS => {
    "changed": true,
    "dest": "/var/tmp/aaa/hello.txt",
    "gid": 0,
    "group": "root",
    "mode": "0777",
    "owner": "root",
    "size": 12,
    "src": "/root/hi.txt",
    "state": "link",
    "uid": 0
}
定时任务模块
[root@node1 ~]# ansible-doc -s cron添加 name一定要添加,不然删除有问题(名字要唯一)
[root@node1 ~]# ansible all -m cron -a 'minute=*/3 job="/usr/sbin/update 192.168.1.200 &>/dev/null" name=updatetime state=present'
192.168.1.210 | SUCCESS => {
    "changed": true,
    "envs": [],
    "jobs": [
        "updatetime"
    ]
}

[root@node2 ~]# crontab -l
#Ansible: updatetime
*/3 * * * * /usr/sbin/update 192.168.1.200 &>/dev/null
删除 只看name 不要误删
[root@node1 ~]# ansible all -m cron -a 'minute=*/3 job="/usr/sbin/update 192.168.1.200 &>/dev/null" name=updatetime state=absent'yum模块
[root@node1 ~]# ansible-doc -s yum[root@node1 ~]# ansible all -m yum -a 'name=zsh state=present'service模块
[root@node1 ~]# ansible-doc -s service#`started'/`stopped'
[root@node1 ~]# ansible all -m service -a 'name=mynginx state=reloaded'远程脚本模块
[root@node1 ~]# ansible-doc -s script[root@node1 ~]# ansible 192.168.1.203 -m script -a 'script' 本地脚本到远端执行setup变量模块
[root@node1 playbooks]# ansible-doc -s setup[root@node1 playbooks]# ansible 192.168.1.201 -m setupplaybook
简单使用
[root@node1 ~]# mkdir playbooks
[root@node1 ~]# cd playbooks/
[root@node1 playbooks]# vim first.yml
- hosts: 192.168.1.201
  remote_user: root
  tasks:
  - name: install vsftpd
    yum:  name=vsftpd state=latest
  - name: config
    copy: src=/root/playbooks/vsftpd.conf dest=/etc/vsftpd/vsftpd.conf mode=600
    notify: restart vsftpd    # 通知下面 handlers name=restart vsftpd的项   如果文件没有修改,不会触发,(比较过文件)
  - name: start vsftpd
    service: name=vsftpd state=started enabled=false
  handlers:
   - name: restart vsftpd     #接收到通知执行
     service: name=vsftpd state=restarted

- hosts: 192.168.1.202
  tasks:
  - name: ip show
    shell: ip a

- hosts: all
  tasks:
  - name: list
    shell: ls
语法检查
[root@node1 playbooks]# ansible-playbook first.yml --syntax-check

playbook: first.yaml
主机任务查看
[root@node1 playbooks]# ansible-playbook --list-hosts --list-tasks first.yml试运行
[root@node1 playbooks]# ansible-playbook first.yml -C通知触发notify handlers
- hosts: 192.168.1.201
  remote_user: root
  tasks:
  - name: install vsftpd
    yum:  name=vsftpd state=latest
  - name: config
    copy: src=/root/playbooks/vsftpd.conf dest=/etc/vsftpd/vsftpd.conf mode=600
    notify: restart vsftpd    # 通知下面 handlers name=restart vsftpd的项
  - name: start vsftpd
    service: name=vsftpd state=started enabled=false
  handlers:
   - name: restart vsftpd     #接收到通知执行
     service: name=vsftpd state=restarted
执行指定标签tags
- hosts: 192.168.1.201
  remote_user: root
  tasks:
  - name: install vsftpd
    yum:  name=vsftpd state=latest
  - name: config
    copy: src=/root/playbooks/vsftpd.conf dest=/etc/vsftpd/vsftpd.conf mode=600
    notify: restart vsftpd
    tags: config   #指定标签
  - name: start vsftpd
    service: name=vsftpd state=started enabled=false
  handlers:
   - name: restart vsftpd
     service: name=vsftpd state=restarted
[root@node1 playbooks]# ansible-playbook -t config first.yml #根据标签执行变量
- hosts: websrvs
  remote_user: root
  vars:
  - pbvar: playbook var
  tasks:
  - name: command line vars
    copy: content={{ cmdvar }} dest=/tmp/cmd.var    #来自命令行穿参数
  - name: playbook var
    copy: content={{ pbvar }} dest=/tmp/pb.var        #来自上面的pbvar
  - name: host var
    copy: content={{ https_port }}{{ http_port  }} dest=/tmp/host.var   #来自host文件 组和host

host文件
[websrvs:vars]
http_port=8080

[websrvs]
192.168.1.201 https_port=4431  ansible_ssh_port=22 ansible_ssh_user=zander ansible_ssh_pass=zander
192.168.1.202 https_port=4432  ansible_ssh_port=22 ansible_ssh_user=zander ansible_ssh_pass=zander
[root@node1 playbooks]# ansible-playbook sencond.yml -e cmdvar='aaaaaaa'
[root@node2 ~]# cat /tmp/cmd.var
aaaaaaa[root@node2 ~]#
[root@node2 ~]# cat /tmp/pb.var
playbook var[root@node2 ~]#
[root@node2 ~]# cat /tmp/host.var
44318080[root@node2 ~]#模板
/root/playbooks/nginx.conf.j2:   变量查看setup模块
worker_processes  worker_processes {{ ansible_processor_vcpus-1 }};
#listen {{ ansible_ens34.ipv4.address }}

- hosts: websrvs
  remote_user: root
  vars:
  tasks:
  - name: command line vars
    template: src=/root/playbooks/nginx.conf.j2 dest=/tmp/nginx.conf
    when: ansible_distribution_major_version == "7"   #加判断

[root@node1 playbooks]# ansible-playbook sencond.yml

每个节点能用对应的变量
[root@node2 ~]# cat /tmp/nginx.conf
worker_processes  worker_processes 2;
#listen 192.168.1.201
[root@node3 ~]# cat /tmp/nginx.conf
worker_processes  worker_processes 2;
#listen 192.168.1.202
role 简单介绍
roles 定义路径
[root@node1 playbooks]# vim /etc/ansible/ansible.cfg
#roles_path    = /etc/ansible/roles
[root@node1 playbooks]# mkdir -pv /etc/ansible/roles/nginx/{files,templates,tasks,vars,handlers,meta,default}roles/
project/
tasks/ 定义task,role的基本元素,至少应该包含一个名为 main.yml的文件;其它的文件需要在此文件中通过include进行 包含
files/ 存放由copy或script模块等调用的文件
vars/ 不常用 定义变量,至少应该包含一个名为main.yml的文件;其 它的文件需要在此文件中通过include进行包含
default/ 不常用 设定默认变量时使用此目录中的main.yml文件
templates/ template模块查找所需要模板文件的目录
handlers/ 至少应该包含一个名为main.yml的文件;其它的文 件需要在此文件中通过include进行包含
meta/ 不常用 定义当前角色的特殊设定及其依赖关系,至少应该包含一 个名为main.yml的文件,其它文件需在此文件中通过include进 行包含[root@node1 tasks]# pwd
/etc/ansible/roles/nginx/tasks
[root@node1 tasks]# vim main.yml
- name: install nginx
yum: name=nginx state=latest
- name: install conf
template: src=vhost1.conf.j2 dest=/etc/nginx/conf.d/vhost1.conf #src 可以写相对路径 在role中[root@node1 playbooks]# vim nginx.yml
- hosts: websrvs
remote_user: root
roles:
- nginx