pssh 10-20台机器
系统装完之后,可以在系统上批量安装服务软件包,ansible由不同的模块组成,,目前为止已经有上千个模块,每个模块都是实现一个功能,由不同的组织开发,
1、运维自动化发展历程及技术应用
2、Ansible命令使用
3、Ansible常用模块详解
4、YAML语法简介
5、Ansible playbook基础 剧本,是一个脚本
6、Playbook变量、tags、handlers使用
7、Playbook模板templates
8、Playbook条件判断 when
9、Playbook字典 with_items
10、Ansible Roles
目录
ansible介绍:
ansible特性
实验环境
安装ansible
配置文件
配置主机清单
ansible命令
实现基于key验证
默认模块command
shell模块
#修改默认模块
scripts模块
copy模块:拷贝文件到远程主机
fetch模块 :抓取远程主机的信息
file模块
hostname主机模块
cron模块
YUM模块 适合红帽系列的系统
service模块
user模块
---------------------------
ansible-galaxy
andible-pull
#主机host清单inventory
#加密hello.yml
#交互式方式执行ansible-console
ansible介绍:
1、运维自动化介绍:
作用:上线新的软件,软件变更,软件升级
功能:运维自动化后期管理:装软件,装服务,推送服务,软件管理,适合一个规模的机器,专业级,自动化运维工具。
ansible是模块化组成,每个模块实现不同的自动化运维功能,模块由不同的人开发。ansiable到目前为止,已有上千个模块
ansible命令:由不同的子命令实现不同模块的功能
ansible playbook: ansible剧本,即命令,具体工作的规则(相当于一个脚本),用YAML语法实现
ansible roles:ansible角色(多个脚本的组合)
2、运维自动化发展历程:
@、本地部署(On-Premises):所有的工作均有自己公司的运维来做(安装机房空调,安装服务器,安装系统,机房规划,电力设施,软件开发,软件安装等)
@、基础设施即服务(IaaS):买一个半成品;如服务器,网络设施,机房等不用自己做,只需要购买就可以了(如阿里云的虚拟机:cpu,内存,带宽)
@、平台即服务(Paas):由一定的平台提供服务,即服务器,操作系统,开发平台,网络设施等均购买,自己开发软件部署即可(如阿里云的开发平台)
@、软件即服务(Saas):所有的一切均是购买(如微信,QQ,公司购买的邮件服务,云环境等基于网络的服务)
IAAS:Infrastructure as a Service :联想卖电脑等硬件
PAAS:Platform as a Service:卖操作系统
SAAS:Software as a Servie:卖android软件,红帽卖服务
图1
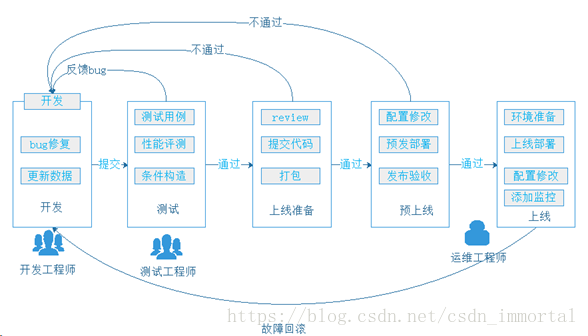
Develop开发环境
使用者:程序员
功能:程序员开发软件,测试BUG的环境
管理者:程序员
测试环境
使用者:QA测试工程师
功能:测试经过Dev环境测试通过的软件的功能
管理者:运维
说明:测试环境往往有多套,测试环境满足测试功能即可,不宜过多
1、测试人员希望测试环境有多套,公司的产品多产品线并发,即多个版本, 意味着多个版本同步测试
2、通常测试环境有多少套和产品线数量保持一样
企业实际应用场景分析
发布环境:代码发布机,有些公司为堡垒机(安全屏障)
使用者:运维
功能:发布代码至生产环境
管理者:运维(有经验)
发布机:往往需要有2台(主备)
生产环境
使用者:运维,少数情况开放权限给核心开发人员,极少数公司将权限完全 开放给开发人员并其维护
功能:对用户提供公司产品的服务
管理者:只能是运维
生产环境服务器数量:一般比较多,且应用非常重要。往往需要自动工具协 助部署配置应用。
企业实际应用场景分析
灰度环境(生产环境的一部分)
使用者:运维
功能:在全量发布代码前将代码的功能面向少量精准用户发布的环境,可基于主机或用户执行灰度发布
案例:共100台生产服务器,先发布其中的10台服务器,这10台服务器就 是灰度服务器
管理者:运维
灰度环境:往往该版本功能变更较大,为保险起见特意先让一部分用户优化 体验该功能,待这部分用户使用没有重大问题的时候,再全量发布至所有服务器
程序发布
程序发布要求:
不能导致系统故障或造成系统完全不可用
不能影响用户体验
预发布验证:
新版本的代码先发布到服务器(跟线上环境配置完全相同,只是未接入到调度器)
灰度发布:
发布路径:
/webapp/tuangou #软链接,指向/webapp/tuangou-1.1
/webapp/tuangou-1.1 #旧版本
/webapp/tuangou-1.2 #新版本
发布过程:在调度器上下线一批主机(标记为maintanance状态) --> 关闭服务 --> 部 署新版本的应用程序 --> 启动服务 --> 在调度器上启用这一批服务器
自动化灰度发布:脚本、发布平台
自动化动维应用场景
文件传输
命令执行
应用部署
配置管理
任务流编排
ansible python语言编写,控制端/被控制端;主控/被控;被控制端装一个(agent,ssh) 一对多
ansible的被控制端基于ssh代理,需要把所有机器实现ssh的key验证,可以把主控端的key对复制到所有被控端,适合几百台机器。。
2012-03-09,发布0.0.1版,红帽收购
2015-10-17,Red Hat宣布收购
#Saltstack:python语言,一般需部署agent,执行效率高,适合千台服务器规模。
#Puppet:ruby语言,功能强大,配置复杂,重型,适合大型环境,上万台服务器
ansible创始人为Michael DeHaan ,其还开发了cobbler自动化安装操作系统工具
https://github.com/ 网址搜索ansible有源代码,可以查看,如图2

ansible特性
模块化:调用特定的模块,完成特定任务
有Paramiko,PyYAML,Jinja2(模板语言)三个关键模块
支持自定义模块
基于Python语言实现
部署简单,基于python和SSH(默认已安装),agentless
安全,基于OpenSSH
支持playbook编排任务
幂等性:一个任务执行1遍和执行n遍效果一样,不因重复执行带来意外情况
无需代理不依赖PKI(无需ssl)
可使用任何编程语言写模块
YAML格式,编排任务,支持丰富的数据结构
较强大的多层解决方案
ansible命令Ad-Hoc 可以管理liunx和网络,windows系统也可以管理(用的少)
ansible playbook 脚本
ansible role playbook集合
ANSIBLE PL AYBOOKS:任务剧本(任务集),编排定义Ansible任务集的配置 文件,由Ansible顺序依次执行,通常是JSON格式的YML文件
INVENTORY:Ansible管理主机的清单/etc/anaible/hosts
MODULES:Ansible执行命令的功能模块,多数为内置核心模块,也可自定义
PLUGINS:模块功能的补充,如连接类型插件、循环插件、变量插件、过滤插件等,该功能不常用
API:供第三方程序调用的应用程序编程接口
ANSIBLE:组合INVENTORY、API、MODULES、PLUGINS的绿框,可以理解 为是ansible命令工具,其为核心执行工具
实验环境
3个centos7,1个centos6 。利用一个centos7(192.168.31.7做主控端),其余均为被控制端
[root@centos7:~]# hostname ansible
[root@centos7:~]# exit
[root@ansible:~]#
[root@centos6 ~ ]#
[root@centos7:~]# hostnamectl set-hostname centos7-1
[root@centos7-1:~]#
[root@cos7:~ ]# hostnamectl set-hostname centos7-2
[root@cos7:~ ]# exit
logout
Connecting to 192.168.31.27:22...
Connection established.
To escape to local shell, press 'Ctrl+Alt+]'.
Last login: Sat Jul 28 19:05:27 2018 from 192.168.31.1
[root@centos7-2:~ ]#
安装ansible
[root@ansible:~]# yum install ansible
[root@ansible:~]# ansible --version
ansible 2.6.1
config file = /etc/ansible/ansible.cfg #主配置文件
configured module search path = [u'/root/.ansible/plugins/modules', u'/usr/share/ansible/plugins/modules']
ansible python module location = /usr/lib/python2.7/site-packages/ansible
executable location = /usr/bin/ansible
python version = 2.7.5 (default, Apr 11 2018, 07:36:10) [GCC 4.8.5 20150623 (Red Hat 4.8.5-28)]
[root@ansible:~]# rpm -ql ansible #ansible 组成文件
[root@ansible:~]# rpm -ql ansible | grep .service #没有对应的服务
ansible不是一个服务,只是一个管理软件
[root@ansible:~]# which ansible
/usr/bin/ansible
[root@ansible:~]# ll /usr/bin/ansible
lrwxrwxrwx 1 root root 20 Jul 19 14:02 /usr/bin/ansible -> /usr/bin/ansible-2.7
[root@ansible:~]# file /usr/bin/ansible
/usr/bin/ansible: symbolic link to `/usr/bin/ansible-2.7'
[root@ansible:~]# file /usr/bin/ansible-2.7
/usr/bin/ansible-2.7: empty #python脚本,文本文件
[root@ansible:~]# cat /usr/bin/ansible-2.7
配置文件
/etc/ansible/ansible.cfg 主配置文件,配置ansible工作特性
/etc/ansible/hosts 主机清单
/etc/ansible/roles/ 存放角色的目录
程序
/usr/bin/ansible 主程序,临时命令执行工具 非交互
/usr/bin/ansible-doc 查看配置文档,模块功能查看工具
/usr/bin/ansible-galaxy 下载/上传优秀代码或Roles模块的官网平台
/usr/bin/ansible-playbook 定制自动化任务,编排剧本工具/usr/bin/ansible-pull
程序执行命令的工具
/usr/bin/ansible-vault 文件加密工具
/usr/bin/ansible-console 基于Console界面与用户交互的执行工具
配置主机清单
[root@ansible:~]# rpm -qf /etc/ansible/hosts
ansible-2.6.1-1.el7.noarch
[root@ansible:~]# vim /etc/ansible/hosts #最后一行添加如下内容
192.168.31.6
192.168.31.[1:2]7
[root@ansible:~]# ansible 192.168.31.6 -m ping -k
SSH password:
192.168.31.6 | SUCCESS => {
"changed": false,
"ping": "pong"
}
# -m 指定模块名称,此处的ping和网络的ping不同,ping测试192.168.31.6是否存活,-k 密码方式连接,默认基于ssh的key验证
[root@ansible:~]# vim /etc/ansible/ansible.cfg
[defaults]
#inventory = /etc/ansible/hosts # 主机列表配置文件
#library = /usr/share/my_modules/ # 库文件存放目录
#remote_tmp = $HOME/.ansible/tmp #临时py命令文件存放在远程主机目录
#local_tmp = $HOME/.ansible/tmp # 本机的临时命令执行目录
#forks = 5 # 默认并发数
#sudo_user = root # 默认sudo 用户
#ask_sudo_pass = True #每次执行ansible命令是否询问ssh密码
#ask_pass = True
#remote_port = 22
#host_key_checking = False # 检查对应服务器的host_key,建议取消注释
#log_path=/var/log/ansible.log #日志文件
实验取消host_key_checking的注释和log的注释
[root@ansible:~]# ansible 192.168.31.6 -m ping -k
[root@ansible:~]# tail /var/log/ansible.log
[root@ansible:~]# ansible-doc --help
Usage: ansible-doc [-l|-F|-s] [options] [-t <plugin type> ] [plugin]
[root@ansible:~]# ansible-doc -l |wc -l
1852
#-s 模块简要说明,不加-s详细说明
[root@ansible:~]# ansible-doc -s ping
- name: Try to connect to host, verify a usable python and return `pong' on success
ping:
data: # Data to return for the `ping' return value. If this parameter
is set to `crash', the module
will cause an exception.
ansible命令
ansible通过ssh实现配置管理、应用部署、任务执行等功能,建议配置ansible端能基于密钥认证的方式联系各被管理节点
ansible <host-pattern> [-m module_name] [-a args]
--version 显示版本
-m module 指定模块,默认为command
-v 详细过程 –vv -vvv更详细
--list-hosts 显示主机列表,可简写—list
-k, --ask-pass 提示输入ssh连接密码,默认Key验证
-K, --ask-become-pass 提示输入sudo时的口令
-C, --check 检查,并不执行
-T, --timeout=TIMEOUT 执行命令的超时时间,默认10s
-u, --user=REMOTE_USER 执行远程执行的用户
-b, --become 代替旧版的sudo 切换
[root@ansible:~]# ansible all -m ping -k
#dhy用户,-k密码 -K sudo提升权限时要求的密码
[root@ansible:~]# ansible all -m ping -u dhy -k -K
SSH password:
SUDO password[defaults to SSH password]:
[root@centos7-1:~]# usermod -aG wheel dhy
#-k 连接时使用的密码, -K 连接后提升权限使用的密码
[root@ansible:~]# ansible 192.168.31.17 -m command -a 'ls /root' -u dhy -k -b -K
SSH password: #输入dhy用户的密码dhy
SUDO password[defaults to SSH password]: #输入dhy的密码dhy
192.168.31.17 | SUCCESS | rc=0 >>
为了不输入sudo验证时的面,可以在17机器上
[root@centos7-1:~]# vim /etc/sudoers
%wheel ALL=(ALL) NOPASSWD:ALL
[root@ansible:~]# ansible 192.168.31.17 -m command -a 'ls /root' -u dhy -k -b
SSH password:
192.168.31.17 | SUCCESS | rc=0 >>
实现基于key验证
[root@ansible:~]# ssh-keygen
[root@ansible:~]# ssh-copy-id [email protected]
[root@ansible:~]# ssh-copy-id 192.168.31.17
[root@ansible:~]# ssh-copy-id 192.168.31.27
[root@ansible:~]# ansible 192.168.31.17 -m command -a 'ls /root'
[root@ansible:~]# ansible all -m command -a 'ls /root'
#对主机清单做一下分组,在配置文件最后的内容如下
[root@ansible:~]# vim /etc/ansible/hosts
[web]
192.168.31.6
192.168.31.17
[app]
192.168.31.17
192.168.31.27
[test]
192.168.31.17
192.168.31.27
192.168.31.6
#测试一下 ,不执行
[root@ansible:~]# ansible all -m ping -C
192.168.31.27 | SUCCESS => {
"changed": false,
"ping": "pong"
}
192.168.31.6 | SUCCESS => {
"changed": false,
"ping": "pong"
}
192.168.31.17 | SUCCESS => {
"changed": false,
"ping": "pong"
}
#-v详细信息
[root@ansible:~]# ansible all -m ping -C -v
[root@ansible:~]# ansible all -m ping -C -vv
[root@ansible:~]# ansible all -m ping -C -vvv
[root@ansible:~]# ansible all -m ping -C -vvv > ansible.log
[root@ansible:~]# grep chmod ansible.log
<192.168.31.27> SSH: EXEC ssh -vvv -C -o ControlMaster=auto -o ControlPersist=60s -o StrictHostKeyChecking=no -o KbdInteractiveAuthentication=no -o PreferredAuthentications=gssapi-with-mic,gssapi-keyex,hostbased,publickey -o PasswordAuthentication=no -o ConnectTimeout=10 -o ControlPath=/root/.ansible/cp/d7098d7a55 192.168.31.27 '/bin/sh -c '"'"'chmod u+x /root/.ansible/tmp/ansible-tmp-1532785573.71-259177618795085/ /root/.ansible/tmp/ansible-tmp-1532785573.71-259177618795085/ping.py && sleep 0'"'"''
[root@ansible:~]# grep rm ansible.log
'rm -f -r /root/.ansible/tmp/ansible-tmp
#ansible执行过程,把脚本拷到目标机器的一个临时文件,加执行权限,执行脚本,执行完后,删除脚本
#颜色显示含义
[root@ansible:~]# vi /etc/ansible/ansible.cfg
[colors]
#highlight = white
#verbose = blue
#warn = bright purple
#error = red
#debug = dark gray
#deprecate = purple
#skip = cyan
#unreachable = red
#ok = green #执行成功并且不需要做改变的操作
#changed = yellow #执行成功并且对目标主机做变更
#diff_add = green
#diff_remove = red #执行失败
#diff_lines = cyan
ansible 中的Host-pattern
[root@centos7:~]# vim /etc/ansible/hosts
[websrvs]
192.168.31.6
192.168.31.17
[appsrvs]
192.168.31.17
192.168.31.27
#通配符
[root@centos7:~]# ansible "*srvs" -m ping
192.168.31.6 | SUCCESS => {
"changed": false,
"ping": "pong"
}
192.168.31.27 | SUCCESS => {
"changed": false,
"ping": "pong"
}
192.168.31.17 | SUCCESS => {
"changed": false,
"ping": "pong"
}
#通配符 :表示或的关系
[root@centos7:~]# ansible "websrvs:appsrvs" -m ping
192.168.31.6 | SUCCESS => {
"changed": false,
"ping": "pong"
}
192.168.31.27 | SUCCESS => {
"changed": false,
"ping": "pong"
}
192.168.31.17 | SUCCESS => {
"changed": false,
"ping": "pong"
}
#与的关系:&
[root@centos7:~]# ansible "websrvs:&appsrvs" -m ping
192.168.31.17 | SUCCESS => {
"changed": false,
"ping": "pong"
}
#:!表示排出 且需要用单引号
[root@centos7:~]# ansible 'websrvs:!appsrvs' -m ping
192.168.31.6 | SUCCESS => {
"changed": false,
"ping": "pong"
}
#支持正则表达式
默认模块command
#-a是command的参数,command是ansible的默认模块,-m可以不写
[root@centos7:~]# ansible all -m command -a "ls /root"
#帮助文档
[root@centos7:~]# ansible-doc command
[root@centos7:~]# ansible all -m command -a "chdir=/root ls"
[root@centos7:~]# ansible all -m command -a 'useradd ansibleuser1'
[root@centos7:~]# ansible all -m command -a 'getent passwd ansibleuser1'
[root@centos7:~]# ansible all -m command -a 'userdel -r ansibleuser1'
#显示的是本机的主机名,不是目标的主机名
[root@centos7:~]# ansible all -m command -a "echo $HOSTNAME"
192.168.31.6 | SUCCESS | rc=0 >>
centos7
192.168.31.17 | SUCCESS | rc=0 >>
centos7
192.168.31.27 | SUCCESS | rc=0 >>
centos7
command对管道符等支持的不是太好,使用shell模块
[root@centos7:~]# ansible-doc -s shell
[root@centos7:~]# ansible-doc -s command
[root@centos7:~]# ansible-doc shell
--------------
[root@centos7:~]# ansible all -m command -a "getent passwd dhy"
192.168.31.6 | SUCCESS | rc=0 >>
dhy:x:500:500::/home/dhy:/bin/bash
192.168.31.27 | SUCCESS | rc=0 >>
dhy:x:1000:1000:dhy:/home/dhy:/bin/bash
192.168.31.17 | SUCCESS | rc=0 >>
dhy:x:1000:1000:dhy:/home/dhy:/bin/bash
[root@centos7:~]# ansible all -m command -a "echo centos| passwd --stdin dhy"
192.168.31.6 | SUCCESS | rc=0 >>
centos| passwd --stdin dhy
192.168.31.27 | SUCCESS | rc=0 >>
centos| passwd --stdin dhy
192.168.31.17 | SUCCESS | rc=0 >>
centos| passwd --stdin dhy
--------------------------上述未更改成功
shell模块
[root@centos7:~]# ansible all -m shell -a "echo centos| passwd --stdin dhy"
192.168.31.6 | SUCCESS | rc=0 >>
Changing password for user dhy.
passwd: all authentication tokens updated successfully.
192.168.31.17 | SUCCESS | rc=0 >>
Changing password for user dhy.
passwd: all authentication tokens updated successfully.
192.168.31.27 | SUCCESS | rc=0 >>
Changing password for user dhy.
passwd: all authentication tokens updated successfully.
[root@centos7:~]# ansible all -m shell -a 'echo $HOSTNAME'
192.168.31.6 | SUCCESS | rc=0 >>
centos6.magedu.com
192.168.31.27 | SUCCESS | rc=0 >>
centos7-2
192.168.31.17 | SUCCESS | rc=0 >>
centos7-1
-------------------------------------上述shell执行成功
#修改默认模块
[root@centos7:~]# vim /etc/ansible/ansible.cfg
module_name = shell
[root@centos7:~]# ansible all -a 'echo $HOSTNAME'
192.168.31.27 | SUCCESS | rc=0 >>
centos7-2
192.168.31.6 | SUCCESS | rc=0 >>
centos6.magedu.com
192.168.31.17 | SUCCESS | rc=0 >>
centos7-1
-------------------------
scripts模块
[root@centos6:~]# vim f1.sh
#!/bin/bash
echo $HOSTNAME
[root@centos6 ~ ]#chmod +x f1.sh
[root@centos7:~]# ansible 192.168.31.6 -a '/root/f1.sh'
192.168.31.6 | SUCCESS | rc=0 >>
centos6
-----
#scripts模块可以把ansible主机上的脚本推送到远程主机执行
[root@centos7:~]vim f2.sh
#!/bin/bash
echo $HOSTNAME
[root@centos7:~]# ansible 192.168.31.6 -m script -a '/root/f2.sh'
192.168.31.6 | SUCCESS => {
"changed": true,
"rc": 0,
"stderr": "Shared connection to 192.168.31.6 closed.\r\n",
"stderr_lines": [
"Shared connection to 192.168.31.6 closed."
],
"stdout": "/root/.bashrc: line 8: aliaz: command not found\r\ncentos6\r\n",
"stdout_lines": [
"/root/.bashrc: line 8: aliaz: command not found",
"centos6"
]
}
copy模块:拷贝文件到远程主机
[root@centos7:~]# ansible-doc -s copy
[root@centos7:~]# ansible all -m copy -a 'src=/etc/hosts dest=/data/host2'
[root@centos7:~]# ansible all -m copy -a 'src=/etc/passwd dest=/data/host2 backup=yes'
#覆盖了host2文件
[root@centos7:~]# ansible all -m copy -a 'src=/etc/passwd dest=/data/host2'
[root@centos7:~]# ansible all -m copy -a 'content="line1\nline2" dest=/data/test.txt'
[root@centos7:~]# ansible all -m copy -a 'content="line1\nline2" dest=/data/test.txt owner=dhy'
[root@centos7:~]# ansible all -a copy -a 'cat /data/test.txt'
192.168.31.6 | SUCCESS | rc=0 >>
line1
line2
192.168.31.27 | SUCCESS | rc=0 >>
line1
line2
192.168.31.17 | SUCCESS | rc=0 >>
line1
line2
#拷贝/etc/sysconfig/目录下的内容到/data/下。 若果是/etc/sysconfig 则拷贝的是目录sysconfig
[root@centos7:~]# ansible all -m copy -a 'src=/etc/sysconfig/ dest=/data/'
[root@centos7:~]# ansible all -a 'rm -rf /data/*'
[WARNING]: Consider using the file module with state=absent rather than running rm. If you need to use #建议用file模块
command because file is insufficient you can add warn=False to this command task or set
command_warnings=False in ansible.cfg to get rid of this message.
192.168.31.27 | SUCCESS | rc=0 >>
fetch模块 :抓取远程主机的信息
[root@centos7:~]# ansible-doc fetch
[root@centos7:~]# ansible all -m fetch -a 'src=/var/log/secure dest=/data/'
[root@centos7:~]# tree /data
/data
├── 192.168.31.17
│ └── var
│ └── log
│ └── secure
├── 192.168.31.27
│ └── var
│ └── log
│ └── secure
├── 192.168.31.6
│ └── var
│ └── log
│ └── secure
file模块
[root@centos7:~]# ansible-doc file
#删除文件absent即删除
[root@centos7:~]# ansible all -m file -a 'path=/data/test state=absent'
#建空文件
[root@centos7:~]# ansible all -m file -a 'path=/data/test state=touch'
[root@centos7:~]# ansible all -a 'ls /data'
[root@centos7:~]# ansible all -m file -a 'path=/data/test.txt state=touch mode=600'
[root@centos7:~]# ansible all -m file -a 'path=/data state=directory'
[root@centos7:~]# ansible all -m file -a 'path=/data/test.txt state=touch mode=600'
#创建软链接
[root@centos7:~]# ansible all -m file -a 'src=/data/test.txt dest=/data/testlink.txt state=link'
[root@centos7:~]# ansible all -a 'ls -l /data'
192.168.31.6 | SUCCESS | rc=0 >>
total 0
lrwxrwxrwx 1 root root 14 Jul 29 14:46 testlink.txt -> /data/test.txt
-rw------- 1 root root 0 Jul 29 14:45 test.txt
#创建硬链接
[root@centos7:~]# ansible all -m file -a 'src=/data/test.txt dest=/data/testlink2.txt state=hard'
[root@centos7:~]# ansible all -a 'ls -li /data'
192.168.31.6 | SUCCESS | rc=0 >>
total 0
393219 -rw------- 2 root root 0 Jul 29 14:45 testlink2.txt
393220 lrwxrwxrwx 1 root root 14 Jul 29 14:46 testlink.txt -> /data/test.txt
393219 -rw------- 2 root root 0 Jul 29 14:45 test.txt
hostname主机模块
[root@centos7:~]# ansible-doc -s hostname
- name: Manage hostname
hostname:
name: # (required) Name of the host
[root@centos7:~]# ansible 192.168.31.6 -m hostname -a 'name=centos6.dhy.com'
192.168.31.6 | SUCCESS => {
"ansible_facts": {
"ansible_domain": "dhy.com",
"ansible_fqdn": "centos6.dhy.com",
"ansible_hostname": "centos6",
"ansible_nodename": "centos6.dhy.com"
},
"changed": true,
"name": "centos6.dhy.com"
}
[root@centos6 ~ ]#cat /etc/sysconfig/network
NETWORKING=yes
HOSTNAME=centos6.dhy.com
cron模块
[root@centos7:~]# ansible all -a 'crontab -l'
[root@centos7:~]# ansible-doc -s cron
[root@centos7:~]# which ntpdate
/usr/sbin/ntpdate
[root@centos7:~]# ansible all -m cron -a 'minute=*/5 weekday=1-5 name=synctime job="/usr/bin/nptdate 1721.18.0.1&> /dev/null"'
192.168.31.6 | SUCCESS => {
"changed": true,
"envs": [],
"jobs": [
"synctime"
]
}
192.168.31.27 | SUCCESS => {
"changed": true,
"envs": [],
"jobs": [
"synctime"
]
}
192.168.31.17 | SUCCESS => {
"changed": true,
"envs": [],
"jobs": [
"synctime"
]
}
[root@centos7:~]# ansible all -a 'crontab -l'
192.168.31.6 | SUCCESS | rc=0 >>
#Ansible: synctime
*/5 * * * 1-5 /usr/bin/nptdate 1721.18.0.1&> /dev/null
192.168.31.27 | SUCCESS | rc=0 >>
#Ansible: synctime
*/5 * * * 1-5 /usr/bin/nptdate 1721.18.0.1&> /dev/null
192.168.31.17 | SUCCESS | rc=0 >>
#Ansible: synctime
*/5 * * * 1-5 /usr/bin/nptdate 1721.18.0.1&> /dev/null
[root@centos7:~]# ansible all -m cron -a 'minute=*/5 weekday=1-5 disabled=yes name=synctime job="/usr/bin/nptdate 1721.18.0.1&> /dev/null"'
192.168.31.27 | SUCCESS => {
"changed": true,
"envs": [],
"jobs": [
"synctime"
]
}
[root@centos7:~]# ansible all -m cron -a ' name=synctime state=absent'
192.168.31.6 | SUCCESS => {
"changed": true,
"envs": [],
"jobs": []
}
192.168.31.27 | SUCCESS => {
"changed": true,
"envs": [],
"jobs": []
}
192.168.31.17 | SUCCESS => {
"changed": true,
"envs": [],
"jobs": []
}
YUM模块 适合红帽系列的系统
[root@centos7:~]# ansible-doc yum
[root@centos7:~]# ansible all -a 'rpm -q httpd'
[WARNING]: Consider using the yum, dnf or zypper module rather than running rpm. If you need to use
command because yum, dnf or zypper is insufficient you can add warn=False to this command task or set
command_warnings=False in ansible.cfg to get rid of this message.
192.168.31.6 | SUCCESS | rc=0 >>
httpd-2.2.15-59.el6.centos.x86_64
192.168.31.27 | FAILED | rc=1 >>
package httpd is not installednon-zero return code
192.168.31.17 | SUCCESS | rc=0 >>
httpd-2.4.6-80.el7.centos.x86_64
#安装httpd
[root@centos7:~]# ansible all -m yum -a ' name=httpd state=present'
[root@centos7:~]# ansible all -m yum -a ' name=httpd state=absent'
service模块
[root@centos7:~]# ansible-doc -s service
[root@centos7:~]# ansible all -m service -a 'name=httpd state=started'
[root@centos7:~]# ansible all -a 'ss -ntl | grep :80'
192.168.31.6 | SUCCESS | rc=0 >>
LISTEN 0 128 :::80 :::*
192.168.31.27 | SUCCESS | rc=0 >>
LISTEN 0 128 :::80 :::*
192.168.31.17 | SUCCESS | rc=0 >>
LISTEN 0 128 :::80 :::*
user模块
[root@centos7:~]# ansible-doc user
[root@centos7:~]# ansible all -m user -a 'name=testuser system=yes groups=dhy,bin shell=/bin/bash'
192.168.31.6 | SUCCESS => {
"changed": true,
"comment": "",
"create_home": true,
"group": 493,
"groups": "dhy,bin",
"home": "/home/testuser",
"name": "testuser",
"shell": "/bin/bash",
"state": "present",
"system": true,
"uid": 496
}
[root@centos7:~]# ansible all -a 'getent passwd testuser'
192.168.31.6 | SUCCESS | rc=0 >>
testuser:x:496:493::/home/testuser:/bin/bash
192.168.31.27 | SUCCESS | rc=0 >>
testuser:x:988:983::/home/testuser:/bin/bash
192.168.31.17 | SUCCESS | rc=0 >>
testuser:x:1001:1001::/home/testuser:/bin/bash
[root@centos7:~]# ansible all -a 'id testuser'
192.168.31.6 | SUCCESS | rc=0 >>
uid=496(testuser) gid=493(testuser) groups=493(testuser),1(bin),500(dhy)
#remove表示移除家目录,不过系统账号默认不创建家目录
[root@centos7:~]# ansible all -m user -a 'name=testuser state=absent remove=yes'
ansible-galaxy
galaxy银河表示开源组织上传发布的roles,多个人的ansible使用总结
连接 https://galaxy.ansible.com 下载相应的roles
列出所有已安装的galaxy
ansible-galaxy list
安装galaxy
ansible-galaxy install geerlingguy.redis
删除galaxy
ansible-galaxy remove geerlingguy.redis
如图3

[root@centos7:~]# ansible-galaxy install ajsalminen.hosts
- downloading role 'hosts', owned by ajsalminen
- downloading role from https://github.com/ajsalminen/ansible-role-hosts/archive/master.tar.gz
- extracting ajsalminen.hosts to /root/.ansible/roles/ajsalminen.hosts
- ajsalminen.hosts (master) was installed successfully
[root@centos7:~]# cd .ansible/roles/ajsalminen.hosts
[root@centos7:ajsalminen.hosts]# tree
.
├── defaults
│ └── main.yml
├── meta
│ └── main.yml
├── README.md
├── tasks
│ ├── hostname.yml
│ ├── hosts.yml
│ └── main.yml
├── templates
│ ├── hostname.j2
│ └── hosts.j2
└── vars
└── FreeBSD.yml
5 directories, 9 files
[root@centos7:roles]# pwd
/root/.ansible/roles
[root@centos7:roles]# ls
ajsalminen.hosts
[root@centos7:roles]# ll
total 0
drwxr-xr-x 7 root root 93 Jul 29 14:39 ajsalminen.hosts
[root@centos7:roles]# cp -r ajsalminen.hosts/ dhy.hosts
[root@centos7:roles]# ll
total 0
drwxr-xr-x 7 root root 93 Jul 29 14:39 ajsalminen.hosts
drwxr-xr-x 7 root root 93 Jul 29 14:43 dhy.hosts
andible-pull
[root@centos7:~]# ansible
ansible ansible-console-2 ansible-galaxy-2 ansible-pull
ansible-2 ansible-console-2.7 ansible-galaxy-2.7 ansible-pull-2
ansible-2.7 ansible-doc ansible-inventory ansible-pull-2.7
ansible-config ansible-doc-2 ansible-playbook ansible-vault
ansible-connection ansible-doc-2.7 ansible-playbook-2 ansible-vault-2
ansible-console ansible-galaxy ansible-playbook-2.7 ansible-vault-2.7
[root@centos7:ajsalminen.hosts]# pwd
/root/.ansible/roles/ajsalminen.hosts
[root@centos7:ajsalminen.hosts]# cat defaults/main.yml
#主机host清单inventory
[root@centos7:~]# vim /etc/ansible/hosts
[websrvs]
192.168.31.6
192.168.31.17
[appsrvs]
192.168.31.17
192.168.31.27
[test]
192.168.31.6
192.168.31.17
192.168.31.27
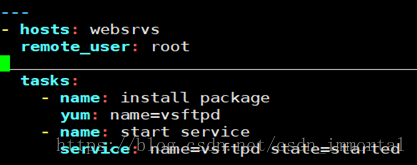
[root@centos7:~]# vim hello.yml
如图4
[root@centos7:~]# ansible-playbook hello.yml
[root@centos7:~]# ansible websrvs -a 'ss -ntlp | grep vsftpd'
192.168.31.6 | SUCCESS | rc=0 >>
LISTEN 0 32 *:21 *:* users:(("vsftpd",25661,3))
192.168.31.17 | SUCCESS | rc=0 >>
LISTEN 0 32 :::21 :::* users:(("vsftpd",pid=37333,fd=3))
[root@centos7:~]# vim hello.yml
- hosts: websrvs
remote_user: root
tasks:
- name: install package
yum: name=vsftpd
- name: start service
service: name=vsftpd state=started
- name: change password
shell: echo centos | passwd --stdin root
#加密hello.yml
[root@centos7:~]# ansible-vault encrypt hello.yml
New Vault password:
Confirm New Vault password:
Encryption successful
#查看
[root@centos7:~]# ansible-vault view hello.yml
Vault password:
#解密
[root@centos7:~]# ansible-vault decrypt hello.yml
#交互式方式执行ansible-console
[root@centos7:~]# ansible-console
Welcome to the ansible console.
Type help or ? to list commands.
root@all (3)[f:5]$ #并发执行数 fork
[root@centos7:~]# ansible all --list-hosts
hosts (3):
192.168.31.6
192.168.31.17
192.168.31.27
[root@centos7:~]# ansible websrvs --list
hosts (2):
192.168.31.6
192.168.31.17