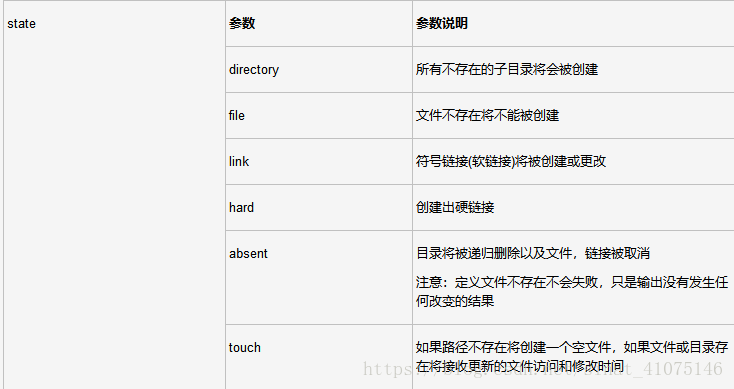
一、Ansible介绍
1.1 一些常用的自动化运维工具
Puppet —基于 Ruby 开发,采用 C/S 架构,扩展性强,基于 SSL,远程命令执行相对较弱
SaltStack —基于 Python 开发,采用 C/S 架构,相对 puppet 更轻量级,配置语法使用 YMAL,使得配置 脚本更简单。
1.2 Ansible —基于 Pythonparamiko 开发,分布式,无需客户端,轻量级,配置语法使用 YMAL 及 Jinja2 模板语言,
更强的远程 命令执行操作 ,Ansible 是一个简单的自动化运维管理工具,可以用来自动化部署应用、配置、
编排 task(持续 交 付、无宕机更新等),采用paramiko 协议库(fabric 也使用这个),通过 SSH 或者 ZeroMQ 等连接主机。
1.3 Ansible 工作机制
Ansible 在管理节点将 Ansible 模块通过 SSH 协议(或者 Kerberos、LDAP)推送到被管理端执 行,执行完之后自动删除,
可以使用SVN 等来管理自定义模块及编排
1.4 Ansible 的组成由 5 个部分组成:
①,Ansible:核心引擎(包含2个模块)
核心模块:ansible模块资源分发到远程节点使其执行特定任务或匹配一个特定的状态。
自定义模块:如果核心模块不足以完成某种功能,可以添加自定义模块。
②,Plugins:完成模块功能的补充,包括连接插件、邮件插件等
③,Playbooks:定义ansible任务的配置文件,可以将多个任务定义在一个剧本中,
④,由ansible自动执行,剧本执行支持多个任务,可以由控制主机运行多个任务,同时对多台远程主机进行管理。
⑤,Inventory:定义 Ansible 管理主机的清单
1.5、Ansible 软件特点概述 ;
01.不需要单独安装客户端 (no agents),基于系统自带的sshd服务,sshd就相当于ansible的客户端
02.不需要服务端 (no servers)
03.需要依靠大量的模块实现批量管理
04.配置文件 /etc/ansible/ansible.cfg (无需配置)
二 、正式开始 Ansible 部署
Ansible 部署环境
[root@m01 ~]# cat /etc/redhat-release
CentOS release 6.9 (Final) 3 台

2.1,ansible 部署需要 :
部署主控端 -----> ssh+key免密码登录 -----> 被控端
如下图所示 :

2.2 , Ansible 命令格式 ;

三、使用 yum 安装 Ansible ,一些依赖包会被自动安装 ;
[root@m01 ~]# yum install ansible -y --->>> 在m01 也就是主控端安装
已加载插件:fastestmirror
设置安装进程
Loading mirror speeds from cached hostfile
epel/metalink
已安装:
ansible.noarch 0:2.5.5-1.el6
作为依赖被安装:
PyYAML.x86_64 0:3.10-3.1.el6 libyaml.x86_64 0:0.1.3-4.el6_6 python-babel.noarch 0:0.9.4-5.1.el6
python-crypto2.6.x86_64 0:2.6.1-2.el6 python-httplib2.noarch 0:0.7.7-1.el6 python-jinja2-26.noarch 0:2.6-3.el6
python-keyczar.noarch 0:0.71c-1.el6 python-markupsafe.x86_64 0:0.9.2-4.el6 python-pyasn1.noarch 0:0.0.12a-1.el6
python-setuptools.noarch 0:0.6.10-3.el6 python-simplejson.x86_64 0:2.0.9-3.1.el6 python-six.noarch 0:1.9.0-2.el6
sshpass.x86_64 0:1.06-1.el6
完毕!
3.1 、 查看一下都安装那些相关的软件包 ;
[root@m01 ~]# rpm -ql ansible
3.2 、 vim 编辑 hosts 配置文件 下方添加你要远程连接也就是被控端的服务器IP地址 、便于 Ansible控制
[root@m01 ~]# cd /etc/ansible/
[root@m01 ansible]# ls
ansible.cfg hosts roles
[root@m01 ansible]# vim hosts
[root@m01 ansible]# tail hosts
## 10.25.1.57
# Here's another example of host ranges, this time there are no
# leading 0s:
## db-[99:101]-node.example.com
[test] ---->> 定义一个组名称 ,到时候批量的时候可以使用模块名字,也可以是IP地址
172.16.1.41
172.16.1.31
[root@m01 ansible]#
四 、 配置秘钥对 ;
在主控服务器上操作 ;
[root@m01 ~]# ssh-keygen -t dsa --->> 执行 ssh-keygen -t dsa 创建秘钥对 ,剩余 默认直接回车即可
Generating public/private dsa key pair.
Enter file in which to save the key (/root/.ssh/id_dsa):
Created directory '/root/.ssh'.
Enter passphrase (empty for no passphrase):
Enter same passphrase again:
Your identification has been saved in /root/.ssh/id_dsa.
Your public key has been saved in /root/.ssh/id_dsa.pub.
The key fingerprint is:
fe:bf:d7:cb:91:19:50:78:68:91:e9:62:24:75:86:4d root@m01
The key's randomart image is:
+--[ DSA 1024]----+
| ..+E*. |
| . ooB.. |
| o o.. |
| o .. |
| S . . . |
| . +|
| . = |
| . o o|
| ..oo o.|
+-----------------+
[root@m01 ~]#
参数说明:
-t 这种加密是用数字加密的
dsa 一种加密方式
4.1 检查是否生成的秘钥对;
[root@m01 ~]# ll /root/.ssh/
总用量 8
-rw-------. 1 root root 668 11月 18 12:45 id_dsa
-rw-r--r--. 1 root root 598 11月 18 12:45 id_dsa.pub
[root@m01 ~]#
4.2 、 公钥上传 到被控端 ;
公钥 和 私钥 的区分 ;
后缀为 .pub 的就是公钥 , 反之即为私钥 ,我们上传公钥到被控端主机上 。
[root@m01 ~]# ssh-copy-id -i ~/.ssh/id_dsa.pub [email protected]
The authenticity of host '172.16.1.31 (172.16.1.31)' can't be established.
RSA key fingerprint is 1c:3f:1f:21:72:28:80:b0:53:05:08:82:2f:5c:05:e3.
Are you sure you want to continue connecting (yes/no)? yes
Warning: Permanently added '172.16.1.31' (RSA) to the list of known hosts.
[email protected]'s password:
Now try logging into the machine, with "ssh '[email protected]'", and check in:
.ssh/authorized_keys
to make sure we haven't added extra keys that you weren't expecting.
[root@m01 ~]# ssh-copy-id -i ~/.ssh/id_dsa.pub [email protected]
The authenticity of host '172.16.1.41 (172.16.1.41)' can't be established.
RSA key fingerprint is 1c:3f:1f:21:72:28:80:b0:53:05:08:82:2f:5c:05:e3.
Are you sure you want to continue connecting (yes/no)? yes
Warning: Permanently added '172.16.1.41' (RSA) to the list of known hosts.
[email protected]'s password:
Now try logging into the machine, with "ssh '[email protected]'", and check in:
.ssh/authorized_keys
to make sure we haven't added extra keys that you weren't expecting.
[root@m01 ~]#
测试
(验证是否实现基于密钥访问服务器,即实现非交互方式) ;
[root@m01 ~]# ssh 172.16.1.31
Last login: Thu Jul 12 12:57:47 2018 from 10.0.0.1
[root@NFS ~]#
ssh 172.16.1.41 "free -m" --->> 不登录远程主机,直接执行命令显示远程主机输出信息
[root@m01 ~]# ssh 172.16.1.41 "free -m"
total used free shared buffers cached
Mem: 1861 236 1624 0 24 70
-/+ buffers/cache: 142 1719
Swap: 199 0 199
[root@m01 ~]# ssh 172.16.1.41 "ip a"
1: lo: <LOOPBACK,UP,LOWER_UP> mtu 65536 qdisc noqueue state UNKNOWN
link/loopback 00:00:00:00:00:00 brd 00:00:00:00:00:00
inet 127.0.0.1/8 scope host lo
inet6 ::1/128 scope host
valid_lft forever preferred_lft forever
2: eth0: <BROADCAST,MULTICAST,UP,LOWER_UP> mtu 1500 qdisc pfifo_fast state UP qlen 1000
link/ether 00:0c:29:2e:6d:d9 brd ff:ff:ff:ff:ff:ff
inet 10.0.0.41/24 brd 10.0.0.255 scope global eth0
inet6 fe80::20c:29ff:fe2e:6dd9/64 scope link
valid_lft forever preferred_lft forever
3: eth1: <BROADCAST,MULTICAST,UP,LOWER_UP> mtu 1500 qdisc pfifo_fast state UP qlen 1000
link/ether 00:0c:29:2e:6d:e3 brd ff:ff:ff:ff:ff:ff
inet 172.16.1.41/24 brd 172.16.1.255 scope global eth1
inet6 fe80::20c:29ff:fe2e:6de3/64 scope link
valid_lft forever preferred_lft forever
[root@m01 ~]#
[root@m01 ~]# ssh 172.16.1.31 "ip a"
1: lo: <LOOPBACK,UP,LOWER_UP> mtu 65536 qdisc noqueue state UNKNOWN
link/loopback 00:00:00:00:00:00 brd 00:00:00:00:00:00
inet 127.0.0.1/8 scope host lo
inet6 ::1/128 scope host
valid_lft forever preferred_lft forever
2: eth0: <BROADCAST,MULTICAST,UP,LOWER_UP> mtu 1500 qdisc pfifo_fast state UP qlen 1000
link/ether 00:0c:29:c0:f2:c9 brd ff:ff:ff:ff:ff:ff
inet 10.0.0.31/24 brd 10.0.0.255 scope global eth0
inet6 fe80::20c:29ff:fec0:f2c9/64 scope link
valid_lft forever preferred_lft forever
3: eth1: <BROADCAST,MULTICAST,UP,LOWER_UP> mtu 1500 qdisc pfifo_fast state UP qlen 1000
link/ether 00:0c:29:c0:f2:d3 brd ff:ff:ff:ff:ff:ff
inet 172.16.1.31/24 brd 172.16.1.255 scope global eth1
inet6 fe80::20c:29ff:fec0:f2d3/64 scope link
valid_lft forever preferred_lft forever
[root@m01 ~]#
4.3 、公钥和私钥之间的关系上图理解 ;

测试批量执行 ;
[root@m01 ~]# ansible test -m command -a "hostname" ----->> command 是ansible的一个默认模块,test 是配置文件里的模块名称 ,这里也可以加IP地址 。
172.16.1.41 | SUCCESS | rc=0 >>
rsync
172.16.1.31 | SUCCESS | rc=0 >>
NFS
[root@m01 ~]#

五 、 ansible 常用的命令和常用模块参数 ;


Ansible 几个常用的模块作用
======================================================================
command --- 执行命令
shell --- 执行脚本 执行命令(万能模块 支持正则或特殊符号信息)
script --- 执行脚本
yum --- 模块
file --- 模块 设置文件属性
六 、Ansible 在执行的时候每个颜色表示:
=====================================================================
# 查询命令,执行ansible命令后,没有发生改变,表示绿色
# 执行ansible命令,发生配置改变时,表示黄色
# 执行ansible命令,出现异常表示红色
七,各个模块实例以及模块说明 ;
7.1 ,ping 模块 ;
[root@m01 ~]# ansible test -m ping
172.16.1.41 | SUCCESS => {
"changed": false,
"ping": "pong"
}
172.16.1.31 | SUCCESS => {
"changed": false,
"ping": "pong"
}
[root@m01 ~]#
7.2 ,command模块 ;
实例01 ;
[root@m01 ~]# ansible test -m command -a "date" ----->>查看时间日期
172.16.1.41 | SUCCESS | rc=0 >>
2018年 07月 18日 星期三 13:28:06 CST
172.16.1.31 | SUCCESS | rc=0 >>
2018年 07月 18日 星期三 13:27:32 CST
[root@m01 ~]#
实例02 ;
[root@m01 ~]# ansible test -m command -a "chdir=/tmp ls" ----->>查看目录
172.16.1.41 | SUCCESS | rc=0 >>
1.log
2.log
3.log
4.log
5.log
ansible_spdn5U
yum.log
172.16.1.31 | SUCCESS | rc=0 >>
ansible_F7qJ98
yum.log
7.3 , debug模块 ;
msg:设置打印自定义消息;如果忽略,则打印通用信息
[root@m01 ~]# ansible test -m debug -a "msg=test"
172.16.1.41 | SUCCESS => {
"msg": "test"
}
172.16.1.31 | SUCCESS => {
"msg": "test"
}
7.4 ,copy模块 ;

模块概要:
a.copy模块拷贝文件从本地或远程机器到远程机器的一个目录区域中;使用fetch模块来拷贝文件从远程区域到本地
b.如果需要复制文件中插入的变量值,可以使用template模块
说明:第一次执行时结果为黄色,即文件传输;第二次执行没有发生任何改变,即为绿
实例01. 使用copy 模块,将/etc/sysconfig/network文件传输到各个服务器,;
[root@m01 ~]# ansible test -m copy -a "src=/etc/sysconfig/network dest=/tmp/"
172.16.1.41 | SUCCESS => {
"changed": false,
"checksum": "becc64eaef427158cda369fe92db9837c718544c",
"dest": "/tmp/network",
"gid": 0,
"group": "root",
"mode": "0644",
"owner": "root",
"path": "/tmp/network",
"secontext": "unconfined_u:object_r:admin_home_t:s0",
"size": 28,
"state": "file",
"uid": 0
}
172.16.1.31 | SUCCESS => {
"changed": false,
"checksum": "becc64eaef427158cda369fe92db9837c718544c",
"dest": "/tmp/network",
"gid": 0,
"group": "root",
"mode": "0644",
"owner": "root",
"path": "/tmp/network",
"secontext": "unconfined_u:object_r:admin_home_t:s0",
"size": 28,
"state": "file",
"uid": 0
7.5 , shell 模块 ;
注意:shell模块在远程执行脚本时,远程主机上一定要有相应的脚本
实例01. 把脚本文件复制到远程服务器,执行远程服务器的脚本
[root@m01 ~]# ansible test -m shell -a "/bin/sh /tmp/ssh-key.sh"
172.16.1.31 | SUCCESS | rc=0 >>
172.16.1.41 ok
172.16.1.31 ok
172.16.1.41 | SUCCESS | rc=0 >>
172.16.1.41 ok
172.16.1.31 ok
实例02. 把/etc/hosts文件中的内容重定向到/banana.txt 中 ;
[root@m01 ~]# ansible test -m shell -a "cat /etc/hosts >/banana.txt"
172.16.1.41 | SUCCESS | rc=0 >>
172.16.1.31 | SUCCESS | rc=0 >>
说明:可支持command模块不能完成的特殊符号,同时汇总所有的模块
7.6 ,file模块 ;

实例01,远程创建目录 ;
[root@m01 ~]# ansible test -m file -a "dest=/tmp/yuancheng-dir state=directory"
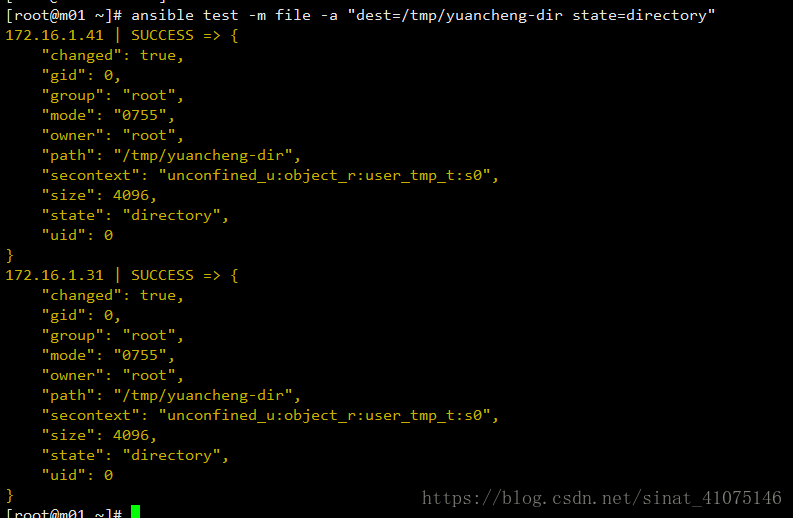
到 tmp 目录下查看一下 ;

实例02.创建远端文件 ;
[root@m01 ~]# ansible test -m file -a "dest=/tmp/yuancheng-file state=touch"

在 tmp 目录下 查看 file 文件是否创建成功 ;

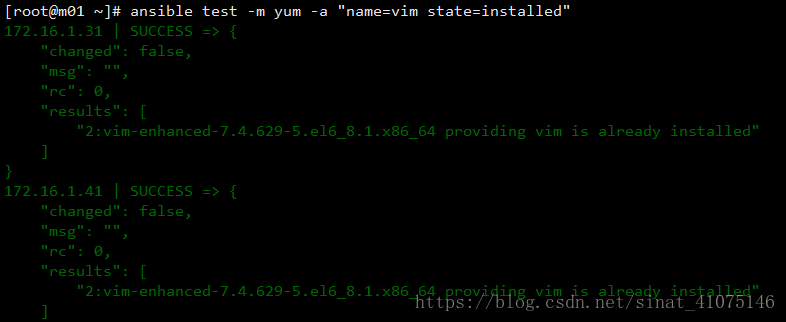
7.7 , yum模块 ;

实例01. 安装 vim 服务 ;
[root@m01 ~]# ansible test -m yum -a "name=vim state=installed"
7.8 , service模块 ;

实例01 ,重启crond 并设置为开机自动启动 ;
[root@m01 ~]# ansible test -m service -a "name=crond state=restarted enabled=yes"
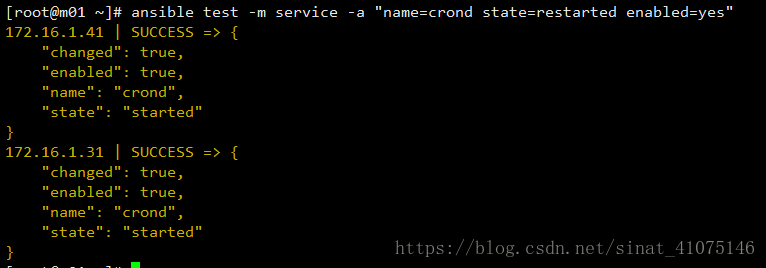
说明:name 即服务的名称,表示将名为crond的服务重启,并且加入开机自启动中 ;
7.9 ,cron 模块 ;
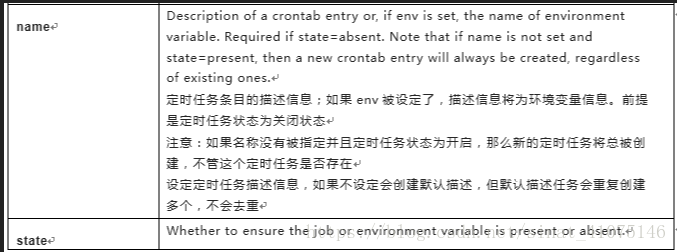


实例01.创建定时任务 ;
[root@m01 ~]# ansible test -m cron -a "name=01 minute=*/5 job='/usr/sbin/ntpdate time.nist.gov >/dev/null 2>&1'"

[root@rsync ~]# crontab -l ---->>> 到被控端 crontab -l 查看下定时任务 ;
#Ansible: 01
*/5 * * * * /usr/sbin/ntpdate time.nist.gov >/dev/null 2>&1
[root@rsync ~]#
实例02.查看定时任务 ;
[root@m01 ~]# ansible test -m shell -a "crontab -l"

实例03.删除定时任务 ;
[root@m01 ~]# ansible test -m cron -a "name=None minute=*/5 job='/usr/sbin/ntpdate time.nist.gov >/dev/null 2>&1' state=absent"

7.10 , fetch模块 ;
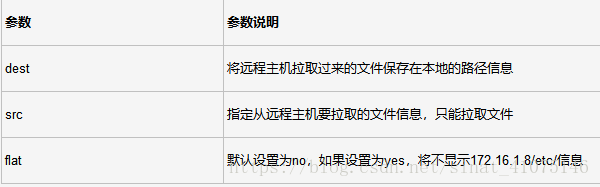
实例01.从远程主机拉取文件 ;
[root@m01 ~]# ansible test -m fetch -a "dest=/tmp src=/etc/hosts"
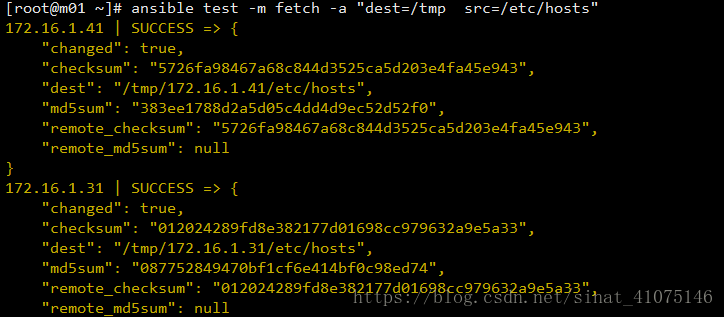
在Ansible管理机上查看一下是否拉过来文件 ;

实例02.拉取时不创建目录(同名文件会覆盖) ;
[root@m01 ~]# ansible test -m fetch -a "dest=/tmp/ src=/etc/hosts flat=yes"


7.11 ,mount模块 ;

实例01.创建挂载 ;
[root@m01 ~]# ansible test -m mount -a "fstype=nfs opts=ro src=172.16.1.31:/data path=/mnt state=mounted"


实例02.卸载 ;
[root@m01 ~]# ansible test -m mount -a "fstype=nfs opts=ro src=172.16.1.31:/data path=/mnt state=unmounted"


八 、Ansible 剧本功能 ;
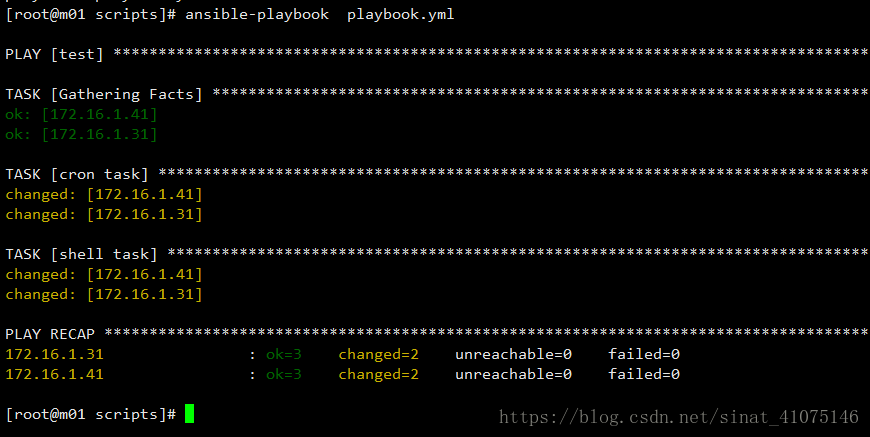
[root@m01 scripts]# vim playbook.yml ---->>> 这里必须是 yml 后缀
[root@m01 scripts]# cat playbook.yml ---->>> 创建一个定时任务的剧本 ;
#command play-book
- hosts: test
tasks:
- name: cron taskzh cron: name=test01 minute=0 hour=1 job='/bin/sh /server/scripts/yum.sh /dev/null'
- name: shell task
shell: echo "$HOSTNAME" >>/tmp/hostname.txt
[root@m01 scripts]#
执行剧本的几个命令 ;
ansible-playbook --syntax-check cron.yml ---->> 检查语法
ansible-playbook -C cron.yml ---->> 模拟执行
ansible-playbook cron.yml ---->>执行这个剧本
实例02 使用剧本功能批量创建, rsync服务端和客户端 ;
[root@m01 scripts]# cat rsync.yml
# command play-book
- hosts: 172.16.1.41
tasks:
- name: step01:install rsync
yum: name=rsync state=installed
- name: step02:edit rsync conf file
copy: src=/etc/ansible/conf/rsync_conf/rsyncd.conf dest=/etc/
- name: step03:create rsync user
shell: userdel -r rsync && useradd rsync -s /sbin/nologin -M
- name: step04:create auth file
copy: src=/etc/ansible/conf/rsync_conf/rsync.password dest=/etc/ mode=600
- name: step05:create backup dir
file: dest=/backup state=directory owner=rsync group=rsync
- name: step06:boot rsync server
shell: rsync --daemon
- hosts: 172.16.1.31
tasks:
- name: step02:create auth file
copy: src=/etc/ansible/conf/rsync_conf/rsync_client.password dest=/etc/rsync.password mode=600
[root@m01 scripts]#

8.1 , 剧本编写方式
01.多主机单任务编写方式
02.多主机多任务编写方式
03.不同主机多任务编写方式
8.2 , ansible编写剧本排错思路
1. ansible-playbook编写完,检査语法和模拟测试运行
2.打开剧本,定位异常问題原因,将剧本中的内容转换命令执行一次
3. 将参数中的脚本文件推送到远程屎务器,在远程服务器本地执行脚本 sh -x test.sh
说明:ansible执行时,加上-vvvv显示ansible详细执行过程,也可以定位异常原因
--syntax-check或-C ansible语法检查和模拟执行(彩排)
8.3 , 排错逻辑
01.剧本执行中的错误
02.把剧本中的内容转换为ansible命令执行
ansible banana -m yum -a "name=rsync state=installed"
03.把参数中的脚本文件推送到远端服务器,放在远端被管理服务器本地上执行