一、N卡驱动下载 官方 GeForce 驱动程序 | NVIDIA 选自动更新下载
在cmd输入nvidia-smi
如果返回以下类似结果,说明驱动已经成功安装。

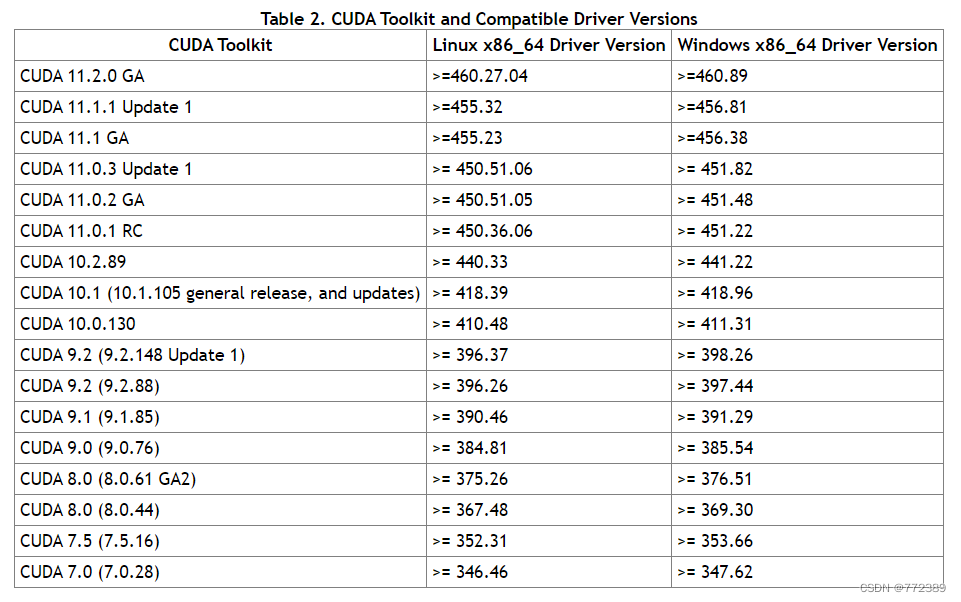
查看本机 CUDA 驱动版本,确认 CUDA Toolkit 的兼容版本。
在桌面上,右键,选择 “NVIDIA 控制面板”,然后,在 “NVIDIA 控制面板” 窗口中,单击 左下角的 “系统信息” ,即可显示 CUDA 驱动版本信息,如下图所示
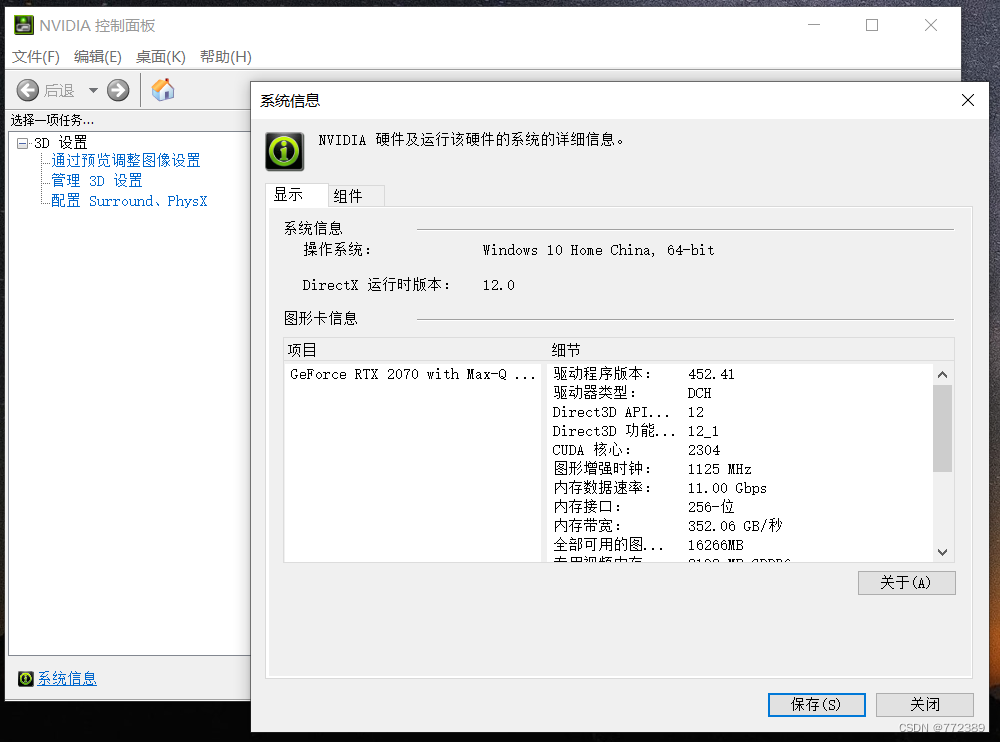
查看网上文档 CUDA Toolkit Release Note 中的 "Table 2. CUDA Toolkit and Compatible Driver Versions" 以确认本机CUDA驱动版本(上图中的 "驱动程序版本:452.41")是否与当前最新的 CUDA Toolkit 版本兼容,其内容截图如下:
(不过一般自动安装最新的)
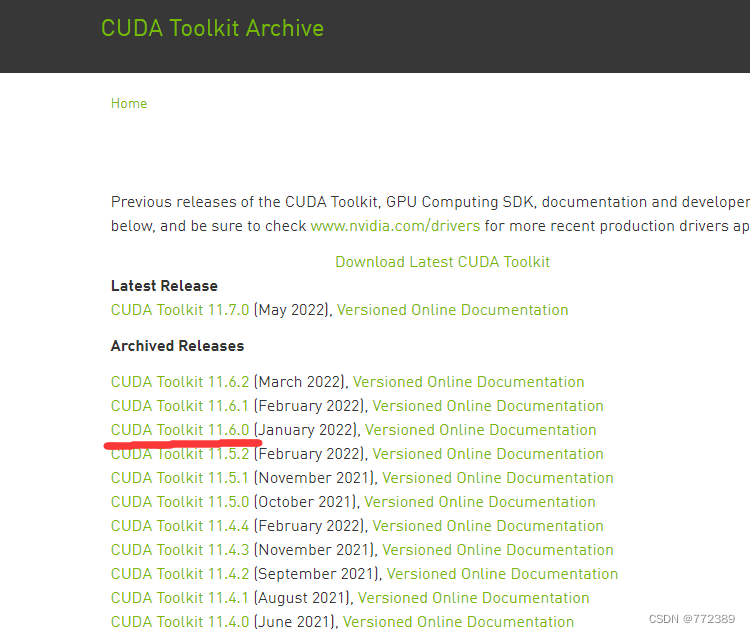
二、cuda下载页面CUDA Toolkit Archive | NVIDIA Developer
这里下载的是11.6.0
cuda环境变量设置
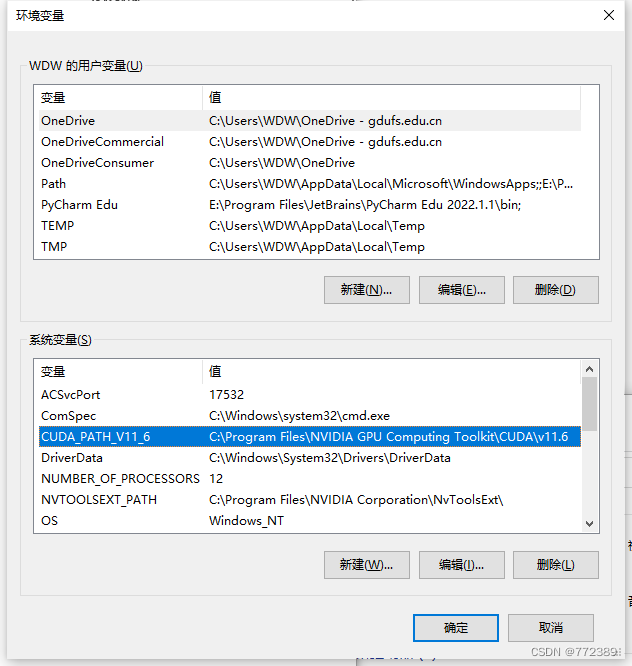

配置好环境后,我们需要验证环境变量是否配置成功:
打开cmd,我们进入到以下路径:
Cd C:\Program Files\NVIDIA GPU Computing Toolkit\CUDA\v11.6\extras\demo_suite
然后分别执行以下两个命令:.\bandwidthTest.exe
和.\deviceQuery.exe

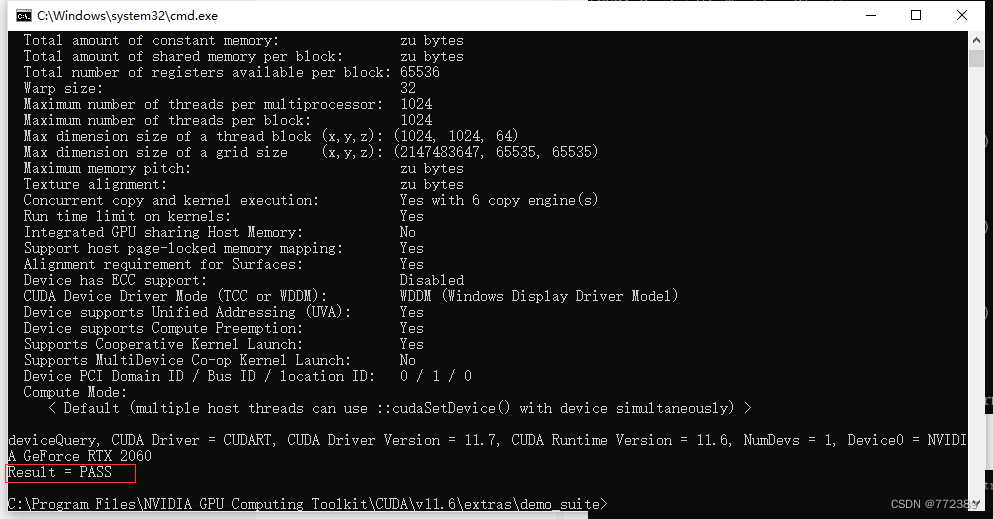
如果Result都为PASS的话则配置成功
我们可以继续查询cuda信息,在cmd输入 nvcc –V或者 nvidia-smi然后查看版本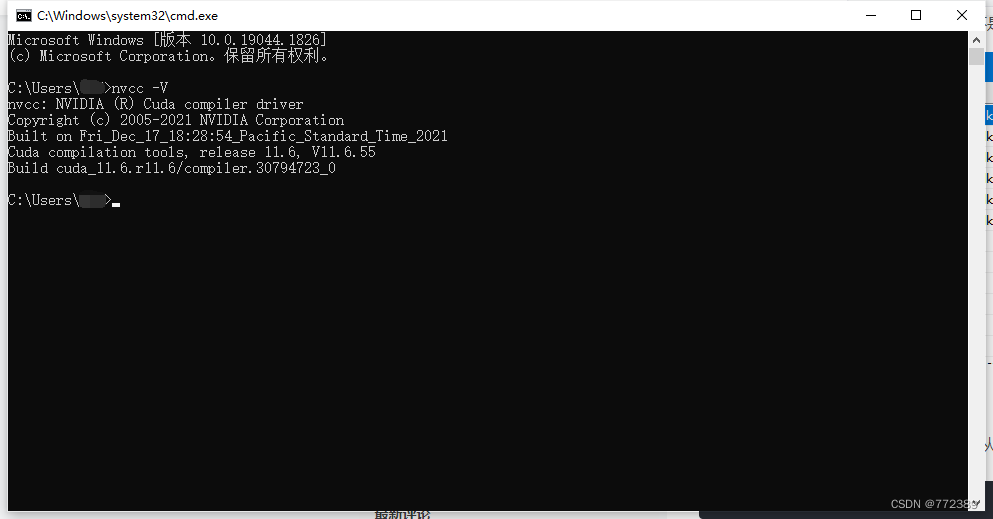
(这里不知道为什么显示的是11.7)正常应该是11.6
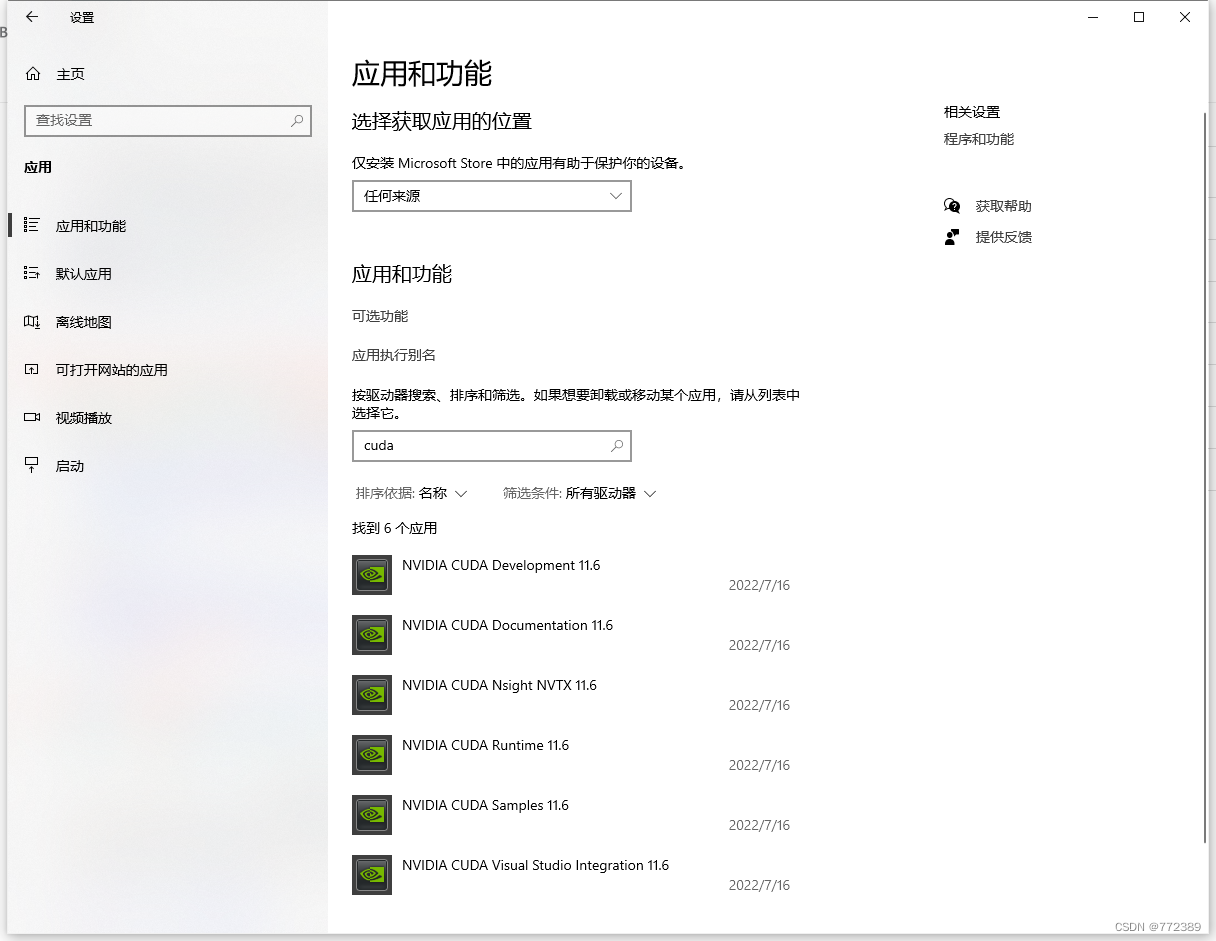
(要卸载cuda卸载带有你下载的对应版本号的就行例如)
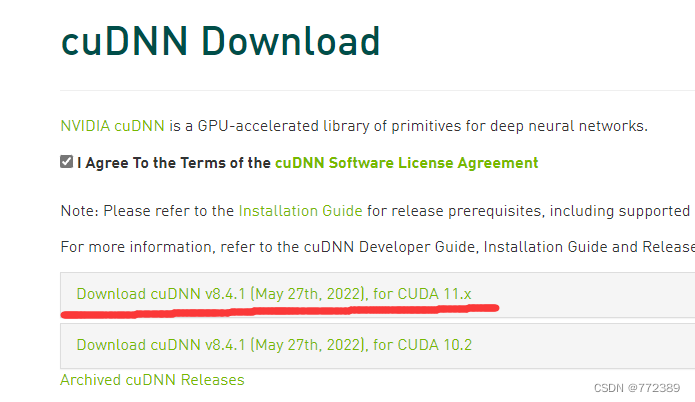
三、CuDnn下载页面 CUDA Deep Neural Network (cuDNN) | NVIDIA Developer 注意与cuda版本对应
这里选择的是11.x
-
把cuDNN文件夹下面的bin,include,lib文件夹里面的内容复制到CUDA文件夹下面对应的bin,include,lib文件夹里面文件夹内,一定要注意
-
然后再把CUDA文件夹下面extras\CUPTI\libx64下的 cupti64_2022.1.0.dll 拷贝到 bin目录。
四、新建虚拟python环境,先将pip升级到最新,这里是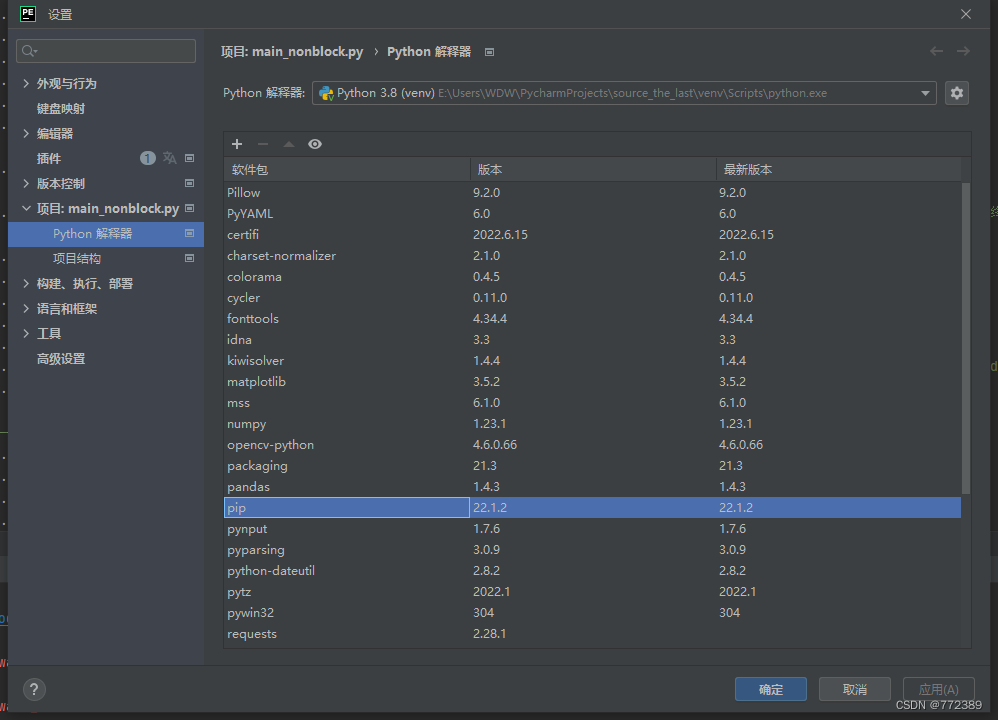
然后在idea的终端 安装以下:( CUDA、pytorch、torchvision版本一定要对应!!! 这里的版本组合是cuda11.6,pytorch1.12.0,torchvision 0.13.0, torchaudio 0.12.0)
组合查看Previous PyTorch Versions | PyTorch
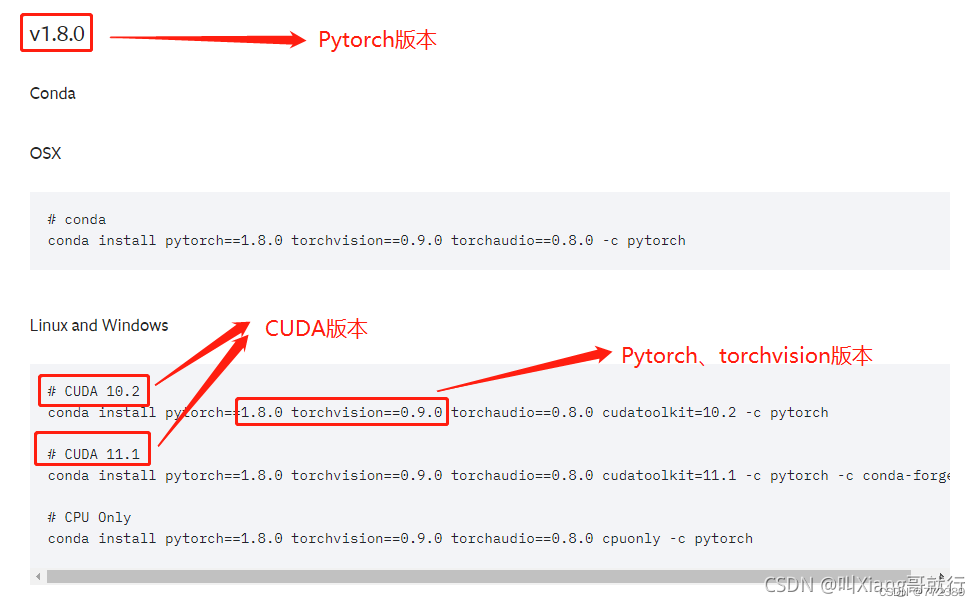
pytorch,选择对应的版本复制安装 Start Locally | PyTorch
这里使用pytorch1.12.0搭配cuda11.6: pip3 install torch torchvision torchaudio --extra-index-url https://download.pytorch.org/whl/cu116
然后是在download.pytorch.org/whl/torch_stable.html 下载torchaudio-0.12.0+cu116-cp38-cp38-win_amd64.whl ,
复制到项目目录里,到终端安装pip install torchaudio-0.12.0+cu116-cp38-cp38-win_amd64.whl
然后还是这个网站下载 torchvision-0.13.0+cu116-cp38-cp38-win_amd64.whl,复制到项目目录里,到终端安装,pip install torchvision-0.13.0+cu116-cp38-cp38-win_amd64.whl
上面这个网站里的cpu就是cpu版的pytorch,也可以在这里下载安装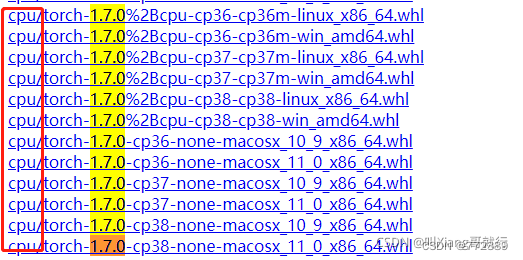
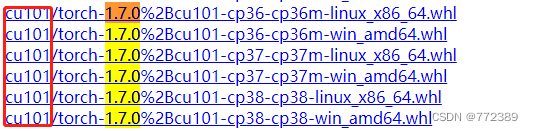
下面这张就是适用于CUDA10.1的Pytorch-1.7.0版本(cu101是cuda10.1,torch就是pytorch,cp38是指python版本3.8,后面win就是windows系统)
安装完后检查
Pytorch版本查看
//idea控制台-输入
python
import torch print(torch.__version__)
#上方的_是两个杠杠

显示安装了1.12.0并且适用cuda11.6的pytorch,如果没有后面的cu116,只有1.12.0,那就是cpu版。
或者 import torch
print(torch.cuda.is_available())
若安装成功,则打印输出 True
torchvision版本查看
// idea控制台 -输入
python
import torchvision
print(torchvision.__version__)
#上方的_是两个 杠杠

显示安装了0.13.0并且适用cuda11.6的torchvision。
(如果只是在cpu跑,并且显示没有gpu环境,那就是版本之间不兼容,请检查以上版本组合)
常见问题

python安装cv2出现如下错误:Could not find a version that satisfies the requirement cv2 (from versions: )
安装yaml不成功
参考(25条消息) 如何安装Python的yaml包(windows 和 Linux)_legendary_Dragon的博客-CSDN博客_yaml安装
小资料:tensorflow下载 Links for tensorflow-gpu (aliyun.com)
GPU 支持 | TensorFlow (google.cn)
(25条消息) YOLOV5使用过程中可能出现的问题及解决方法_sixian666的博客-CSDN博客
print(tf.config.list_physical_devices('GPU'))
2022-07-17 00:07:42.163961: I tensorflow/core/platform/cpu_feature_guard.cc:193] This TensorFlow binary is optimized with oneAPI Deep Neural Network Library (oneDNN) to use the following CPU instructions in performance-critical operations: AVX AVX2
To enable them in other operations, rebuild TensorFlow with the appropriate compiler flags.
2022-07-17 00:07:42.647452: I tensorflow/core/common_runtime/gpu/gpu_device.cc:1532] Created device /device:GPU:0 with 10063 MB memory: -> device: 0, name: NVIDIA GeForce RTX 2060, pci bus id: 0000:01:00.0, compute capability: 7.5
/device:GPU:0
[PhysicalDevice(name='/physical_device:GPU:0', device_type='GPU')]
查看是否有GPU:
import tensorflow as tf
gpu_device_name = tf.test.gpu_device_name()
print(gpu_device_name)
查看GPU是否可用,返回 True 或者 False
tf.test.is_gpu_available()
检查Tensorflow-gpu是否可用
tf.config.list_physical_devices('GPU')
(25条消息) 安装tensorflow的GPU版本(详细图文教程)--CUDA11.6的安装_Aaron-ywl的博客-CSDN博客_cuda安装tensorflow