目录
1、前言
Future 模式是多线程开发中非常常见的一种设计模式,它的核心思想是异步调用。当我们需要调用一个函数方法时,如果这个函数执行得很慢,那么我们就要进行等待。但有时候,我们可能并不急着要结果。因此,我们可以让被调者立即返回,让它在后台慢慢处理这个请求。对于调用者来说,则可以先处理一些其他任务,在真正需要数据的场合再去尝试获得需要的数据。
2、什么是Future
大白话理解就是,Future 模式有点类似在网上买东西。如果我们在网上下单买了一部手机,当我们支付完成后,手机并没有办法立即送到家里,但是在电脑上会立即产生一个订单。这个订单就是将来发货或者领取手机的重要凭证,这个凭证也就是 Future 模式中会给出的一个契约。在支付活动结束后,大家不会傻傻地等着手机到来,而是各忙各的。而这张订单就成了商家配货、发货的驱动力。
对于Future模式来说,他虽然无法给出你需要的数据,但是他会返回一个契约给你,将来你可以凭借这个契约去重新获取你需要的信息。
而java.util.concurrent.Future是一个接口,是用于表示异步计算结果的抽象。它代表了一个可能在未来完成的计算,可以用于获取计算结果、取消计算、查询计算是否完成等操作。Java 5引入的Future接口为异步编程提供了方便的抽象,可以更好地处理并发和并行任务。
2.1、传统程序调用

传统的调用方式,当客户端发出call请求,需要等到call_01调用call_02,且call_02和call_01返回后,其他的任务才能执行(self call)。
2.2、Future模式调用
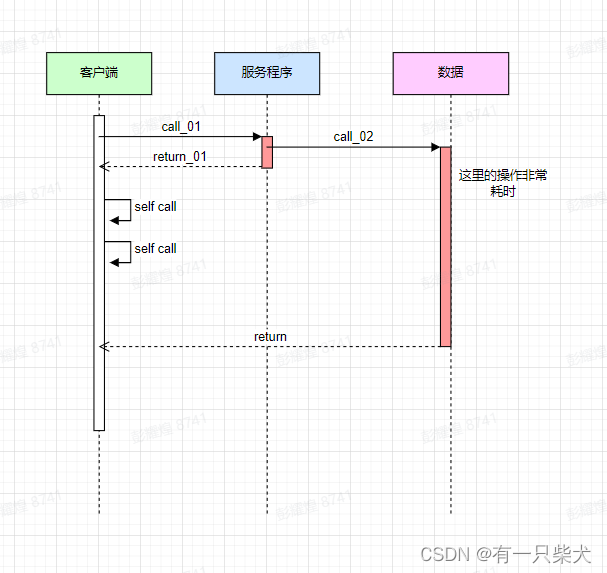
从上图可以看到,call_02时,数据本身需要很长一段时间来处理才能返回结果。但是,服务程序无需等待数据处理完成,便可以提前返回给客户端一个伪造的数据(相当上面提到的凭证,而不是数据本身)。实现了客户端拿到这个返回结果后,不用着急对其处理,而是可以先去完成其他的业务瑞吉(如self call),而无需阻塞等待call_02的执行结束。充分利用了等待时间。在完成了其他业务逻辑处理后,再去使用返回慢的Future数据。
3、JDK中的Future
前面说到Future模式的一个基本概念以及雏形,这个模式其实在项目中是很常用的。所以JDK内部已经为我们准备了一套完整的实现。那就是Future,Future是个接口,对具体的Runnable和Callable任务进行取消,查询获取结果,并会检索计算结果。get()获取任务结果,该任务是阻塞的。

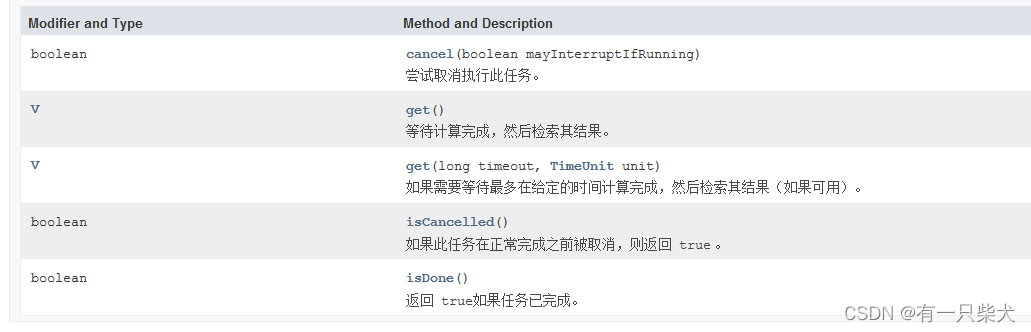
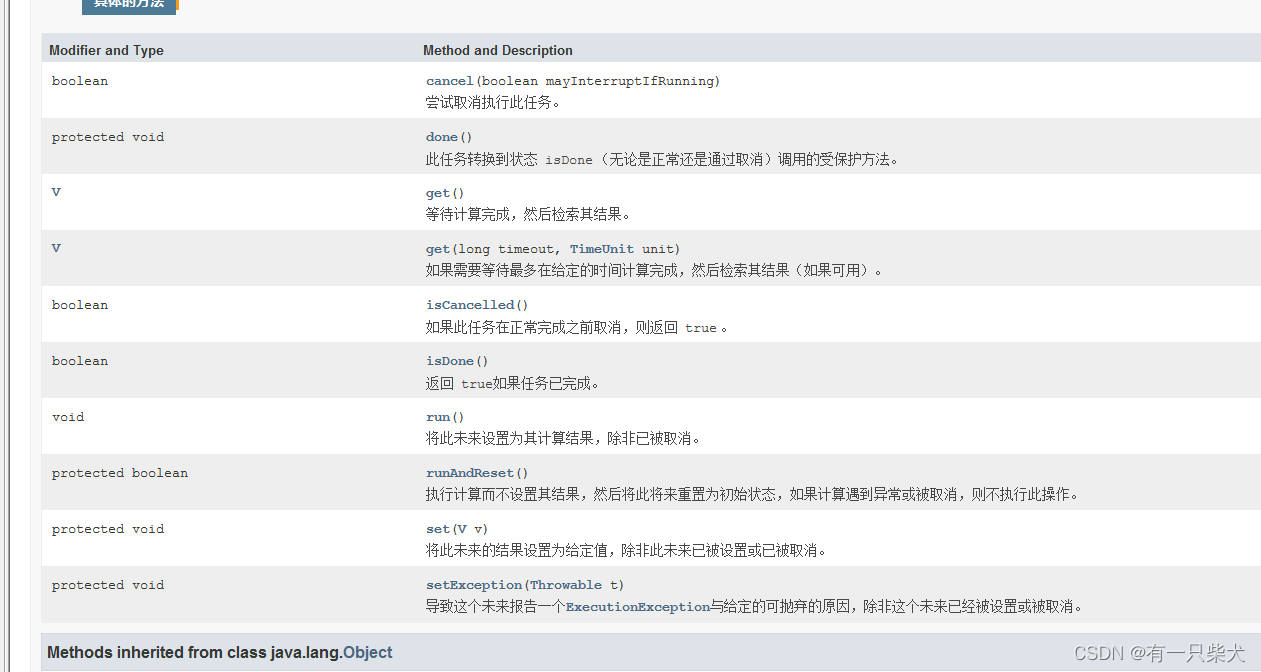
3.1、Future相关API
package java.util.concurrent;

public interface Future<V> {
    boolean cancel(boolean var1);
    boolean isCancelled();
    boolean isDone();
    V get() throws InterruptedException, ExecutionException;
    V get(long var1, TimeUnit var3) throws InterruptedException, ExecutionException, TimeoutException;
}
举个简单的例子:
public static void main(String[] args) throws ExecutionException, InterruptedException {
ExecutorService executorService = Executors.newFixedThreadPool(10);
// 这里使用submit提交可以看到返回Future
Future<String> submit = executorService.submit(() -> {
System.out.println("child thread is deal......");
ThreadUtil.sleep(1000);
// 由于线程池submit是可以接收callable,因此可以直接返回。如果使用runnable,线程池可以支持submit(runnable, result),
// 将需要线程返回的数据通过定义result传入
return "child return result “hello future”";
});
System.out.println("main thread is deal......");
ThreadUtil.sleep(1000);
// 通过future.get()阻塞等待返回结果
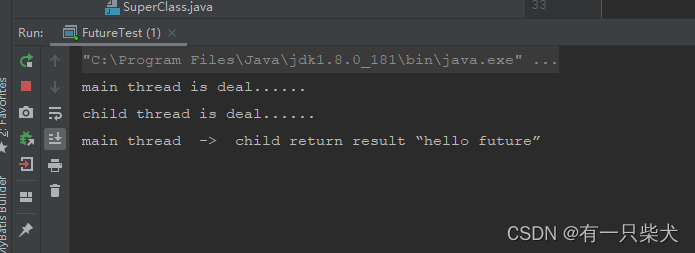
System.out.println("main thread -> " + submit.get());
}执行结果:可以看到main thread结果打印,永远在child thread is deal......打印之后,证明get()是阻塞等待的。但是在等待的中间,我们是可以处理其他的任务的,比如打印的main thread is deal......
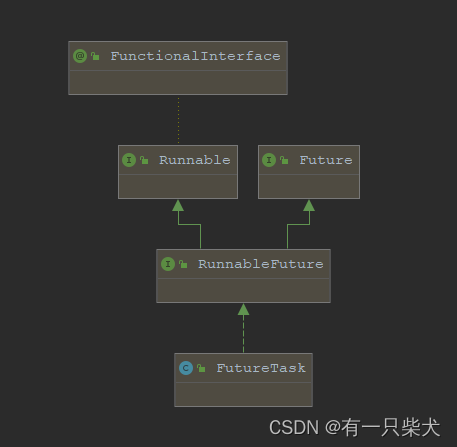
3.2、FutureTask
Future是个接口,而FutureTask就是他的其中一个实现。FutureTask实现了RunnableFuture接口,RunnableFuture接口又实现了Runnable接口和Future接口。所以FutureTask既可以被当做Runnable来执行,也可以被当做Future来获取Callable的返回结果。
3.2.1、FutureTask实现
从3.1的示例代码中,我们跟进去submit()方法,选择AbstractExecutorService实现。我们可以看到:
public <T> Future<T> submit(Callable<T> task) {
    if (task == null) throw new NullPointerException();
    RunnableFuture<T> ftask = newTaskFor(task);
    execute(ftask);
    return ftask;
}

protected <T> RunnableFuture<T> newTaskFor(Callable<T> callable) {
    return new FutureTask<T>(callable);
}
我们可以看到最终将callable封装进了FutureTask。而FutureTask真正执行的方法:
public void run() {
    if (state != NEW ||
        !UNSAFE.compareAndSwapObject(this, runnerOffset,
                                     null, Thread.currentThread()))
        return;
    try {
        Callable<V> c = callable;
        if (c != null && state == NEW) {
            V result;
            boolean ran;
            try {
                // 因为构造传入的callable,所以调用了callable的call方法
                result = c.call();
                ran = true;
            } catch (Throwable ex) {
                result = null;
                ran = false;
                setException(ex);
            }
            // 如果ran结束,则设置执行结果
            if (ran)
                set(result);
        }
    } finally {
        // runner must be non-null until state is settled to
        // prevent concurrent calls to run()
        runner = null;
        // state must be re-read after nulling runner to prevent
        // leaked interrupts
        int s = state;
        if (s >= INTERRUPTING)
            handlePossibleCancellationInterrupt(s);
    }
}
而set(result)方法如下:
/**
 * Sets the result of this future to the given value unless
 * this future has already been set or has been cancelled.
 *
 * <p>This method is invoked internally by the {@link #run} method
 * upon successful completion of the computation.
 *
 * @param v the value
 */
protected void set(V v) {
    if (UNSAFE.compareAndSwapInt(this, stateOffset, NEW, COMPLETING)) {
        // 这里将结果设置到outcome中
        outcome = v;
        UNSAFE.putOrderedInt(this, stateOffset, NORMAL); // final state
        finishCompletion();
    }
}

// 执行结束之后的操作
private void finishCompletion() {
    // assert state > COMPLETING;
    for (WaitNode q; (q = waiters) != null;) {
        if (UNSAFE.compareAndSwapObject(this, waitersOffset, q, null)) {
            for (;;) {
                Thread t = q.thread;
                if (t != null) {
                    q.thread = null;

                    // 通过unpark给当前线程一个许可凭证
                    LockSupport.unpark(t);
                }
                WaitNode next = q.next;
                if (next == null)
                    break;
                q.next = null; // unlink to help gc
                q = next;
            }
            break;
        }
    }

    done();

    callable = null;        // to reduce footprint
}
而当我们调用get()方法:
public V get() throws InterruptedException, ExecutionException {
    int s = state;
    if (s <= COMPLETING)
        // 阻塞等待,默认0L表示永久等待
        s = awaitDone(false, 0L);

    // 这里获取
    return report(s);
}

private V report(int s) throws ExecutionException {
    // 这里获取到outcome
    Object x = outcome;
    if (s == NORMAL)
        return (V)x;
    if (s >= CANCELLED)
        throw new CancellationException();
    throw new ExecutionException((Throwable)x);
}
3.2.2、FutureTask相关API
3.3、CompletableFuture
前面说到FutureTask,实现了完整的Future模式。但是显然还有几个问题:
- Future提供了isDone()方法用来判断当前异步任务是否完成,不支持回调方法。而当你需要任务执行结束后就去做其他操作,就得不断的判断isDone()是否结束。
- 异步任务的编排。假如你有三个任务需要异步执行,而第三个任务需要前面两个任务结束后合并处理第三个,Future无法实现。
- Future并没有任何异常的处理。
为了解决这些问题,JDK在1.8的时候引入了CompletableFuture。CompletableFuture也是实现了Future的接口,对FutureTask进行了扩展。
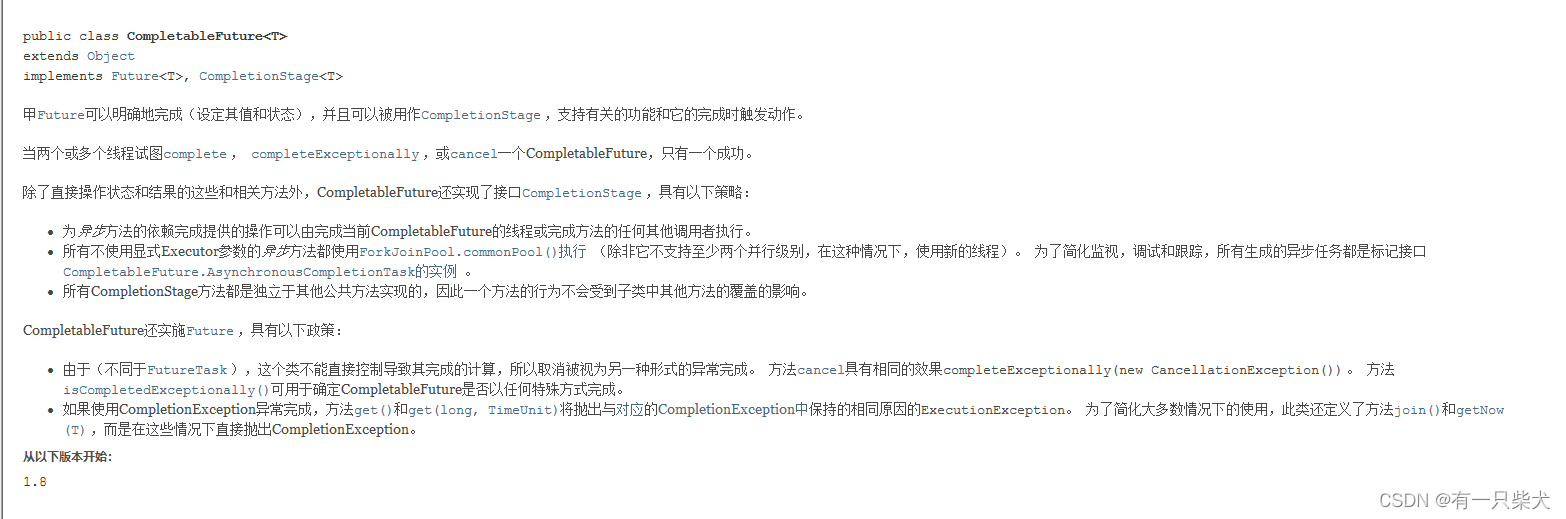
CompletableFuture很好的解决了上述的问题:
- CompletableFuture提供了thenApply,thenApplyAsync等方法,用于在任务执行结束后,可以传入进去一个回调方法。
- CompletableFuture提供了更灵活的方式来编排多个并发任务的执行顺序和依赖关系。通过使用thenCompose()、thenCombine()、allOf()等方法,可以更方便地实现并发任务的调度和控制。
- CompletableFuture提供了exceptionally()方法和handle()方法来处理异步任务执行过程中的异常情况。可以通过这些方法对异常进行处理,并返回一个默认值或执行备选操作。
3.3.1、thenApply
当使用CompletableFuture时,可以使用thenApply()方法来对异步任务的结果进行处理。thenApply()方法接受一个Function函数式接口作为参数,用于对前一个任务的结果进行转换或处理,并返回一个新的CompletableFuture对象,表示转换后的结果。
CompletableFuture<String> future = CompletableFuture.supplyAsync(() -> "Hello")
    // 支持链式语法
    .thenApply(result -> result + " CompletableFuture!")
    .thenApply(result -> result.toUpperCase());

future.thenAccept(System.out::println); // 输出:HELLO COMPLETABLEFUTURE!
3.3.2、异步任务编排之thenCompose()
任务2需要任务1的结果,进行合并计算。
CompletableFuture<String> future1 = CompletableFuture.supplyAsync(() -> "Hello");
CompletableFuture<String> future2 = CompletableFuture.supplyAsync(() -> "CompletableFuture!");

CompletableFuture<String> combinedFuture = future1.thenCompose(result1 ->
    future2.thenApply(result2 -> result1 + " " + result2)
);

combinedFuture.thenAccept(System.out::println); // 输出:Hello CompletableFuture!
在这个示例中,我们创建了两个独立的异步任务 future1 和 future2。然后使用 thenCompose() 方法,将第二个任务 future2 的结果与第一个任务 future1 的结果进行组合,并返回一个新的 CompletableFuture 对象 combinedFuture。最后,我们通过调用 thenAccept() 方法来接收并输出组合后的结果。
3.3.3、异步任务编排之thenCombine()
任务1和任务2的结果进行合并处理。
CompletableFuture<String> future1 = CompletableFuture.supplyAsync(() -> "Hello");
CompletableFuture<String> future2 = CompletableFuture.supplyAsync(() -> "CompletableFuture!");

CompletableFuture<String> combinedFuture = future1.thenCombine(future2, (result1, result2) -> result1 + " " + result2);

combinedFuture.thenAccept(System.out::println); // 输出:Hello CompletableFuture!
在这个示例中,我们仍然有两个独立的异步任务 future1 和 future2,但是这次我们使用了 thenCombine() 方法,它接受两个 CompletableFuture 对象和一个 BiFunction 函数式接口作为参数,用于组合两个任务的结果。在示例中,我们使用 lambda 表达式将两个结果进行连接并返回。
3.3.4、异步任务编排之allOf()
等待任务1和任务2完成后,调用回调方法。
CompletableFuture<String> future1 = CompletableFuture.supplyAsync(() -> "Hello");
CompletableFuture<String> future2 = CompletableFuture.supplyAsync(() -> "CompletableFuture!");

CompletableFuture<Void> allFutures = CompletableFuture.allOf(future1, future2);

allFutures.thenRun(() -> {
    String result1 = future1.join();
    String result2 = future2.join();
    System.out.println(result1 + " " + result2);
});
在这个示例中,我们有两个独立的异步任务 future1 和 future2,并使用 CompletableFuture.allOf() 方法来等待它们都完成。然后,我们使用 thenRun() 方法定义一个任务,当所有的任务完成后执行其中的代码块。在代码块中,我们使用 join() 方法来获取每个任务的结果,并将它们连接在一起输出。
3.3.5、异常处理
当使用CompletableFuture时,可以使用exceptionally()方法和handle()方法来处理异步任务执行过程中的异常情况。
CompletableFuture<Integer> future = CompletableFuture.supplyAsync(() -> {
    // 模拟一个可能会抛出异常的异步任务
    if (Math.random() < 0.5) {
        throw new RuntimeException("Oops, something went wrong!");
    }
    return 42;
});

CompletableFuture<Integer> handledFuture = future.exceptionally(ex -> {
    System.out.println("Exception occurred: " + ex.getMessage());
    return 0; // 提供一个默认值来替代异常情况下的结果
});

handledFuture.thenAccept(result -> System.out.println("Result: " + result));
在这个示例中,我们使用CompletableFuture.supplyAsync()方法创建了一个异步任务,它可能会抛出一个运行时异常。然后,我们通过调用exceptionally()方法,传入一个函数式接口来处理异常情况。在异常发生时,exceptionally()方法会执行传入的函数,并返回一个新的CompletableFuture对象,该对象包含了处理异常后的结果(在这个例子中,我们返回了一个默认值 0)。最后,我们通过调用thenAccept()方法来接收并输出最终的结果。
CompletableFuture<Integer> future = CompletableFuture.supplyAsync(() -> {
    // 模拟一个可能会抛出异常的异步任务
    if (Math.random() < 0.5) {
        throw new RuntimeException("Oops, something went wrong!");
    }
    return 42;
});

CompletableFuture<Integer> handledFuture = future.handle((result, ex) -> {
    if (ex != null) {
        System.out.println("Exception occurred: " + ex.getMessage());
        return 0; // 提供一个默认值来替代异常情况下的结果
    }
    return result;
});

handledFuture.thenAccept(result -> System.out.println("Result: " + result));
在这个示例中,我们也是创建了一个可能会抛出异常的异步任务,并使用CompletableFuture.supplyAsync()方法进行包装。然后,通过调用handle()方法,传入一个BiFunction函数式接口来处理结果和异常。handle()方法会在任务执行完成后执行传入的函数,无论是否发生异常。在函数中,我们可以根据异常情况来处理结果,这里我们在发生异常时返回了一个默认值 0。最后,我们通过调用thenAccept()方法来接收并输出最终的结果。
exceptionally()方法主要用于处理异步任务执行过程中的异常,提供一个备选的结果或处理逻辑。它只处理异常,不会对正常的结果进行额外的处理。
handle()方法用于处理异步任务执行过程中的结果和异常,可以在一个方法内部同时处理结果和异常,并返回一个新的结果。它对异常和正常结果都进行处理,更加灵活。
4、小结
到这里Future模式以及JDK提供的实现都已经介绍的差不多了。Future模式是典型的ForkJoin思想,除了JDK提供的相关支持以外,不少的第三方库也实现了Future模式,有些提供了更加强大的实现,比如Guava等。这些为以后的并行处理提供了更加方便,更加强大,更加简化的编程模型。