mmsegmentation作为开源的语义分割框架,优势就是集成了经典的图像分割算法。做对比试验简直不要太方便,但大部分算法直指多类图像分割,多类指的是分割类别大于等于3。对于单类别分割官方给了说明,也有很多人在github上提issue。基本上看了一遍,没有详细的解决方案。于是自己去琢磨了一下,此教程旨在给大家做参考用。码字不易,不喜勿喷。
1.一天最无聊的事从搭环境开始
1.conda create -n openmmlab python=3.7
2.conda activate openmmlab
3.conda install pytorch==1.7.0 torchvision==0.8.0 torchaudio==0.7.0 cudatoolkit=11.0
4.pip install mmcv-full -f https://download.openmmlab.com/mmcv/dist/cu110/torch1.7.0/index.html
5.pip install mmseg
#需要注意的是pytorch版本、cuda版本与mmcv版本需搭配,否则会出错。
2.环境搭好下个官方的模型测试一下,测试脚本如下。
from mmseg.apis import inference_segmentor, init_segmentor
import mmcv

config_file = '../configs/pspnet/pspnet_r50-d8_512x1024_40k_cityscapes.py'
checkpoint_file = '../ckpt/pspnet_r50-d8_512x1024_40k_cityscapes_20200605_003338-2966598c.pth'

# 通过配置文件和模型权重文件构建模型
model = init_segmentor(config_file, checkpoint_file, device='cuda:0')

# 对单张图片进行推理并展示结果
img = 'demo.png'  # or img = mmcv.imread(img), which will only load it once
result = inference_segmentor(model, img)
# 在新窗口中可视化推理结果
model.show_result(img, result, show=True)
# 或将可视化结果存储在文件中
# 你可以修改 opacity 在(0,1]之间的取值来改变绘制好的分割图的透明度
model.show_result(img, result, out_file='result.jpg', opacity=1)
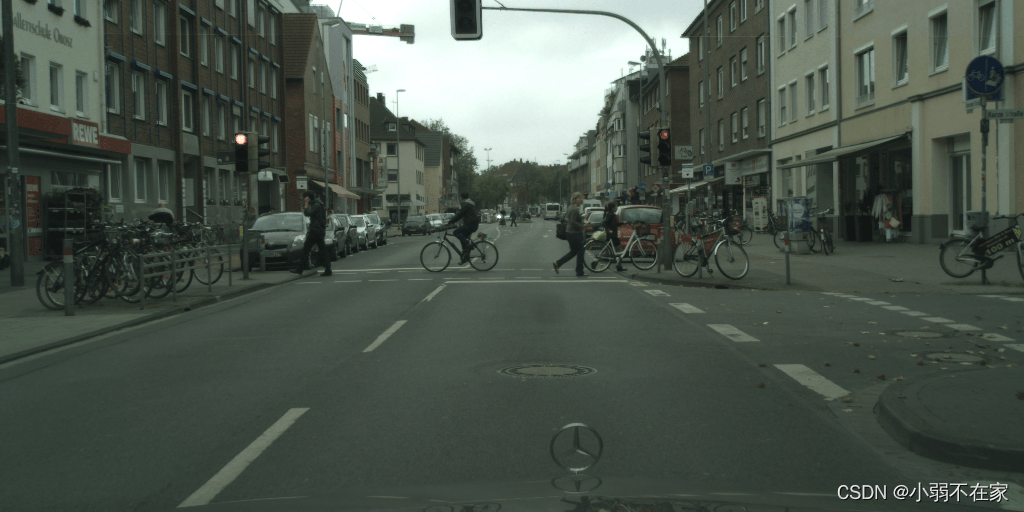
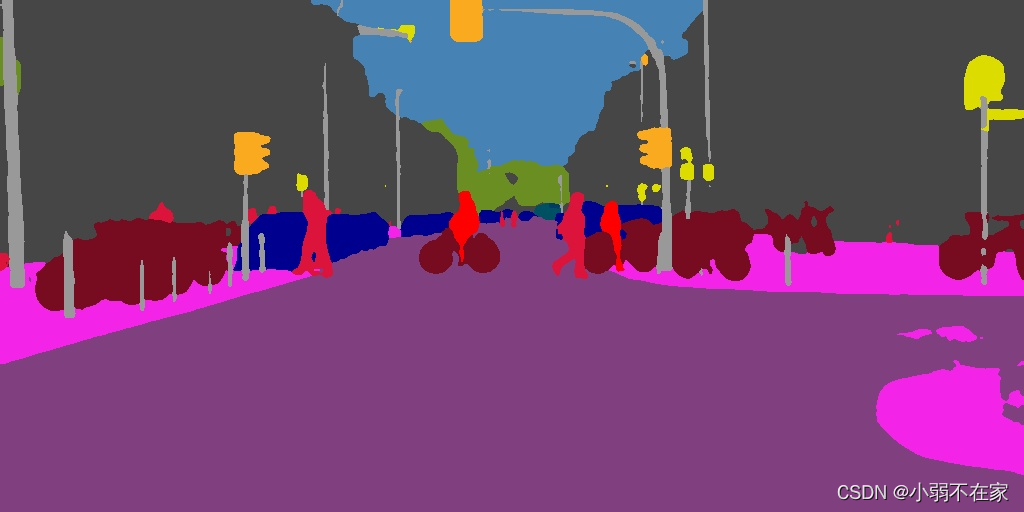
在这里插入图片描述
3.至此,可以准备自己的数据集了。数据集划分脚本在tools下的convert_datasets里,可自行选择
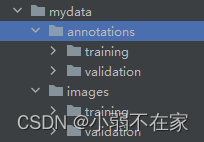
数据集如上图所示。images下是训练验证时用到的原始图像,annotations下是训练验证时用到的label
4.定义数据集预处理方式
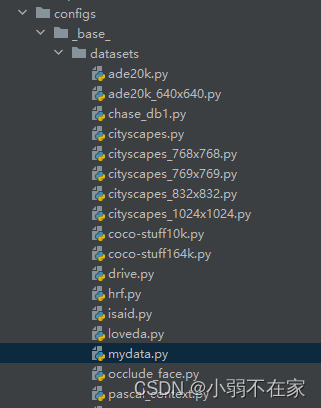
dataset下新建一个py文件用来处理自己的数据集,对应的code如下
# dataset settings
dataset_type = 'MydataDataset'
data_root = 'data/mydata'
img_norm_cfg = dict(
    mean=[35.1826, 35.1826, 35.1826], std=[41.0360, 41.0360, 41.0360], to_rgb=True)
crop_size = (512, 512)
train_pipeline = [
    dict(type='LoadImageFromFile'),
    dict(type='LoadAnnotations', reduce_zero_label=False),
    dict(type='Resize', img_scale=(512, 512), ratio_range=(0.5, 2.0)),
    dict(type='RandomCrop', crop_size=crop_size, cat_max_ratio=0.75),
    dict(type='RandomFlip', prob=0.5),
    dict(type='PhotoMetricDistortion'),
    dict(type='Normalize', **img_norm_cfg),
    dict(type='Pad', size=crop_size, pad_val=0, seg_pad_val=255),
    dict(type='DefaultFormatBundle'),
    dict(type='Collect', keys=['img', 'gt_semantic_seg']),
]
test_pipeline = [
    dict(type='LoadImageFromFile'),
    dict(
        type='MultiScaleFlipAug',
        img_scale=(512, 512),
        # img_ratios=[0.5, 0.75, 1.0, 1.25, 1.5, 1.75],
        flip=False,
        transforms=[
            dict(type='Resize', keep_ratio=True),
            dict(type='RandomFlip'),
            dict(type='Normalize', **img_norm_cfg),
            dict(type='ImageToTensor', keys=['img']),
            dict(type='Collect', keys=['img']),
        ])
]
data = dict(
    samples_per_gpu=4, #设置每个GPU的batch_size
    workers_per_gpu=6, #设置每个GPU对应读取线程数
    train=dict(
        type=dataset_type,
        data_root=data_root,
        img_dir='images/training',
        ann_dir='annotations/training',
        pipeline=train_pipeline),
    val=dict(
        type=dataset_type,
        data_root=data_root,
        img_dir='images/validation',
        ann_dir='annotations/validation',
        pipeline=test_pipeline),
    test=dict(
        type=dataset_type,
        data_root=data_root,
        img_dir='images/validation',
        ann_dir='annotations/validation',
        pipeline=test_pipeline))
5.在mmseg下的datasets里自定义自己的数据集
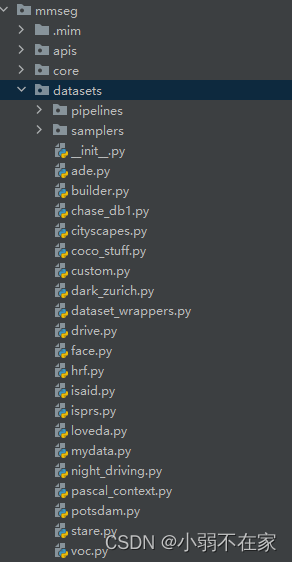
对应的code如下
# Copyright (c) OpenMMLab. All rights reserved.
import os.path as osp

from .builder import DATASETS
from .custom import CustomDataset


@DATASETS.register_module()
class MydataDataset(CustomDataset):


    CLASSES = ('background', '你自己的类别')

    PALETTE = [[0, 0, 0], [255, 255, 255]]

    def __init__(self, **kwargs):
        super(MydataDataset, self).__init__(
            img_suffix='.jpg',
            seg_map_suffix='.png',
            reduce_zero_label=False,
            ignore_index=10,
            classes= ('background', '你自己的类别'),
            palette=[[0, 0, 0], [255, 255, 255]],
            **kwargs)
        assert osp.exists(self.img_dir)
6.init.py里添加上自定义的数据集
对应的code如下
# Copyright (c) OpenMMLab. All rights reserved.
from .ade import ADE20KDataset
from .builder import DATASETS, PIPELINES, build_dataloader, build_dataset
from .chase_db1 import ChaseDB1Dataset
from .cityscapes import CityscapesDataset
from .coco_stuff import COCOStuffDataset
from .custom import CustomDataset
from .dark_zurich import DarkZurichDataset
from .dataset_wrappers import (ConcatDataset, MultiImageMixDataset,
                               RepeatDataset)
from .drive import DRIVEDataset
from .face import FaceOccludedDataset
from .hrf import HRFDataset
from .isaid import iSAIDDataset
from .isprs import ISPRSDataset
from .loveda import LoveDADataset
from .night_driving import NightDrivingDataset
from .pascal_context import PascalContextDataset, PascalContextDataset59
from .potsdam import PotsdamDataset
from .stare import STAREDataset
from .voc import PascalVOCDataset
from .mydata import MydataDataset

__all__ = [
    'CustomDataset', 'build_dataloader', 'ConcatDataset', 'RepeatDataset',
    'DATASETS', 'build_dataset', 'PIPELINES', 'CityscapesDataset',
    'PascalVOCDataset', 'ADE20KDataset', 'PascalContextDataset',
    'PascalContextDataset59', 'ChaseDB1Dataset', 'DRIVEDataset', 'HRFDataset',
    'STAREDataset', 'DarkZurichDataset', 'NightDrivingDataset',
    'COCOStuffDataset', 'LoveDADataset', 'MultiImageMixDataset',
    'iSAIDDataset', 'ISPRSDataset', 'PotsdamDataset', 'FaceOccludedDataset','MydataDataset'
]
7.class_names.py修改
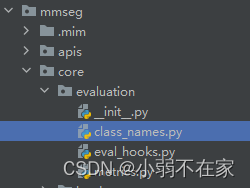
添加如下代码
def mydata_classes():
    return ['background','你自己的数据集']
def mydata_palette():

    return [[0, 0, 0], [255, 255, 255]]
8.本教程选ocrnet作为自己的baseline,若有需要可以去config选一个你满意的模型。修改num_classes及加载上自己的数据预处理模块。
_base_ = [
    '../_base_/models/ocrnet_hr18.py', '../_base_/datasets/mydata.py',
    '../_base_/default_runtime.py', '../_base_/schedules/schedule_80k.py'
]
norm_cfg = dict(type='SyncBN', requires_grad=True)
model = dict(decode_head=[
    dict(
        type='FCNHead',
        in_channels=[18, 36, 72, 144],
        channels=sum([18, 36, 72, 144]),
        in_index=(0, 1, 2, 3),
        input_transform='resize_concat',
        kernel_size=1,
        num_convs=1,
        concat_input=False,

        dropout_ratio=-1,
        num_classes=2,
        #out_channels=2,
        norm_cfg=norm_cfg,
        align_corners=False,
        loss_decode=dict(
            type='DiceLoss', use_sigmoid=False, loss_weight=0.4)),
    dict(
        type='OCRHead',
        in_channels=[18, 36, 72, 144],
        in_index=(0, 1, 2, 3),
        input_transform='resize_concat',
        channels=512,
        ocr_channels=256,
        dropout_ratio=-1,
        num_classes=2,
        #out_channels=2,
        norm_cfg=norm_cfg,
        align_corners=False,
        loss_decode=dict(
            type='DiceLoss', use_sigmoid=False, loss_weight=1.0)),
])
9.这个时候可以开始训练了,但是有bug。
10.bug排查,因为mmseg分割单个类别将背景赋值为0前景赋值为1,需要对loading里的代码进行修改:gt_semantic_seg[gt_semantic_seg_copy == old_id*255] = new_id
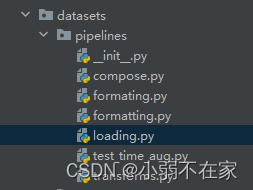
对应的code如下
# Copyright (c) OpenMMLab. All rights reserved.
import os.path as osp

import mmcv
import numpy as np

from ..builder import PIPELINES


@PIPELINES.register_module()
class LoadImageFromFile(object):
    """Load an image from file.

    Required keys are "img_prefix" and "img_info" (a dict that must contain the
    key "filename"). Added or updated keys are "filename", "img", "img_shape",
    "ori_shape" (same as `img_shape`), "pad_shape" (same as `img_shape`),
    "scale_factor" (1.0) and "img_norm_cfg" (means=0 and stds=1).

    Args:
        to_float32 (bool): Whether to convert the loaded image to a float32
            numpy array. If set to False, the loaded image is an uint8 array.
            Defaults to False.
        color_type (str): The flag argument for :func:`mmcv.imfrombytes`.
            Defaults to 'color'.
        file_client_args (dict): Arguments to instantiate a FileClient.
            See :class:`mmcv.fileio.FileClient` for details.
            Defaults to ``dict(backend='disk')``.
        imdecode_backend (str): Backend for :func:`mmcv.imdecode`. Default:
            'cv2'
    """

    def __init__(self,
                 to_float32=False,
                 color_type='color',
                 file_client_args=dict(backend='disk'),
                 imdecode_backend='cv2'):
        self.to_float32 = to_float32
        self.color_type = color_type
        self.file_client_args = file_client_args.copy()
        self.file_client = None
        self.imdecode_backend = imdecode_backend

    def __call__(self, results):
        """Call functions to load image and get image meta information.

        Args:
            results (dict): Result dict from :obj:`mmseg.CustomDataset`.

        Returns:
            dict: The dict contains loaded image and meta information.
        """

        if self.file_client is None:
            self.file_client = mmcv.FileClient(**self.file_client_args)

        if results.get('img_prefix') is not None:
            filename = osp.join(results['img_prefix'],
                                results['img_info']['filename'])
        else:
            filename = results['img_info']['filename']
        img_bytes = self.file_client.get(filename)
        img = mmcv.imfrombytes(
            img_bytes, flag=self.color_type, backend=self.imdecode_backend)
        if self.to_float32:
            img = img.astype(np.float32)

        results['filename'] = filename
        results['ori_filename'] = results['img_info']['filename']
        results['img'] = img
        results['img_shape'] = img.shape
        results['ori_shape'] = img.shape
        # Set initial values for default meta_keys
        results['pad_shape'] = img.shape
        results['scale_factor'] = 1.0
        num_channels = 1 if len(img.shape) < 3 else img.shape[2]
        results['img_norm_cfg'] = dict(
            mean=np.zeros(num_channels, dtype=np.float32),
            std=np.ones(num_channels, dtype=np.float32),
            to_rgb=False)
        return results

    def __repr__(self):
        repr_str = self.__class__.__name__
        repr_str += f'(to_float32={

      self.to_float32},'
        repr_str += f"color_type='{

      self.color_type}',"
        repr_str += f"imdecode_backend='{

      self.imdecode_backend}')"
        return repr_str


@PIPELINES.register_module()
class LoadAnnotations(object):
    """Load annotations for semantic segmentation.

    Args:
        reduce_zero_label (bool): Whether reduce all label value by 1.
            Usually used for datasets where 0 is background label.
            Default: False.
        file_client_args (dict): Arguments to instantiate a FileClient.
            See :class:`mmcv.fileio.FileClient` for details.
            Defaults to ``dict(backend='disk')``.
        imdecode_backend (str): Backend for :func:`mmcv.imdecode`. Default:
            'pillow'
    """

    def __init__(self,
                 reduce_zero_label=False,
                 file_client_args=dict(backend='disk'),
                 imdecode_backend='pillow'):
        self.reduce_zero_label = reduce_zero_label
        self.file_client_args = file_client_args.copy()
        self.file_client = None
        self.imdecode_backend = imdecode_backend

    def __call__(self, results):
        """Call function to load multiple types annotations.

        Args:
            results (dict): Result dict from :obj:`mmseg.CustomDataset`.

        Returns:
            dict: The dict contains loaded semantic segmentation annotations.
        """

        if self.file_client is None:
            self.file_client = mmcv.FileClient(**self.file_client_args)

        if results.get('seg_prefix', None) is not None:
            filename = osp.join(results['seg_prefix'],
                                results['ann_info']['seg_map'])
        else:
            filename = results['ann_info']['seg_map']
        img_bytes = self.file_client.get(filename)
        gt_semantic_seg = mmcv.imfrombytes(
            img_bytes, flag='unchanged',
            backend=self.imdecode_backend).squeeze().astype(np.uint8)
        # modify if custom classes
        if results.get('label_map', None) is not None:
            # Add deep copy to solve bug of repeatedly
            # replace `gt_semantic_seg`, which is reported in
            # https://github.com/open-mmlab/mmsegmentation/pull/1445/
            gt_semantic_seg_copy = gt_semantic_seg.copy()
            for old_id, new_id in results['label_map'].items():
                gt_semantic_seg[gt_semantic_seg_copy == old_id*255] = new_id
        # reduce zero_label
        if self.reduce_zero_label:
            # avoid using underflow conversion
            gt_semantic_seg[gt_semantic_seg == 0] = 255
            gt_semantic_seg = gt_semantic_seg - 1
            gt_semantic_seg[gt_semantic_seg == 254] = 255
        results['gt_semantic_seg'] = gt_semantic_seg
        results['seg_fields'].append('gt_semantic_seg')
        return results

    def __repr__(self):
        repr_str = self.__class__.__name__
        repr_str += f'(reduce_zero_label={

      self.reduce_zero_label},'
        repr_str += f"imdecode_backend='{

      self.imdecode_backend}')"
        return repr_str
11.此外原始的loss为交叉熵loss,修改为DICE loss,backbone的loss也统一一下。对应的code如下
# model settings
norm_cfg = dict(type='SyncBN', requires_grad=True)
model = dict(
    type='CascadeEncoderDecoder',
    num_stages=2,
    pretrained='open-mmlab://msra/hrnetv2_w18',
    backbone=dict(
        type='HRNet',
        norm_cfg=norm_cfg,
        norm_eval=False,
        extra=dict(
            stage1=dict(
                num_modules=1,
                num_branches=1,
                block='BOTTLENECK',
                num_blocks=(4, ),
                num_channels=(64, )),
            stage2=dict(
                num_modules=1,
                num_branches=2,
                block='BASIC',
                num_blocks=(4, 4),
                num_channels=(18, 36)),
            stage3=dict(
                num_modules=4,
                num_branches=3,
                block='BASIC',
                num_blocks=(4, 4, 4),
                num_channels=(18, 36, 72)),
            stage4=dict(
                num_modules=3,
                num_branches=4,
                block='BASIC',
                num_blocks=(4, 4, 4, 4),
                num_channels=(18, 36, 72, 144)))),
    decode_head=[
        dict(
            type='FCNHead',
            in_channels=[18, 36, 72, 144],
            channels=sum([18, 36, 72, 144]),
            in_index=(0, 1, 2, 3),
            input_transform='resize_concat',
            kernel_size=1,
            num_convs=1,
            concat_input=False,
            dropout_ratio=-1,
            num_classes=2,
            norm_cfg=norm_cfg,
            align_corners=False,
            loss_decode=dict(
                type='DiceLoss', use_sigmoid=False, loss_weight=0.4)),
        dict(
            type='OCRHead',
            in_channels=[18, 36, 72, 144],
            in_index=(0, 1, 2, 3),
            input_transform='resize_concat',
            channels=512,
            ocr_channels=256,
            dropout_ratio=-1,
            num_classes=2,
            norm_cfg=norm_cfg,
            align_corners=False,
            loss_decode=dict(
                type='DiceLoss', use_sigmoid=False, loss_weight=1.0)),
    ],
    # model training and testing settings
    train_cfg=dict(),
    test_cfg=dict(mode='whole'))
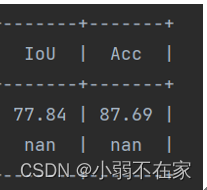
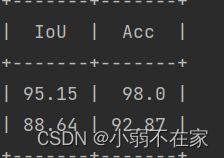
至此,正常训练。iou acc不会出现异常情况
12,测试脚本测试一下
from mmseg.apis import inference_segmentor, init_segmentor
import mmcv
import cv2
from PIL import Image
import numpy as  np


config_file = '../work_dirs/ocrnet_hr18_512x512_80k_ade20k_mydata_baseline/ocrnet_hr18_512x512_80k_ade20k.py'
checkpoint_file = '../work_dirs/ocrnet_hr18_512x512_80k_ade20k_mydata_baseline/latest.pth'

# 通过配置文件和模型权重文件构建模型
model = init_segmentor(config_file, checkpoint_file, device='cuda:0')

# #对单张图片进行推理并展示结果

img = '17.jpg'  # or img = mmcv.imread(img), which will only load it once
#img=img.resize(img,(1000,800))

#打印输入图像通道数
# img=Image.open(img)
# print(len(img.split()))
# imageSize=img.size
# w=img.width
# h=img.height
# f=img.format
#
# print(imageSize)
# print(w,h,f)
result = inference_segmentor(model, img)
print(result)

#np.savetxt(r'result.txt',result)
# 在新窗口中可视化推理结果
model.show_result(img, result, show=True)

print(model.show_result)
# 或将可视化结果存储在文件中
# 可以修改 opacity 在(0,1]之间的取值来改变绘制好的分割图的透明度
model.show_result(img, result, out_file='result17_0.jpg', opacity=1)


#对视频进行推理并展示结果
# video = mmcv.VideoReader('test.avi')
# for frame in video:
#    result = inference_segmentor(model, frame)
#    model.show_result(frame, result, wait_time=1)
效果很好,私人数据这个地方就不展示了。