resnet18 网络结构代码的复现
- 更多学习项目路线:https://github.com/xiaoaleiBLUE
文章目录
前言
本次文章主要是对resnet18网路结构进行代码复现(pytorch框架),对网络架构进行简单的作图, 并比较和比别人写的resnet18网路结构,发现自己写的代码可读性还需要提高。
一、resnet18 网络结构
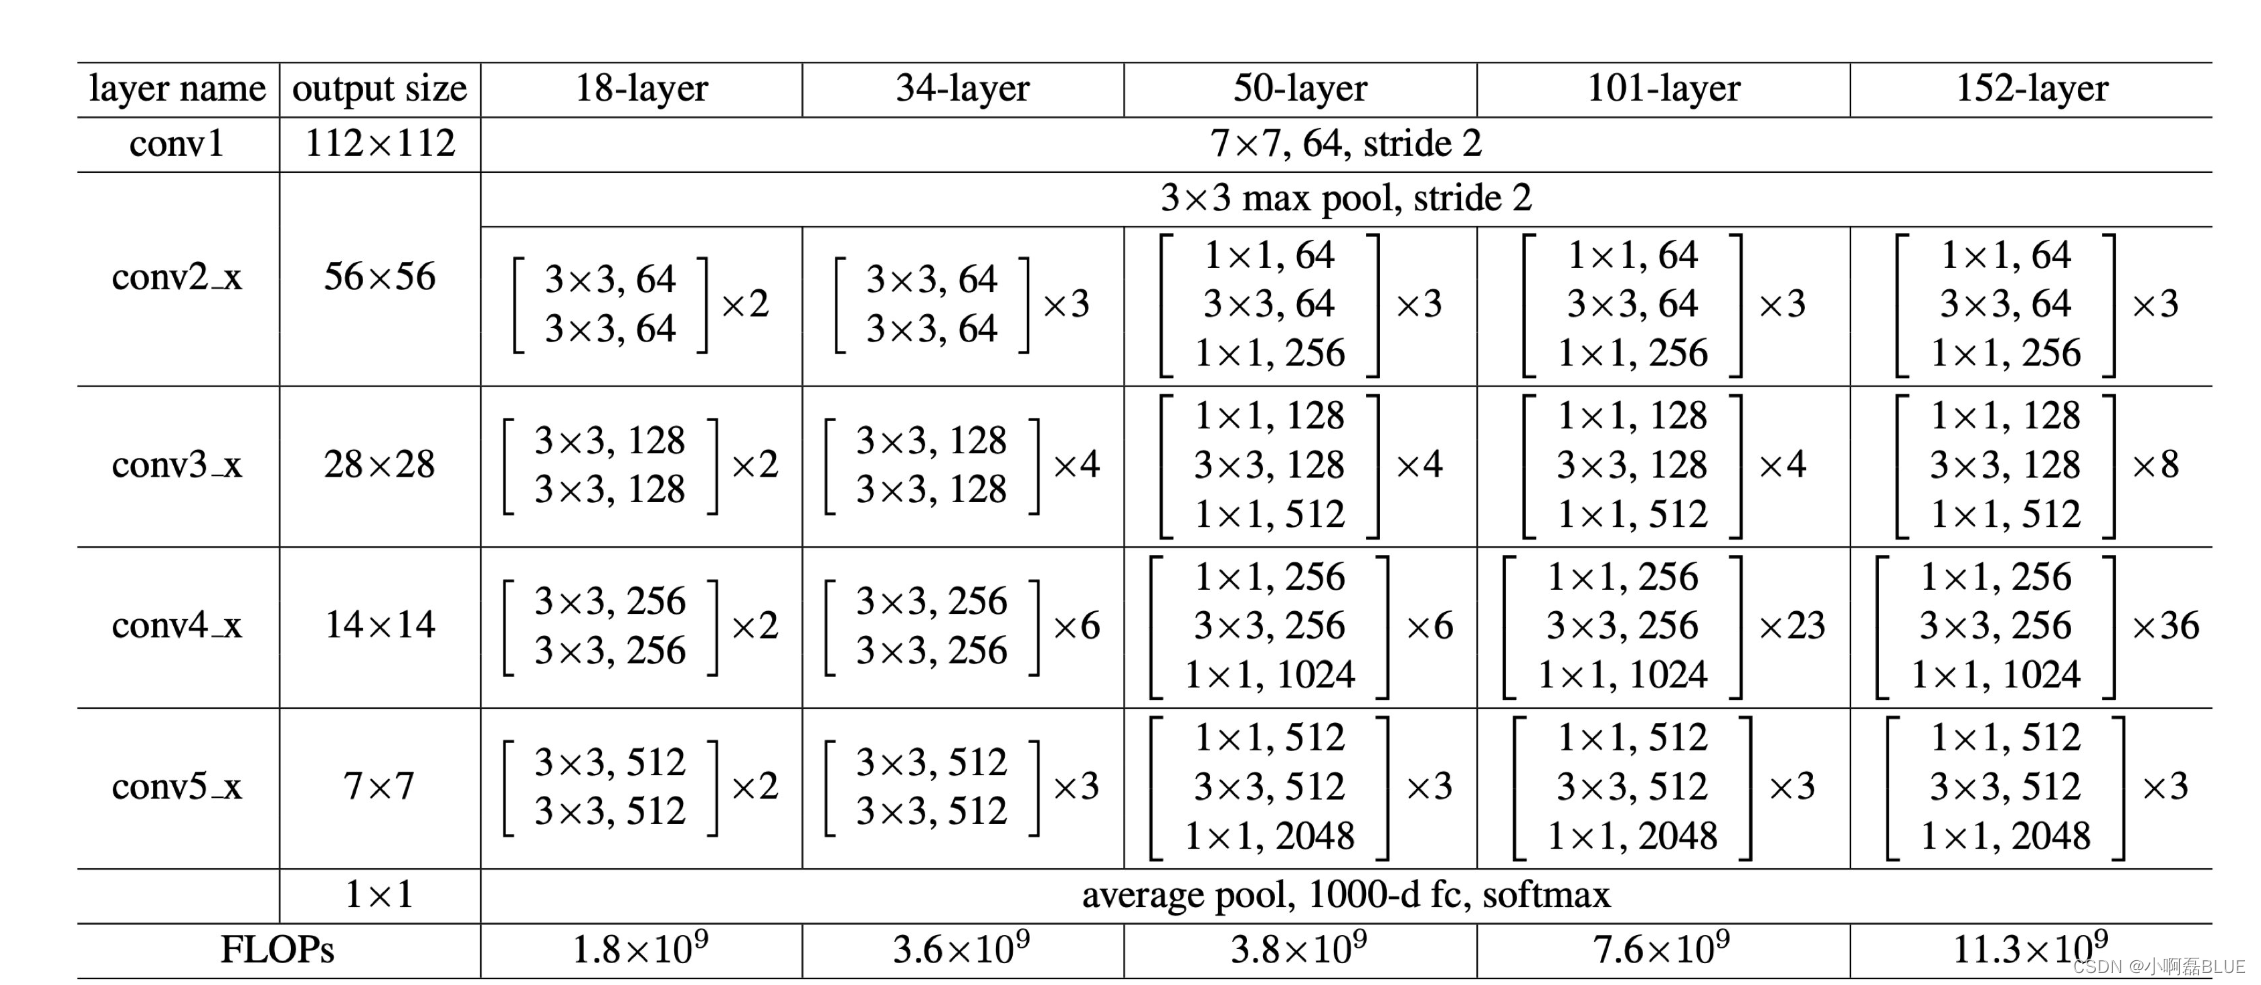
二、架构具体分析
1. 架构分析
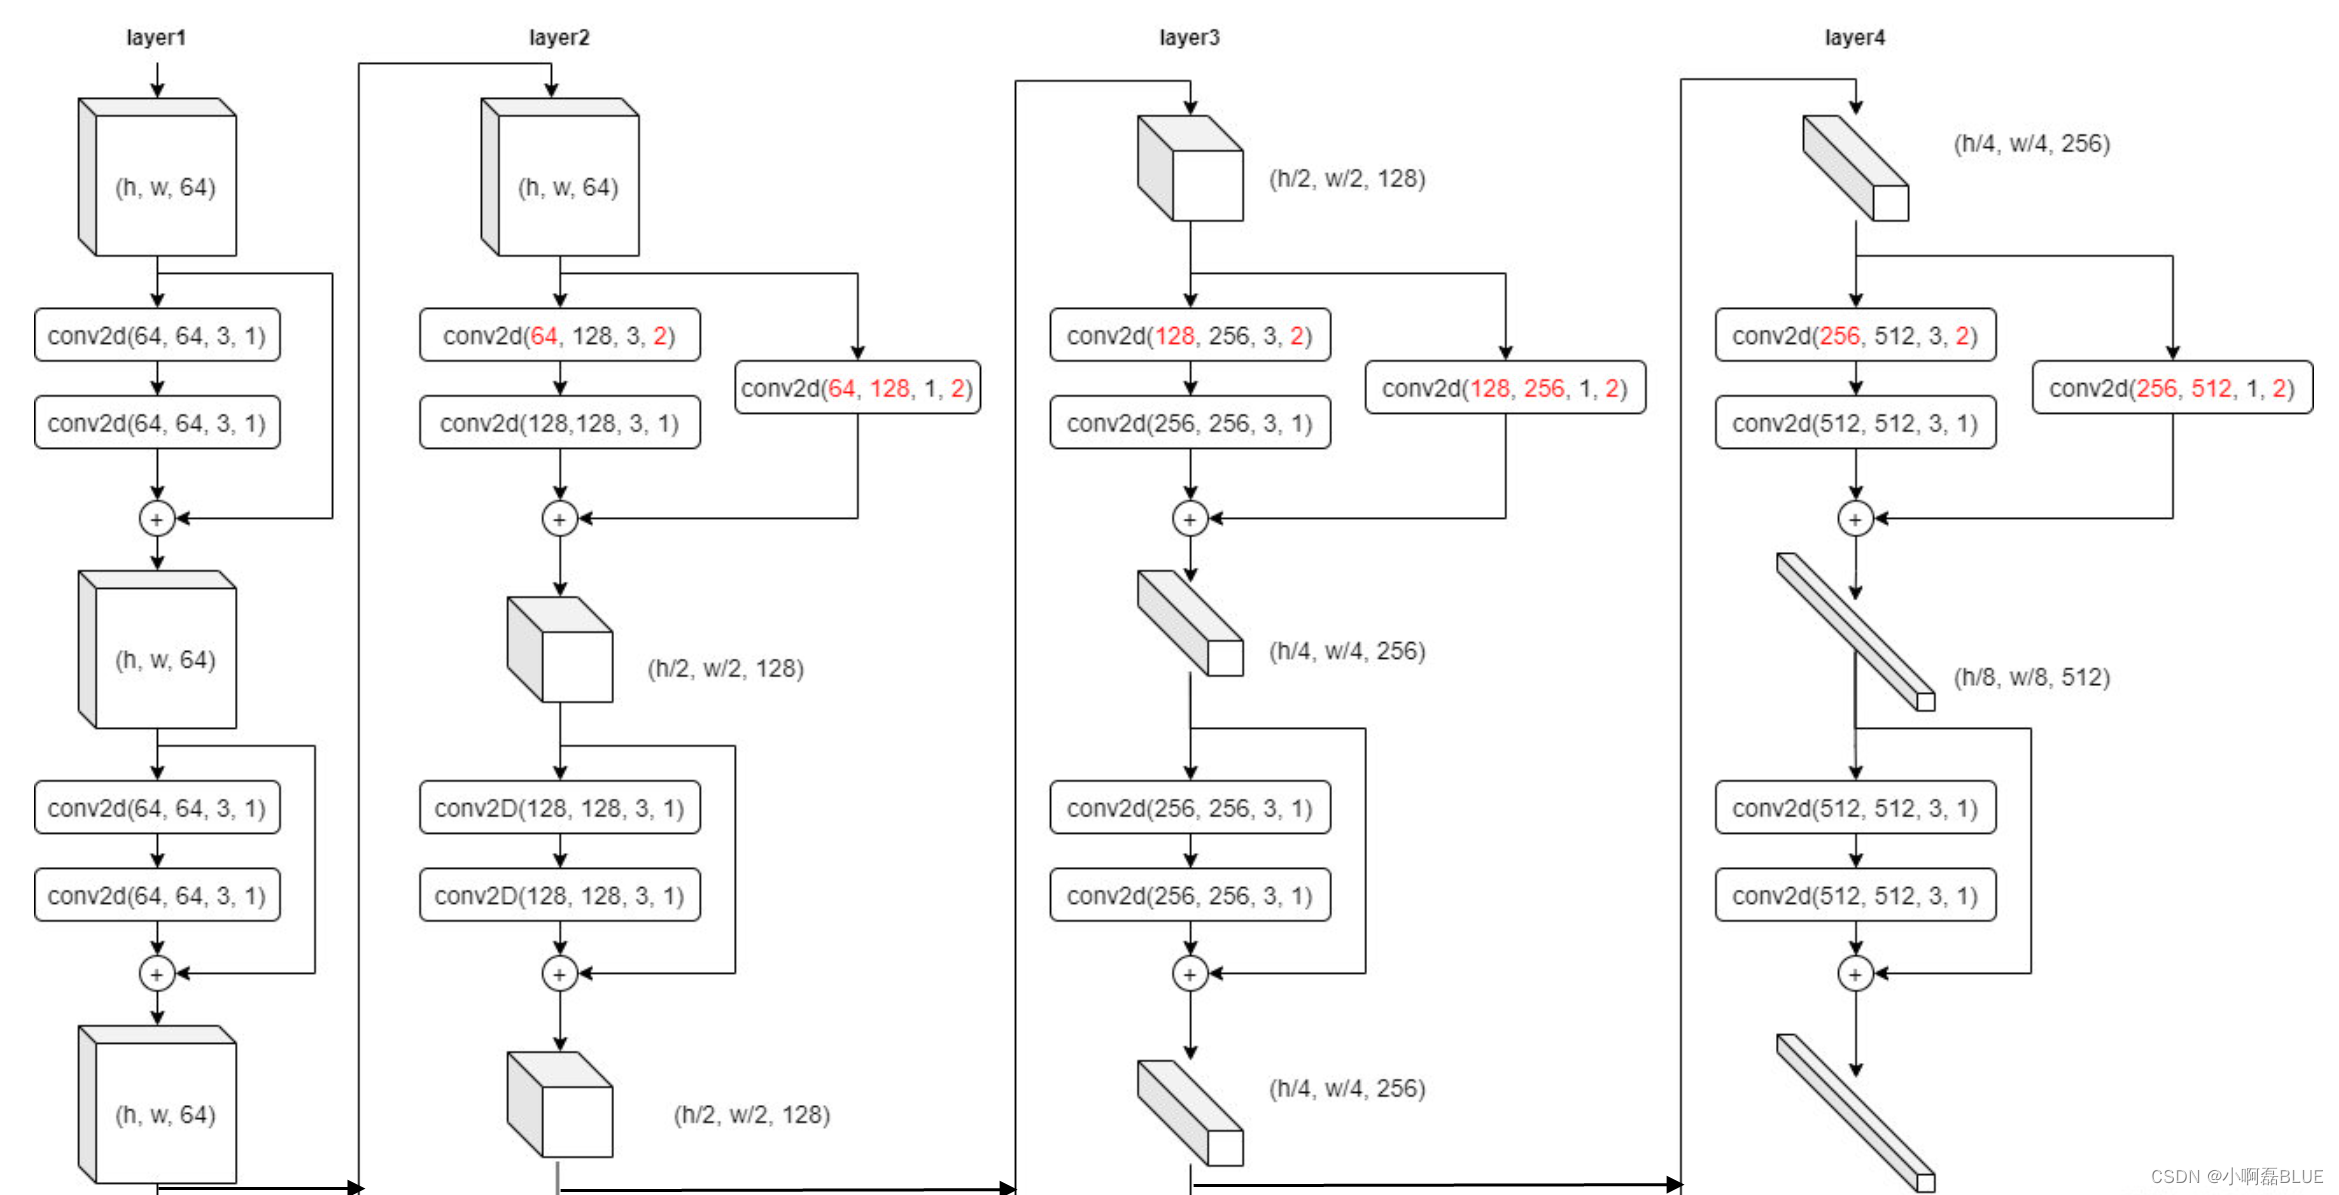
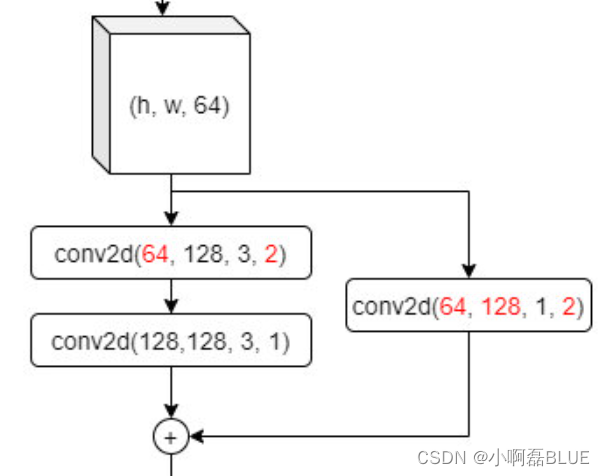
- 其实我们发现就是一个模块进行复用, 只是输入和输出大小不一致而已
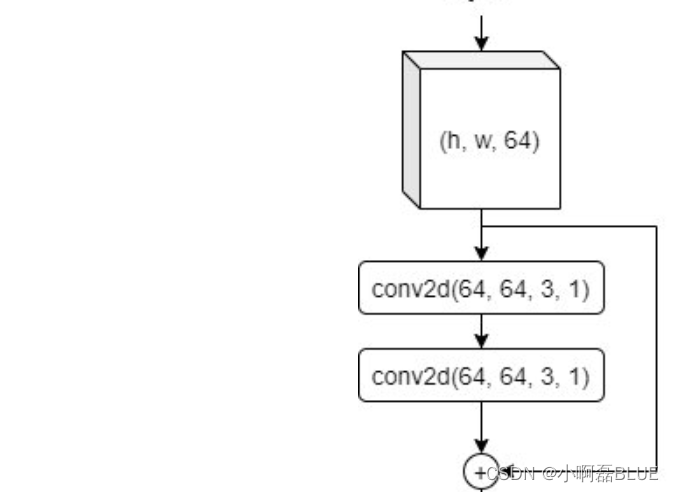
- 无残差连接时的一个最小单元
- 有残差连接时的一个最小单元
2. 自己编写残差单元
class Resblock(nn.Module):
def __init__(self, down_sample, in_channels, out_channels):
super(Resblock, self).__init__()
self.down_sample = down_sample
self.conv_1 = nn.Conv2d(in_channels, out_channels, 3, 1, 1)
self.bn_1 = nn.BatchNorm2d(out_channels)
self.relu_1 = nn.ReLU()
self.conv_2 = nn.Conv2d(in_channels, out_channels, 3, 2, 1)
self.bn_2 = nn.BatchNorm2d(out_channels)
self.relu_2 = nn.ReLU()
self.shortcut = nn.Conv2d(in_channels, out_channels, 1, 2, 0)
self.shortcut_bn = nn.BatchNorm2d(out_channels)
self.conv2 = nn.Conv2d(in_channels, out_channels, 3, 1, 1)
self.bn2 = nn.BatchNorm2d(out_channels)
self.relu2 = nn.ReLU()
self.relu = nn.ReLU()
def forward(self, x):
if self.down_sample:
shortcut = self.shortcut_bn(self.shortcut(x))
x = self.relu_2(self.bn_2(self.conv_2(x)))
x = self.relu2(self.bn2(self.conv2(x)))
x = x + shortcut
else:
shortcut = x
x = self.relu_1(self.bn_1(self.conv_1(x)))
x = self.relu2(self.bn2(self.conv2(x)))
x = x + shortcut
x = self.relu(x)
return x
device = 'cuda' if torch.cuda.is_available() else 'cpu'
# Resblock 实例化
resblock = Resblock(True, 64, 64).to(device)
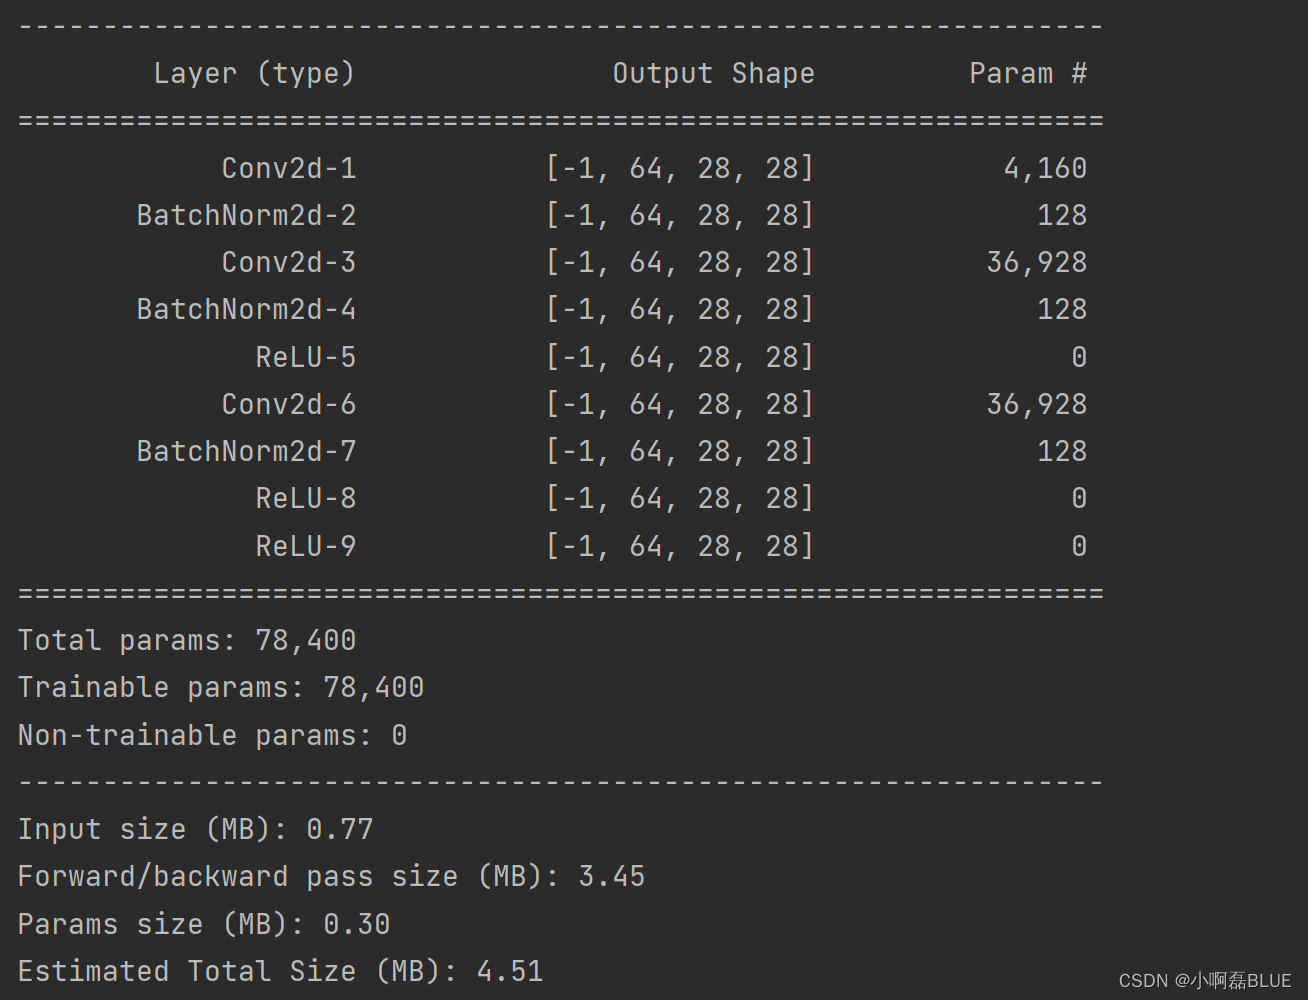
# 打印模型参数, 可视化
summary(resblock, (64, 56, 56))
3. 网上看到别人写的残差单元
class ResBlock(nn.Module):
    def __init__(self, down_sample, in_channels, out_channels):
        super(ResBlock, self).__init__()

        self.down_sample = down_sample

        if self.down_sample:
            # 需要下采样
            self.conv1 = nn.Conv2d(in_channels, out_channels, 3, 2, 1)

            self.shortcut = nn.Sequential(
                nn.Conv2d(in_channels, out_channels, 1, 2, 0),
                nn.BatchNorm2d(out_channels)
            )

        else:
            # 不需要下采样
            self.conv1 = nn.Conv2d(in_channels, out_channels, 3, 1, 1)

            # 对输入不做处理, nn.Sequential()里面啥都没有, 相当于残差连接那个分支啥都没有
            self.shortcut = nn.Sequential()

        self.bn1 = nn.BatchNorm2d(out_channels)
        self.relu1 = nn.ReLU()

        self.conv2 = nn.Conv2d(out_channels, out_channels, 3, 1, 1)
        self.bn2 = nn.BatchNorm2d(out_channels)
        self.relu2 = nn.ReLU()

        self.relu3 = nn.ReLU()

    def forward(self, x):

        # 对输入进行处理
        shortcut = self.shortcut(x)

        # conv1
        x = self.conv1(x)
        x = self.relu1(self.bn1(x))

        # conv2
        x = self.conv2(x)
        x = self.relu2(self.bn2(x))

        # 残差连接
        x = x + shortcut

        # 激活
        x = self.relu3(x)

        return x


device = 'cuda' if torch.cuda.is_available() else 'cpu'

# ResBlock 实例化
resblock = ResBlock(True, 64, 64).to(device)

# 打印模型参数, 可视化
summary(resblock, (64, 56, 56))
4. 比较
- 首先看看模型参数量, 经过随机输入一个张量,查看模型结构,两种结果一样, 但是仔细比较上述两种残差单元结构代码实现方式,别人写的复用用也高, 而自己写的相同的模块没有进行复用,自己写的还是很多不足。
三、整个网络实现
class Resnet18(nn.Module):
"""
搭建一个简单的残差网络: RESNET 18
输入: 224*224*3
输出: 1000类
"""
def __init__(self, num_classes):
super(Resnet18, self).__init__()
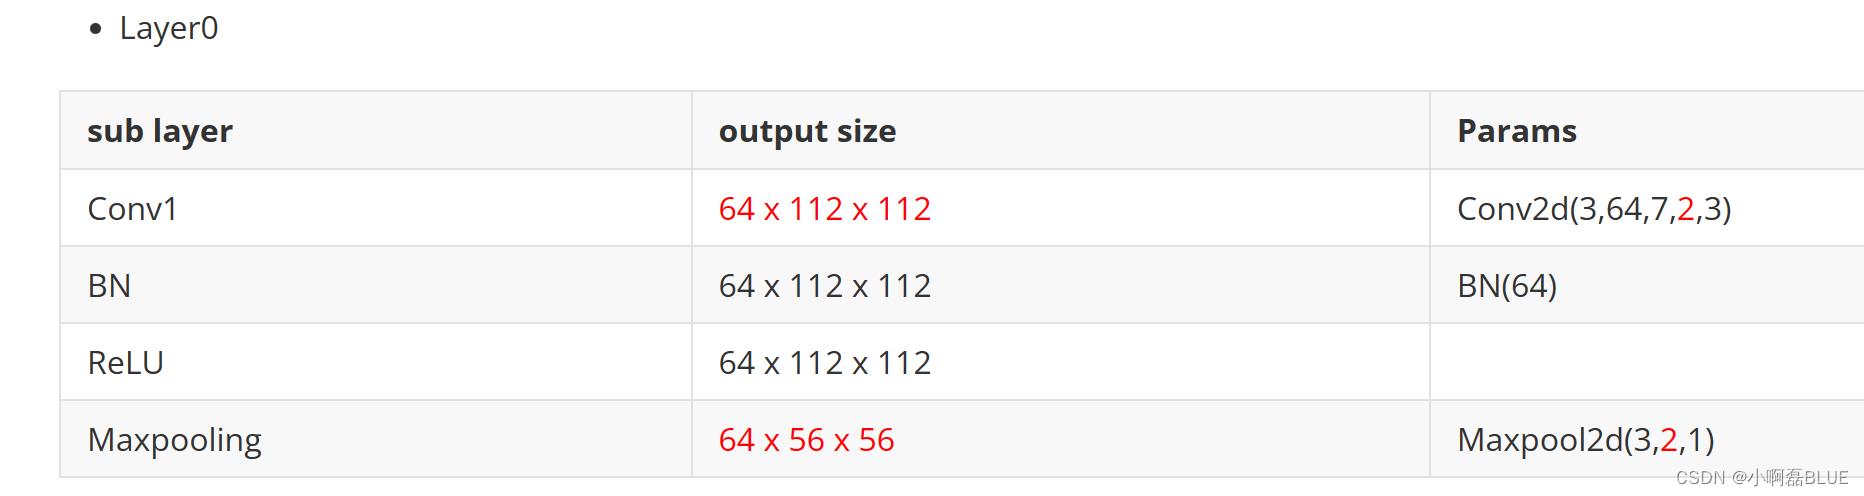
# Layer 0
self.layer_0 = nn.Sequential(
nn.Conv2d(in_channels=3, out_channels=64, kernel_size=7, stride=2, padding=3),
nn.BatchNorm2d(64),
nn.ReLU(inplace=True),
nn.MaxPool2d(kernel_size=3, stride=2, padding=1)
)
# Layer 1
self.layer_1 = nn.Sequential(
# 不需下采样
ResBlock(False, 64, 64)
# 不需下采样
ResBlock(False, 64, 64)
)
self.layer_2 = nn.Sequential(
# 下采样
ResBlock(True, 64, 128),
# 无需下采样
ResBlock(False, 128, 128)
)
self.layer_3 = nn.Sequential(
# 下采样
ResBlock(True, 128, 256),
# 无需下采样
ResBlock(False, 256, 256)
)
self.layer_4 = nn.Sequential(
# 下采样
ResBlock(True, 256, 512),
# 无需下采样
ResBlock(False, 512, 512)
)
# AdaptiveAvgPool2d
self.app = nn.AdaptiveAvgPool2d(1)
self.flatten = nn.Flatten()
self.linear = nn.Linear(512, num_classes)
def forward(self, x):
x = self.layer_0(x)
x = self.layer_1(x)
x = self.layer_2(x)
x = self.layer_3(x)
x = self.layer_4(x)
x = self.app(x)
x = self.flatten(x)
x = self.linear(x)
return x
- 可视化模型参数
device = 'cuda' if torch.cuda.is_available() else 'cpu'

# ResBlock 实例化
resnet = Resnet18(10).to(device)

# 打印模型参数, 可视化
summary(resnet, (3, 224, 224))