目录
这里首先确定是否安装imutils库,这个库能让调整大小或者翻转屏幕等基本任务更加容易实现。这一次主要应用的是对于图片的形态学处理函数。
一、主要函数介绍
1. cv2.erode()
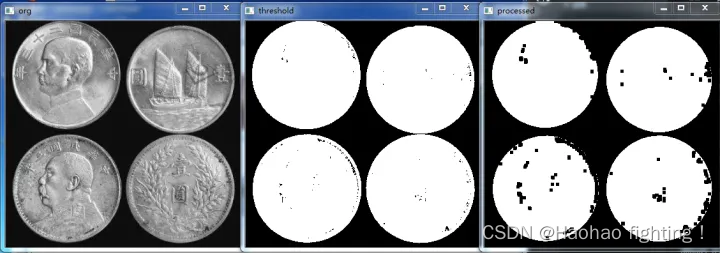
腐蚀与膨胀属于形态学操作,所谓的形态学,就是改变物体的形状,形象理解一些:腐蚀=变瘦 膨胀=变胖。主要是采用 cv2.erode() 和 cv2.dilate(),需要注意一点的是,腐蚀和膨胀主要针对二值化图像的白色部分。
腐蚀函数,就像土壤侵蚀一样,这个操作会把前景物体的边界腐蚀掉(但是前景仍然是白色)。在原图的每一个小区域里取最小值,由于是二值化图像,只要有一个点为0,则都为0,来达到瘦身的目的。因此在下面的例子中,我们就可以使用腐蚀来将图片中的一些毛刺或者说很细小的东西给去掉。也可以用作分离图像。
mask = cv2.erode(mask, None, iterations=2)
参数:第一个参数是输入图片,第二个参数是卷积核,第三个参数是迭代次数。
原图: 腐蚀后:
腐蚀后: 
2. cv2.dilate()
与腐蚀相反,与卷积核对应的原图像的像素值中只要有一个是 1,中心元素的像素值就是1。所以这个操作会增加图像中的白色区域(前景)。一般在去噪声时先用腐蚀再用膨胀。因为腐蚀在去掉白噪声的同时,也会使前景对象变小。所以我们再对他进行膨胀。这时噪声已经被去除了,不会再回来了,但是前景还在并会增加。膨胀也可以用来连接两个分开的物体。
mask = cv2.dilate(mask, None, iterations=2)
函数第一个参数是输入图片,第二个参数是卷积核,第三个参数是迭代次数。
原图: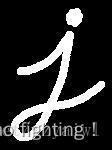 膨胀后:
膨胀后: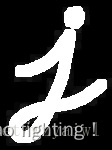
3. cv2.findContours()
作用是从二值图中检索轮廓,这就是我们能检测到球体的函数。
cv2.findContours(mask.copy(),cv2.RETR_EXTERNAL,cv2.CHAIN_APPROX_SIMPLE)[-2]
函数形式:
cv2.findContours(image, mode, method[, contours[, hierarchy[, offset]]])
参数介绍:
image:8-bit单通道图像。该图像会将非0像素值视为1,0像素值视为0,因此也被视为二值图像。
mode:轮廓检索模式,检测外轮廓还是内轮廓,是否包含继承(包含)关系: cv2.RETR_EXTERNAL 表示只检测外轮廓,忽略轮廓内部的结构,无继承相关信息;cv2.RETR_LIST 检测所有的轮廓但不建立继承(包含)关系;cv2.RETR_CCOMP 检测所有轮廓,但是仅仅建立两层包含关系;cv2.RETR_TREE 检测所有轮廓,并且建立所有的继承(包含)关系。
method:轮廓近似方法,有记录方法:cv2.CHAIN_APPROX_NONE 存储所有的轮廓点,相邻的两个点的像素位置差不超过 1,即 max(abs(x1-x2), abs(y1-y2))=1; cv2.CHAIN_APPROX_SIMPLE 压缩水平方向,垂直方向,对角线方向的元素,只保留该方向的终点坐标,例如一个矩阵轮廓只需 4 个点来保存轮廓信息。
contours:返回值,检测到的轮廓。每个轮廓都以点向量的形式存储。
hierarchy:返回值,包含有关图像轮廓的拓扑信息。它的元素和轮廓的数量一样多。对于第i ii个轮廓contours[i],元素hierarchy[i][0]、hierarchy[i][1]、hierarchy[i][2]和hierarchy[i][3]分别设置为同一层次的下一个轮廓、同一层次的上一个轮廓、该轮廓的第一个子轮廓(嵌套轮廓)、该轮廓的父轮廓,它们的取值是轮廓的索引值(从0开始)。如果contours[i]没有与其同级的下一个轮廓、上一个轮廓、嵌套轮廓或父轮廓,则hierarchy[i]的相应元素将为负。
offset:可选偏移量,每个轮廓点偏移量。如果从图像ROI中提取轮廓,然后在整个图像上下文中对其进行分析,这将非常有用。
4. cv2.circle()
作用:在任何图像上绘制圆。
cv2.circle(image, center_coordinates, radius, color, thickness)
参数介绍:
image:它是要在其上绘制圆的图像。
center_coordinates:它是圆的中心坐标。坐标表示为两个值的元组,即(X坐标值,Y坐标值)。
radius:它是圆的半径。
color:它是要绘制的圆的边界线的颜色。对于BGR,我们通过一个元组。例如:(255,0,0)为蓝色。
thickness:它是圆边界线的粗细像素。厚度-1像素将以指定的颜色填充矩形形状。
返回值:它返回一个图像。
5. cv2.line()
作用:在图像中划线(追踪轨迹)
cv2.line(img, pt1, pt2, color, thickness)
参数介绍:
第一个参数 img:要划的线所在的图像;
第二个参数 pt1:直线起点(用在图像中的坐标表示)
第三个参数 pt2:直线终点(用在图像中的坐标表示)
第四个参数 color:直线的颜色
第五个参数 thickness=1:线条粗细
二、代码
# import the necessary packages
from collections import deque
import numpy as np
import argparse
import imutils
import cv2

# construct the argument parse and parse the arguments
ap = argparse.ArgumentParser()
ap.add_argument("-v", "--video",
	help="path to the (optional) video file")
ap.add_argument("-b", "--buffer", type=int, default=64,
	help="max buffer size")
args = vars(ap.parse_args())

# define the lower and upper boundaries of the "yellow object"
# (or "ball") in the HSV color space, then initialize the
# list of tracked points
colorLower = (24, 100, 100)
colorUpper = (44, 255, 255)
pts = deque(maxlen=args["buffer"])

# if a video path was not supplied, grab the reference
# to the webcam
if not args.get("video", False):
	camera = cv2.VideoCapture(0)

# otherwise, grab a reference to the video file
else:
	camera = cv2.VideoCapture(args["video"])

# keep looping
while True:
	# grab the current frame
	(grabbed, frame) = camera.read()

	# if we are viewing a video and we did not grab a frame,
	# then we have reached the end of the video
	if args.get("video") and not grabbed:
		break

	# resize the frame, inverted ("vertical flip" w/ 180degrees),
	# blur it, and convert it to the HSV color space
	frame = imutils.resize(frame, width=600)
	#frame = imutils.rotate(frame, angle=180)
	# blurred = cv2.GaussianBlur(frame, (11, 11), 0)
	hsv = cv2.cvtColor(frame, cv2.COLOR_BGR2HSV)

	# construct a mask for the color "green", then perform
	# a series of dilations and erosions to remove any small
	# blobs left in the mask
	mask = cv2.inRange(hsv, colorLower, colorUpper)
	mask = cv2.erode(mask, None, iterations=2)
	mask = cv2.dilate(mask, None, iterations=2)

	# find contours in the mask and initialize the current
	# (x, y) center of the ball
	cnts = cv2.findContours(mask.copy(), cv2.RETR_EXTERNAL,
		cv2.CHAIN_APPROX_SIMPLE)[-2]
	center = None

	# only proceed if at least one contour was found
	if len(cnts) > 0:
		# find the largest contour in the mask, then use
		# it to compute the minimum enclosing circle and
		# centroid
		c = max(cnts, key=cv2.contourArea)
		((x, y), radius) = cv2.minEnclosingCircle(c)
		M = cv2.moments(c)
		center = (int(M["m10"] / M["m00"]), int(M["m01"] / M["m00"]))

		# only proceed if the radius meets a minimum size
		if radius > 10:
			# draw the circle and centroid on the frame,
			# then update the list of tracked points
			cv2.circle(frame, (int(x), int(y)), int(radius),
				(0, 255, 255), 2)
			cv2.circle(frame, center, 5, (0, 0, 255), -1)

	# update the points queue
	pts.appendleft(center)

		# loop over the set of tracked points
	for i in range(1, len(pts)):
		# if either of the tracked points are None, ignore
		# them
		if pts[i - 1] is None or pts[i] is None:
			continue

		# otherwise, compute the thickness of the line and
		# draw the connecting lines
		thickness = int(np.sqrt(args["buffer"] / float(i + 1)) * 2.5)
		cv2.line(frame, pts[i - 1], pts[i], (0, 0, 255), thickness)

	# show the frame to our screen
	cv2.imshow("Frame", frame)
	key = cv2.waitKey(1) & 0xFF

	# if the 'q' key is pressed, stop the loop
	if key == ord("q"):
		break

# cleanup the camera and close any open windows
camera.release()
cv2.destroyAllWindows()