Unity 编辑器扩展(一) —— 自定义Unity面板
自定义Menu菜单
MenuItem 特性
MenuItem 属性可以向主菜单和上下文菜单添加菜单选项。
//API
public MenuItem(string itemName);
public MenuItem(string itemName, bool isValidateFunction);
public MenuItem(string itemName, bool isValidateFunction, int priority);
- itemName: 路径加快捷键
"GameObject/Do Something" + " " + "$hotkey" - isValidateFunction: 如果为true,则方法为校验函数,拥有bool类型的返回值。返回的bool值将决定相同路径的菜单是否处于激活状态。
- priority:权重排序,权重越低越靠前,默认1000。
ItemName 路径与快捷键
在itemName的hotkey格式中有以下对应关系:
-
%="ctrl +" -
#="shift +" -
&="alt +" -
_:如果不需要以上几个特殊的修改键组合,则可以在下划线之后给出该键。后面可接26个字母和 LEFT, RIGHT, UP, DOWN, F1 … F12, HOME, END, PGUP, PGDN.等特殊键。
例如:"%t" 在编辑器中显示为 Ctrl+T、"_t%" 在编辑器中显示为 TCtrl+(当然是无效的)。
设置快捷键,具体代码如下:
[MenuItem("MenuItem/02-Shortcuts/Alt_Shift_t &#t")]
private static void Shortcuts_Shift_Alt_T()
{


	Debug.Log("Alt Shift t");
}
[MenuItem("MenuItem/02-Shortcuts/Alpha_G _G")]
private static void Shortcuts_Alpha_G()
{


	Debug.Log("g");
}
// 触发需要 Fn
[MenuItem("MenuItem/02-Shortcuts/LeftArrow _LEFT")]
private static void Shortcuts_LeftArrow()
{


	Debug.Log("LeftArrow");
}
效果如下:

IsValidateFunction 校验函数
对菜单是否激活进行校验,具体代码如下:
// 如果没有选择Object,该项将是禁用的。
[MenuItem("MenuItem/03-Selected/SelectedObject")]
static void SelectedObject()
{


    Debug.Log("Selected Active Object is " + Selection.activeObject.name + ".");
}

// 验证有没有选择Object.注意路径必须指向一致。
[MenuItem("MenuItem/03-Selected/SelectedObject", true)]
static bool ValidateSelectedObject()
{


    return Selection.activeObject != null;
}
效果如下:

Priority 优先级
对菜单进行排序,具体代码如下:
[MenuItem("MenuItem/04-Sequence/C_Priority1", false, 1)]
private static void Priority1()
{


	Debug.Log("Priority1");
}

[MenuItem("MenuItem/04-Sequence/B_Priority2", false, 2)]
private static void Priority2()
{


	Debug.Log("Priority2");
}

[MenuItem("MenuItem/04-Sequence/A_Priority3", false, 3)]
private static void Priority3()
{


	Debug.Log("Priority3");
}
效果如下:

关于优先级:
Also note that in order for a menu item in “GameObject/” to be propagated to the hierarchy Create dropdown and hierarchy context menu, it must be grouped with the other GameObject creation menu items. This can be achieved by setting its priority to 10 (see example below). Note that for legacy purposes MenuItems in “GameObject/Create Other” with no explicit priority set will receive a priority of 10 instead of the default 1000 - we encourage using a more descriptive category name than “Create Other” and explicitly setting the priority to 10.
https://docs.unity.cn/2020.2/Documentation/ScriptReference/MenuItem.html
a.分割线,当相邻的两个菜单项优先级相差>10时,表示不同组,这时会有分割线
b.相同优先级的情况下,先定义的在前面,不会出现覆盖的情况
c.相同菜单路径的情况下,后定义的会覆盖先定义的。unity内置的菜单项同样也可以被覆盖
d.GameObject/下的菜单项优先级<50的才会显示在Hierarchy视图中
https://www.cnblogs.com/lyh916/archive/2004/01/13/13061296.html
这里补充一点,父级选项的优先级取决于子级选项中的最小优先级。以下例子中,我们会创建一个名为Sub父级选项。
[MenuItem("MenuItem/04-Sequence/Sub/DefaultPriority")]
private static void DefaultPriority()
{


    Debug.Log("DefaultPriority");
}
[MenuItem("MenuItem/04-Sequence/Sub/Priority7", false, 7)]
private static void Priority9()
{


    Debug.Log("Priority7");
}
[MenuItem("MenuItem/04-Sequence/Sub/Priority11", false, 11)]
private static void Priority11()
{


    Debug.Log("Priority11");
}

如果发现修改优先级级发现无效,需要重启编辑器,或者注释掉所有相关代码,Unity编译后再取消注释。
特殊路径
- CONTEXT:为组件添加菜单项
- GameObject:对应顶部菜单GameObject,以及Hierarchy视图右击窗口
- Assets:对应顶部菜单Assets
- Component:对应顶部Component菜单,对应Inspection视图的AddComponent窗口
- File、Edit、Window、Help均与顶部菜单对应
AddComponent 特性
//API
public AddComponentMenu(string menuName);
public AddComponentMenu(string menuName, int order);
MenuName 路径
添加主键功能菜单的位置,路径自动放在Component菜单下面。
order 顺序
与MenuItem中的Priority类似,不过 order 似乎默认是从20开始计算,即 order 为 1 时,priority实际值为21。

[AddComponentMenu("MyCategory/AddComponent Default Order")]
public class AddComponentLearn : MonoBehaviour{

    }
ContextMenu 特性
ContextMenu 属性允许您向上下文菜单添加命令,函数必须是非静态的。
// API
public ContextMenu(string itemName);
public ContextMenu(string itemName, bool isValidateFunction);
public ContextMenu(string itemName, bool isValidateFunction, int priority);
itemName 指明路径,isValidateFunction 和 priority 均与 menuItem 中的作用相同。
特别的是 ContextMenu 的默认优先级为 1000000
[ContextMenu("ToString")]
public override string ToString()
{


    Debug.Log(num + " : " + str);
    return base.ToString();
}

自定义Inspector面板
HelpURL 特性
添加脚本说明的链接
//API
public HelpURLAttribute(string url);
只需要写在继承MonoBehaviour的类头上就行了
[HelpURL("https://www.baidu.com")]
public class ComponentTest : MonoBehaviour{

    }
通过点击脚本面板右上角的问号图标就可以跳转到目标地址。

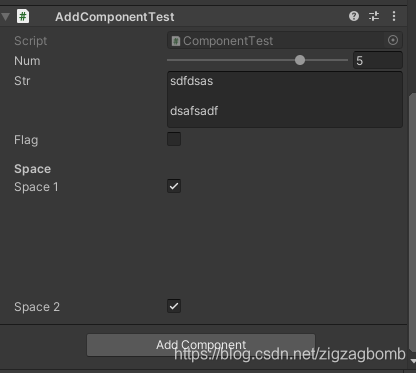
Range Tooltip Header Space Multiline 特性
分别对应范围、提示、标题、空白、多行。
public class ComponentTest : MonoBehaviour
{


    [Range(-10,10)]
    public int num;

    [Multiline(4)]
    public string str;

    [Tooltip("flag")]
    public bool flag;

    [Header("Space")]
    public bool space1;

    [Space(100)]
    public bool space2;
}
CustomEditor 特性
CustomEditor 属性通知 Unity 它是作为哪个脚本的自定义编辑器。
// API
public CustomEditor(Type inspectedType);
public CustomEditor(Type inspectedType, bool editorForChildClasses);
inspectedType 指示目标脚本,editorForChildClasses 指示是否应用于子类。
CanEditMultipleObjects 特性
CanEditMultipleObjects 属性告诉 Unity,您可以使用这个编辑器选择多个对象并同时更改它们。
GUI 与 EditorGUI
GUI 来自UnityEngine命名空间,这里指的是一种即时模式GUI系统(IMGUI),他由OnGUI()函数进行驱动,IMGUI通常用于:
- 构建调试工具
- 自定义inspector面板
- 扩展编辑器
IMGUI通常不会用于游戏内的用户界面(游戏内可以使用的是UGUI等)。
IMGUI在OnGUI()函数中进行驱动。在继承自MonoBehaviour的类中,具体生成的界面会在Game窗口中进行体现。
public class IMGUITest : MonoBehaviour
{


    private void OnGUI()
    {


        GUILayout.Button("hello world");
    }
}

以上是通过GUILayout创建的,我们也可以通过GUI进行创建。
public class IMGUITest : MonoBehaviour
{


    private void OnGUI()
    {


        GUI.Button(new Rect(0,0,150,50),"hello world");
    }
}

GUI 和 GUILayout的不同之处在于,前者是固定布局(Fixed Layout),而后者是自动布局(Automatic Layout)。
Fixed Layout makes sense to use when you have a pre-designed interface to work from. Automatic Layout makes sense to use when you don’t know how many elements you need up front, or don’t want to worry about hand-positioning each Control. For example, if you are creating a number of different buttons based on Save Game files, you don’t know exactly how many buttons will be drawn. In this case Automatic Layout might make more sense. It is really dependent on the design of your game and how you want to present your interface.
https://docs.unity.cn/2020.2/Documentation/Manual/gui-Layout.html
固定布局在使用时需要时刻指定UI覆盖的位置与范围(通过 Rect函数),而自动布局可以通过水平排列和垂直排列进行控制。
public class IMGUITest : MonoBehaviour
{


    private void OnGUI()
    {


        GUILayout.BeginHorizontal();
        GUILayout.Button("Unity");
        GUILayout.Button("Editor");
        GUILayout.EndHorizontal();
    }
}

再来说说EditorGUI,它与GUI在某些方面上十分类似。EditorGUI来自于命名空间UnityEditor,它常常被用于自定义inspect面板,主要在OnInspectorGUI()函数中进行驱动。
// MyPlayer.cs
public class MyPlayer : MonoBehaviour
{


    public int armor = 75;
    public int damage = 25
    public GameObject gun;
}
// MyPlayerEditor.cs
[CustomEditor(typeof(MyPlayer))]
public class MyPlayerEditor : Editor
{


    public override void OnInspectorGUI()
    {


        // target来自父类Editor,指明当前操作的对象
        MyPlayer mp = (MyPlayer)target;
        mp.damage = EditorGUILayout.IntField("Damage", 0);
        mp.armor = EditorGUILayout.IntSlider("Armor", mp.armor, 0, 100);
        serializedObject.ApplyModifiedProperties();
    }
}

在布局方面上,同样可以分为固定布局EditorGUI和自动布局EditorGUILayout。
public override void OnInspectorGUI()
{


    MyPlayer mp = (MyPlayer)target;
	// 固定布局
    EditorGUI.IntField(new Rect(0, 0, 200, 50), new GUIContent("HERE"), 100000);
    // 自定义布局
    EditorGUILayout.BeginHorizontal();
    mp.damage = EditorGUILayout.IntField("Damage", mp.damage);
    mp.armor = EditorGUILayout.IntSlider("Armor", mp.armor, 0, 100);
    EditorGUILayout.EndHorizontal();
}

可以看到固定布局和自定义布局互不影响,它们重合在了一起。
GUI和EditorGUI两个在自定义inspector面板上经常搭配使用。在使用上,EditorGUI 常常与目标脚本(target)的属性绑定使用,在功能上,GUI可以提供EditorGUI没有的按钮等功能。
两者的布局函数可以互相嵌套使用:
public override void OnInspectorGUI()
{


    MyPlayer mp = (MyPlayer)target;
    GUILayout.BeginHorizontal();

        EditorGUILayout.BeginVertical();
        mp.damage = EditorGUILayout.IntField("A Damage", mp.damage);
        mp.armor = EditorGUILayout.IntField("A Armor", mp.armor);
        EditorGUILayout.EndVertical();

        GUILayout.BeginVertical();
        mp.damage = EditorGUILayout.IntField("B Damage", mp.damage);
        mp.armor = EditorGUILayout.IntField("B Armor", mp.armor);
        GUILayout.EndVertical();

    GUILayout.EndHorizontal();
}

甚至交叉使用也可以达到相同的效果:
public override void OnInspectorGUI()
{


    MyPlayer mp = (MyPlayer)target;
    GUILayout.BeginHorizontal();
        GUILayout.BeginVertical();
        mp.damage = EditorGUILayout.IntField("A Damage", mp.damage);
        mp.armor = EditorGUILayout.IntField("A Armor", mp.armor);
        EditorGUILayout.EndVertical();

        GUILayout.BeginVertical();
        mp.damage = EditorGUILayout.IntField("B Damage", mp.damage);
        mp.armor = EditorGUILayout.IntField("B Armor", mp.armor);
        EditorGUILayout.EndVertical();
    EditorGUILayout.EndHorizontal();
}
继承 Editor
从Editor派生出来的子类可以用来创建自定义编辑器或检查器。
OnInspectorGUI() :在此函数中实现自定义 inspector面板,每当鼠标在inspector区域触发一次Event就会执行一次。
CreateInspectorGUI():在此函数中使用UIElement 自定义 inspector面板,实现此函数会使OnInspectorGUI()无效。
OnSceneGUI():在此函数中自定义Scene区域的内容,每当鼠标在Scene区域触发一次 Event 就会执行一次。
OnHeaderGUI():在此函数中修改头部GUI
OnPreviewGUI() 和 OnInteractivePreviewGUI():两者从源码上看,拥有同样作用,均用于修改Preview窗口。
执行顺序:
OnInspectorGUI
HasPreviewGUI
OnPreviewSettings
OnInteractivePreviewGUI
OnPreviewGUI
SerializedObject 与 SerializedProperty
将目标脚本的属性映射到inspector面板上可以有两种方法。第一种就是上面所展示的那样直接映射:
    MyPlayer mp = (MyPlayer)target;
    ...
    mp.damage = EditorGUILayout.IntField("A Damage", mp.damage);
    mp.armor = EditorGUILayout.IntField("A Armor", mp.armor);
    ...
另外一种,也是Unity官方推荐的内容,就是使用序列化类和属性。
public override void OnInspectorGUI()
{


    MyPlayer mp = (MyPlayer)target;
    // 同步序列化物体 serializedObject 来自父类Editor,指示正在操作的序列化对象
    serializedObject.Update();
	// 通用写法
    EditorGUILayout.PropertyField(serializedObject.FindProperty("damage"), new GUIContent("Damage"));
    EditorGUILayout.PropertyField(serializedObject.FindProperty("armor" ), new GUIContent("Armor" ));

	// 杂技写法
    SerializedProperty damageProperty = serializedObject.FindProperty("damage");
    damageProperty.intValue = EditorGUILayout.IntField("damage",damageProperty.intValue);
    SerializedProperty armorProperty  = serializedObject.FindProperty("armor" );
    armorProperty.intValue = EditorGUILayout.IntField("armor", armorProperty.intValue);
	// 应用修改后的属性
    serializedObject.ApplyModifiedProperties();
}
官方对序列化物体这样解释:
SerializedObject opens a data stream to one or more target Unity objects at a time, which allows you to simultaneously edit serialized data that the objects share in common. For example, if you have several Behaviours of different types in the data stream, the only property they have in common may be ‘m_Enabled’.
When you first create a SerializedObject instance it is up-to-date. Any changes that you make to a SerializedProperty accessed within this data stream must ultimately be flushed via the SerializedObject.ApplyModifiedProperties method. If you keep a reference to a SerializedObject instance for more than one frame, you must make sure to manually call its SerializedObject.Update method before you read any data from it, as one or more target objects may have been modified elsewhere, such as from a separate SerializedObject stream. Respectively, note that two different SerializedObject streams with the same target objects are independent from one another and you must manually synchronize them in this fashion if one or more of them is maintained over the course of several frames.
One of the most common uses of the SerializedObject and SerializedProperty classes is when creating custom Editors, where using SerializedObject is the recommended approach as opposed to modifying inspected target objects directly.
https://docs.unity.cn/2020.2/Documentation/ScriptReference/SerializedObject.html
SerializedObject 可以一次性给一个或多个 Unity 对象打开一个数据流,这让您能同时编辑这些对象共享的序列化数据。 z对数据流中的 SerializedProperty 所做的任何更改最终都必须通过 SerializedObject 刷新。(通过函数ApplyModifiedProperties()进行应用)
由于具有相同目标对象的两个不同 SerializedObject 流彼此独立,如果在多个帧的过程中维护了其中一个或多个,则必须以这种方式手动同步它们。(通过函数Update()进行同步)
SerializedObject 和 SerializedProperty 类最常见的用途之一是在创建自定义编辑器时,推荐使用 SerializedObject,而不是直接修改已检查的目标对象。
继承 PropertyDrawer 处理序列化类
除了Unity内置的数据结构外,如果想在面板上展示特殊类的字段,就必须对类进行序列化,而想要自定义序列化类的显示,就需要用到 PropertyDrawer。
从PropertyDrawer派生出来的子类拥有两种用途:
- 定制一个
Serializable class的GUI面板 - 定制一个
Attribute特性
此处只涉及他的第一个用途,即自定义一个序列化类的Inspector面板。
// Recip.cs
public enum IngredientUnit {
Spoon, Cup, Bowl, Piece }
[Serializable]
public class Ingredient
{
public string name;
public int amount;
public IngredientUnit unit;
}
public class Recipe : MonoBehaviour
{
public Ingredient potionResult;
}
// IngredientDrawer.cs
[CustomPropertyDrawer(typeof(Ingredient))]
public class IngredientDrawer : PropertyDrawer
{
public override float GetPropertyHeight(SerializedProperty property, GUIContent label)
{
return base.GetPropertyHeight(property, label);
}
public override void OnGUI(Rect position, SerializedProperty property, GUIContent label)
{
// 设置前置标签,并获取控件位置
position = EditorGUI.PrefixLabel(position, GUIUtility.GetControlID(FocusType.Passive), label);
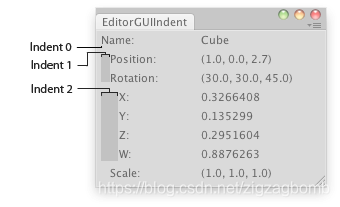
// 设置标签缩进
int indent = EditorGUI.indentLevel;
EditorGUI.indentLevel = 0;
// 计算控件位置
Rect amountRect = new Rect(position.x, position.y, 30, position.height);
Rect unitRect = new Rect(position.x + 35, position.y, 50, position.height);
Rect nameRect = new Rect(position.x + 90, position.y, position.width - 90, position.height);
// 绘制字段,通过 GUIContent.none 去除各自的前置标签
EditorGUI.PropertyField(amountRect, property.FindPropertyRelative("amount"), GUIContent.none);
EditorGUI.PropertyField(unitRect, property.FindPropertyRelative("unit"), GUIContent.none);
EditorGUI.PropertyField(nameRect, property.FindPropertyRelative("name"), GUIContent.none);
// 还原标签缩进
EditorGUI.indentLevel = indent;
}

首先CustomPropertyDrawer特性指定了要自定义的序列化类是Ingredient。
在IngredientDrawer类中,我们重写了父类的两个方法:
GetPropertyHeight(SerializedProperty property, GUIContent label):获取控件高度,这里指显示序列化类 Ingredient所有内容所需要的高度。默认返回的是固定一行的高度,我的电脑上是固定值18。
property:第一个参数指示要展示的序列化属性,这里指Recipe类中的pontionResult字段。label:第二参数指示要展示的标签内容,这里指 Potion Result 。
OnGUI(Rect position, SerializedProperty property, GUIContent label):实际绘制的内容都包含在此函数中。
positon:根据GetPropertyHeight函数获取高度后,计算出来控件需要占据的范围大小。property:第一个参数指示要展示的序列化属性,这里指Recipe类中的pontionResult字段。label:第二参数指示要展示的标签内容,这里指 Potion Result 。
由上可以看出,调用顺序是先调用GetPropertyHeight确定高度,后调用OnGUI绘制面板内容。
另外,上面有一个indentLevel字段控制着标签的缩进,具体效果如官方图片所示:
这里使用了固定布局EditorGUI类,所有部分需要手动控制他们的位置。当然你也可以使用自动布局 EditorGUILayout去做。
[CustomPropertyDrawer(typeof(Ingredient))]
public class IngredientDrawer : PropertyDrawer
{


    public override float GetPropertyHeight(SerializedProperty property, GUIContent label)
    {


        return base.GetPropertyHeight(property, label);
    }
    public override void OnGUI(Rect position, SerializedProperty property, GUIContent label)
    {


        EditorGUILayout.PropertyField(property.FindPropertyRelative("unit"), new GUIContent("Unit"));
        EditorGUILayout.PropertyField(property.FindPropertyRelative("name"), new GUIContent("Name"));
    }
}

这里可以看到使用了自动布局后,GetPropertyHeight函数的作用下多开辟的一行空白位置后,才开始自动布局。
这里官方并不建议这样用,因为出于性能原因,EditorGUILayout 函数不能用于 PropertyDrawer。
Note that for performance reasons, EditorGUILayout functions are not usable with PropertyDrawers.
https://docs.unity.cn/2020.2/Documentation/ScriptReference/PropertyDrawer.html
修改 HeaderGUI
Editor类中有OnHeaderGUI()函数,从官方文档上看并没有对此函数进行说明。在对自己的脚本进行扩展的Editor中实现该方法,也不会被调用。
却对DrawHeader()进行了说明。
Call this function to draw the header of the editor.
https://docs.unity.cn/2020.2/Documentation/ScriptReference/Editor.DrawHeader.html
实际使用时,似乎并没有什么效果。
我们反编译UnityEditor.dll,查看Editor.DrawHeader()源码:
// 只展示开始几行
public void DrawHeader()
{


    bool hierarchyMode = EditorGUIUtility.hierarchyMode;
    bool flag = hierarchyMode;
    if (flag)
    {


        this.DrawHeaderFromInsideHierarchy();
    }
    else
    {


        this.OnHeaderGUI();
    }

    ...
}
private void DrawHeaderFromInsideHierarchy()
{


    GUIStyle style = GUILayoutUtility.topLevel.style;
    EditorGUILayout.EndVertical();
    this.OnHeaderGUI();
    EditorGUILayout.BeginVertical(style, new GUILayoutOption[0]);
}
可以看出来DrawHeader内部,会根据EditorGUIUtility.hierarchyMode进行判断当前Editor是否处于一种层级模式,如果是,就直接在层级内部添加GUI(并调用OnHeaderGUI()),如果不是,就直接调用OnHeaderGUI()。
所谓层级模式,是指生成Editor面板是可以收缩的,例如下图的Mesh Filter组件,上面最左侧有个倒三角符号,点击可以进行收缩,就是层级模式。

但可惜的是,对于我们自己写的Editor,我目前还没有找到能够取消层级模式的方法。所以,在OnHeaderGUI()中写好内容,再调用DrawHeader(),这和直接在OnInspectorGUI()中写UI控件没有区别。
所以,我们只可以再看看UnityEditor下面的源码。我们可以发现OnHeaderGUI()确实有被使用,但似乎只有特定的几个类中的OnHeaderGUI()会被自动调用。
例如,我们可以看一下UnityEditor.GameObjectInspector这个类,
namespace UnityEditor
{


	[CanEditMultipleObjects]
	[CustomEditor(typeof(GameObject))]
	internal class GameObjectInspector : Editor
	{


        ...
        protected override void OnHeaderGUI()
        {


            bool enabled = GUI.enabled;
            GUI.enabled = true;
            EditorGUILayout.BeginVertical(EditorStyles.inspectorBig, new GUILayoutOption[0]);
            GUI.enabled = enabled;
            this.DrawInspector();
            EditorGUILayout.EndVertical();
        }
        ...
    }
}
GameObjectInspector是对GamObject对象的Inspector面板进行了扩展,我们随便点击一个GameObject,最初Inspector面板的样子就是在这个类中定义的。

红色方框中实际上就是OnHeaderGUI()控制的效果,而绿色方框自然是由UnityEditor.TransformInspector类所控制的。
如果我们再次重新对GameObject进行扩展,就可以验证了。
[CustomEditor(typeof(GameObject))]
public class MyTestEditor : Editor
{


    protected override void OnHeaderGUI()
    {


        Debug.Log("OnHeaderGUI");
        GUILayout.Button("REOREOREOREO...");
        base.OnHeaderGUI();
    }
    // 重写OnInspectorGUI,如果默认处理会让GameObject中的字段以另外一种方式显示出来
    public override void OnInspectorGUI()
    {


        Debug.Log("OnInspectorGUI");
    }
}
可以看到我们得到了预期的效果。

像这样OnHeaderGUI会自动调用的类,除此之外,还有UnityEditor.AnimationWindowEventInspector、UnityEditor.MaterialEditor等。
那我们无法在其他组件对Header进行控制了吗?
当然可以,这时我们需要用到Editor.finishedDefaultHeaderGUI这是一个事件,他会在每次OnHeaderGUI绘制完成后进行执行。
[CustomEditor(typeof(MyTest))]
public class MyTestEditor : Editor
{


    private void HeaderGUI(Editor editor) {


        Debug.Log("HeaderGUI");
        // 确定当前调用,是在GameobjectInspector.OnHeaderGUI()调用结束后触发的。
        // 否则,按钮还会出现在Material等面板上
        if (editor.target is GameObject)
        GUILayout.Button("cccccccccccccccccc");
    }
    private void OnEnable()
    {


        finishedDefaultHeaderGUI += HeaderGUI;
        Debug.Log("enable");
    }
    private void OnDisable()
    {


        // 必须减掉,否则每次刷新就多一个按钮
        finishedDefaultHeaderGUI -= HeaderGUI;
        Debug.Log("Disable");
    }
}

多个程序对同一面板自定义的执行顺序
修改面板的途径很多,当有多个程序对同一个面板进行控制时,我们需要注意一下几点:
- 同时只有一个Editor对目标生效,即使有多个Editor对同一个类进行扩展,也只有一个类会执行。
- 当一个Editor想应用字段的扩展时(例如:拥有特性的字段或扩展过的序列化类),得在
OnInspectorGUI中对相应字段使用EditorGUILayout.PropertyField()进行显示。 PropertyDrawer同时只能生效一个,而在同一字段上面可以有多个DecoratorDrawer属性
自定义Scene面板
Handles
通过Handles类,我们可以自定义场景视图中的物品控件。
在Handles类中,我们使用的函数可以大致分为三大类。
首先是以Draw开头的函数,例如DrawLine、DrawWireCube。这类函数简单粗暴,直接进行绘制,绘制出来的图形不可交互。
// Handles.cs
public class HandlerClass : MonoBehaviour
{


    public float value = 7.0f;
    public Vector3 targetPosition;
    public void Update()
    {


        transform.LookAt(targetPosition);
    }
}
// HandlerClassEditor.cs
[CustomEditor(typeof(HandlerClass))]
public class HandlerClassEditor : Editor
{


    public void OnSceneGUI()
    {


        var t = target as HandlerClass;
        var tr = t.transform;
        var pos = tr.position;
        Handles.DrawWireDisc(pos, tr.up, t.value);
    }
}
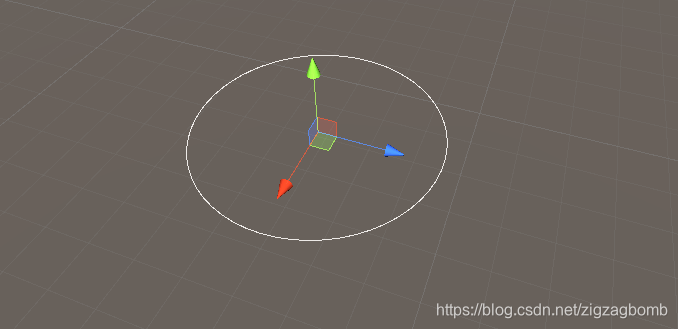
然后是以Handle结尾的函数,例如ScaleValueHandle、RadiusHandle。这类函数绘制出来的图形,可以在Scene场景中进行交互,交互的结果会通过返回值传出。
public class HandlerClassEditor : Editor
{


    public void OnSceneGUI()
    {


        var t = target as HandlerClass;
        var tr = t.transform;
        var pos = tr.position;

        Handles.DrawWireDisc(pos, tr.up, t.value);
      	// BeginChangeCheck 检查直到 EndChangeCheck 中,是否有控件发生改变。
        EditorGUI.BeginChangeCheck();
        Vector3 newTargetPosition = Handles.PositionHandle(t.targetPosition, Quaternion.identity);
        if (EditorGUI.EndChangeCheck())
        {


            t.targetPosition = newTargetPosition;
            t.Update();
        }
    }
}
拖动多出来的坐标轴,圆形会跟着转动。

最后是以Cap结尾的函数,例如CubeCap、RectangleCap。这类函数是委托CapFunction的实现,主要用于配合部分Handle函数使用,指明绘制的图案类型。
[CustomEditor(typeof(HandlerClass))]
public class HandlerClassEditor : Editor
{


    public void OnSceneGUI()
    {


        var t = target as HandlerClass;
        var tr = t.transform;
        var pos = tr.position;

        Handles.DrawWireDisc(pos, tr.up, t.value);

        float size = 3f;
        Vector3 snap = Vector3.one * 0.5f;

        EditorGUI.BeginChangeCheck();
        // RectangleHandleCap 指示图案为矩形
        Vector3 newTargetPosition = Handles.FreeMoveHandle(t.targetPosition, Quaternion.identity, size, snap, Handles.RectangleHandleCap);
        if (EditorGUI.EndChangeCheck())
        {


            t.targetPosition = newTargetPosition;
            t.Update();
        }
    }
}
这里的矩形在编辑模式下,可以任意拖动。

当然,它们也可以独立使用进行绘制。
// SphereExample.cs
public class SphereExample : MonoBehaviour{

    }
// SphereExampleEditor.cs
[CustomEditor(typeof(SphereExample))]
public class SphereExampleEditor : Editor
{


    float size = 1f;
    protected virtual void OnSceneGUI()
    {


        Transform transform = ((SphereExample)target).transform;
        Handles.color = Handles.xAxisColor;
        Handles.SphereHandleCap(
            0,
            transform.position + new Vector3(3f, 0f, 0f),
            transform.rotation * Quaternion.LookRotation(Vector3.right),
            size,
            EventType.Repaint
        );
        Handles.color = Handles.yAxisColor;
        Handles.SphereHandleCap(
            0,
            transform.position + new Vector3(0f, 3f, 0f),
            transform.rotation * Quaternion.LookRotation(Vector3.up),
            size,
            EventType.Repaint
        );
        Handles.color = Handles.zAxisColor;
        Handles.SphereHandleCap(
            0,
            transform.position + new Vector3(0f, 0f, 3f),
            transform.rotation * Quaternion.LookRotation(Vector3.forward),
            size,
            EventType.Repaint
        );
    }
}

除了以上三种,这里再提一下几个特殊的函数。
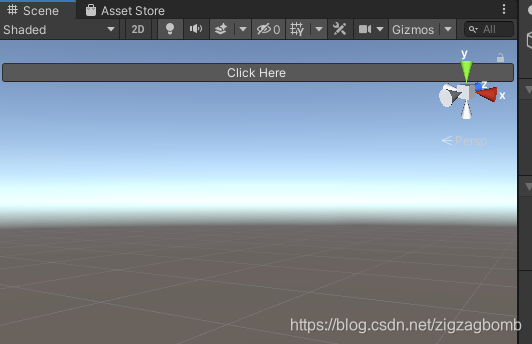
BeginGUI() 和 EndGUI() 在这两个函数之间,我们可以利用EditorGUI和GUI对 Scene 面板进行开发。
[CustomEditor(typeof(HandlerClass))]
public class HandlerClassEditor : Editor
{


    public void OnSceneGUI()
    {


        Handles.BeginGUI();
        EditorGUILayout.BeginHorizontal();
        if (GUILayout.Button("Click Here"))
        {


            Debug.Log("冲冲冲!");
        }
        EditorGUILayout.EndHorizontal();
        Handles.EndGUI();
    }
}
Gizmos
Gizmos 用于在场景视图提供可视化的调试与帮助。
所有图标都需要放置在Gizmos文件夹中,才可以进行使用。
所有关于GIzmos的绘图都必须在OnDrawGizmos和OnDrawGizmosSelected函数中实现,其中OnDrawGizmos会在运行时不断执行,而编辑模式下,只在Scene中触发Event才会执行。OnDrawGizmosSelected会在物体选中的前提下执行。
public class OnDrawGizmosClass : MonoBehaviour
{


    void OnDrawGizmos()
    {


        Gizmos.DrawIcon(transform.position, "state_lightningroar.png");
    }
    private void OnDrawGizmosSelected()
    {


    }
}
除了绘制图标之外,Gizmos还提供一些简单图标的绘制。

自定义Preview面板
Editor与ObjectPreview
想要调出Preview面板,实际上只要实现UnityEditor.IPreviwable接口内容就行了。所以目前有两种方式供我们选择,一是继承Editor,二是继承ObjectPreview,前者实际上包含后者的全部内容。不过,我们这里先看一下后者的写法。
[CustomPreview(typeof(MeshFilter))]
public class MyPreview : ObjectPreview
{


    // 必须返回true,preview窗口才出来
    public override bool HasPreviewGUI()
    {


        return true;
    }
    // 设置标题
    public override GUIContent GetPreviewTitle()
    {


        return new GUIContent("Preview");
    }
    // 预览窗口设置选项
    public override void OnPreviewSettings()
    {


        GUILayout.Label("Label", "preLabel");
        if (GUILayout.Button("Button", "preButton")) {

     Debug.Log("Click!"); }
    }
    // 绘制preview窗口
    public override void OnPreviewGUI(Rect r, GUIStyle background)
    {


        GUI.Label(r, target.name + " is being previewed");
    }
}

我们这里扩展了MeshFilter这个组件,只要有物体挂有这个组件,就可以调出预览窗口。
值得注意的是ObjectPreview并不拥有例如OnDisable()等函数,不能在销毁时对资源进行清理,这注定继承ObjectPreview只能用来显示简单的文本信息,所以想要实现交互等复杂操作,接下来的我们还得用Editor。
那么如果我们想要在这里显示一个可以交互的预览窗口该怎么做?
我们继续来看Unity的源码,定位到UnityEditor.GameObjectInspector,康康他们是怎么做的。
namespace UnityEditor
{


	[CanEditMultipleObjects]
	[CustomEditor(typeof(GameObject))]
	internal class GameObjectInspector : Editor
    {


        public override void OnPreviewGUI(Rect r, GUIStyle background)
        {


            // 判断硬件是否支持材质渲染
            bool flag = !ShaderUtil.hardwareSupportsRectRenderTexture;
            if (flag) {

      ... }
            else
            {


                // 获取拖拽向量
                Vector2 vector = PreviewGUI.Drag2D(this.m_PreviewDir, r);
 			   ...
                bool flag4 = Event.current.type != EventType.Repaint;
                if (!flag4)
                {


 				   ...
                    PreviewRenderUtility renderUtility = this.GetPreviewData().renderUtility;
                    // 从cache中取值
                    bool flag6 = this.m_PreviewCache.TryGetValue(this.referenceTargetIndex, out texture);
                    if (flag6) {

     ... }
                    else
                    {


                        // 我们可以只简单关心没有cache的情况
                        renderUtility.BeginPreview(r, background);
                        this.DoRenderPreview();
                        renderUtility.EndAndDrawPreview(r);
                        ...
                    }
                }
            }
        }
        private void DoRenderPreview()
        {


            GameObjectInspector.PreviewData previewData = this.GetPreviewData();
            Bounds bounds = new Bounds(previewData.gameObject.transform.position, Vector3.zero);
            GameObjectInspector.GetRenderableBoundsRecurse(ref bounds, previewData.gameObject);
            float num = Mathf.Max(bounds.extents.magnitude, 0.0001f);
            float num2 = num * 3.8f;
            Quaternion quaternion = Quaternion.Euler(-this.m_PreviewDir.y, -this.m_PreviewDir.x, 0f);
            Vector3 position = bounds.center - quaternion * (Vector3.forward * num2);
            // 设置相机数据
            previewData.renderUtility.camera.transform.position = position;
            previewData.renderUtility.camera.transform.rotation = quaternion;
            previewData.renderUtility.camera.nearClipPlane = num2 - num * 1.1f;
            previewData.renderUtility.camera.farClipPlane = num2 + num * 1.1f;
            // 设置光源数据
            previewData.renderUtility.lights[0].intensity = 0.7f;
            previewData.renderUtility.lights[0].transform.rotation = quaternion * Quaternion.Euler(40f, 40f, 0f);
            previewData.renderUtility.lights[1].intensity = 0.7f;
            previewData.renderUtility.lights[1].transform.rotation = quaternion * Quaternion.Euler(340f, 218f, 177f);
            previewData.renderUtility.ambientColor = new Color(0.1f, 0.1f, 0.1f, 0f);
            // 渲染
            previewData.renderUtility.Render(true, true);
        }


    }
}
源码比较长,我只截取了关键部分的代码。从上面代码,我们可以知道制作可交互的预览窗口,只需要两步,一是获取拖拽向量,二是利用PreviewRenderUtility辅助类进行渲染绘制。
我们只需要稍微看一下PreviewRenderUtility的相关API就可以开干了。
[CustomEditor(typeof(MeshFilter))]
public class MyPreview : Editor
{


    private PreviewRenderUtility m_PreviewRenderUtility;
    private MeshFilter m_MeshFilter;
    private bool m_Loaded = true;
    private Vector2 m_Drag;
    private void OnDisable()
    {


        if (m_PreviewRenderUtility != null)
        {


            // 必须进行清理,否则会存在残留对象
            m_PreviewRenderUtility.Cleanup();
            m_PreviewRenderUtility = null;
        }
    }
    public override bool HasPreviewGUI()
    {


        // 初始化
        if (m_PreviewRenderUtility == null) m_PreviewRenderUtility = new PreviewRenderUtility();
        m_MeshFilter = target as MeshFilter;
        return true;
    }
    public override void OnPreviewGUI(Rect r, GUIStyle background)
    {


        // m_Loaded	确保只加载一次物体
        if (m_Loaded) {


            // AddSingleGO 添加物体
            m_PreviewRenderUtility.AddSingleGO(GameObject.Instantiate(m_MeshFilter.gameObject, Vector3.zero, Quaternion.identity));
            m_Loaded = false;
        }
        // 获取拖拽向量
        m_Drag = Drag2D(m_Drag, r);
        // 事件为绘制时,才进行绘制
        if (Event.current.type == EventType.Repaint)
        {


            m_PreviewRenderUtility.BeginPreview(r, background);
            //调整相机位置与角度
            m_PreviewRenderUtility.camera.transform.position = Vector2.zero;
            m_PreviewRenderUtility.camera.transform.rotation = Quaternion.Euler(new Vector3(-m_Drag.y, -m_Drag.x, 0));
            m_PreviewRenderUtility.camera.transform.position = m_PreviewRenderUtility.camera.transform.forward * -6f;
            // 相机渲染
            m_PreviewRenderUtility.camera.Render();
            // 结束并绘制
            m_PreviewRenderUtility.EndAndDrawPreview(r);
        }
    }
    // Drag2D 来自源码
    private static int sliderHash = "Slider".GetHashCode();
    public static Vector2 Drag2D(Vector2 scrollPosition, Rect position)
    {


        // 每次获得独一无二的 controlID
        int controlID = GUIUtility.GetControlID(sliderHash, FocusType.Passive);
        Event current = Event.current;
        // 获取对应 controlID 的事件
        switch (current.GetTypeForControl(controlID))
        {


            case EventType.MouseDown:
                {


                    bool flag = position.Contains(current.mousePosition) && position.width > 50f;
                    if (flag)
                    {


                        // 鼠标摁住拖出预览窗口外,预览物体任然能够旋转
                        GUIUtility.hotControl = controlID;
                        // 采用事件
                        current.Use();
                        // 让鼠标可以拖动到屏幕外后,从另一边出来
                        EditorGUIUtility.SetWantsMouseJumping(1);
                    }
                    break;
                }
            case EventType.MouseUp:
                {


                    bool flag2 = GUIUtility.hotControl == controlID;
                    if (flag2)
                    {


                        GUIUtility.hotControl = 0;
                    }
                    EditorGUIUtility.SetWantsMouseJumping(0);
                    break;
                }
            case EventType.MouseDrag:
                {


                    bool flag3 = GUIUtility.hotControl == controlID;
                    if (flag3)
                    {


                        // shift 加速
                        scrollPosition -= current.delta * (float)(current.shift ? 3 : 1) / Mathf.Min(position.width, position.height) * 140f;
                        // 以下两条缺少任意一个,会导致延迟更新,拖动过程中无法实时更新
                        // 直到 repaint事件触发才重新绘制
                        current.Use();
                        GUI.changed = true;
                    }
                    break;
                }
        }
        return scrollPosition;
    }
}
这里我没有添加光源,所以预览窗口很暗。

这里我简单提一下Drag2D()中的hotControl和Use()。
GUIUtility.hotControl:热控制ID,这里会记录当前所操作的控件ID,并让控件进入热状态,不允许其他控件响应鼠标事件。一旦用户 mouseup,该控件将 hotControl 设置为0,以指示其他控件现在可以响应用户输入。在代码中的具体作用为鼠标摁住拖出预览窗口外,预览物体任然能够旋转,而不会被其他控件所捕获。
Event.Use():在使用事件时调用此方法。事件的类型将重置为 EventType.Used,使其他 GUI 元素忽略它。如果对EventType.Repaint 和 EventType.Layout使用此方法,将发出警告。
自定义Attribute特性
PropertyDrawer
从PropertyDrawer派生出来的子类拥有两种用途:
- 定制一个
Serializable class的GUI面板 - 定制一个
Attribute特性
之前说了第一种用途,这里我们来说说第二个用途——自定义特性。
// MyRangeAttribute.cs
public class MyRangeAttribute : PropertyAttribute
{


    public float min;
    public float max;
    public MyRangeAttribute(float min, float max)
    {


        this.min = min;
        this.max = max;
    }
}
// MyRangeDrawer.cs
[CustomPropertyDrawer(typeof(MyRangeAttribute))]
public class MyRangeDrawer : PropertyDrawer
{


    public override float GetPropertyHeight(SerializedProperty property, GUIContent label)
    {


        // 默认为一行的高度
        return base.GetPropertyHeight(property, label) ;
    }
    public override void OnGUI(Rect position, SerializedProperty property, GUIContent label)
    {


        // attribute 来自父类,可获取要自定义的特性类
        MyRangeAttribute range = attribute as MyRangeAttribute;
        if (property.propertyType == SerializedPropertyType.Float)
            EditorGUI.Slider(position, property, range.min, range.max, label);
        else if (property.propertyType == SerializedPropertyType.Integer)
            EditorGUI.IntSlider(position, property, Convert.ToInt32(range.min), Convert.ToInt32(range.max), label);
        else
            EditorGUI.LabelField(position, label.text, "Use Range with float or int.");
    }
}
所有自定义特性必须继承自PropertyAttribute类,并且必须以Attribute结尾。
OnGUI(Rect position, SerializedProperty property, GUIContent label):实际绘制的内容都包含在此函数中。
positon:根据GetPropertyHeight函数获取高度后,计算出来控件需要占据的范围大小。property:第一个参数指示要展示的序列化属性,这里指紧贴[MyRange]特性的关联字段。label:第二参数指示要展示的标签内容,这里指紧贴[MyRange]特性的关联字段名 。
// MyRangeTest.cs
public class MyRangeTest : MonoBehaviour
{


    [MyRange(0,10)]
    public float num1;
    [MyRange(0, 10)]
    public int num2;
    [MyRange(0, 10)]
    public bool num3;
}

DecoratorDrawer
DecoratorDrawer和PropertyDrawer类似,只是他并不会绘制与特性关联的字段,它只是对特性类PropertyAttribute获取的数据进行绘制。
这里我们自定义一个特性,使其能够显示指定路径的图片。
// MyImageAttribute.cs
public class MyImageAttribute : PropertyAttribute
{


    public string path;
    public MyImageAttribute(string path) {


        this.path = path;
    }
}

// MyImageAttributeDrawer.cs
[CustomPropertyDrawer(typeof(MyImageAttribute))]
public class MyImageAttributeDrawer : DecoratorDrawer
{


    private Texture2D image;
    //从参数来看,无法获取关联字段的信息
    public override void OnGUI(Rect position)
    {


        GUI.DrawTexture(new Rect(position.x,position.y,image.width,image.height),image);
    }
    // 获取高度
    public override float GetHeight()
    {


        MyImageAttribute myImageAttribute = (MyImageAttribute)attribute;
        if (image == null) {


            image = Resources.Load<Texture2D>(myImageAttribute.path);
        }
        return base.GetHeight() + image.height;
    }
}

// MyImageTest.cs
public class MyImageTest : MonoBehaviour
{


    [MyImage("state_windwalk")]
    public int num;
}

虽然DecoratorDrawer从概念上不与特定字段关联,但它使用时仍然需要放置在脚本的字段之上。但与 PropertyDrawer 不同的是,在同一字段上面可以有多个 DecoratorDrawer 属性。如果 DecoratorDrawer属性位于List 或数组的字段之上,那么 decorator 只会出现在数组之前一次,而不是对于每个数组元素都出现。
Although a DecoratorDrawer conceptually is not meant to be associated with a specific field, its attribute still needs to be placed above a field in the script. However, unlike PropertyDrawer attributes, there can be multiple DecoratorDrawers attributes above the same field. Also unlike PropertyDrawers, if a DecoratorDrawer attribute is placed above a field that is a List or an array, the decorator will only show up once before the array; not for every array element.
https://docs.unity.cn/2020.2/Documentation/ScriptReference/DecoratorDrawer.html
自定义窗口 EditorWindow
想要在Unity中创建新的窗口,都需要继承此类。
//EditorWindowTest.cs
public class EditorWindowTest : EditorWindow
{


    [MenuItem("Example/Display simple Window")]
    static void Initialize()
    {


        EditorWindowTest window = (EditorWindowTest)EditorWindow.GetWindow(typeof(EditorWindowTest), true, "My Empty Window");
    }
}
在顶部菜单栏找到Example/Display simple Window,点击即可生成新窗口。
但有一点得注意,EditorWindow创建新窗口是通过GetWindow函数实现的,而这个函数执行时,会检测此窗口是否打开,如果没有,创建并显示新窗口,并返回该窗口的实例,如果有,就重新聚焦该窗体。
If there is none, creates and shows new window and returns the instance of it.
https://docs.unity.cn/2020.2/Documentation/ScriptReference/EditorWindow.GetWindow.html
所以,如果需要重复弹出窗口的操作,需要重新封装窗口函数,并制定界面层级管理逻辑。
注意Event事件
无论是OnGUI()还是OnInspectorGUI()都是由事件驱动的,我们应该清楚什么事件触发时执行什么逻辑。
比如下面这个例子,MyPlayerEditor对Inspector面板进行了绘制,我们把触发绘制的事件类型打印出来。
// MyPlayer.cs
public class MyPlayer : MonoBehaviour
{


    public int armor = 75;
    public int damage = 25
    public GameObject gun;
}
// MyPlayerEditor.cs
[CustomEditor(typeof(MyPlayer))]
public class MyPlayerEditor : Editor
{


    public override void OnInspectorGUI()
    {


        //查看触发绘制的事件类型
        Debug.Log(Event.current.type);
        // target来自父类Editor,指明当前操作的对象
        MyPlayer mp = (MyPlayer)target;
        mp.damage = EditorGUILayout.IntField("Damage", 0);
        mp.armor = EditorGUILayout.IntSlider("Armor", mp.armor, 0, 100);
        serializedObject.ApplyModifiedProperties();
    }
}
我们以极快的速度,将鼠标移入inspector区域,又迅速退出来。可以看出来,这里至少触发了两个事件,让OnInspectorGUI多绘制了一次。

我们先来看这两个事件是什么:
EventType.Layout :这个事件会在其他事件之前发送,用于初始化。
EventType.Repaint:这个事件用于重新绘制UI
所以,我们OnInspectorGUI的绘制内容应该在EventType.Repaint事件中触发执行,而现在明显多做了一次无效操作,我们应该对其做如下修改:
// MyPlayerEditor.cs
[CustomEditor(typeof(MyPlayer))]
public class MyPlayerEditor : Editor
{


    public override void OnInspectorGUI()
    {


        //查看触发绘制的事件类型
        Debug.Log(Event.current.type);
        if (Event.current.type == EventType.Repaint) {


          	// target来自父类Editor,指明当前操作的对象
            MyPlayer mp = (MyPlayer)target;
            mp.damage = EditorGUILayout.IntField("Damage", 0);
            mp.armor = EditorGUILayout.IntSlider("Armor", mp.armor, 0, 100);
            serializedObject.ApplyModifiedProperties();
        }
    }
}
另外提一下:
EventType.Used:代表已经处理的事件,其他控件接收到应该忽略。该状态由Event.Use()调用修改,在使用事件时调用此方法。事件的类型将重置为 EventType.Used,使其他 GUI 元素忽略它。如果对EventType.Repaint 和 EventType.Layout使用此方法,将发出警告。
(`・ω・´) 水平有限,如有错,请指正~