1. 绘制文字
绘制文字可以使用putText()函数来实现,其原型为:
void putText(
	Mat& img,     			//原图
	const string& text,   	//带绘制文字
	Point org, 				//文字绘制的左下角
	int fontFace,			//字体类型
	double fontScale,		//字体大小
	Scalar color, 			//字体颜色
	int thickness = 1, 		//字体粗细
	int lineType = 8 		//线型(4邻域或8邻域)
	bool bottomLeftOrigin = false   //图像坐标系
	);
主要需要关注的是第三个和第四个参数,其他参数根据字面意思自行设置即可
第四个参数的字体类型有:
FONT_HERSHEY_SIMPLEX = 0
FONT_HERSHEY_PLAIN = 1
FONT_HERSHEY_DUPLEX = 2
FONT_HERSHEY_COMPLEX = 3
FONT_HERSHEY_TRIPLEX = 4
FONT_HERSHEY_COMPLEX_SMALL = 5
FONT_HERSHEY_SCRIPT_SIMPLEX = 6
FONT_HERSHEY_SCRIPT_COMPLEX = 7
FONT_ITALIC = 16
其示意图如下所示:

其中第三个参数可以通过getTextSize()函数先获取待绘制文本框的大小,以方便放置文本框,其格式如下:
Size getTextSize(
	const string& text, 	//带绘制文字
	int fontFace, 			//字体类型
    double fontScale, 		//字体大小
    int thickness,			//字体粗细
    int* baseLine			//最下面文字点的Y坐标
    );
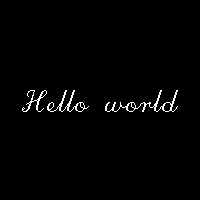
利用这个我们就可以将文字在指定位置以居中格式绘制:
int main()
{


	Mat img=Mat::zeros(Size(200,200),CV_8UC3);
	string str="Hello world";
	int baseline;
	Size ts = getTextSize(str, 7, 1, 1, &baseline);
	Point org;
	org.x = img.cols / 2 - ts.width / 2;
	org.y = img.rows / 2 + ts.height / 2;
	putText(img, str, org, 7, 1, Scalar(255, 255, 255),1);
	imshow("img",img);
	waitKey(0);
	system("pause");
}
展示如下:
2. 绘制线
2.1 直线
函数原型:
void line(
	Mat& img,				//绘制图像
	Point pt1, 				//绘制起点
	Point pt2, 				//绘制终点
	const Scalar& color,	//绘制颜色
    int thickness=1, 		//线粗
    int lineType=8, 		//邻域类型
    int shift=0				//小数点位数(起始点)
    );
2.2 折线
polylines(
	InputOutputArray img,   	//输入图像
	InputArrayOfArrays pts,   	//折线各顶点集合
    bool isClosed, 				//折线是否闭合
    const Scalar& color,
    int thickness=1,
    int lineType=8,
    int shift=0 );
其中第三个参数可以决定折线是否闭合
2.3 箭头线
void arrowedLine(
	Mat& img,
	Point pt1,     //起始点
	Point pt2,     //终止点
	const Scalar& color,
    int thickness=1,
    int line_type=8,
    int shift=0,
    double tipLength=0.1   //箭头相对于直线长度的长度
    );
2.4 裁剪直线
可以判断直线是否在指定矩形内部进行裁剪线段
bool clipLine(
	Size imgSize,   //矩形的右下角,默认为左上角为(0,0)
	Point& pt1,     //直线起始点
	Point& pt2      //直线终止点
	);
//or
bool clipLine(
	Rect imgRect,   //矩形参数
	Point& pt1,
	Point& pt2
	);
注意这个函数的返回值为bool类型,可以判断是否相交
3. 绘制矩形
3.1 长方形
只会绘制边,不会填充
void rectangle(
	Mat& img,
	Point pt1,     			//矩形左上角顶点
	Point pt2,				//矩形右下角顶点
    const Scalar& color,
    int thickness=1,
    int lineType=8,
    int shift=0);
//or
void rectangle(
	Mat& img,
	Rect rec,    //矩形类
    const Scalar& color,
    int thickness=1,
    int lineType=8,
    int shift=0);
3.2 任意填充多边形
类似于折线的闭合,但其内部会填充指定的颜色
void fillConvexPoly(
	InputOutputArray img,   //输入图像
	InputArray points,		//多边形的各顶点,等价于vector<Point>
    const Scalar& color,
    int lineType=8,
    int shift=0);
3.3 一次绘制多个填充多边形
void fillPoly(
	InputOutputArray img,
	InputArrayOfArrays pts,  //各顶点,等价于vector<vector<Point>>
    const Scalar& color,
    int lineType=8,
    int shift=0,
    Point offset=Point()
    );
4. 绘制圆
4.1 标准圆
void circle(
	Mat& img,
	Point center,    //圆心坐标
	int radius,      //半径
    const Scalar& color,
    int thickness=1,
    int lineType=8,
    int shift=0);
4.2 椭圆
void ellipse(
	Mat& img,
	Point center,    //圆心坐标
	Size axes,       //长短轴
    double angle,    //椭圆旋转角度
    double startAngle,  //绘制起始角度
    double endAngle,    //绘制终止角度,设置为0到360为全椭圆,也可以绘制一部分
    const Scalar& color,
    int thickness=1,
    int lineType=8,
    int shift=0);
opencv的几乎所有的绘制函数都在这里了,其函数定义可以在core.hpp中查看