参考:(文中部分图/文字/代码来自以下文章,部分内容由于时间久远已经找不到原作者,可联系注明或删除)
PYTHON串口数据打包发送STM32接收数据解析
openmv中文文档
这里以openmv循迹代码为例
main.py
THRESHOLD = (74, 100, -128, 127, -128, 127) # 识别白线
import sensor, image, time
from pyb import LED,UART

uart = UART(3, 115200)
uart.init(115200, bits=8, parity=None, stop=1)  # 定义串口
sensor.reset()
sensor.set_vflip(True)
sensor.set_hmirror(True)
sensor.set_pixformat(sensor.RGB565)
sensor.set_framesize(sensor.QQQVGA)
clock = time.clock()

def sending_data(rho_err,theta_error):    #发送函数
    global uart
    data = ustruct.pack("<bbhhb",  # 解释见下文
                   0x2C,
                   0x12,
                   int(rho_err),
                   int(theta_error),
                   0x5B)
    uart.write(data);


while(True):
    clock.tick()
    img = sensor.snapshot().binary([THRESHOLD])
    line = img.get_regression([(100,100)], robust = True)
    if (line):
        rho_err = abs(line.rho())-img.width()/2
        theta_error = line.theta()
        if (line.theta()>90):
            theta_error = line.theta()-180
        print('rho:', rho_err, 'theta:', theta_error)
        img.draw_line(line.line(), color = 127)
        sending_data(rho_err, theta_error)  # 发送数据,这里发送了两个数据
        time.sleep_ms(10)
关于struct.pack:
函数原型:struct.pack(fmt, v1, v2, …)
- fmt是格式字符串
- v1,v2是要转换的python值,详情见下表
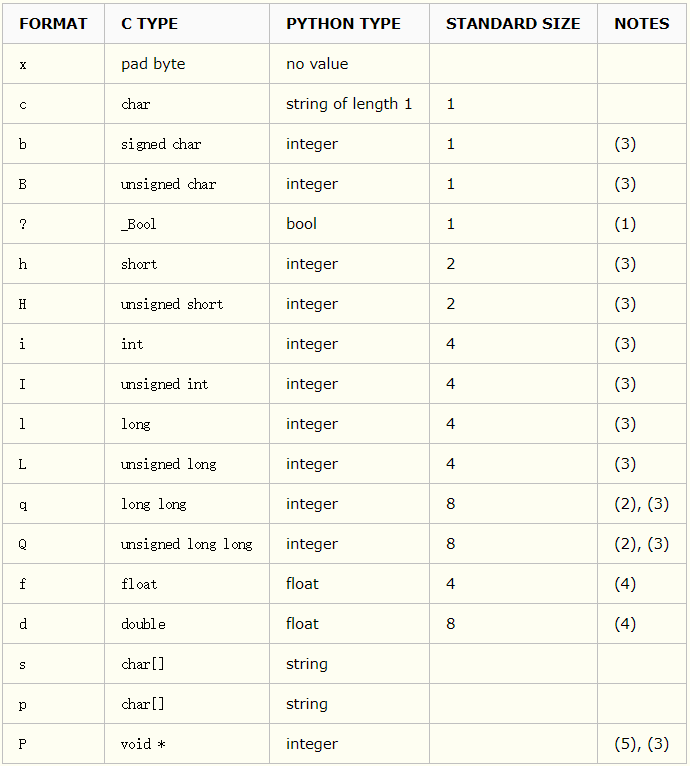
注1.q和Q只在机器支持64位操作时有意思;
注2.每个格式前可以有一个数字,表示个数;
注3.s格式表示一定长度的字符串,4s表示长度为4的字符串,但是p表示的是pascal字符串;
注4.P用来转换一个指针,其长度和机器字长相关;
注5.最后一个可以用来表示指针类型的,占4个字节;
为了同c中的结构体交换数据,还要考虑有的c或c++编译器使用了字节对齐,通常是以4个字节为单位的32位系统,故而struct根据本地机器字节顺序转换.可以用格式中的第一个字符来改变对齐方式.定义如下:

大端和小端的区别:
小端:较高的有效字节存放在较高的的存储器地址,较低的有效字节存放在较低的存储器地址。
大端:较高的有效字节存放在较低的存储器地址,较低的有效字节存放在较高的存储器地址。
例如0x12345678 ,在大端模式的排列:0x01(低地址),0x23,0x45,0x67,0x89(高地址)。
在小端模式的排列:0x89(低地址),0x67,0x45,0x23,0x01(高地址)。
在stm32中的代码如下:
openmv.c
#include "openmv.h"
#include "stm32f10x.h"

void USART2_Init(void){

     //串口2初始化并启动
    //GPIO端口设置
    GPIO_InitTypeDef GPIO_InitStructure; //串口端口配置结构体变量
	USART_InitTypeDef USART_InitStructure; //串口参数配置结构体变量
	NVIC_InitTypeDef NVIC_InitStructure;//串口中断配置结构体变量

	RCC_APB1PeriphClockCmd(RCC_APB1Periph_USART2, ENABLE);	//打开串口复用时钟
	RCC_APB2PeriphClockCmd(RCC_APB2Periph_GPIOA, ENABLE);   //打开PC端口时钟

    //USART2 TX  PA2;
    GPIO_InitStructure.GPIO_Pin = GPIO_Pin_2; //PA2
    GPIO_InitStructure.GPIO_Speed = GPIO_Speed_50MHz;//设定IO口的输出速度为50MHz
    GPIO_InitStructure.GPIO_Mode = GPIO_Mode_AF_PP;	//复用推挽输出
    GPIO_Init(GPIOA, &GPIO_InitStructure); //初始化PA2
    //USART2 RX  PA3;
    GPIO_InitStructure.GPIO_Pin = GPIO_Pin_3; //PA3
    GPIO_InitStructure.GPIO_Mode = GPIO_Mode_IN_FLOATING;//浮空输入
    GPIO_Init(GPIOA, &GPIO_InitStructure); //初始化PA3

    //Usart1 NVIC 配置
    NVIC_InitStructure.NVIC_IRQChannel = USART2_IRQn;
	NVIC_InitStructure.NVIC_IRQChannelPreemptionPriority=0 ;//抢占优先级0
	NVIC_InitStructure.NVIC_IRQChannelSubPriority = 2;		//子优先级2
	NVIC_InitStructure.NVIC_IRQChannelCmd = ENABLE;			//IRQ通道使能
	NVIC_Init(&NVIC_InitStructure);	//根据指定的参数初始化VIC寄存器

    //USART 初始化设置
	USART_InitStructure.USART_BaudRate = 115200;//串口波特率为115200
	USART_InitStructure.USART_WordLength = USART_WordLength_8b;//字长为8位数据格式
	USART_InitStructure.USART_StopBits = USART_StopBits_1;//一个停止位
	USART_InitStructure.USART_Parity = USART_Parity_No;//无奇偶校验位
	USART_InitStructure.USART_HardwareFlowControl = USART_HardwareFlowControl_None;//无硬件数据流控制
	USART_InitStructure.USART_Mode = USART_Mode_Rx | USART_Mode_Tx;	//收发模式
    USART_Init(USART2, &USART_InitStructure); //初始化串口1

    USART_ITConfig(USART2, USART_IT_RXNE, ENABLE);//开启ENABLE
    USART_Cmd(USART2, ENABLE);   //使能串口1

	//如下语句解决第1个字节无法正确发送出去的问题
	USART_ClearFlag(USART2, USART_FLAG_TC);       //清串口2发送标志
}

//串口2中断处理函数
void USART2_IRQHandler(void)			   //串口2全局中断服务函数
{


	u8 temp;
	if( USART_GetITStatus(USART2,USART_IT_RXNE)!=RESET )
	{


		USART_ClearITPendingBit(USART2,USART_IT_RXNE);//清除中断标志
		temp = USART_ReceiveData(USART2);
		Openmv_Receive_Data(temp);//openmv数据处理函数
	}
}

u8 RxCounter1 = 0;//接受OpenMV数据里用到的
u8 RxBuffer1[18];//接受OpenMV数据里用到的数组
u16 rho_err = 0,theta_err = 0;//rho偏差和theta偏差


//接收OpenMV传过来的数据
void Openmv_Receive_Data(int16_t data)
{


	static u8 state = 0;
	if(state==0&&data==0x2C)
	{


		state=1;
		RxBuffer1[RxCounter1++]=data;
	}
	else if(state==1&&data==18)
	{


		state=2;
		RxBuffer1[RxCounter1++]=data;
	}
	else if(state==2)
	{


		RxBuffer1[RxCounter1++]=data;
		if(RxCounter1>19||data == 0x5B) state=3;	//最后字符是openmv[19]
	}
	else if(state==3)		//state == 3  检测是否接受到结束标志
	{


        if(RxBuffer1[RxCounter1-1] == 0x5B)
        {


           	state = 0;
			USART_ITConfig(USART2,USART_IT_RXNE,DISABLE);//关闭DTSABLE中断

			rho_err = RxBuffer1[3]<<8 | RxBuffer1[2];   //这时已经赋值给rho_err和theta_err
			theta_err = RxBuffer1[5]<<8 | RxBuffer1[4];
	   		RxCounter1 = 0;
			USART_ITConfig(USART2,USART_IT_RXNE,ENABLE);//开启ENABLE中断
       	}
       	else   //错误
       	{


           	state = 0;
			RxCounter1=0;
        	}
	}
	else	//错误
	{


		state = 0;
		RxCounter1=0;
	}
}
//这段代码的原稿是一位博主贡献的,由于时间久远已经找不到原文章,侵删或联系注明
openmv.h
#ifndef __OPENMV_H_
#define __OPENMV_H_
#include "stm32f10x.h"

extern u16 USART1_RX_STA;         		//接受状态标记
extern u8 RxCounter1; 	 //接受OpenMV数据里用到的
extern u8 RxBuffer1[18];   //接受OpenMV数据里用到的数组

extern u16 rho_err;
extern u16 theta_err;

extern u8 state;

void USART2_Init(void);//串口2初始化并启动
void Openmv_Receive_Data(int16_t data);//接收OpenMV传过来的数据
#endif