本人初学者,文中定有代码、术语等错误,欢迎指正
文章目录
高级光照
Phong光照的缺点
-
造成Phong光照缺点的两个条件
-
当物体的高光反光度(shiness)比较小时
-
什么是高光的反光度
在片段着色器计算镜面光照分量时
float spec = pow(max(dot(viewDir, reflectDir), 0.0), 32);// spec = 光源对当前片段的镜面光影响
vec3 specular = specularStrength * spec * lightColor;// specular = 镜面光照分量
第一行代码:float spec=…,其中32就是片段的高光反光度
-
shiness小到什么程度
小于1以下(下面有例子:代值计算shiness比较小时对spec的影响)
扫描二维码关注公众号,回复: 15331316 查看本文章
-
-
视线与反射光线向量的夹角大于90度
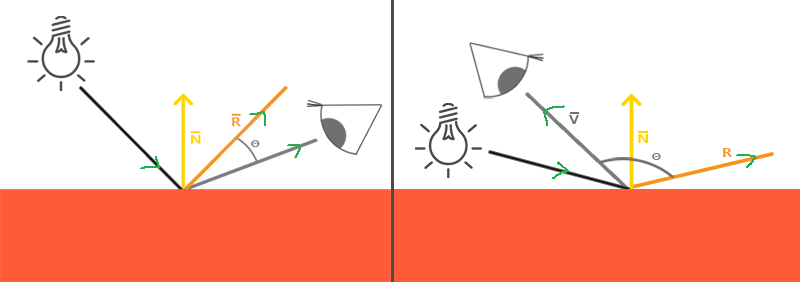
左图小于90度,右图大于90度
-
-
满足上一点的两个条件,会引起问题
-
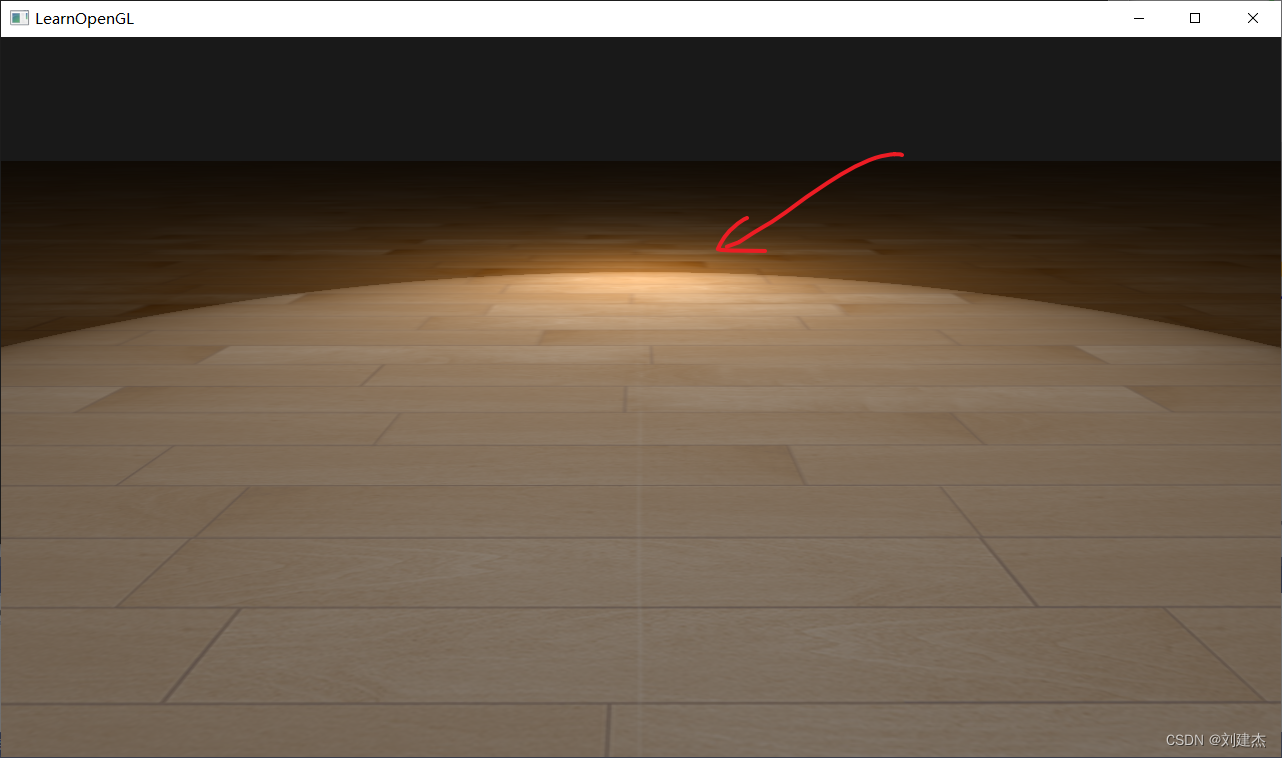
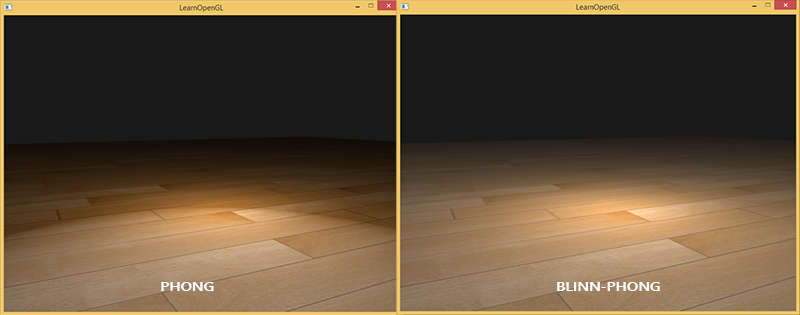
图示
-
文字描述
如红色箭头所指,在镜面高光区域的边缘出现了一道很明显的断层。
-
-
将两个条件转换为具体值计算如何影响spec的(大概率有误,请指正)
-
测试前需了解
cos:在0-90度是
1至0,在90度-180度是0至-1 -
测试pow(a,b)值
a = dot(viewDir, reflectDir)
b = shiness
// 用例一
for (float i = 0; i <= 0.1; i += 0.01) {


    float spec = pow(i, 0.2);// shiness:0.2 < 1
    cout << "pow("<< i <<", 0.2):" << spec << endl;
}
cout << "---" << endl;
// 用例二
for (float i = 2; i <= 2.1; i += 0.01) {


    float spec = pow(i, 0.2);// shiness:0.2 < 1
    cout << "pow(" << i << ", 0.2):" << spec << endl;
}
cout << "---" << endl;
// 用例三
float spec = pow(-0.1, 0.2);// shiness:0.2 < 1
cout << "pow(-0.1, 0.2):" << spec << endl;
cout << "---" << endl;
// 用例四
spec = pow(-2, 2);			// shiness:2 > 1
cout << "pow(-2, 2):" << spec << endl;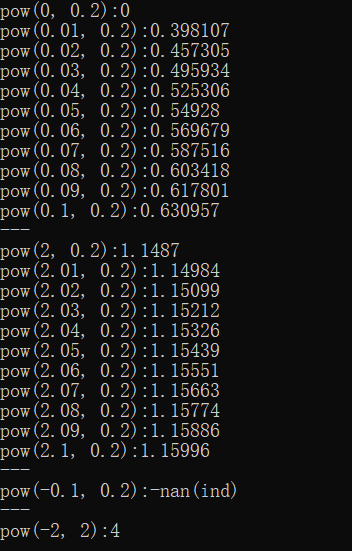
看输出可知
-
a^b,a=0.01<1,b=0.2<1,pow(a,b)后大于a
-
a^b,a=2.01>1,b=0.2<1,pow(a,b)后小于a
-
a^b,a<0,b=0.2<1,pow(a,b)后非法数字
-
a^b,a<0,b=2>1 ,pow(a,b)后合法数字
-
-
再回到片段着色器中计算
specspec = pow(max(dot(viewDir, reflectDir), 0.0), 0.2);// 光源对当前片段的镜面光影响 vec3 specular = specularStrength * spec * lightColor;// 镜面光照分量-
当视线与反射光线向量的夹角大于90度,比如夹角是:120
-
dot(viewDir, reflectDir) = cos(120) = -0.5
-
max(-0.5, 0.0) = 0 (注意:max(-0.5 , 0 ) 取最大的为0)
-
从而spec = pow(a=0, b=0.2) = 0
-
则specular = 0,根本没有镜面光照分量,即:这个片段没有镜面高光,不会造成此片段的颜色太亮
个人认为:镜面高光区域的边缘出现了一道很明显的断层,此时视线与反射光线向量的夹角
并不大于90度(大概率我错了,求大佬指正) -
-
但是图中边缘区域确实有镜面高光断层
则只有可能是视线与反射光线向量的夹角小于90度,并且接近90度,从而cos角度为很小的值,比如夹角是:87.708
-
dot(viewDir, reflectDir) = cos(87.708) 约等于0.04
-
max(dot(viewDir, reflectDir), 0.0) = 0.04
-
spec = pow(0.04, 0.2) = 0.525306 (对应上述代值计算的 用例一)
-
specular = specularStrength * 0.525306 * vec3(1)
镜面光照分量 = specularStrength * spec * 光照颜色白色1,而0.525306约是1/2,1是白色,1/2是一半的白色,所以边缘区域的光高亮,出现断层。
-
-
Blinn-Phong
介绍
-
目的
解决上述Phong提到的问题(在镜面高光区域的边缘出现了一道很明显的断层)
-
解决方式
不再计算反射向量与观察向量的点积。
而是用
半程向量(Halfway Vector)与法线向量的点积。 -
什么是半程向量
光线与视线夹角一半方向上的一个单位向量
-
图示

-
几个要点
- 当半程向量与法线向量越接近时,镜面光分量就越大
- 不论观察者向哪个方向看,半程向量与表面法线之间的夹角都不会超过90度(除非光源在表面以下)
-
如何计算半程向量
只需要将光线的方向向量和观察向量加到一起,并将结果正规化(Normalize)
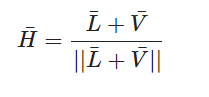
// 半程向量
vec3 halfwayDir = normalize(lightDir + viewDir);
例子
-
代码
glsl
#version 330 core layout (location = 0) in vec3 aPos; layout (location = 1) in vec3 aNormal; layout (location = 2) in vec2 aTexCoords; out VS_OUT{ // 4.8节讲的接口块 vec3 FragPos; vec3 Normal; vec2 TexCoords; }vs_out; uniform mat4 projection; uniform mat4 view; uniform mat4 model; void main() { // 虽然没乘model矩阵到世界空间,但model是单位矩阵,可以认为已经在世界空间了 vs_out.FragPos = aPos; vs_out.Normal = aNormal; vs_out.TexCoords = aTexCoords; gl_Position = projection * view * vec4(aPos, 1.0); }#version 330 core out vec4 FragColor; in VS_OUT{ vec3 FragPos; vec3 Normal; vec2 TexCoords; }fs_in; uniform sampler2D floorTexture; uniform vec3 lightPos; uniform vec3 viewPos; uniform bool blinn; void main() { // 采样纹理作为光照颜色 vec3 color = texture(floorTexture, fs_in.TexCoords).rgb; // 环境光 float ambientStrength = 0.05; vec3 ambient = ambientStrength * color; // 漫反射 vec3 lightDir = normalize(lightPos - fs_in.FragPos); vec3 normal = normalize(fs_in.Normal); float diff = max(dot(normal, lightDir), 0.0); vec3 diffuse = diff * color; // 环境光照 vec3 viewDir = normalize(viewPos - fs_in.FragPos); // 是观察者方向,不是观察者看向的方向 float spec = 0.0; if(blinn){ // blinn-pong:半程方向向量与法线方向向量的点积 // 半程向量/// vec3 halfwayDir = normalize(lightDir + viewDir); spec = pow(max(dot(normal, halfwayDir), 0.0), 1); } else { // pong:观察者方向向量与反射方向向量的点积 vec3 reflectDir = reflect(-lightDir, normal); spec = pow(max(dot(viewDir, reflectDir), 0.0), 1); } float specularStrength = 0.3; vec3 specular = specularStrength * spec * vec3(1);// 不像漫反射需要乘以纹理颜色,而是乘以1,表示镜面光的颜色为白色 FragColor = vec4(ambient + diffuse + specular, 1.0); }cpp
float planeVertices[] = { // positions // normals // texcoords 10.0f, -0.5f, 10.0f, 0.0f, 1.0f, 0.0f, 10.0f, 0.0f, ....... }; // first, configure the cube's VAO (and VBO) unsigned int planeVBO, planeVAO; glGenVertexArrays(1, &planeVAO); glBindVertexArray(planeVAO); glGenBuffers(1, &planeVBO); glBindBuffer(GL_ARRAY_BUFFER, planeVBO); glBufferData(GL_ARRAY_BUFFER, sizeof(planeVertices), planeVertices, GL_STATIC_DRAW); // position attribute glVertexAttribPointer(0, 3, GL_FLOAT, GL_FALSE, 8 * sizeof(float), (void*)0); glEnableVertexAttribArray(0); glVertexAttribPointer(1, 3, GL_FLOAT, GL_FALSE, 8 * sizeof(float), (void*)(3 * sizeof(float))); glEnableVertexAttribArray(1); glVertexAttribPointer(2, 2, GL_FLOAT, GL_FALSE, 8 * sizeof(float), (void*)(6 * sizeof(float))); glEnableVertexAttribArray(2); unsigned int floorTexture = loadTexture("assest/textures/wood.png"); lightingShader.use(); lightingShader.setInt("texture1", 0); // render loop // ----------- while (!glfwWindowShouldClose(window)) { ...... lightingShader.use(); // view/projection transformations glm::mat4 projection = glm::perspective(glm::radians(camera.Zoom), (float)SCR_WIDTH / (float)SCR_HEIGHT, 0.1f, 100.0f); glm::mat4 view = camera.GetViewMatrix(); lightingShader.setMat4("projection", projection); lightingShader.setMat4("view", view); lightingShader.setMat4("model", glm::mat4(1.0f)); lightingShader.setInt("blinn", blinn);// 控制是否开启blinn-phong lightingShader.setVec3("viewPos", camera.Position); lightingShader.setVec3("lightPos", lightPos); // render the cube glBindVertexArray(planeVAO); glActiveTexture(GL_TEXTURE0); glBindTexture(GL_TEXTURE_2D, floorTexture); glDrawArrays(GL_TRIANGLES, 0, 36); ....... void processInput(GLFWwindow* window){ ....... if (glfwGetKey(window, GLFW_KEY_V) == GLFW_PRESS) { blinn = false; } if (glfwGetKey(window, GLFW_KEY_B) == GLFW_PRESS) { blinn = true; } } -
效果
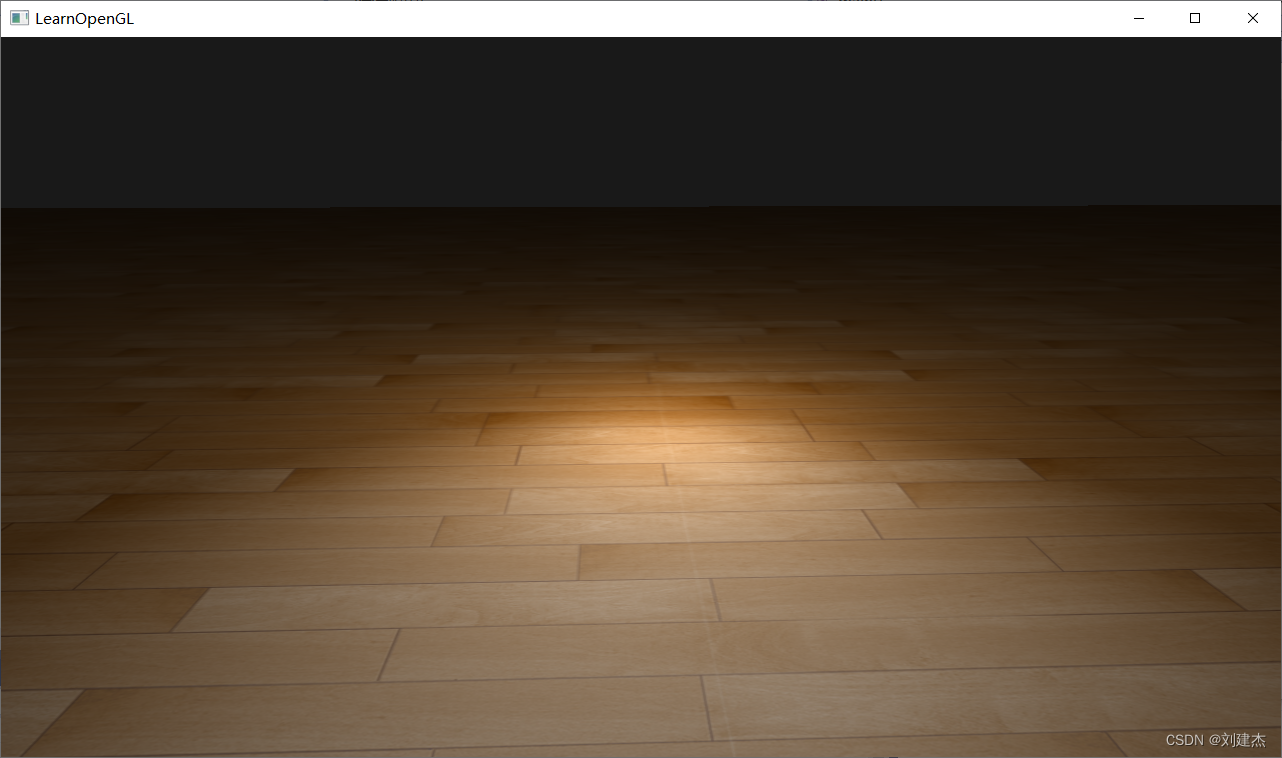
blinn-phong
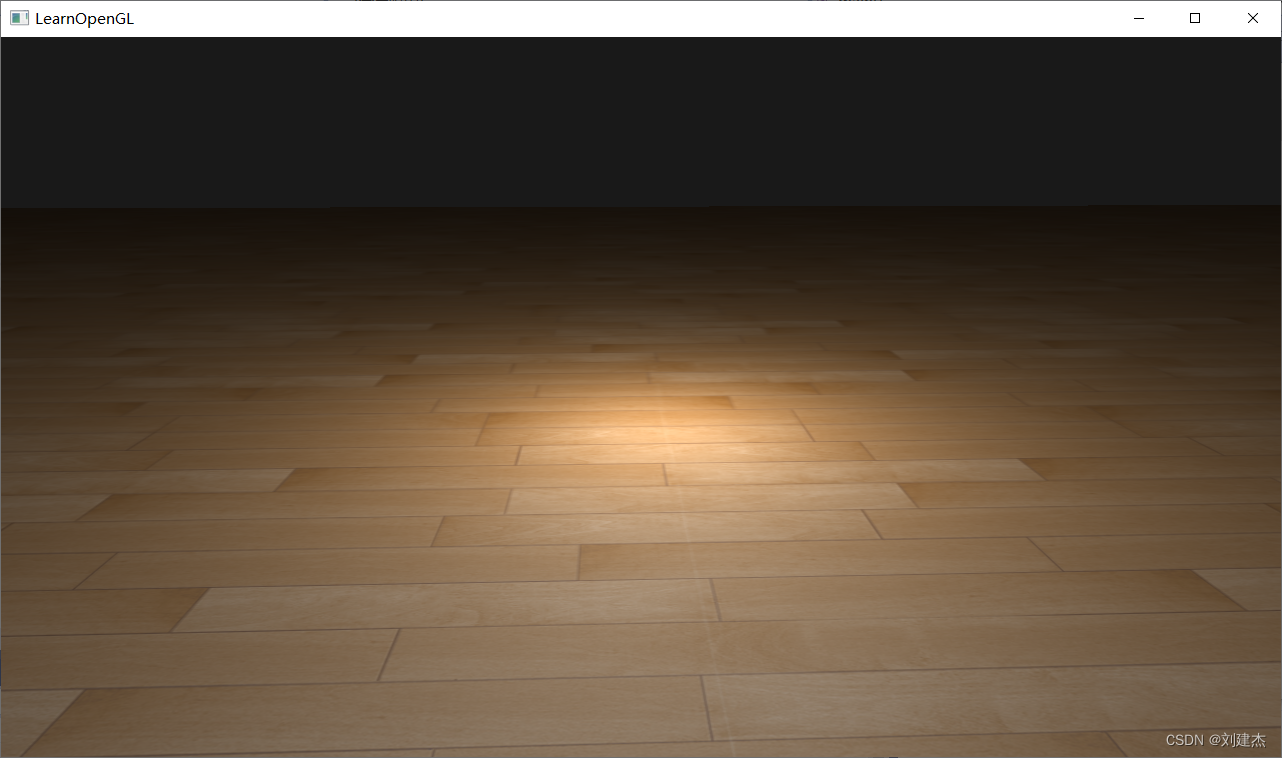
phong
-
原文与Phong对比
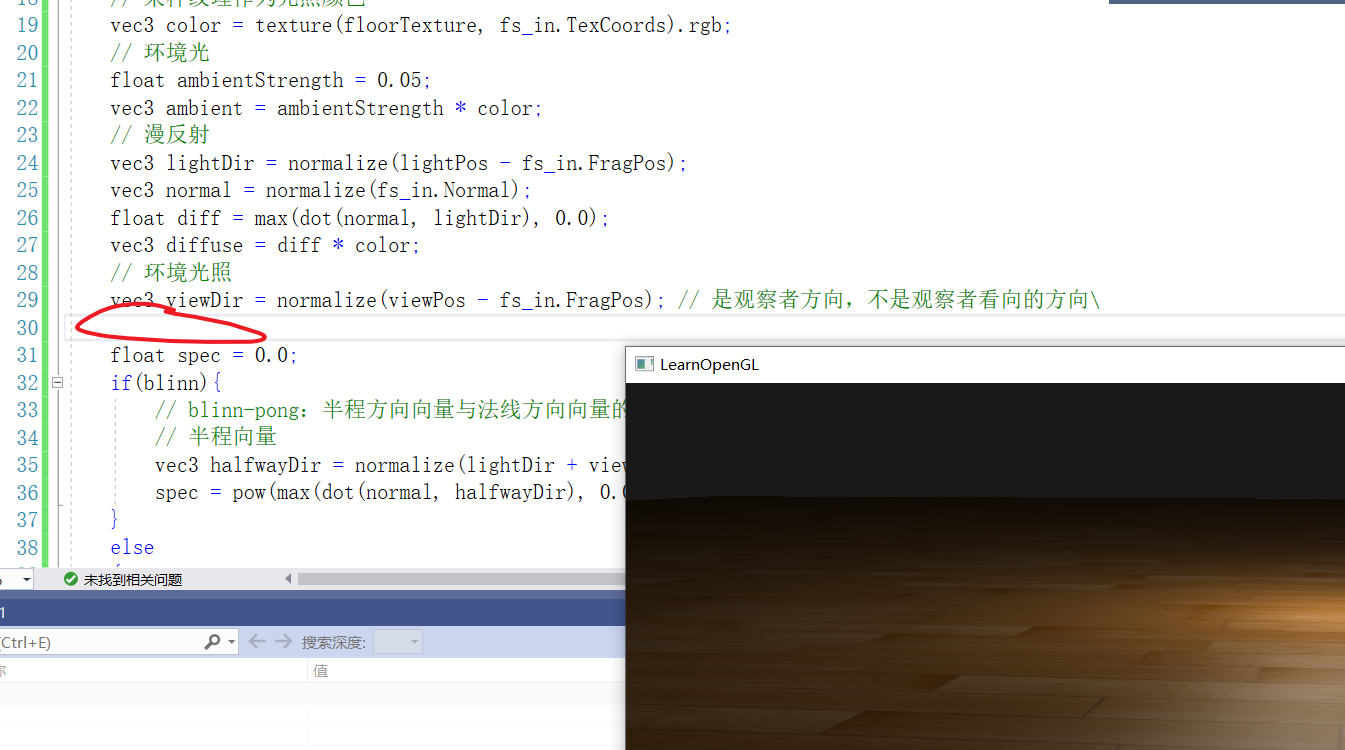
GLSL中遇到的BUG
-
Bug如图
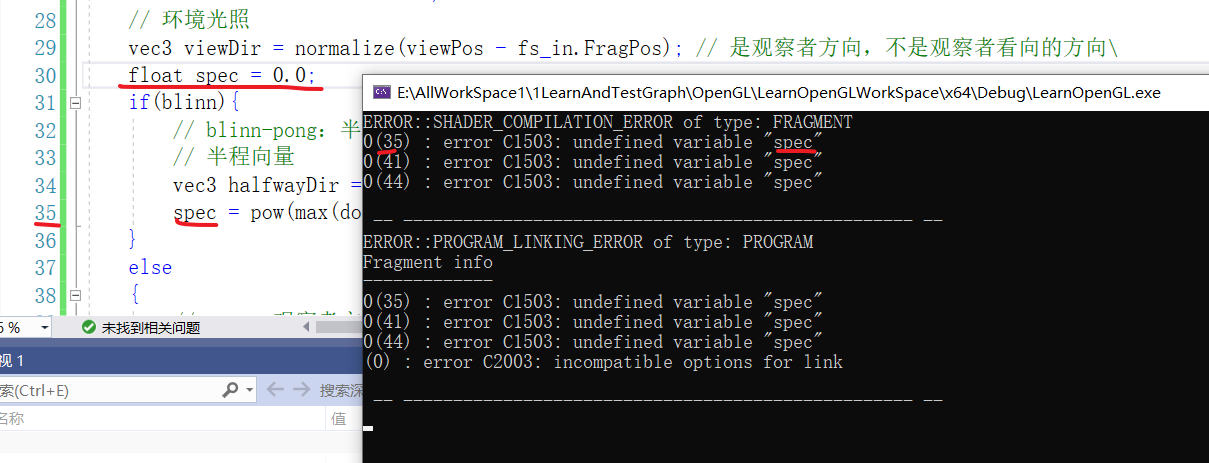
明明在if else 外部定义了spec变量,而glsl却报未定义spec变量,百思不得琦姐。
-
解决方法
不知道为什么,空了一行就能运行了
-
原因找到

由于29行的末尾的中文注释有个**\**,从而引起的问题,可能会引起转义成字符什么问题。
去掉这个**\**,即时不空行,也能正确运行了
